Workspace Network
Network operators utilizing the Forward Platform during change management windows in large infrastructures can create Workspace networks for efficiency. A Workspace network is a copy of a selected network, containing specific devices within the scope of a change window. This feature streamlines the change management process, allowing users to save time, focus on necessary devices, complete collections efficiently, and verify changes within the context of this targeted subset.
Creating a Workspace Network
You can create a Workspace network from either the Network Selector or a Path Analysis, with the assistance of a guided wizard.
Creating a Workspace Network from the Network Selector
To create a Workspace network from the Network Selector, open the Network Selector dropdown and select Add Workspace network to start the guided creation process.
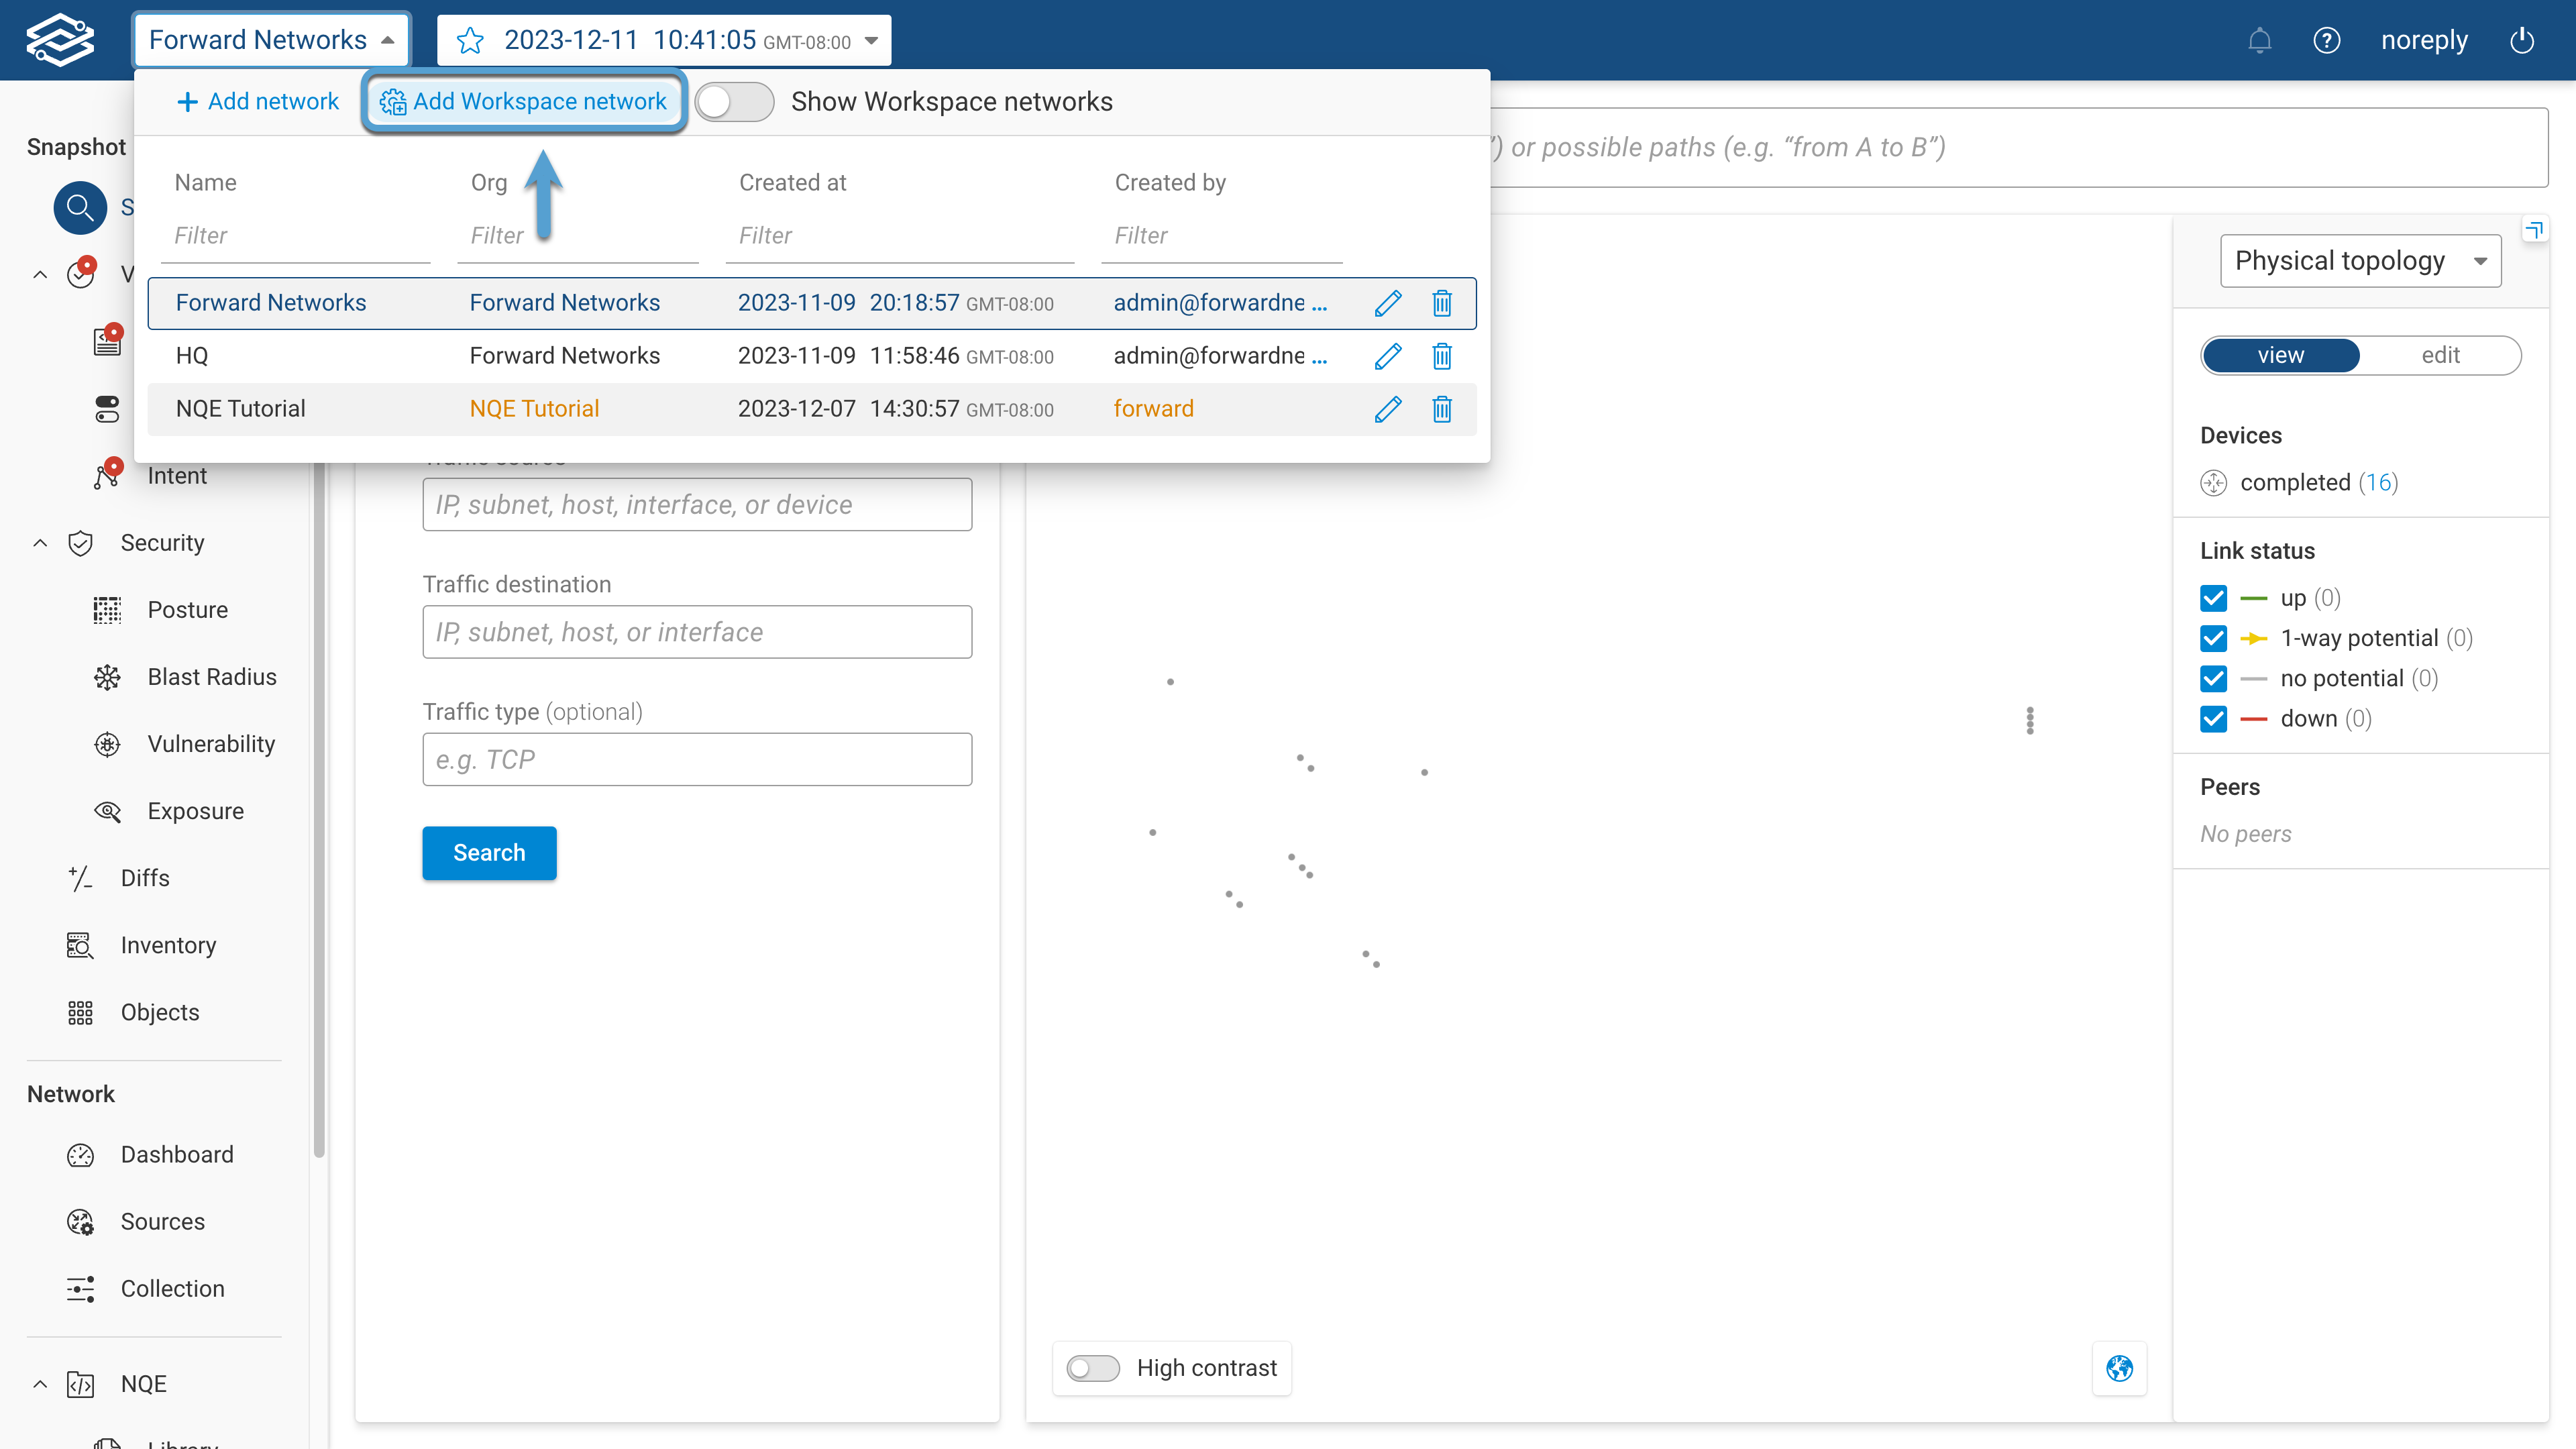
The copy credential option allows automatic copying of device credentials from a parent network during Workspace network creation. If the option is disabled, manual assignment of credentials may be required during creation
See RBAC for more details.
Step 1. Define the Workspace Network

Define the Workplace network by filling in the following fields:
- Parent Network - Select the parent network from the dropdown.
- Workspace Name - Provide a unique name to easily identify the Workspace network
- Note (optional) - Add details and information about the Workspace network.
- Include Verifications - Disabled by default. If enabled, additional options to select which verification types will be included. Available options are: NQE, Predefined, and Intent.
Step 2 - Include Devices
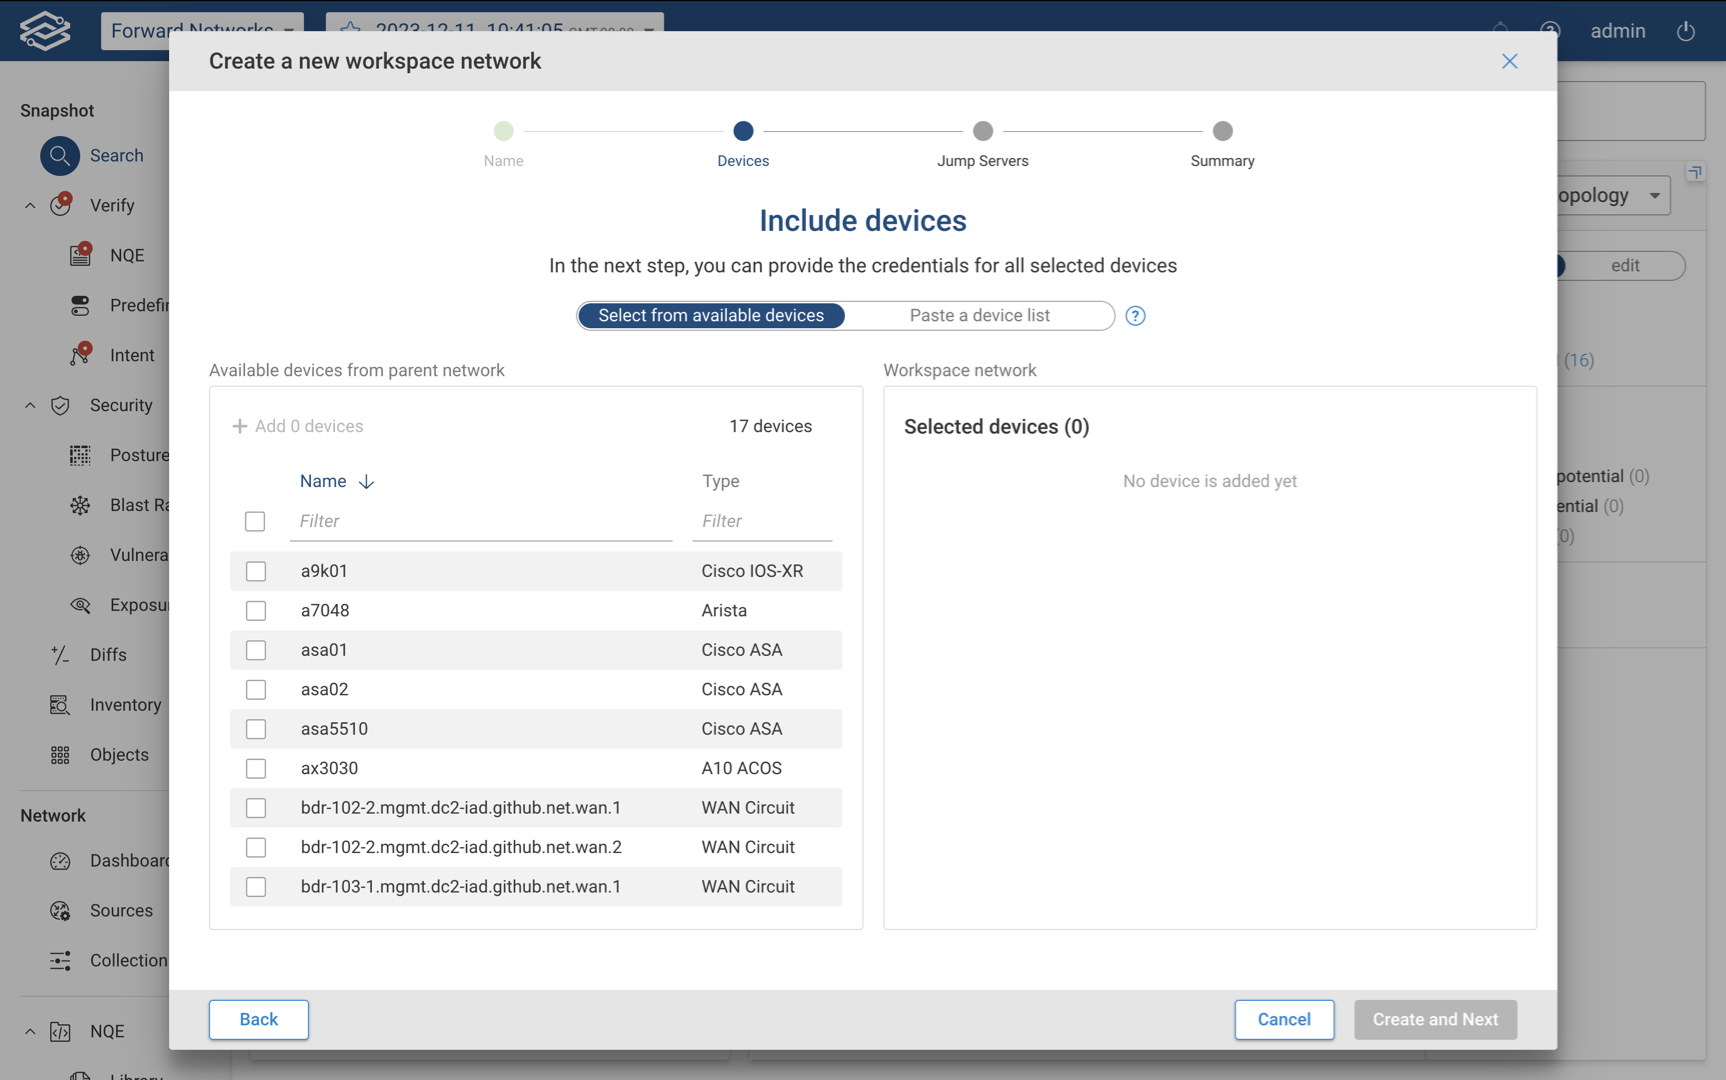
Assign devices by selecting from the list of available devices to add, or by pasting a list of devices within the Paste a Device List tab.
Only one method can be used at a time, so only devices added with the currently selected method will be included in the Workspace network. If the credential copy option is enabled, select Create and Next to proceed to the summary. If the credential copy option is disabled, select Create and Next to add device credentials.
Step 3 (Optional) - Add Device Credentials
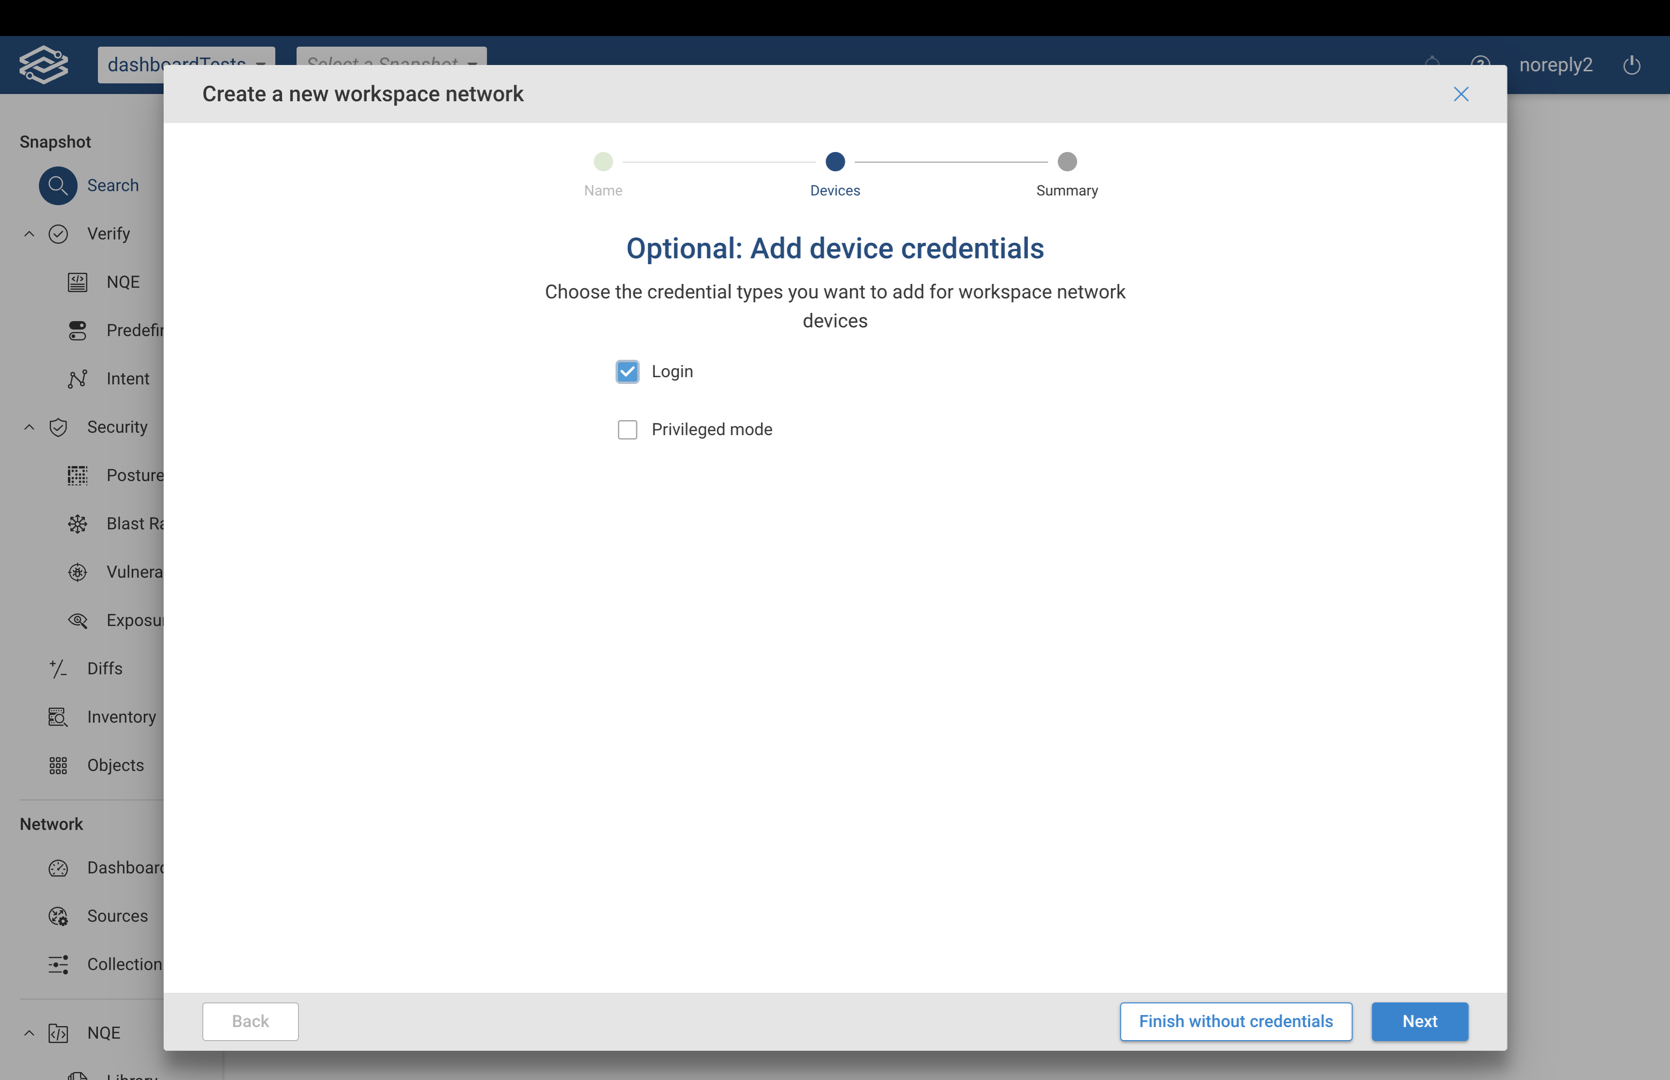
This optional step is available only when the credential copy option is disabled. Select the credential types to add: login and privileged mode.
Step 4 (Optional) - Add Login Credentials

This optional step is available when the credential copy option is disabled and login credentials were selected in the previous step. Provide the name, username, and password for the login credentials to the selected devices, and select Next when ready to continue.
Step 5 (Optional) - Add Privileged Mode Credentials
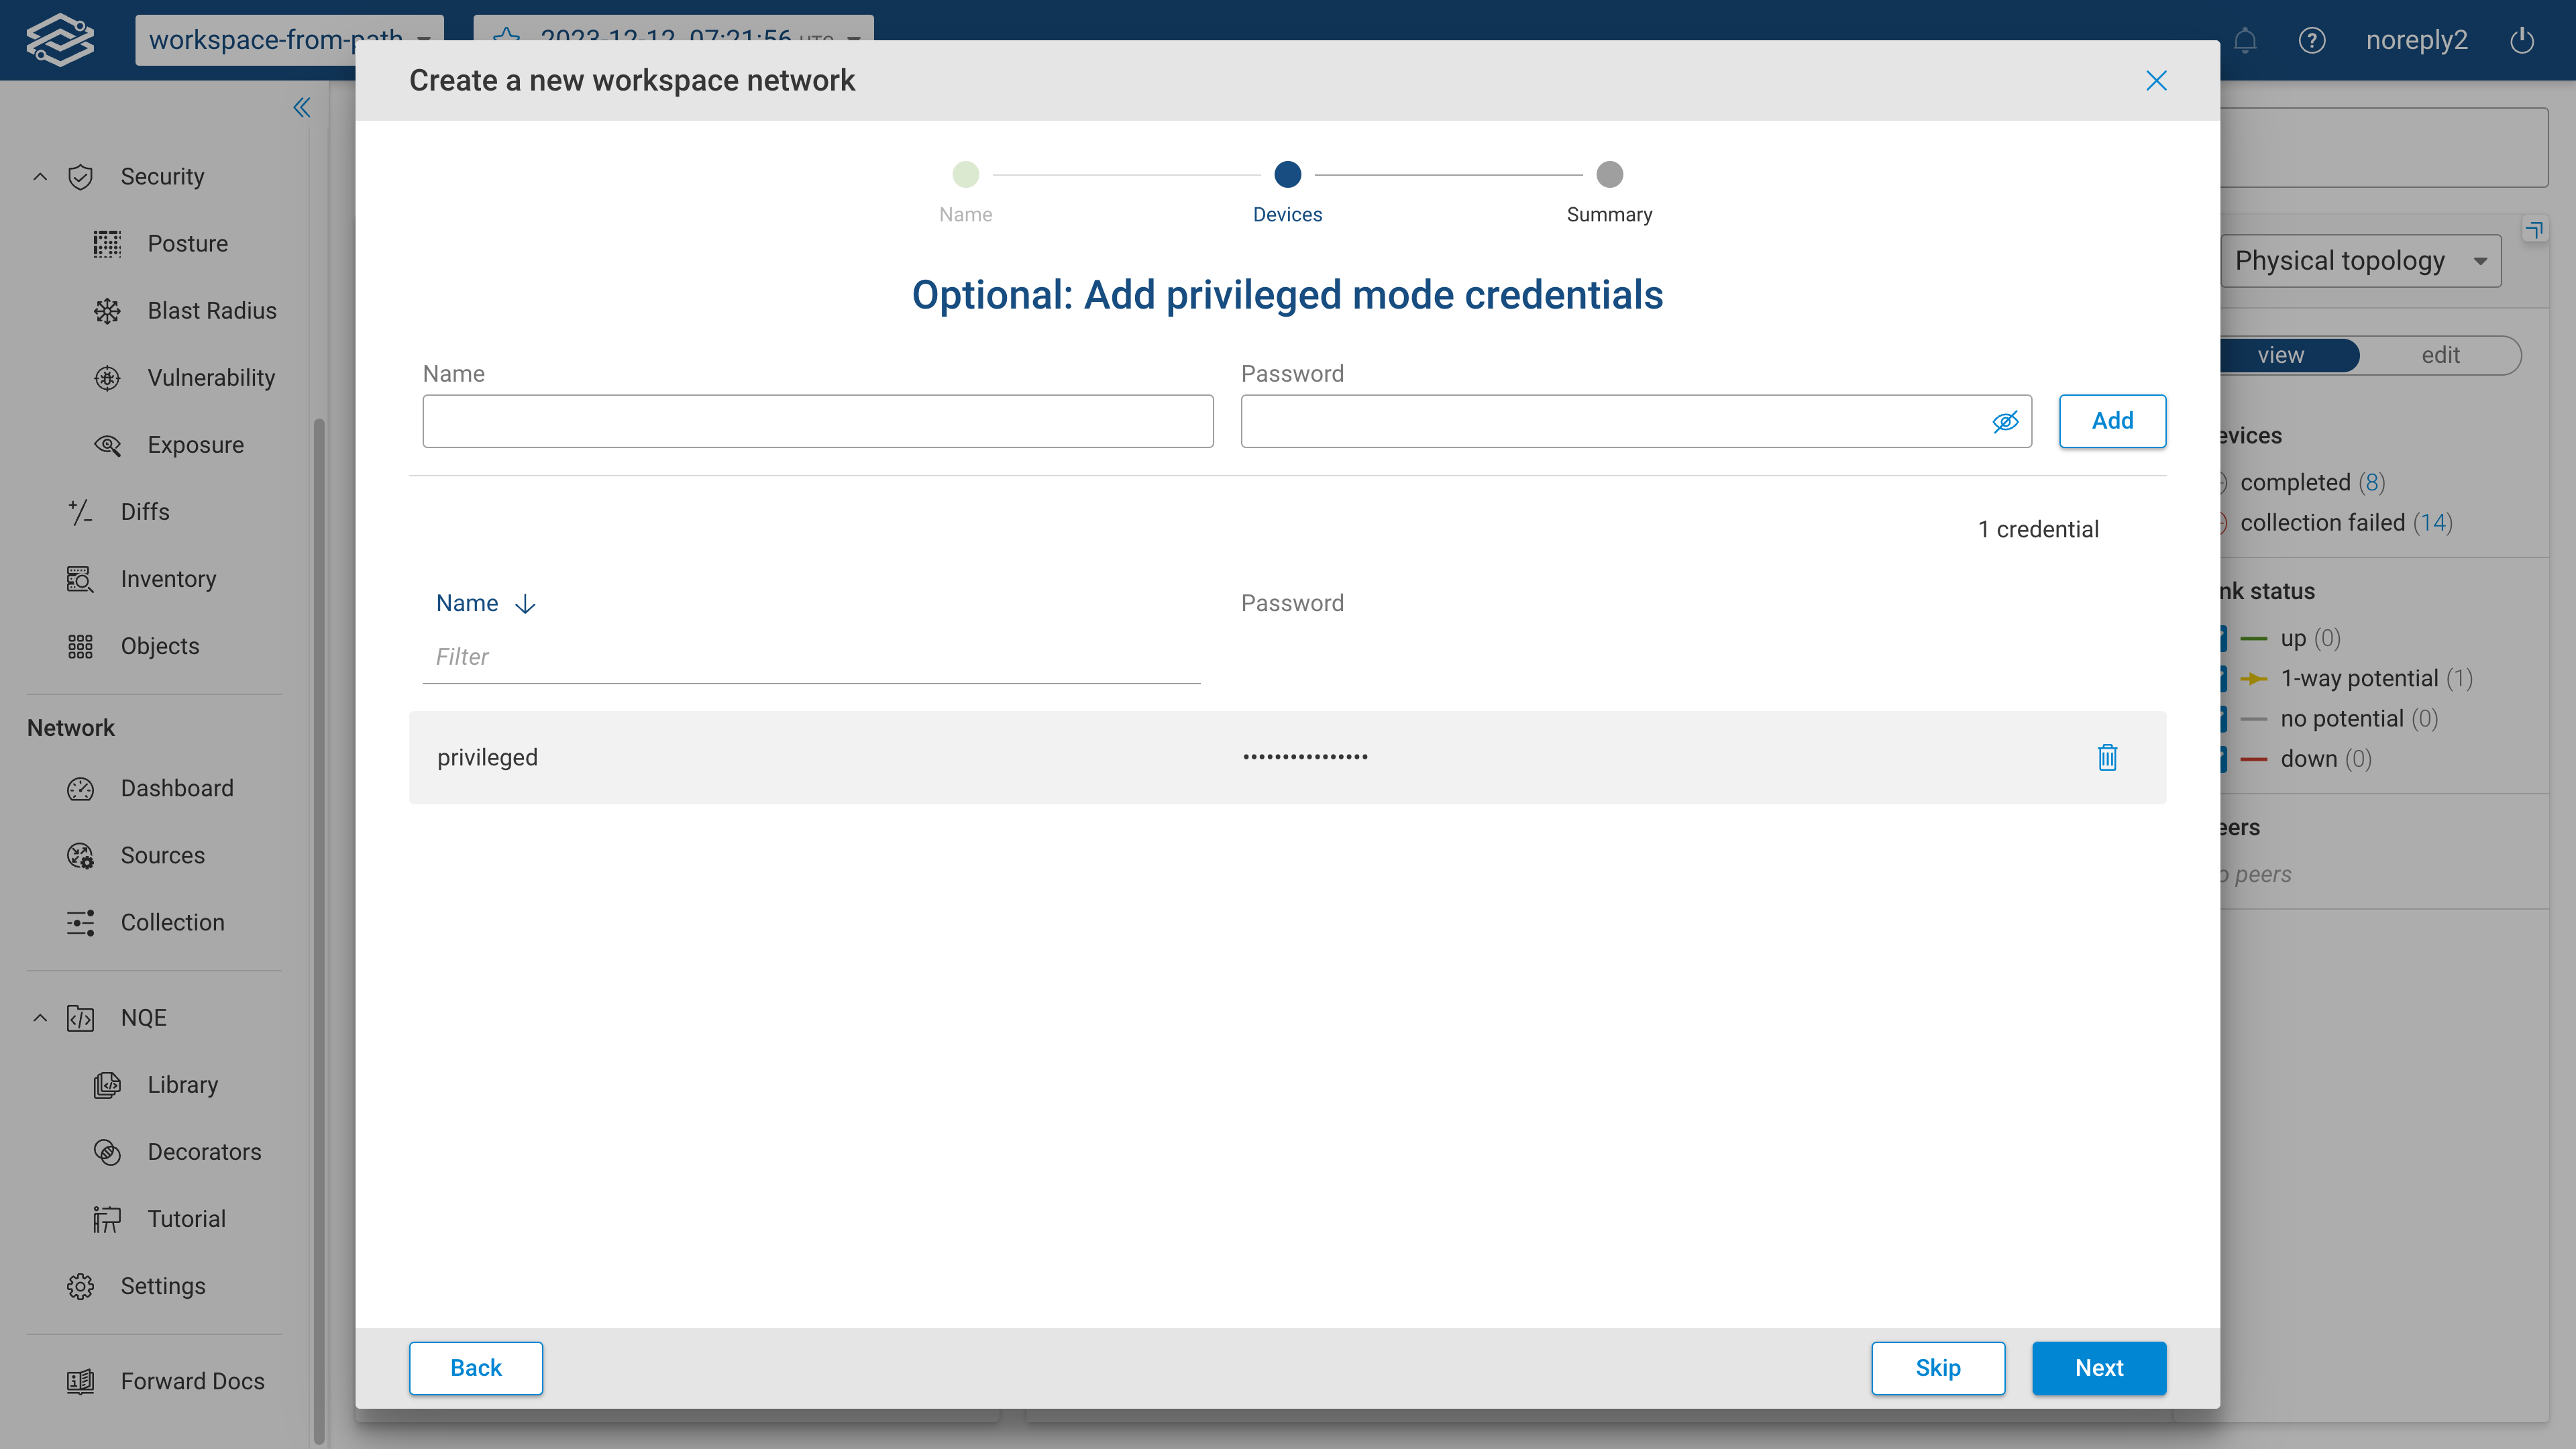
This optional step is available when the credential copy option is disabled and privileged mode credentials were selected in the previous step.
Provide the name, and password for privileged mode credentials to the selected devices.
Step 6. Summary
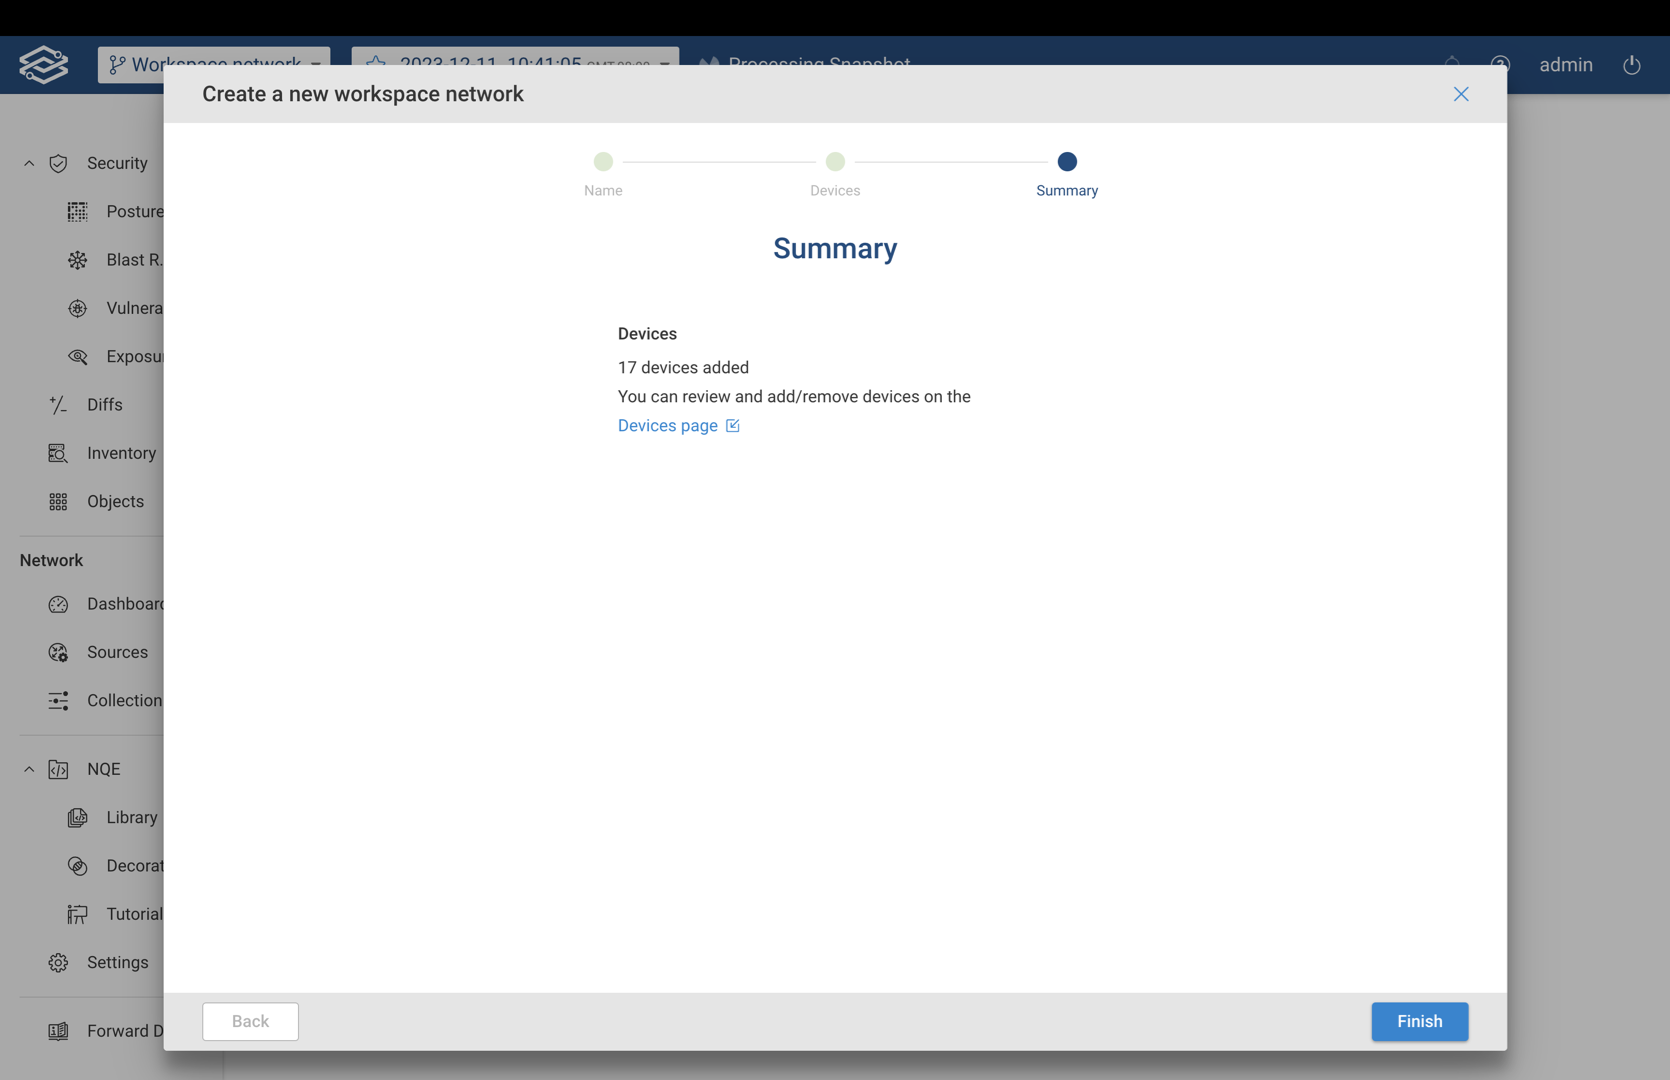
The summary page lists the total number of devices that have been added. The listed devices can be reviewed and edited from the Device page linked within the summary.
Creating a Workspace Network from a Path Analysis
Workspace networks can be created directly from a path search using the devices within a specified path. To create a Workspace network from a path search, select Refresh path in Workspace Network.

The copy credential option allows automatic copying of device credentials from a parent network during Workspace network creation. If the option is disabled, manual assignment of credentials may be required during creation
See RBAC for more details.
Step 1: Define your Workspace network
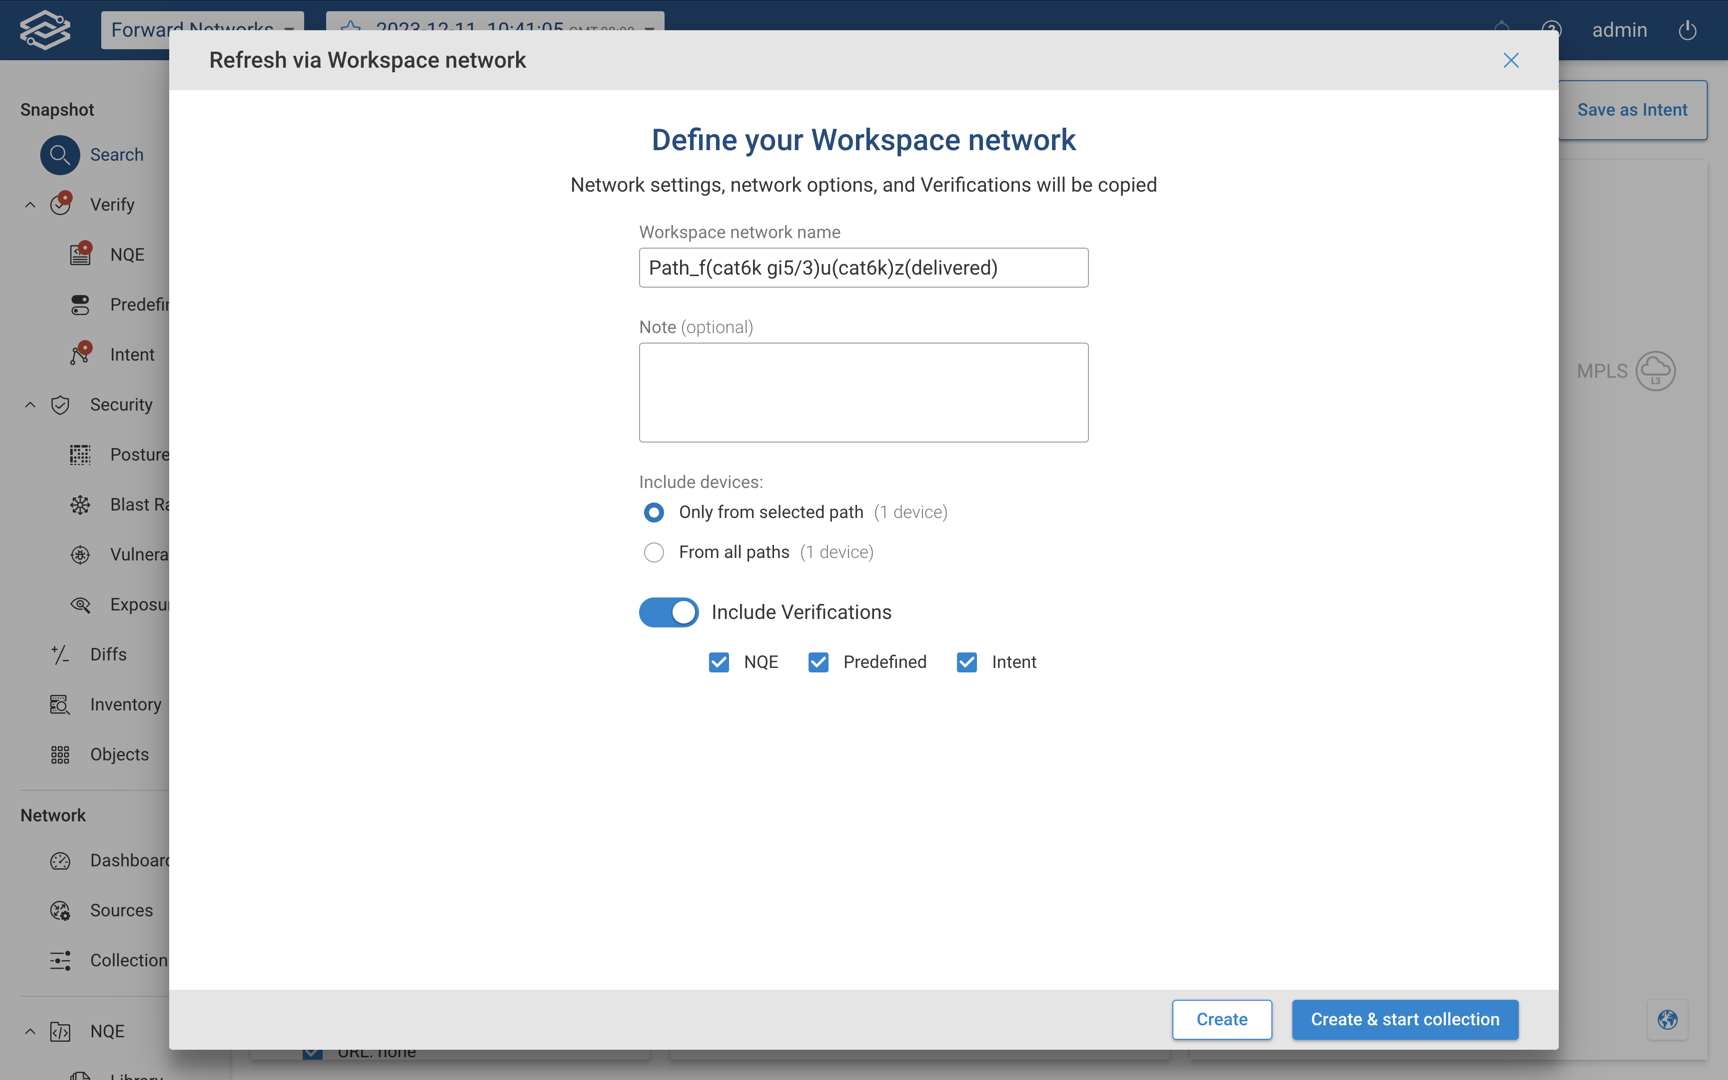
Define the Workplace network by filling in the following fields:
- Workspace Name - Provide a unique name to easily identify the Workspace network.
- Note (optional) - Add details and information about the Workspace network.
- Include Devices - Select one of the following to include devices only from the selected path, or from all paths.
- Include Verifications - Disabled by default. If enabled, additional options to select which verification types will be included. Available options are: NQE, Predefined, and Intent.
If the credential copy option is enabled, select Create to finish creating the Workspace network, or Create and Start Collection to finish creating the Workspace network and start the collection process.
If the credential copy option is disabled, proceed to the next step.
Step 2 (Optional) - Add Credentials for Selected Devices
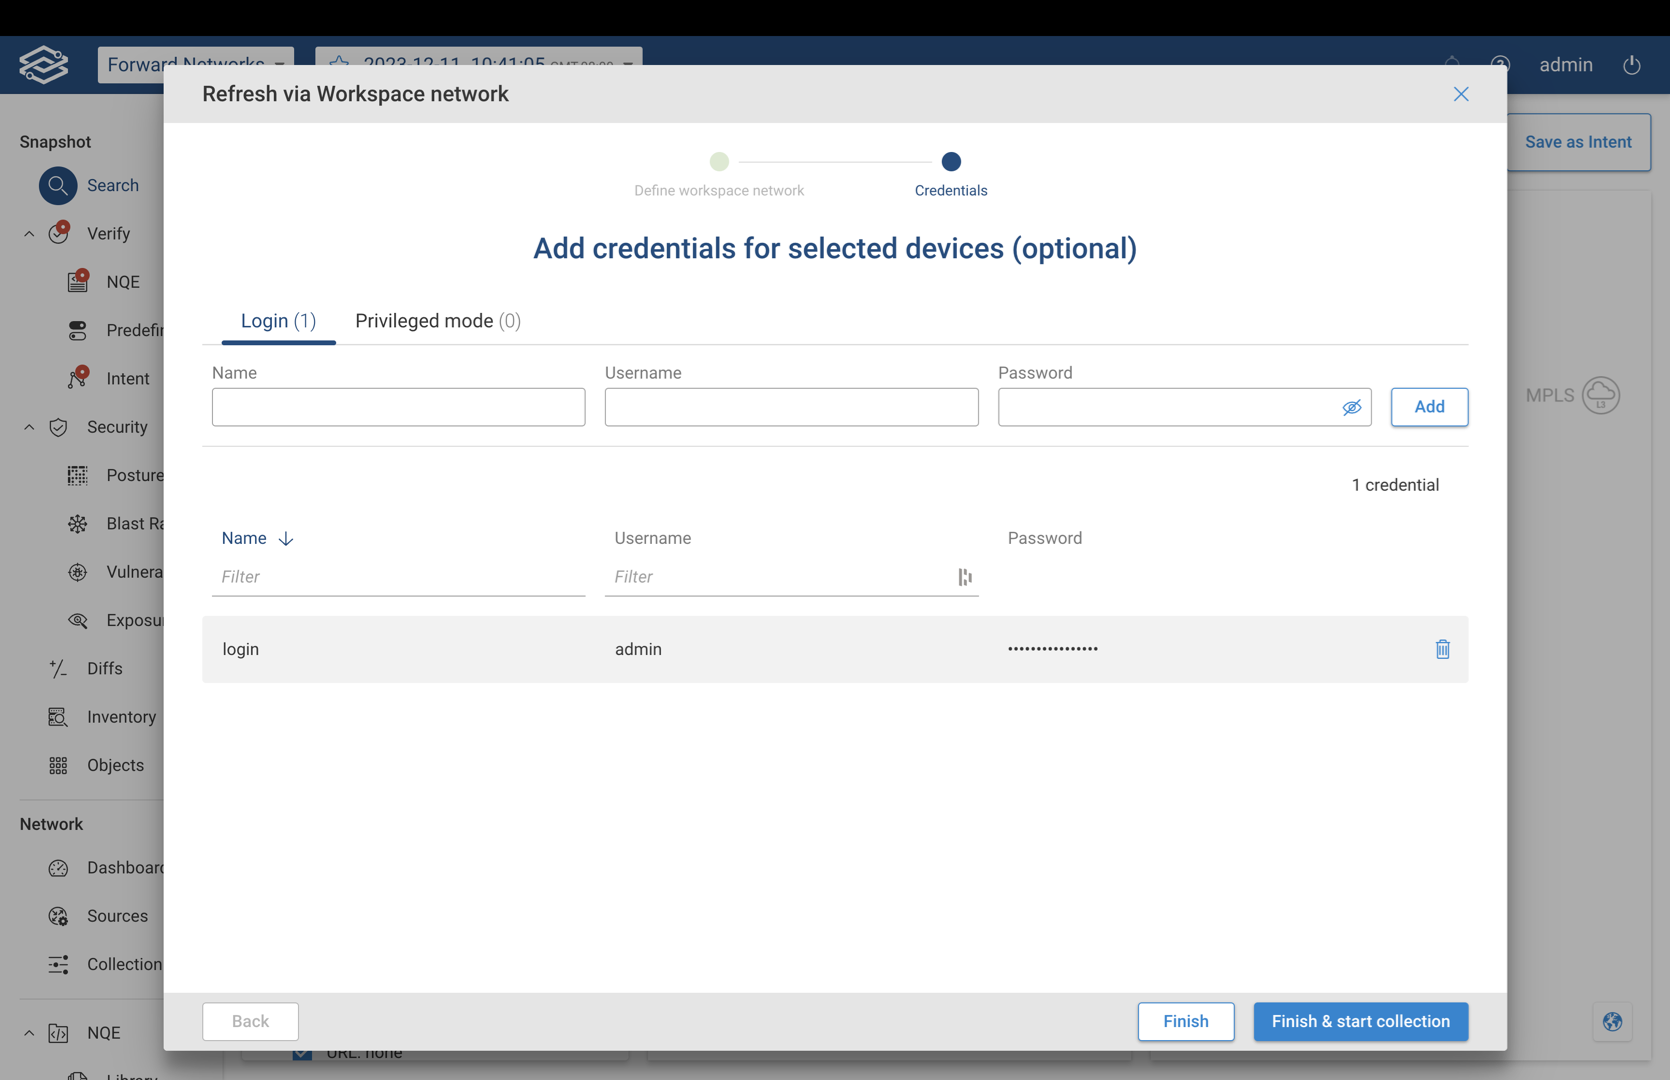
This optional step is available only when the credential copy option is disabled.
Depending on the type of credentials required, select Add Credentials within either login and privileged mode tabs, and enter the name, username, and password. Select Add to add it to the list.
Once all credentials have been added, select Finish to complete the wizard or Finish & Start Collection to start the collection process.
Copying Devices from Parent Network
New devices can be copied from the parent network by navigating to the Sources page. Choose the specific devices to copy and select copy. Pick the destination Workspace network from the available network list in the drawer, where you intend to copy the chosen devices.
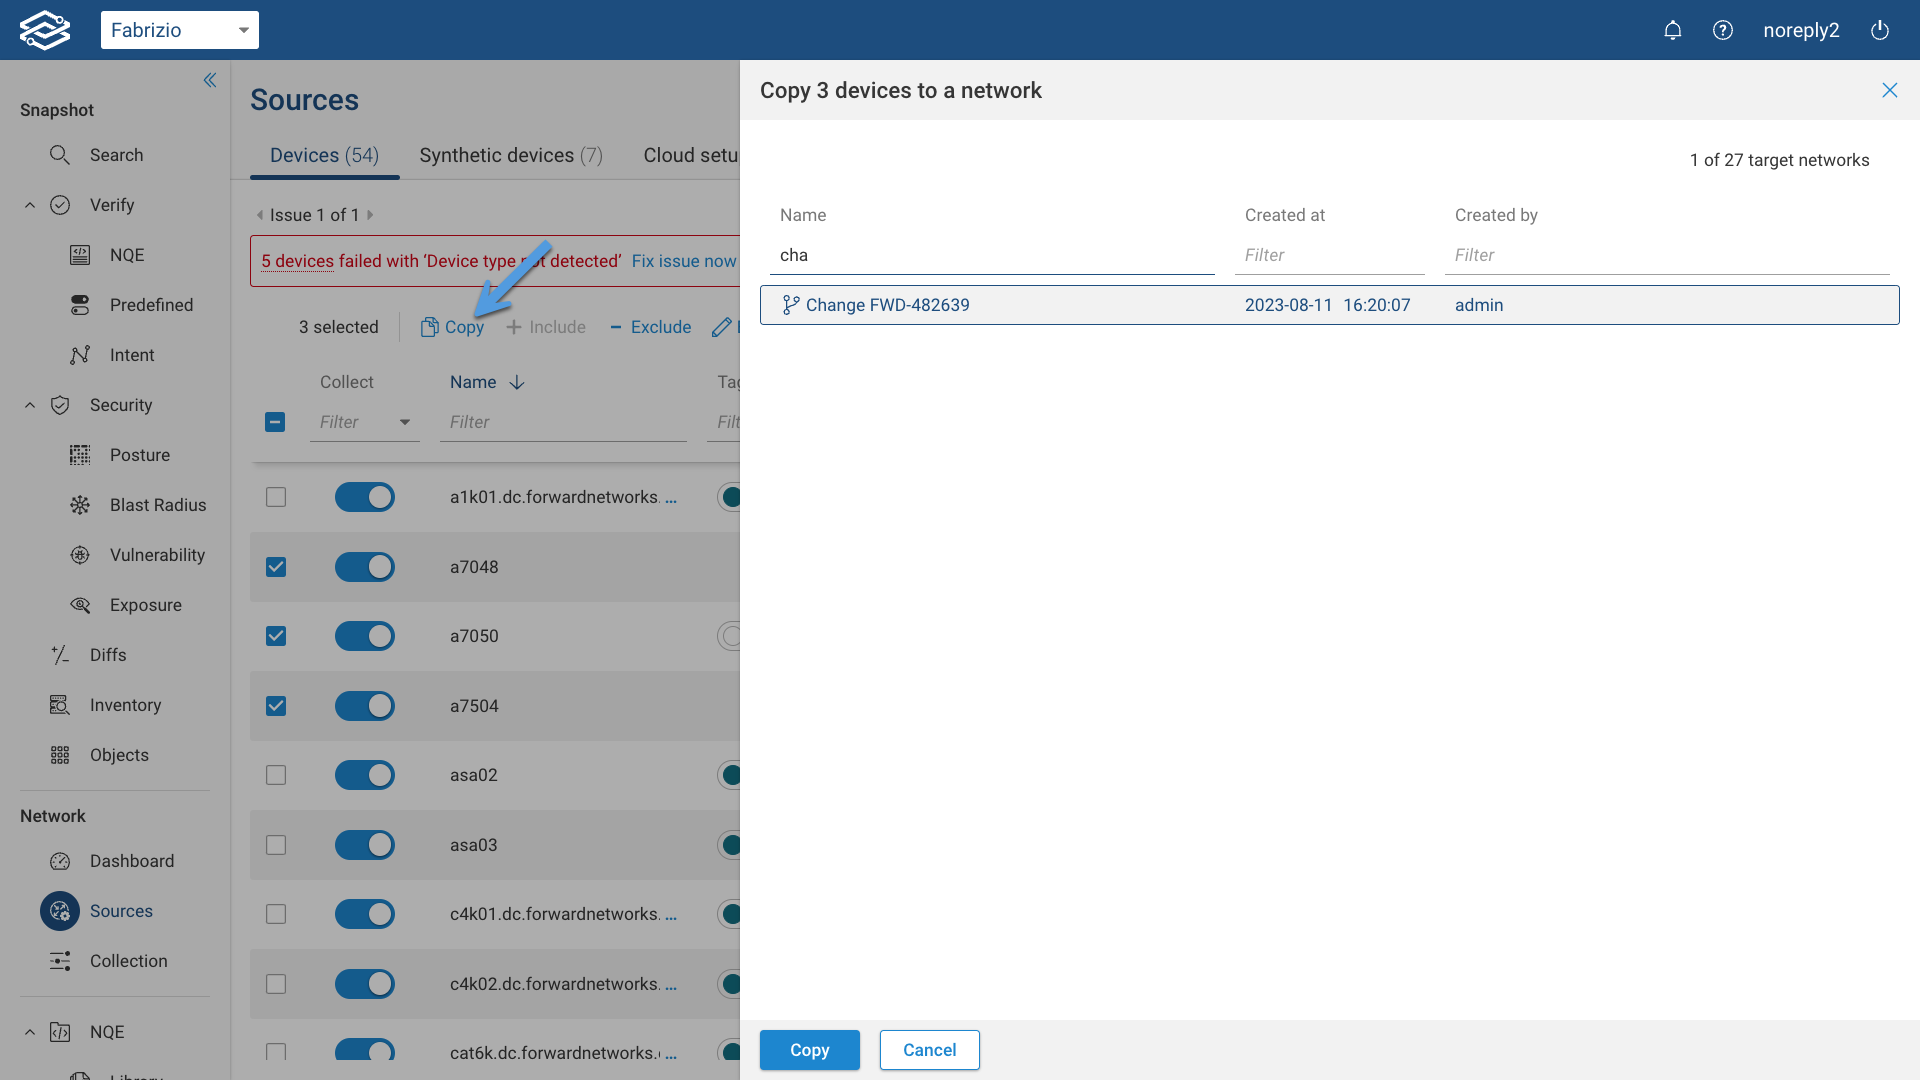
The Forward platform has the capability to identify any instances of duplicated devices between the parent network and the Workspace network.
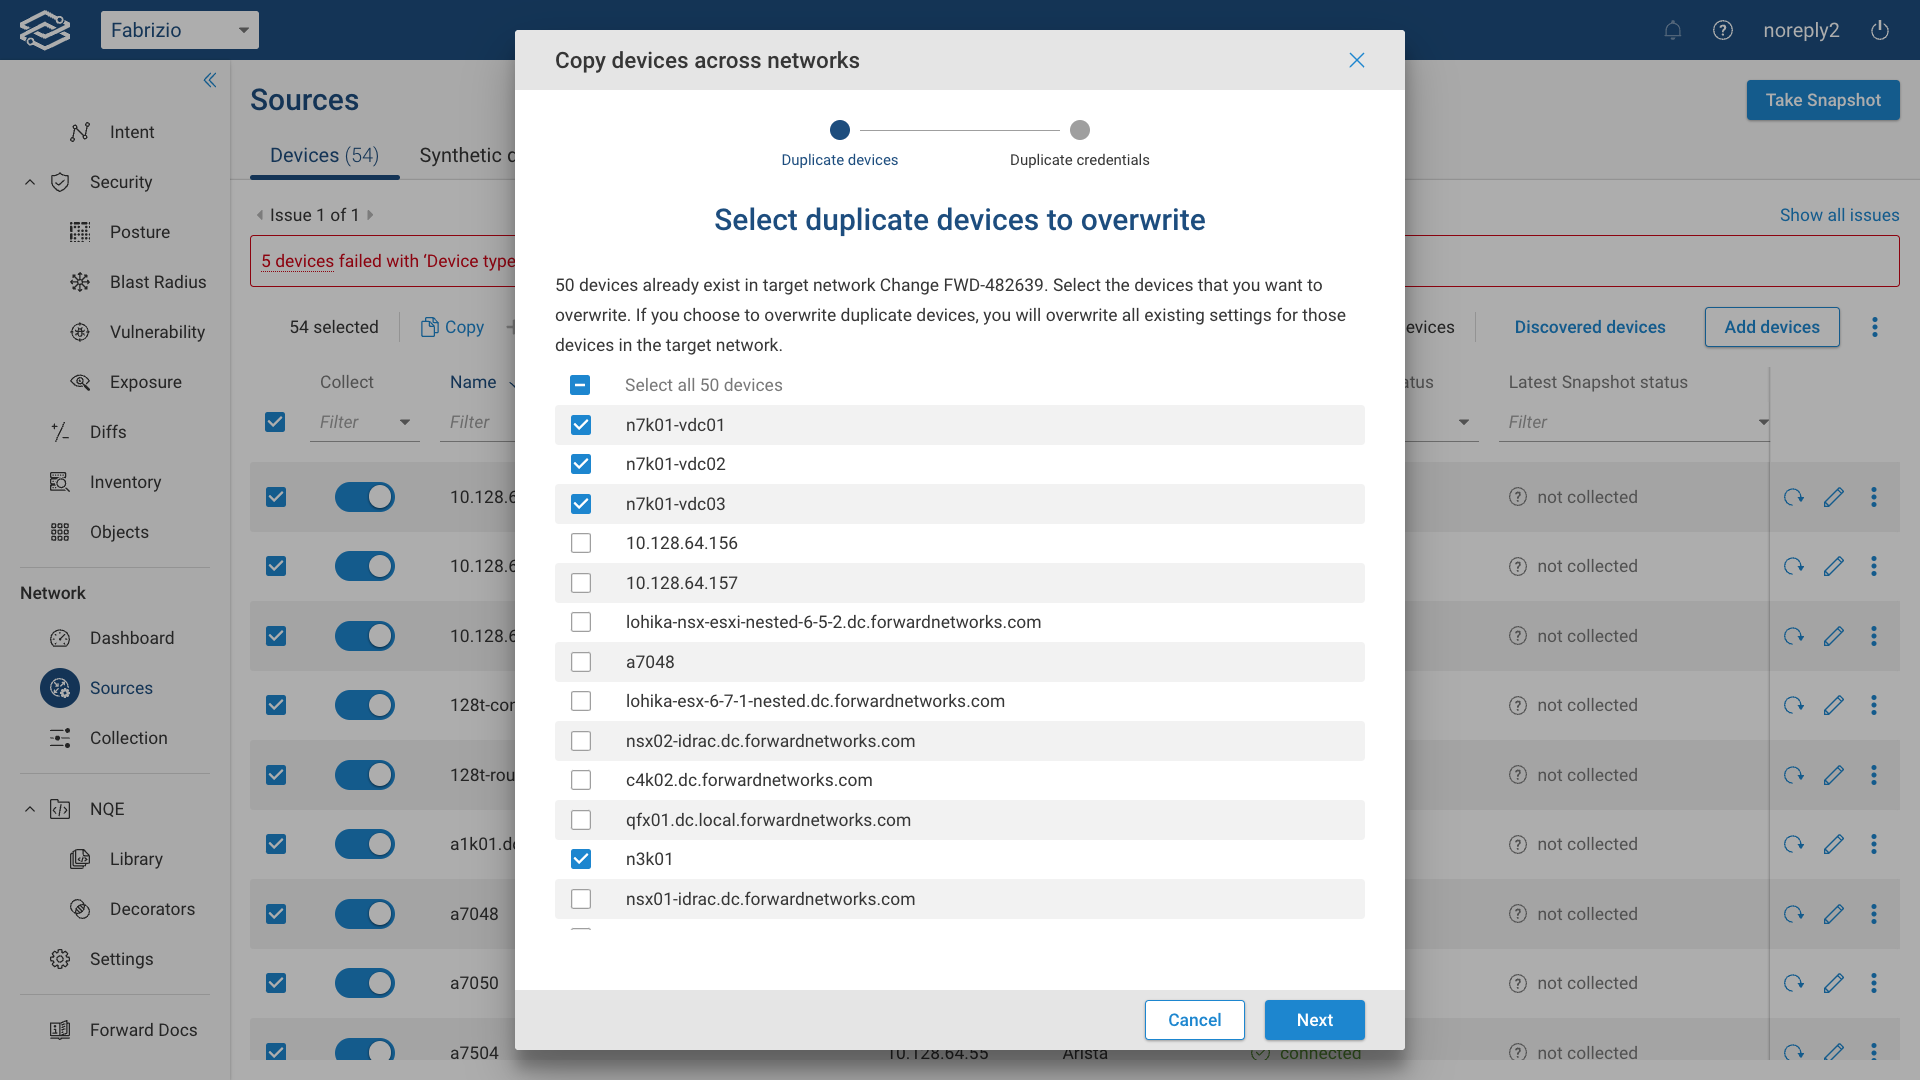
Select the devices you wish to replace and then proceed by clicking on Next.
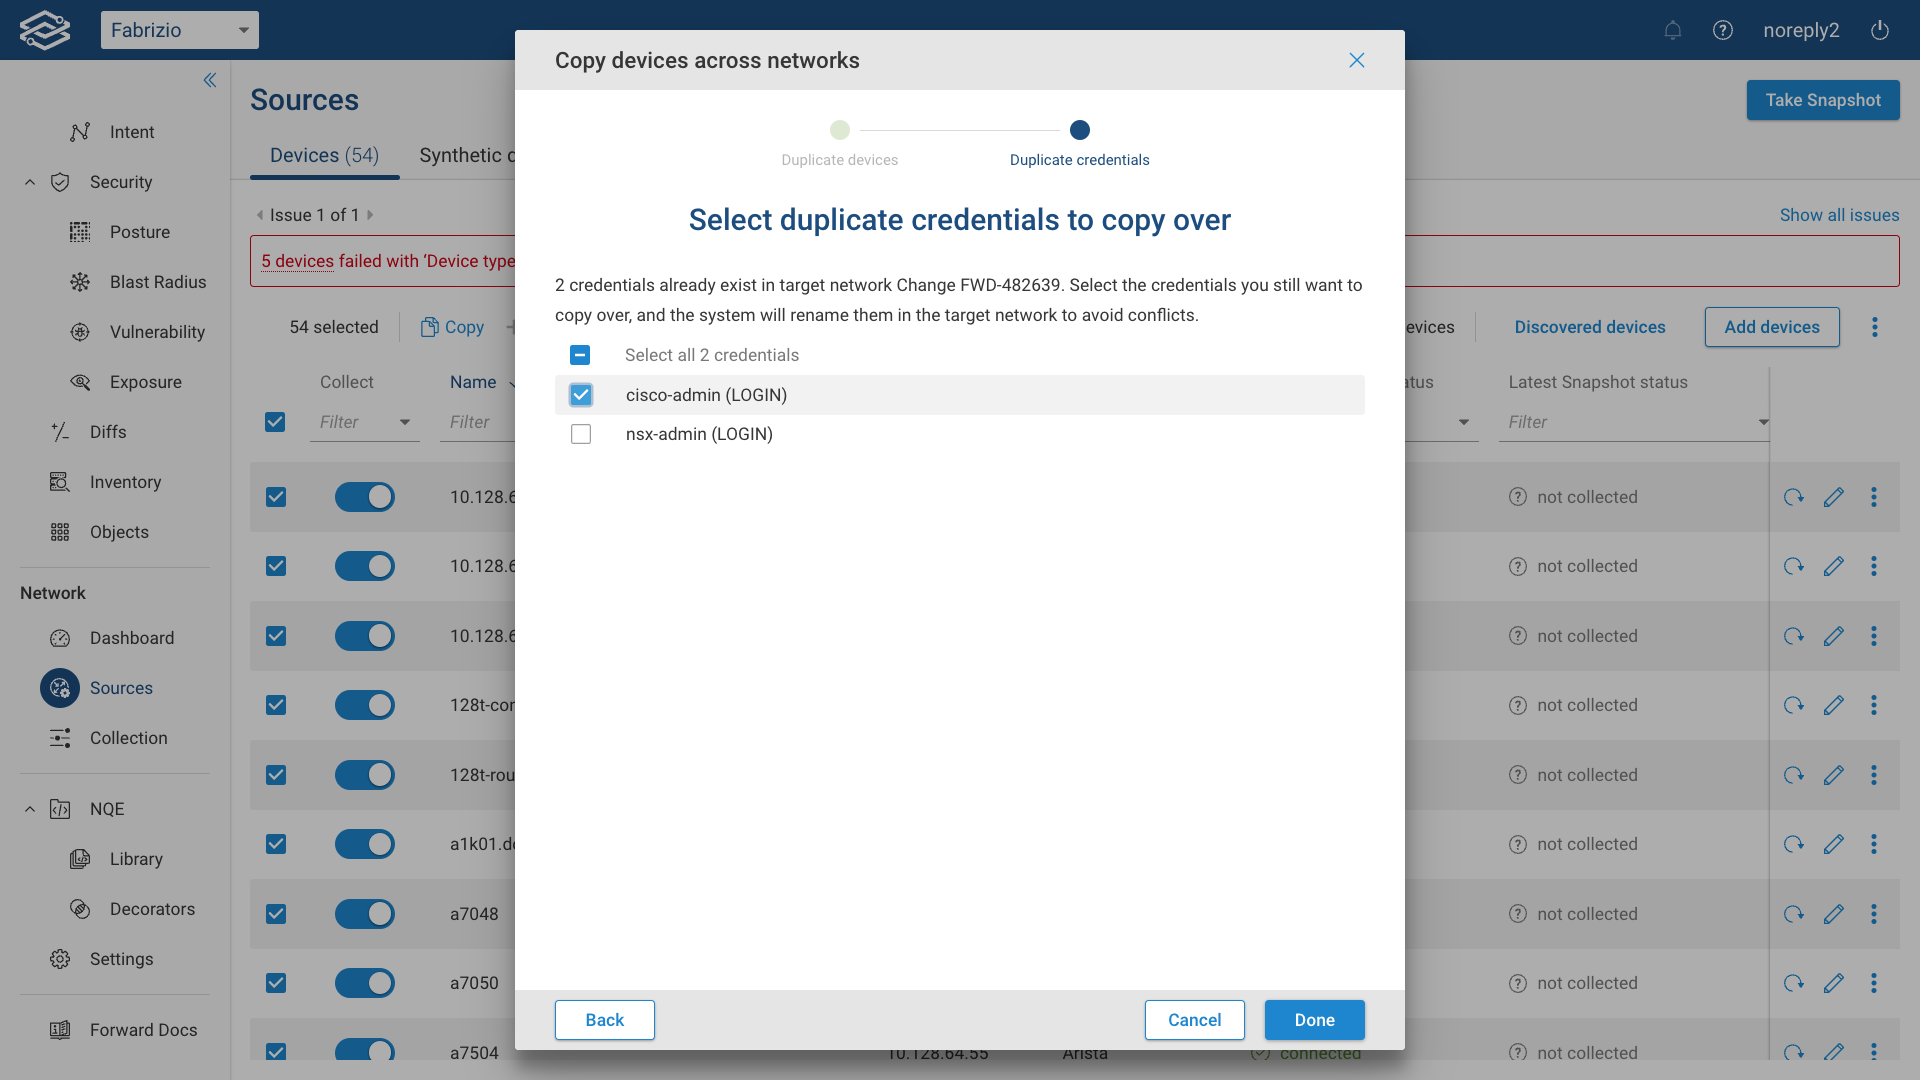
Select the duplicate credentials you would like to copy over, and then click on Done.
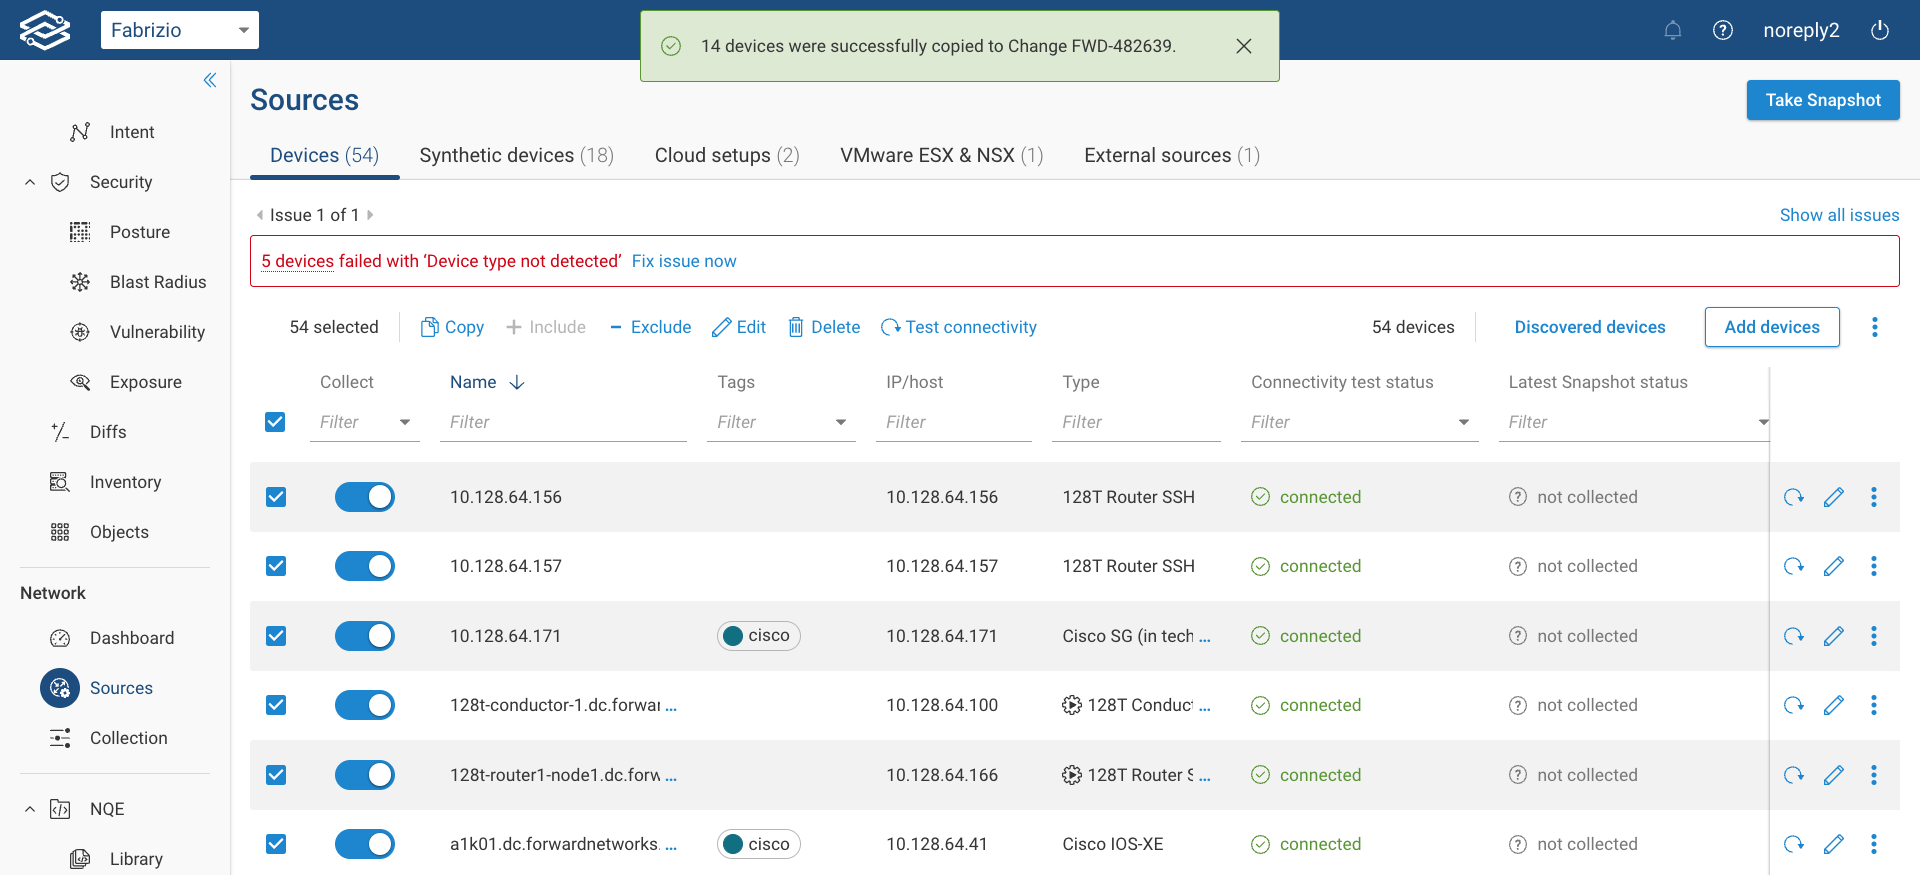
A confirmation banner will display the count of devices that have been successfully copied to the Workspace network.
Options and Settings
Role-Based Access Control (RBAC)
The Workspace network follows the role-based access control (RBAC) outlined for the parent network. The user creating the Workspace network inherits its RBAC role from the parent network. If a network operator is creating the Workspace network, their role can automatically be elevated to Network Admin for the newly created Workspace network. This can be configured under Settings --> System --> Org preferences --> Workspace networks.
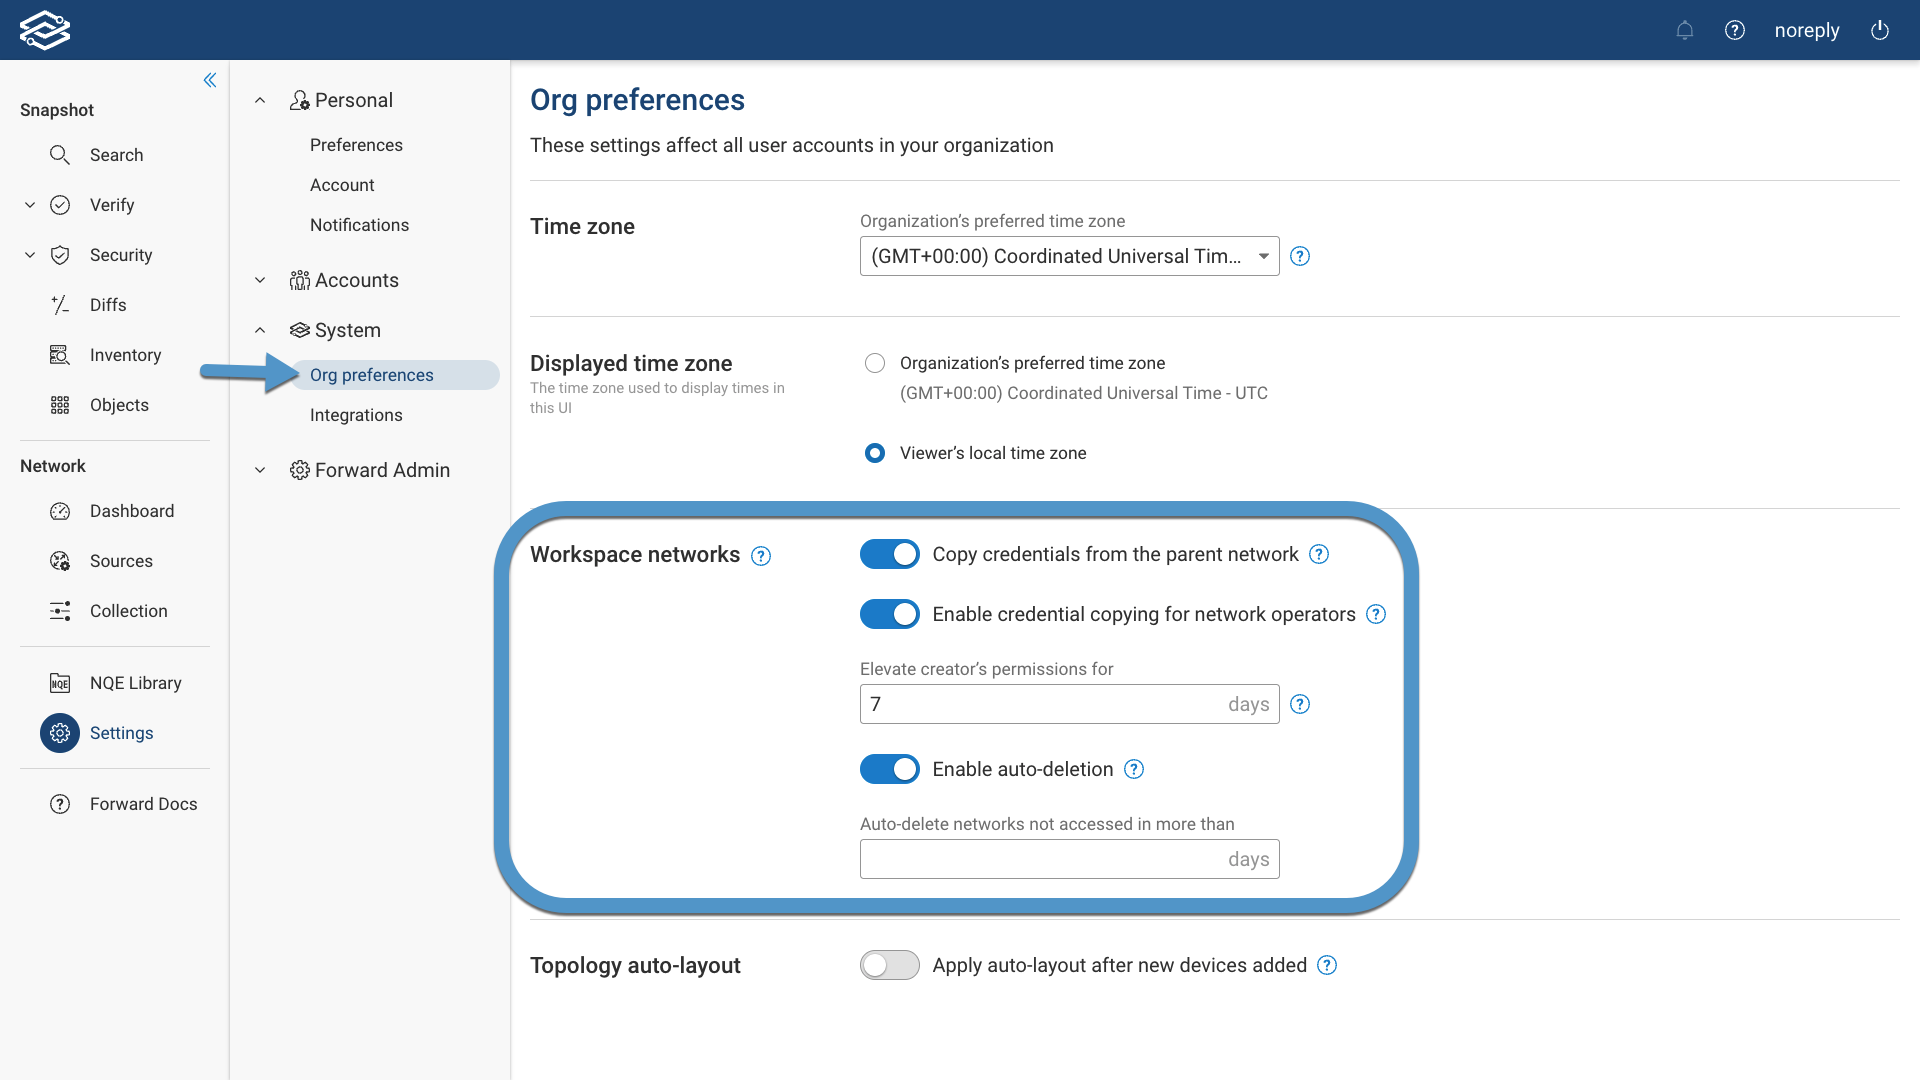
There are three global Workspace settings:
- Copy credentials from the parent network: If disabled (as is by default), credentials must be redefined in the Workspace network.
- Enable credential copying for network operators: If disabled (as is by default), credentials are copied only for Org Admin and Network Admin creators.
- Elevate creator’s permissions for … days: If enabled the Workspace creator's role will be elevated to Network Admin for the configured number of days. After time has passed, the creator's role will go back to their original one. By default, it's 7 days.
Auto-Deletion
Auto-deletion allows you to automatically delete Workspace Networks that haven’t been accessed in more than a specified number of days.
To enable auto-deletion, navigate to Settings --> System --> Org preferences --> Workspace networks. Enable the Enable auto-deletion option and set the Auto-delete networks not accessed in more than days options.
Show/Hide Workspace Networks
The Show Workspace networks toggle button allows you to show/hide the Workspace Networks in the Network Selector
dropdown menu. 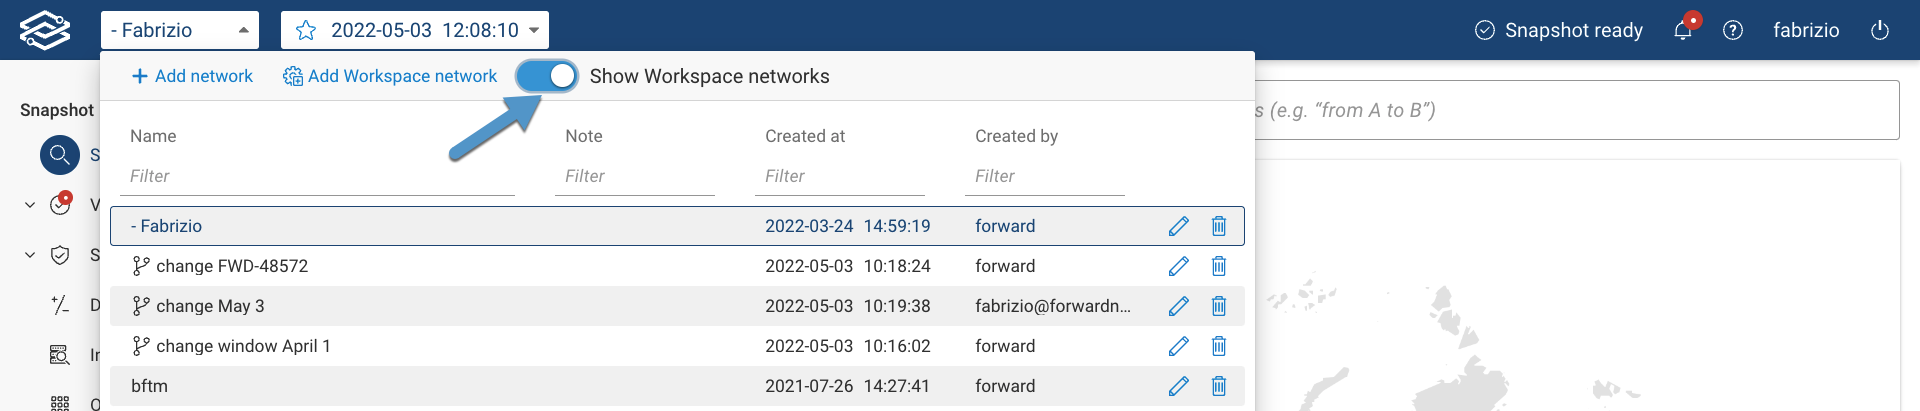
This feature is very useful if you have a very large number of Workspace Networks.
Working with the Workspace Networks
Following are some information on Workspace networks you should be aware of:
- Once the Workspace network is created, the system will not take a new snapshot automatically. Before collecting the snapshot, the user can check all aspects of the newly created network such as Devices, NQE, Checks etc.
- Once ready, the user can trigger the pre-change snapshot manually. The new data collected and processed from these devices will not refresh the parent network.
- Once a snapshot is collected, the user can evaluate everything as needed.
- The user can make the necessary changes after the pre-change snapshot is collected. Once ready, users can again collect the post-change snapshot.
- Upon completion, the user can now work with post-change snapshot and utilize all Forward Enterprise applications (e.g. Search, Verify, Diffs, Security, etc.).
- Once the change management window is complete the user can decide to keep or delete the Workspace network.
Other important things to keep in mind for the Workspace network:
- The Workspace network will not be synced to its parent network in any capacity before or after the purpose of the creation is completed.
- The collection settings available on Collection --> Collection settings --> Collector page will be carried over into the Workspace network from its parent network.
- Device configuration and state:
- All the configuration and state will be carried over from the latest available snapshot for the selected devices.
- Device layouts for topology will not be carried over from the parent network.
- Clusters will not be carried over.
- If the location is assigned to a device in the parent network, it will be carried over in the Workspace network. If a user modifies any locations in the Workspace network, the updated locations will not be synced back to the parent network.
- Verifications checks:
- NQE queries and checks - The Workspace network will inherit all NQE queries and checks from the parent network.
- Predefined checks - The Workspace network will inherit the same Predefined checks configuration (enabled / disabled and any parameters) from the parent network
- Intent checks will not be inherited