Endpoint Profiles
Endpoint profiles enable data collection over CLI, SNMP, and HTTP(S) from devices not natively supported by Forward Enterprise. The collected data is accessible within NQE (Network Query Engine) for custom analysis but is not utilized for path analysis, topology generation, or Entity search.
Using endpoint profiles
To make use of your endpoint profiles, navigate to the Endpoints category within the Sources page in any network and add some endpoints for data collection. For detailed instructions, refer to the Endpoints documentation.
Adding HTTP(S) endpoint profiles
HTTP(S) endpoint profiles enable data collection from external sources using HTTP(S) GET requests. These profiles define how Forward Enterprise retrieves, parses, and structures data in supported formats such as JSON, CSV, and text.
Forward supports data in JSON, CSV, and any text. Binary data is not supported.
The format is based on the content-type header. If the content type is set to application/json then Forward uses
JSON format. If the content type is set to text/csv then Forward will use CSV format; otherwise, it uses text.
To create an HTTP(S) endpoint profile:
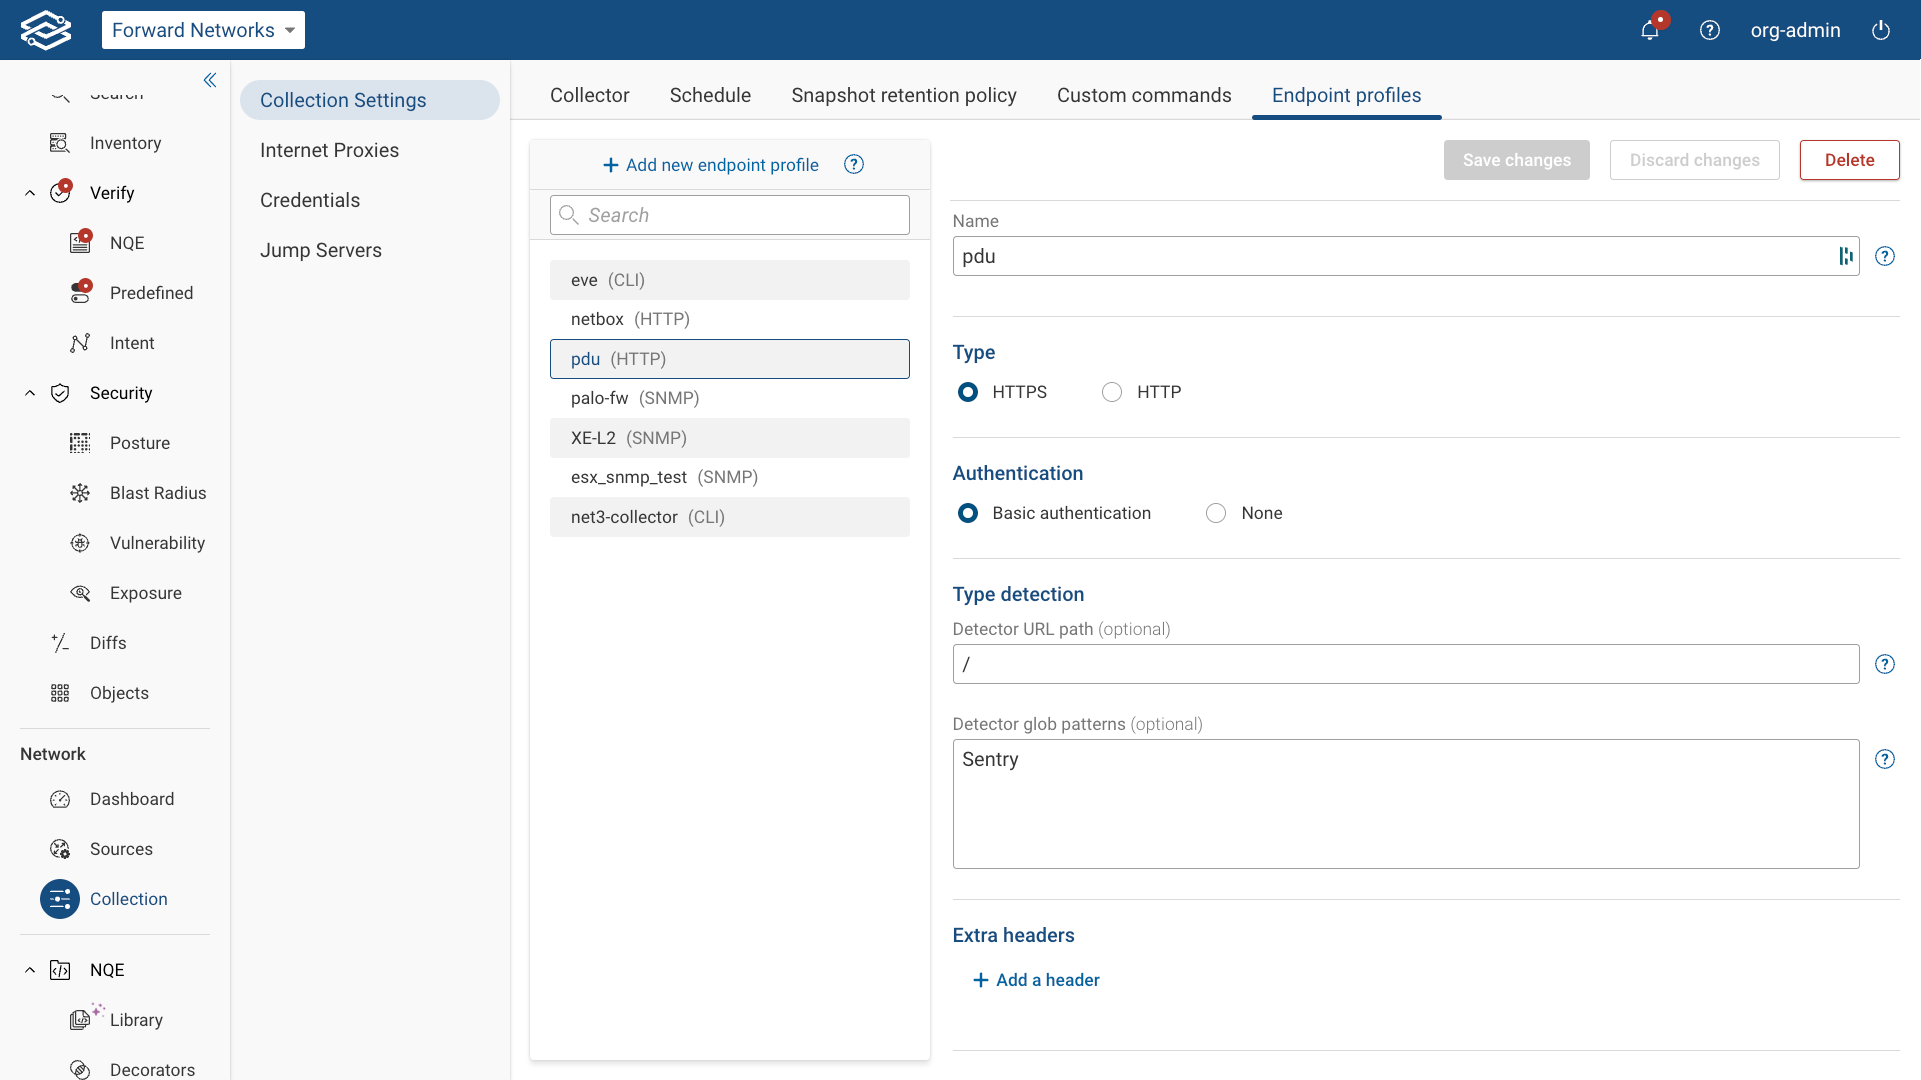
- Navigate to Settings > System > Collection Settings > Endpoint Profiles.
- Click Add New Endpoint Profile.
- Select HTTP(S) Source Profile, then configure the following fields:
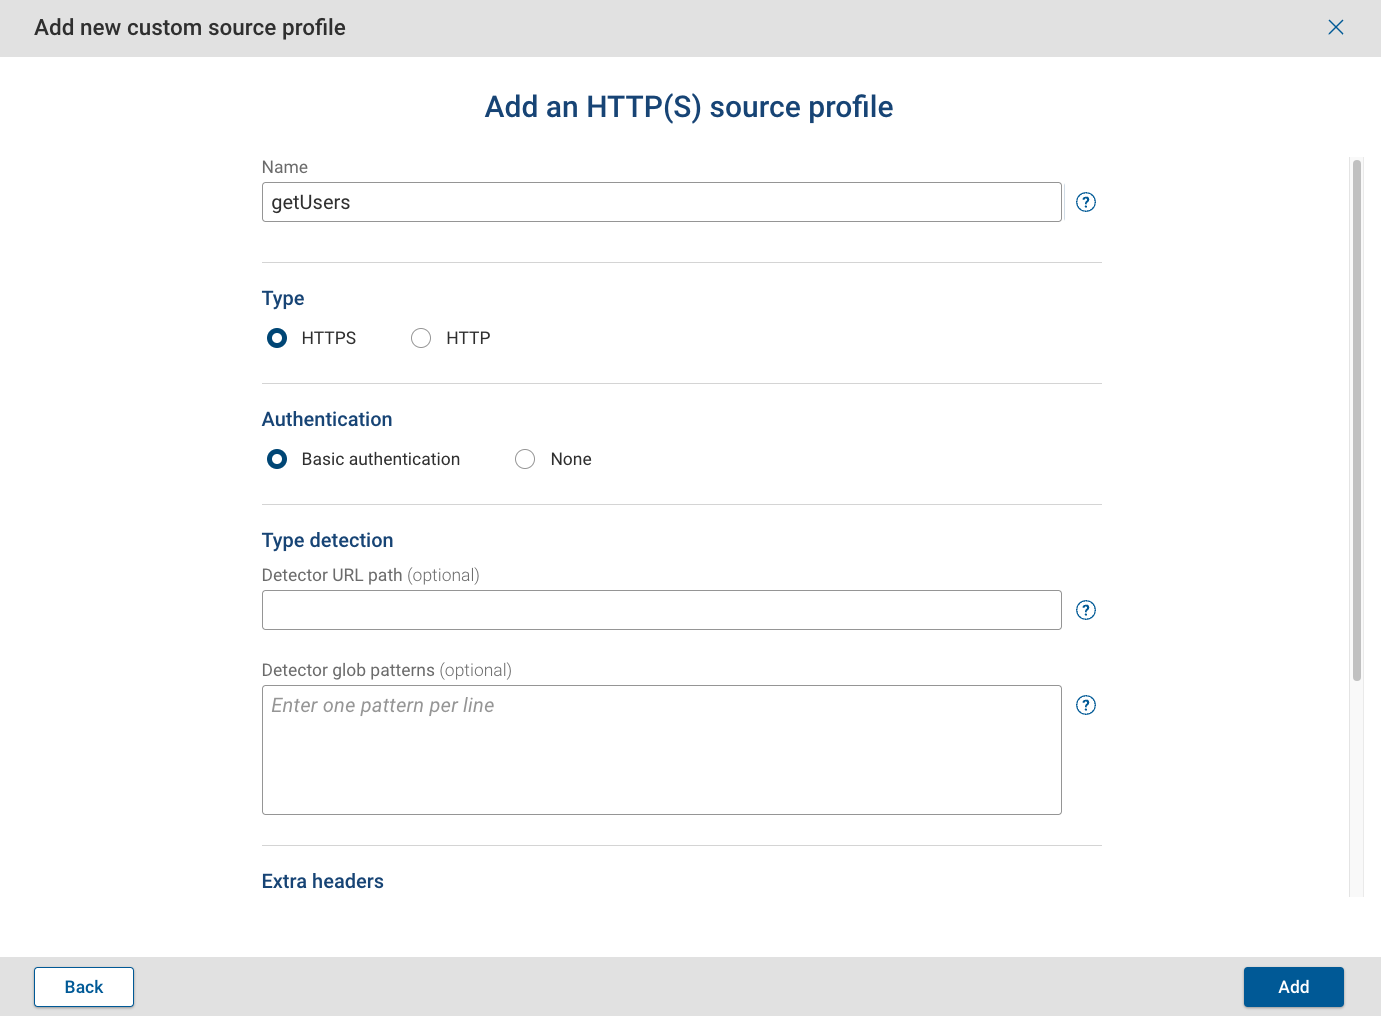
General Settings
- Name: Assign a unique name to identify the profile.
- Type: Select HTTPS or HTTP.
- Authentication: Select Basic Authentication or None. Type Detection
- Detector URL path (optional): Specify the URL to identify the source type during discovery. If omitted, this profile must be manually assigned.
- Detector glob patterns (optional): Define patterns used to match text in the response from the Detector URL Path. If a match is found, the endpoint is assigned this profile. Extra headers
- Add a header: Extra headers can be used to provide additional authentication or request details. Click Add a Header and include additional custom headers as Key/Value pairs (e.g., API tokens, custom request headers). Endpoints
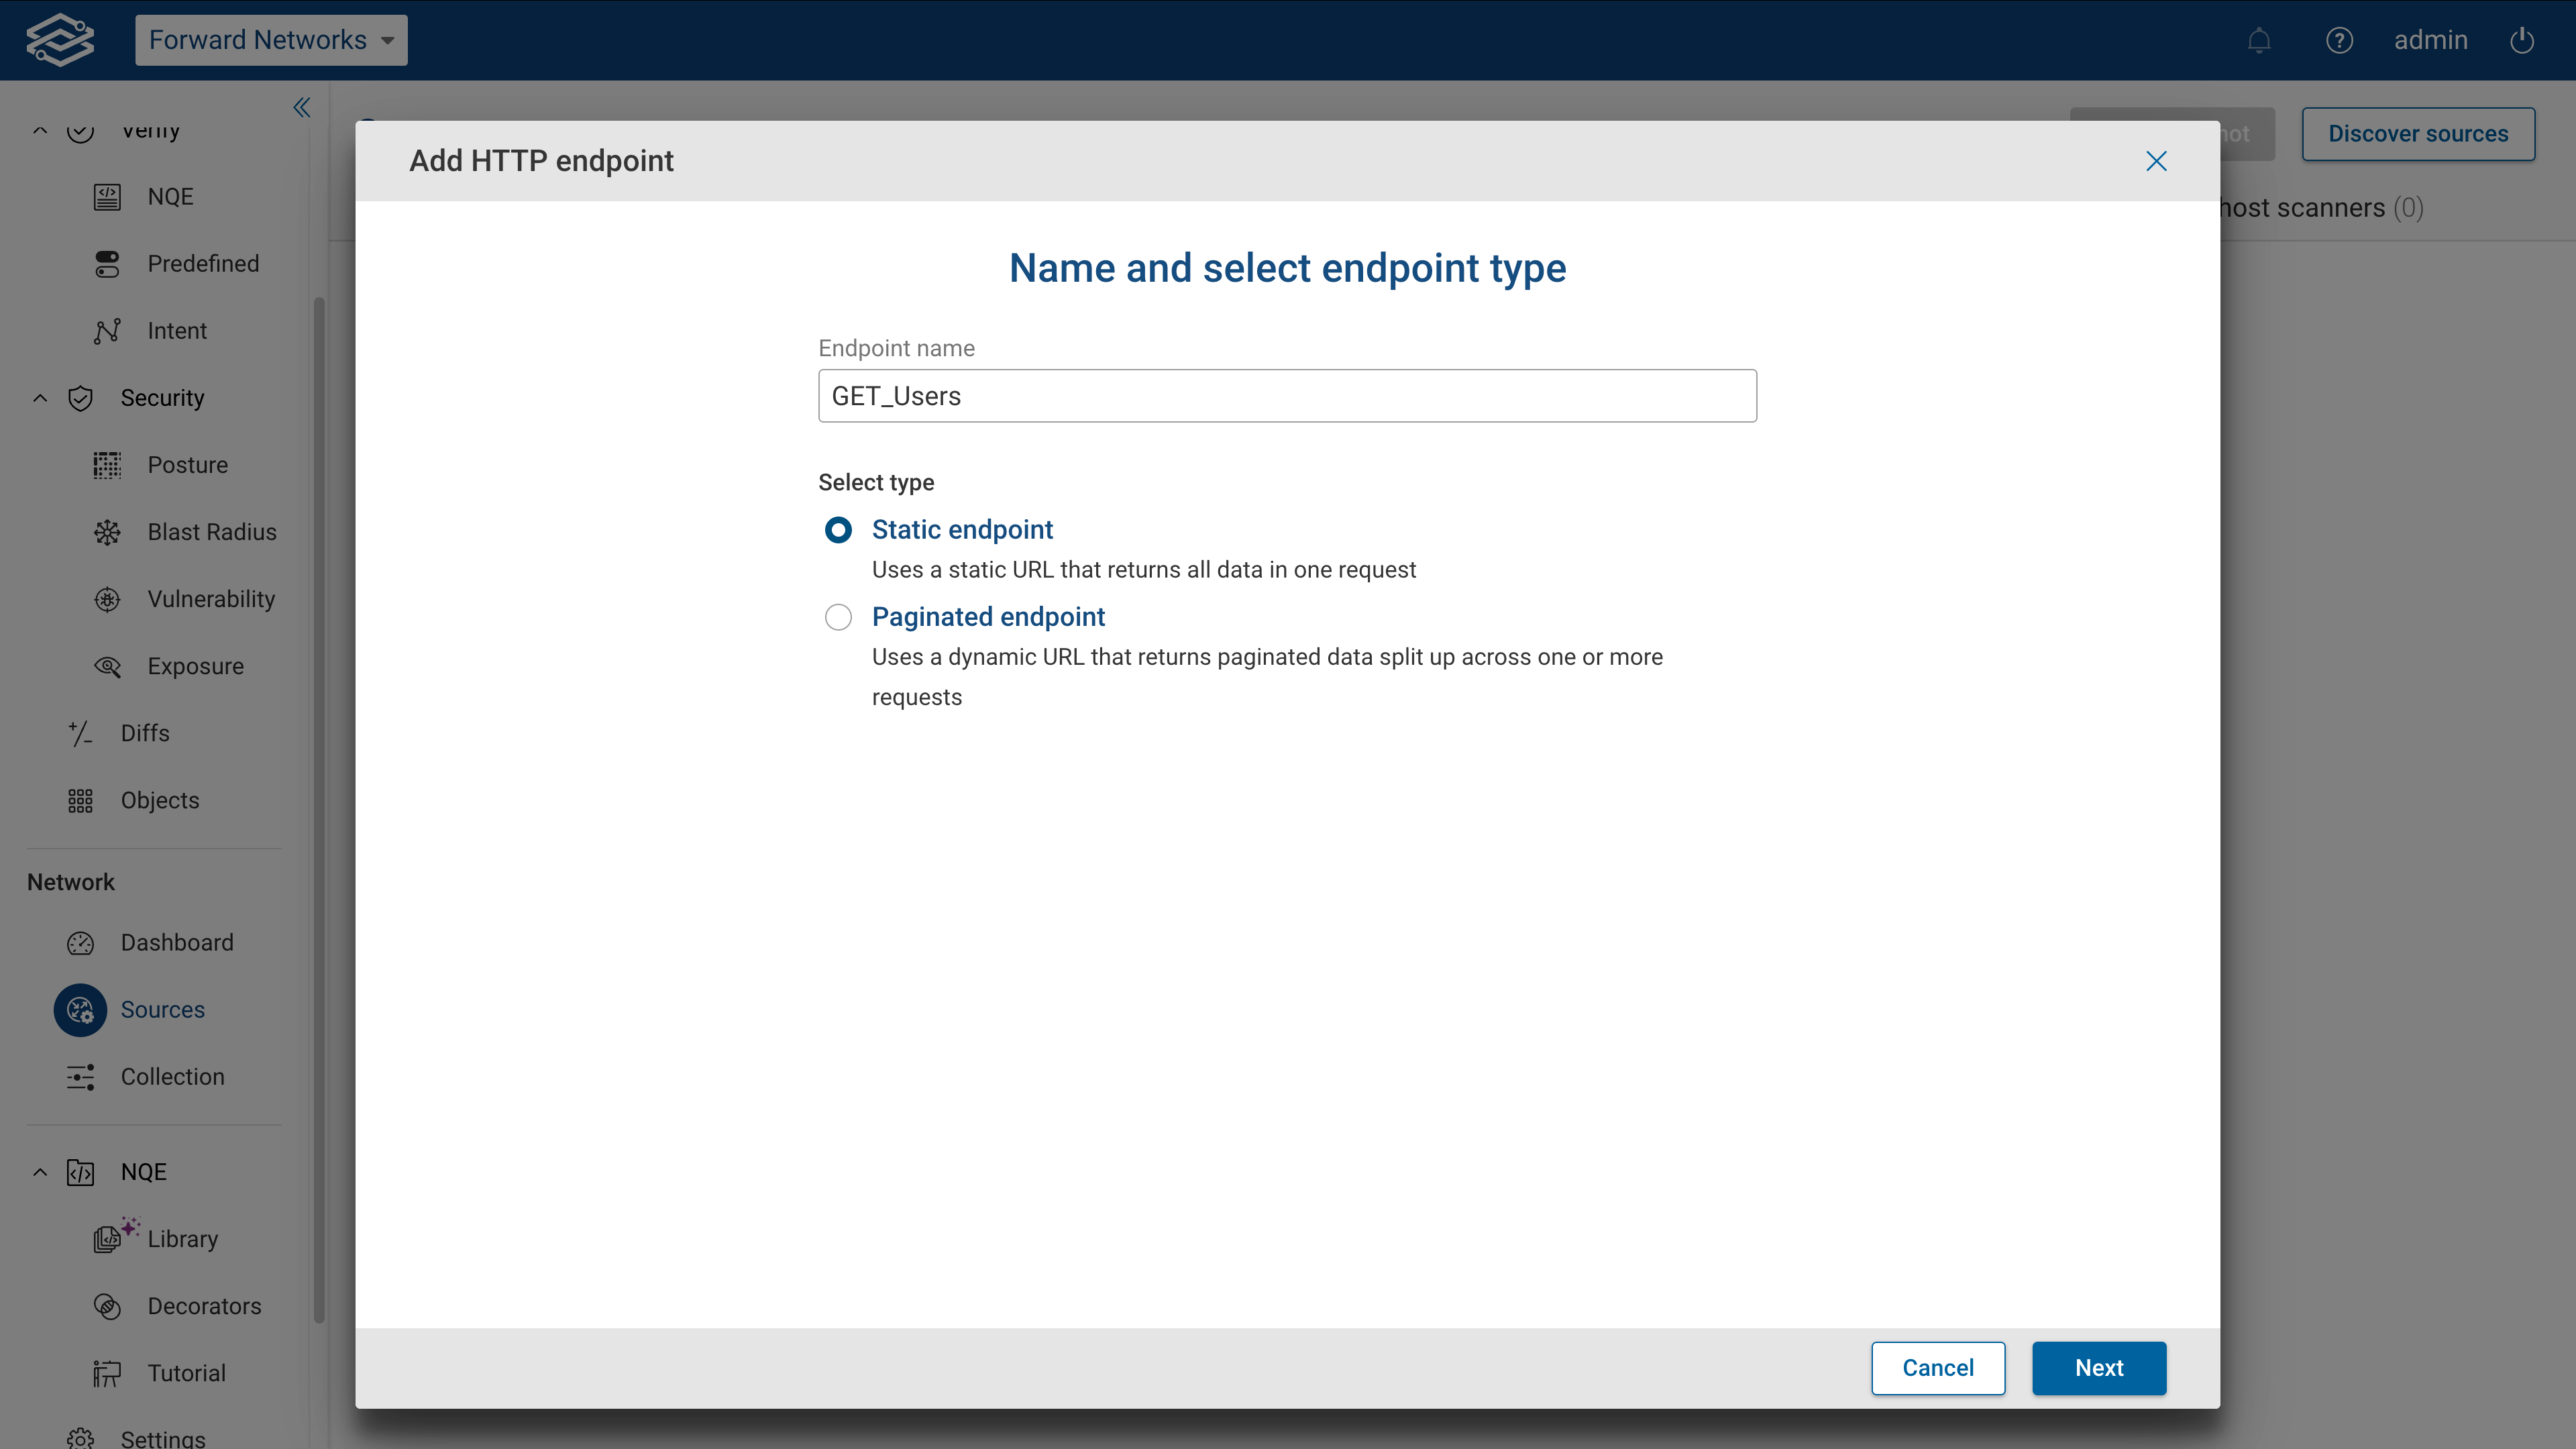
- Add an endpoint: Select this option to add and configure a static or paginated endpoint.
Adding a static endpoint
A static endpoint retrieves all data in a single request. To configure a static endpoint, provide the following details:
- Base URL: Specify the base URL for the request.
- Path: Enter the endpoint path relative to the Base URL.
- Disable SSL verification: Toggle to disable SSL verification if needed (not recommended).
- Username: (If using Basic Authentication) Enter the username for authentication.
- Password: (If using Basic Authentication) Enter the password for authentication.
- Collector: Select an active Forward collector for this endpoint.
When ready, click Execute to test the request's connectivity and display the response's results.
If the test succeeds, a Succeeded message will appear with a See Details link to view additional information.
Adding a paginated endpoint
A paginated endpoint is used when data is split across multiple pages, requiring multiple requests to retrieve the full dataset. Three main types of pagination are supported:
To configure a paginated endpoint, provide the following details:
- Base URL: Specify the base URL for the request.
- Path: Enter the endpoint path relative to the Base URL.
- Disable SSL verification: Toggle to disable SSL verification if needed (not recommended).
- Username: Enter the username for authentication (if using Basic Authentication).
- Password: Enter the password for authentication (if using Basic Authentication).
- Collector: Select an active Forward collector for this endpoint.
When ready, click Execute to test the request's connectivity and display the response's results. If the test succeeds, a Succeeded message will appear with a See Details link.
Defining the pagination model
Once connectivity has been successfully tested, select the type of pagination:
URL cursor pagination
URL cursor pagination extracts the next-page URL from the API response. To configure URL cursor pagination, fill in the following details:
- Items field: Provide the JSON path pointing to the data items in the response.
- URL field: Specify the response containing the next-page URL.
- Max number of Pages (optional): Limits the number of pages to be retrieved.
Click Test to verify configuration. If the test succeeds, a Succeeded message will appear with a See Details link.
Select Done after completing a successful test to finish.
Parameter cursor pagination
Parameter cursor pagination appends a cursor value (token) to the request URL for fetching the next page.
To configure Parameter cursor pagination, fill in the following details:
- Items field: Provide the JSON path pointing to the data items in the response.
- Cursor parameter name: Specify the name of the query parameter used for pagination.
- Cursor parameter field: Specify the response containing the next-page cursor value.
- Max number of Pages (optional): Limits the number of pages to be retrieved.
Click Test to verify configuration. If the test succeeds, a Succeeded message will appear with a See Details link.
Select Done after completing a successful test to finish.
Offset-based pagination
Offset pagination retrieves data by specifying a start index and a limit.
To configure offset pagination, fill in the following details:
- Items field: Provide the JSON path pointing to the data items in the response.
- Offset parameter name: Specify the name of the query parameter used for pagination.
- Offset parameter value - Select the method used to calculate the next page:
- Previous Offset + Length: Uses the current page size.
- Previous Offset + NextPage: Uses the response’s nextPage value.
- Previous Offset + 1: Increments the offset by 1.
- Max number of Pages (optional): Limits the number of pages to be retrieved.
After selecting Offset-based pagination from the available options, fill in the following fields:
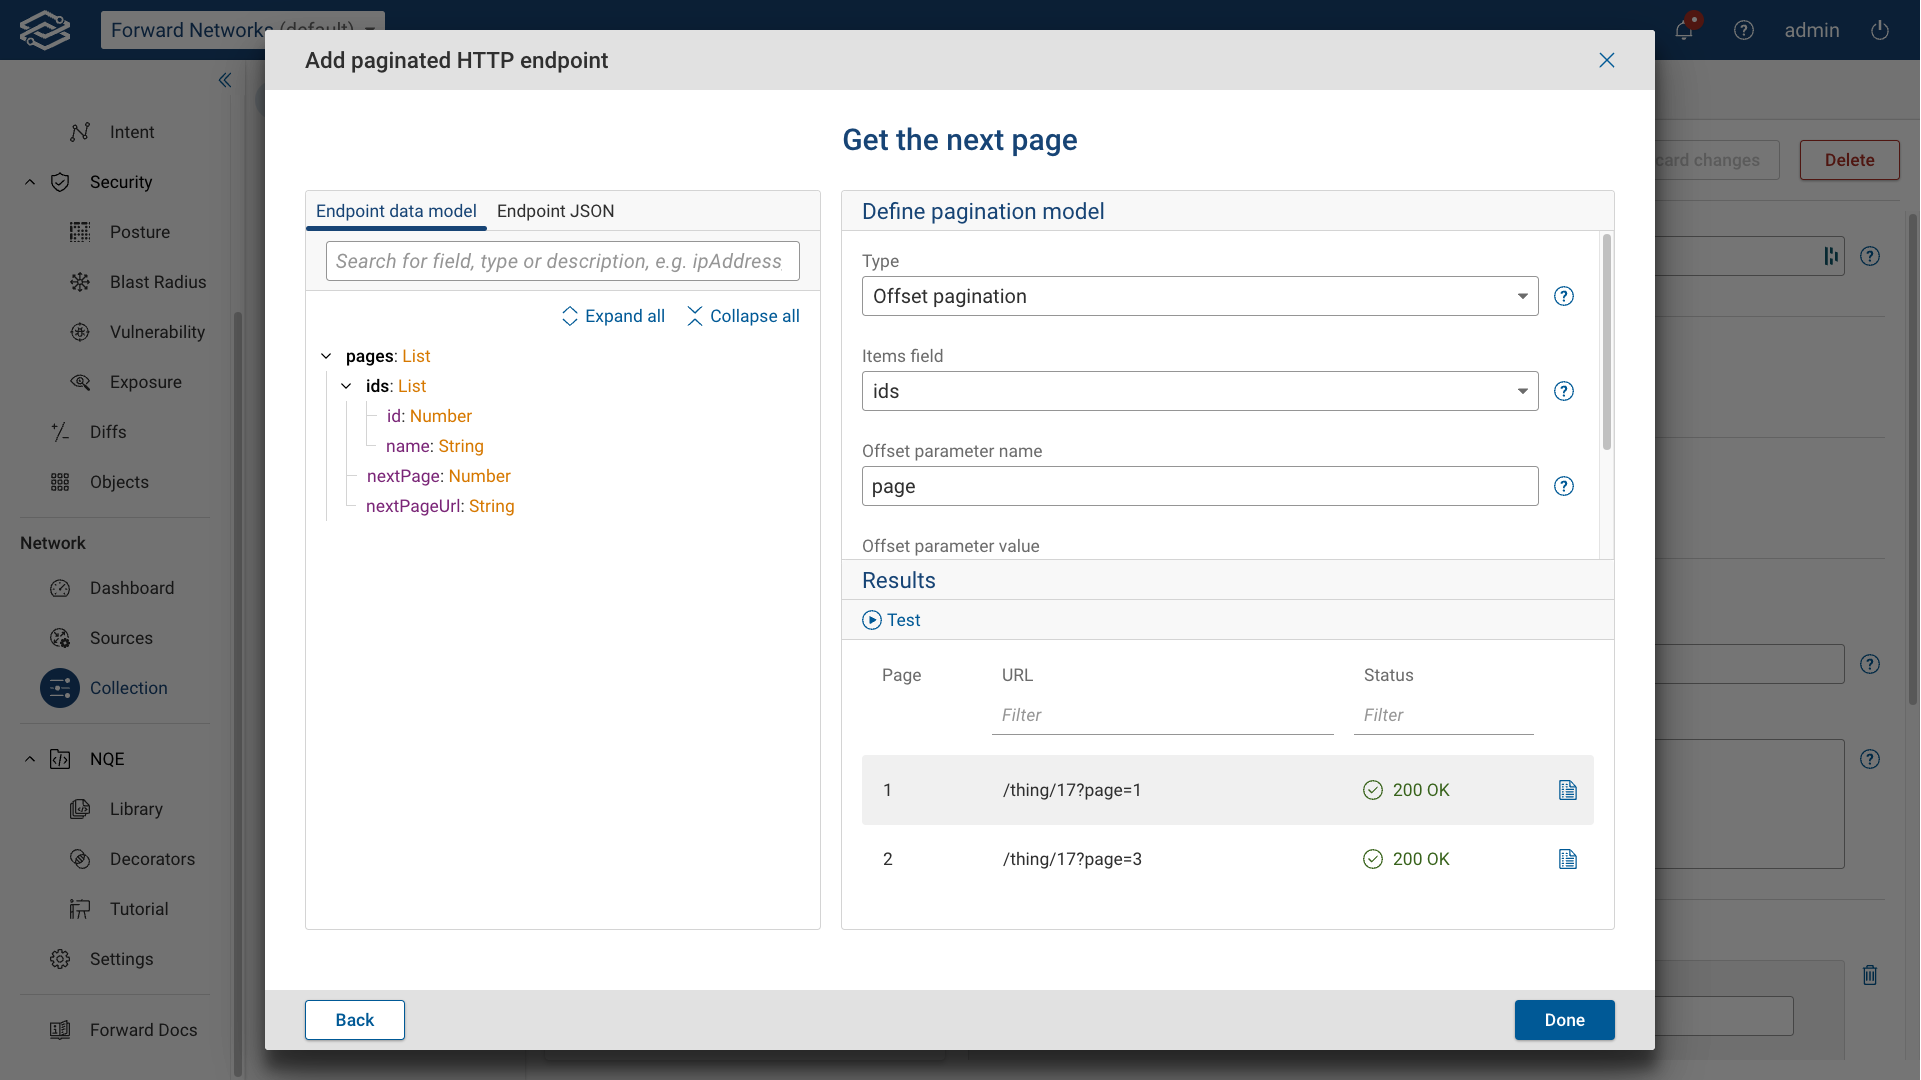
Click Test to verify configuration. If the test succeeds, a Succeeded message will appear with a See Details link.
Select Done after completing a successful test to finish.
Adding SNMP endpoint profiles
SNMP endpoint profiles define how the Forward collector discovers and polls SNMP-capable systems that are not modeled network devices — for example, environmental sensors, UPS units, or other appliances.
Each profile defines:
- How to recognize an endpoint during discovery,
- How to extract its display name (this part is optional), and
- Which OIDs to collect during snapshots.
To add a New SNMP Endpoint Profile go to Settings → Collection → Endpoint Profiles and click Add new endpoint profile. Provide a descriptive Name for this endpoint profile and fill out the form fields as described below.
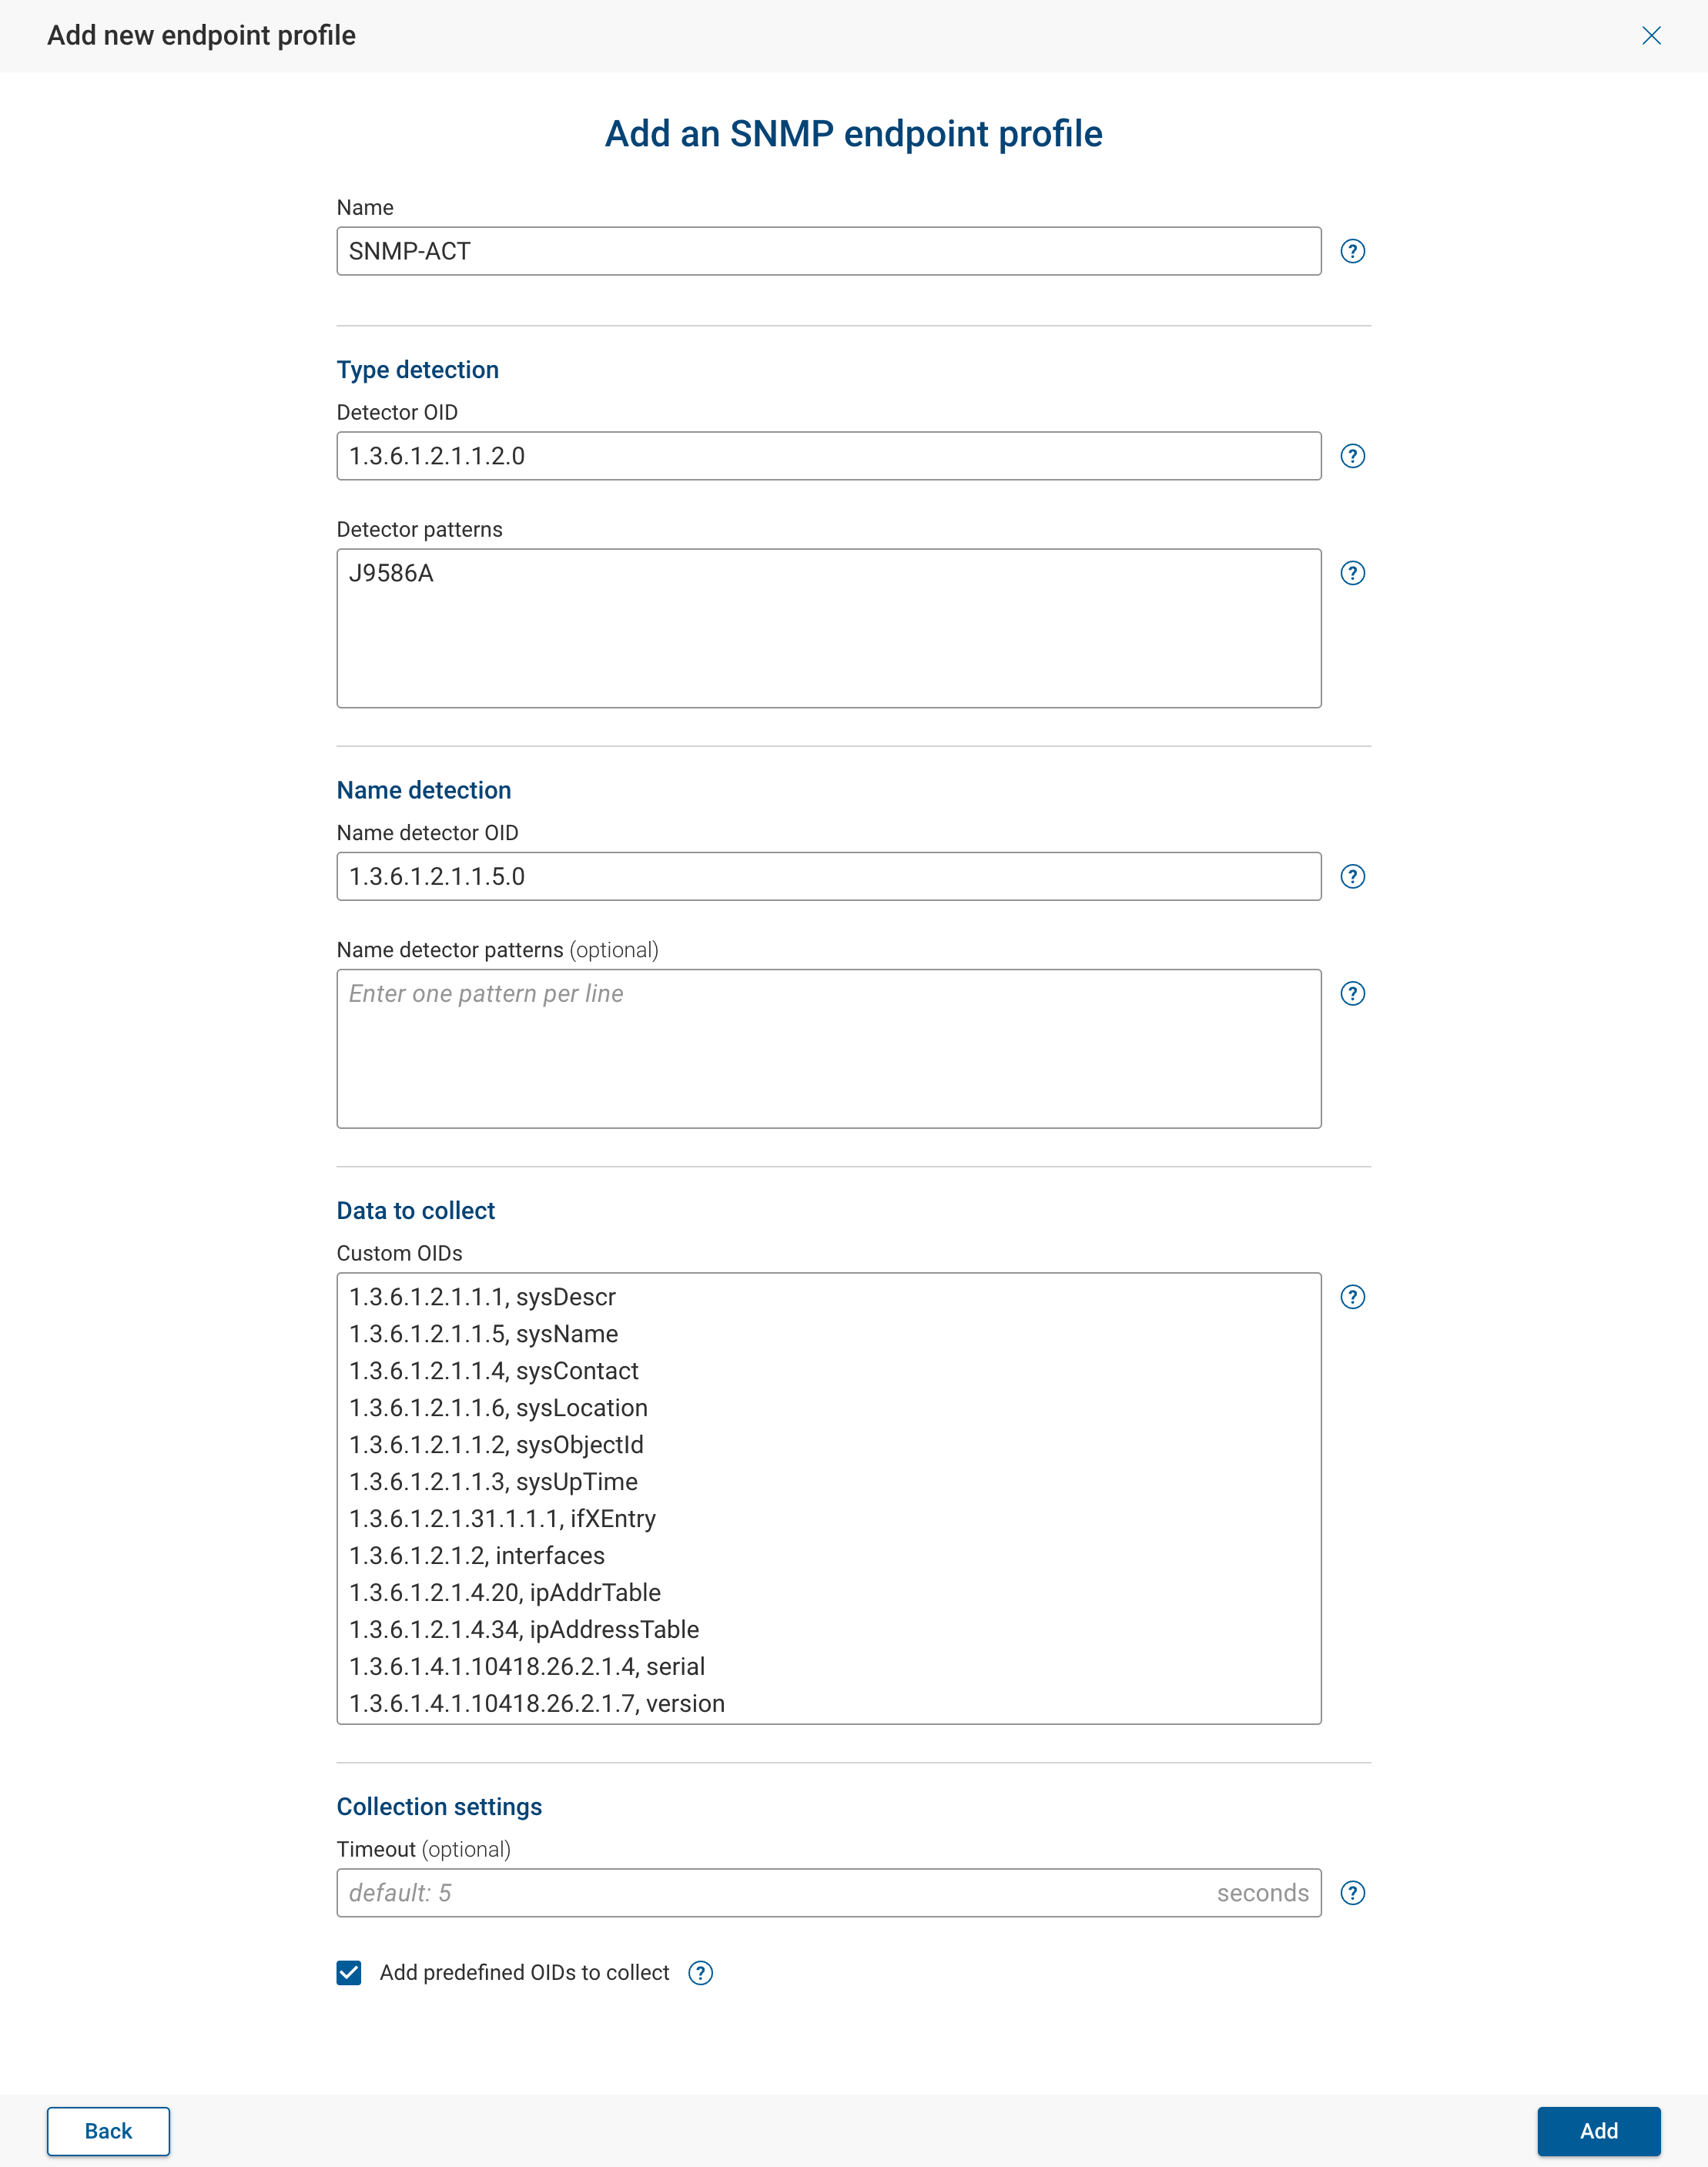
Type Detection
Type detection is used during discovery to determine that an unknown SNMP source matches this endpoint profile.
Detector OID — the OID queried to identify the device type. It should return a descriptive string unique to the
device.
Typically .1.3.6.1.2.1.1.1 (sysDescr).
Detector patterns — required field.
One or more glob-style patterns matched against the value returned by the Detector OID. If any pattern matches,
Forward recognizes the source as this type. If no pattern is provided, the profile will never match automatically and
must be manually assigned.
Name Detection
Used to extract the endpoint’s name (hostname or identifier).
Name detector OID — the OID that provides the name.
Typically .1.3.6.1.2.1.1.5.0 (sysName).
Name detector patterns (optional) — glob-style extraction patterns applied to the returned text.
For example, if the OID output is: hostname: deviceA, ipAddr: 10.1.1.1
and the pattern is: hostname:
Forward extracts deviceA as the endpoint name. If left empty, the first word of the response is used.
Important: Specify Lexicographically Correct OIDs
Forward collector uses snmpBulkGet to retrieve SNMP values.
This command returns the next OID in lexicographical order, not necessarily the exact one requested.
If you specify an OID that is the last leaf in its branch (for example, .1.3.6.1.2.1.1.5.0), the collector may
skip it and return the next item instead, preventing successful detection.
To avoid this issue:
- Use the branch OID itself (
.1.3.6.1.2.1.1.5), or - An earlier OID (
.1.3.6.1.2.1.1.4.0)
Data to Collect
Specify one or more Custom OIDs that define what data to retrieve from this endpoint type. Each entry includes the OID and an alias name separated by a comma. The alias becomes the label used in Forward and in NQE queries.
Example:
1.3.6.1.2.1.1.1.1.0, dev-type
1.3.6.1.2.1.1.3.0, uptime
1.3.6.1.4.1.99999.10.0, temp_c
1.3.6.1.4.1.99999.11.0, humid
You can optionally enable Add predefined OIDs to collect to collect common information like hostname, OS, vendor, TCP and UDP listening ports.
Collection Settings
- Timeout (optional) — response timeout in seconds used during connectivity tests and collection.
Default: 5 seconds
Adding CLI endpoint profiles
CLI endpoint profiles allow data collection from network devices using SSH. These profiles define the commands used to retrieve device information, identify device types, and extract relevant data.
To create a CLI endpoint profile:
- Navigate to Settings > System > Collection Settings > Endpoint Profiles.
- Click Add New Endpoint Profile.
- Select CLI Source Profile as the profile type, then configure the following fields.
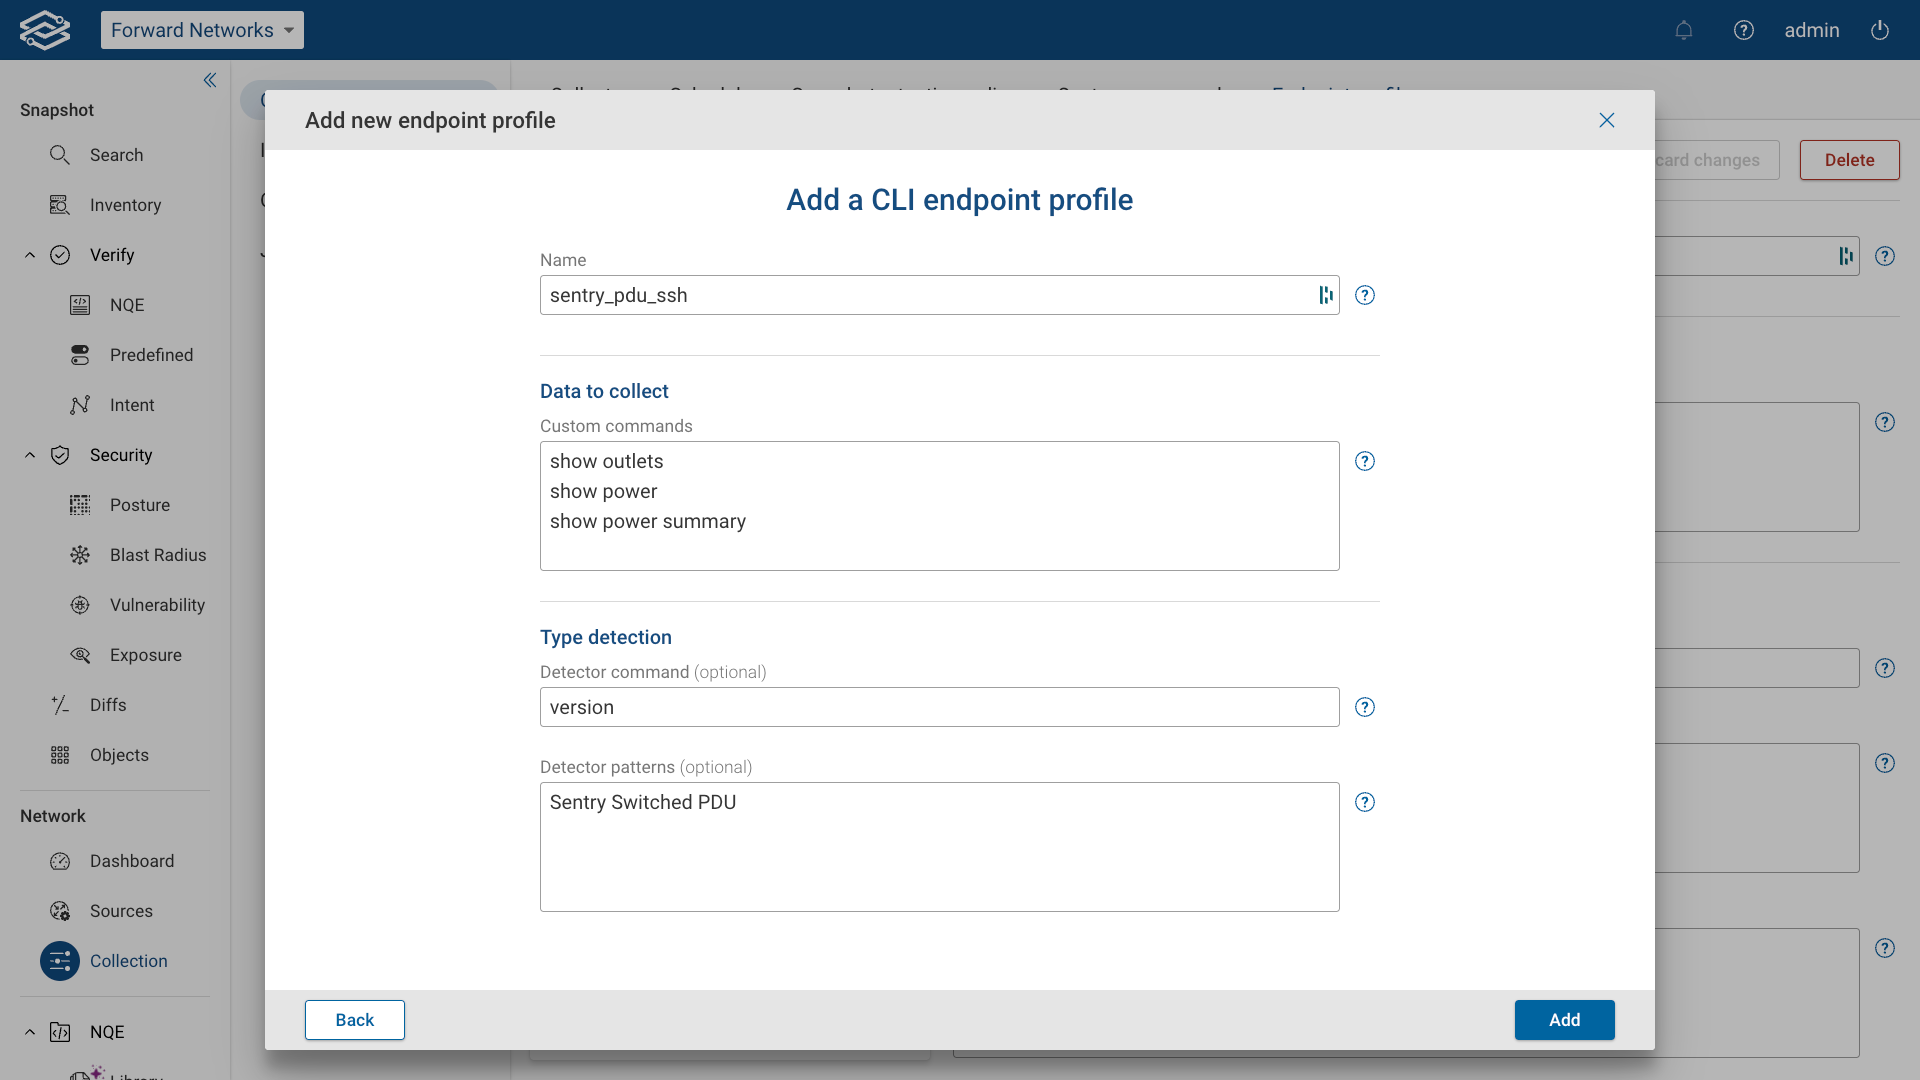
General Settings
- Name: Assign a unique name to identify the profile. Data to collect
- Custom commands: Enter the list of CLI commands that will be executed to collect data. Type detection
- Detector command (optional): Specify the command that identifies the device type (e.g.,
show version). - Detector patterns: Define patterns to match the output of the detector command for recognizing the device type (one per line).
- Invalid/unrecognized command error patterns (optional): Specify patterns to detect unsupported commands during type discovery. Name detection
- Name detector command (optional): Enter the command used to retrieve the device name (e.g.,
show hostname). - Name detector patterns (optional): Define patterns to extract the device name from the name detector command output. CLI settings
- Pagination prompt pattern (optional) Define a pattern to detect page breaks in output prompts (e.g.,
--More--). - Pagination prompt response (optional): Specify the response to send when a pagination prompt is detected (e.g., ENTER or SPACE).
- Console prompt pattern (optional): Set the pattern to detect interactive prompts (e.g., license agreements or terms).
- Console prompt response (optional): Define the response to send when encountering a console prompt.
- PTY type (optional): Define the terminal emulation type:
- vt100: Basic compatibility with older devices.
- xterm-256color: Supports color output for enhanced readability.
- PTY column size (optional): Set the terminal column width (default: 500).
- Clear prompt (optional): Define the key sequence to clear the CLI prompt (default: CTRL+C).
- Command output read timeout (optional): Set the timeout for reading command output (default: 5 seconds). Adjust for devices with slower responses.
Once configured, click Add to save the CLI endpoint profile.
For CLI endpoint profiles, we strongly recommend setting the Invalid/Unrecognized Command Error Patterns.
Defining these patterns allows the system to quickly detect failed commands, which improves the speed of endpoint discovery and connectivity tests.
To configure an error pattern:
- Run a standard command such as
show version, and copy the exact error text your device returns. - If
show versionis already used for type detection, issue an invalid command (for example, arjeklqr) and copy the resulting error message.
Use the returned error message text as the pattern to specify here.
Default allowed commands
Forward Enterprise provides a predefined set of allowed CLI commands for use in custom CLI endpoint profiles. These commands ensure secure and efficient data collection from network devices.
Only Org Admins can request additions or modifications to this list. To make changes, Org Admins must contact Forward Networks Customer Support, who will provide the necessary authorization file.
To view the default allowed commands or upload a custom, authorized list of organization-specific commands, navigate
to:
Settings > Org Preferences > Custom CLI Profile Commands.
Default Allowed Commands List
^show\s+[^|>;]*$
^display\s+[^|>;]*$
^get\s+[^|>;]*$
^list\s+[^|>;]*$
^info\s+[^|>;]*$
^esxcfg-info\s*[^|>;]*$
^cat\s+[^|>;]*$
^uptime$
^version$
^netstat\s+[^|>;]*$
^ifconfig$
^ip\s+route$
^lsb_release\s+[^|>;]*$
^hostname\s+(-[a-zA-Z]\s+)*$
^paginate\s+[^|>;]*$
^set paginate\s+[^|>;]*$
^shell
^ps\s+[^|>;]*$
^set cli pager\s+[^|>;]*$
^show$
^rtdisplay$
^config paging\s+[^|>;]*$
^dig\s+[^|>;]*$
^iptables -L
Editing endpoint profiles
To edit an endpoint profile, select it from the list within the Endpoint Profiles tab. When finished, select Save Changes or Discard Changes.
Deleting endpoint profiles
To delete an endpoint profile, select the profile from the list within the Endpoint Profiles tab. Select Delete and confirm your choice.
Profiles cannot be deleted as long as endpoints in any networks are still configured to use them.