Library
The NQE Library provides users with an environment to easily create, store, organize, and share their NQE queries. NQE queries are used to extract specific information and insights from NQE.
To access the NQE Library, select NQE Library, located under the NQE section on the navigation bar.
Navigating the NQE Library
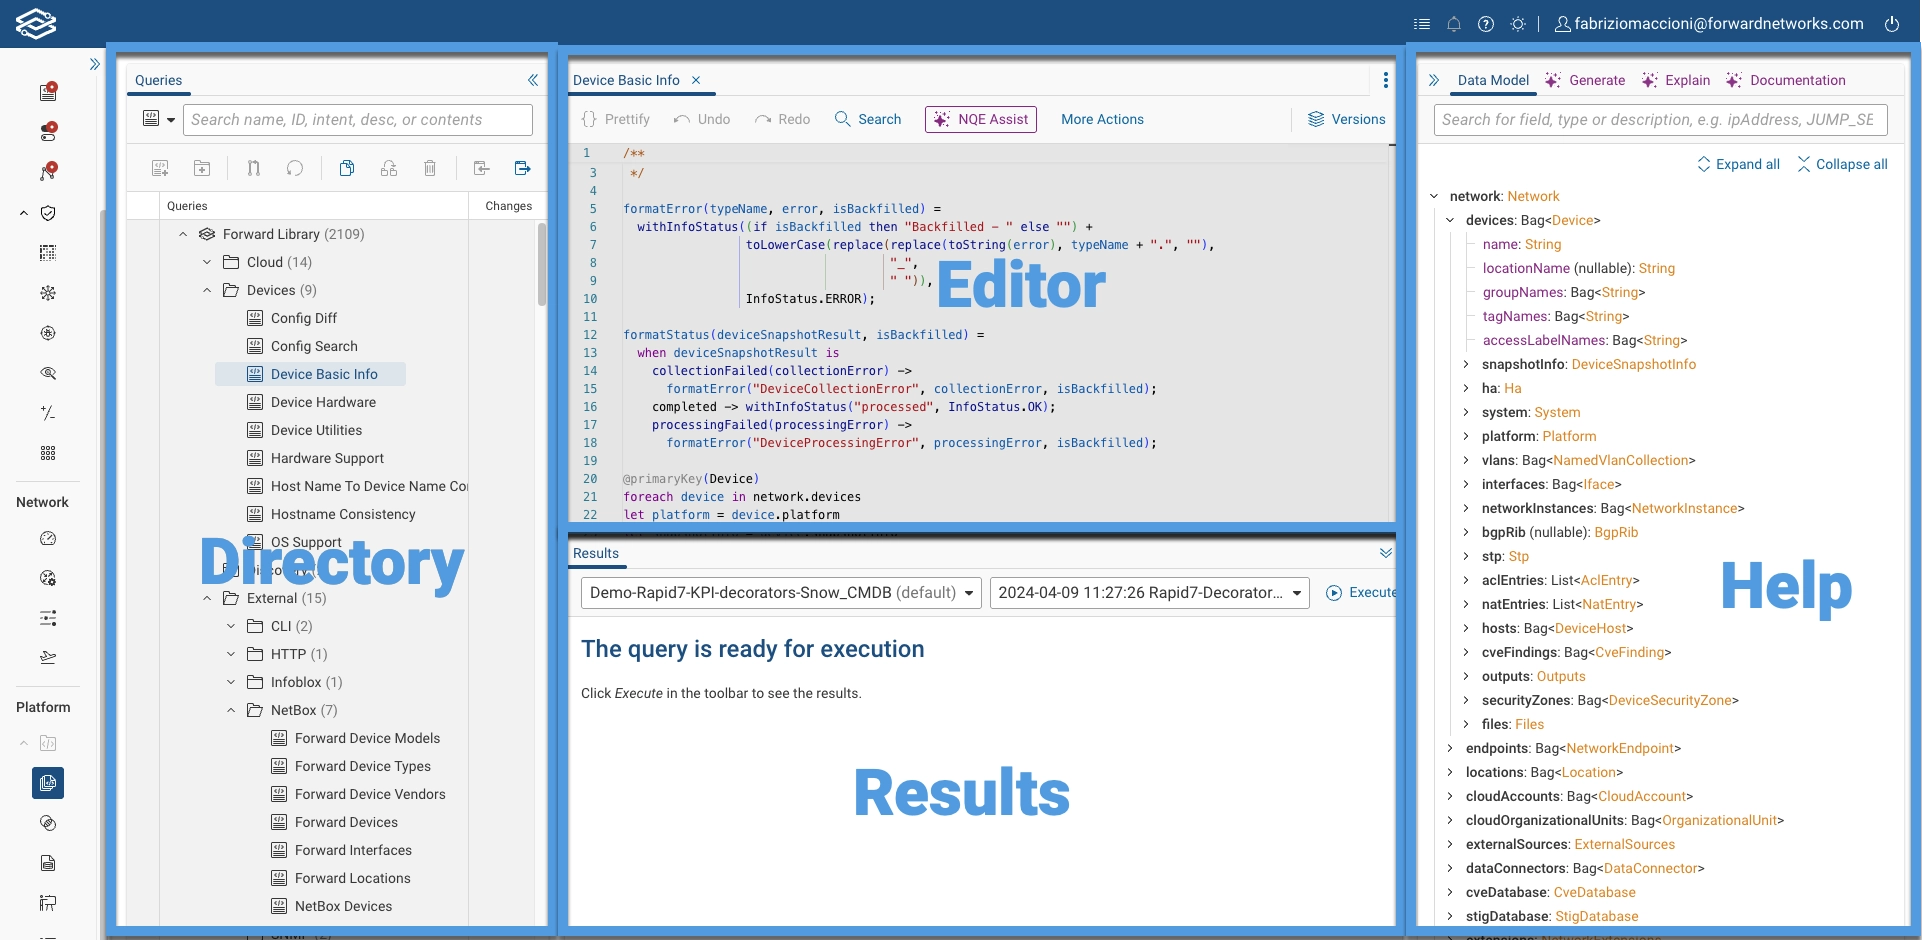
Upon viewing the page, you will be presented with the NQE Integrated Development Environment (IDE). The IDE helps users create queries utilizing features like auto-completion, syntax highlighting, and error detection, as well as the tracking and management of queries utilizing query history and comparing version diffs.
The NQE Library page consists of 4 separate panes.
Files Pane
This section is where you can manage the lifecycle of your NQE queries. You can create new queries, edit existing ones, delete unnecessary queries, and organize them into folders. It also allows you to commit your queries, making them available across your organization and for use as NQE Verification Checks.

Query Editor
This section is used to write and edit NQE queries, as well as comparing different version diffs of a query.
Results Pane
After executing a query, this section is used for configuring additional query parameters, executing queries, and displaying the outcome.
Help Pane
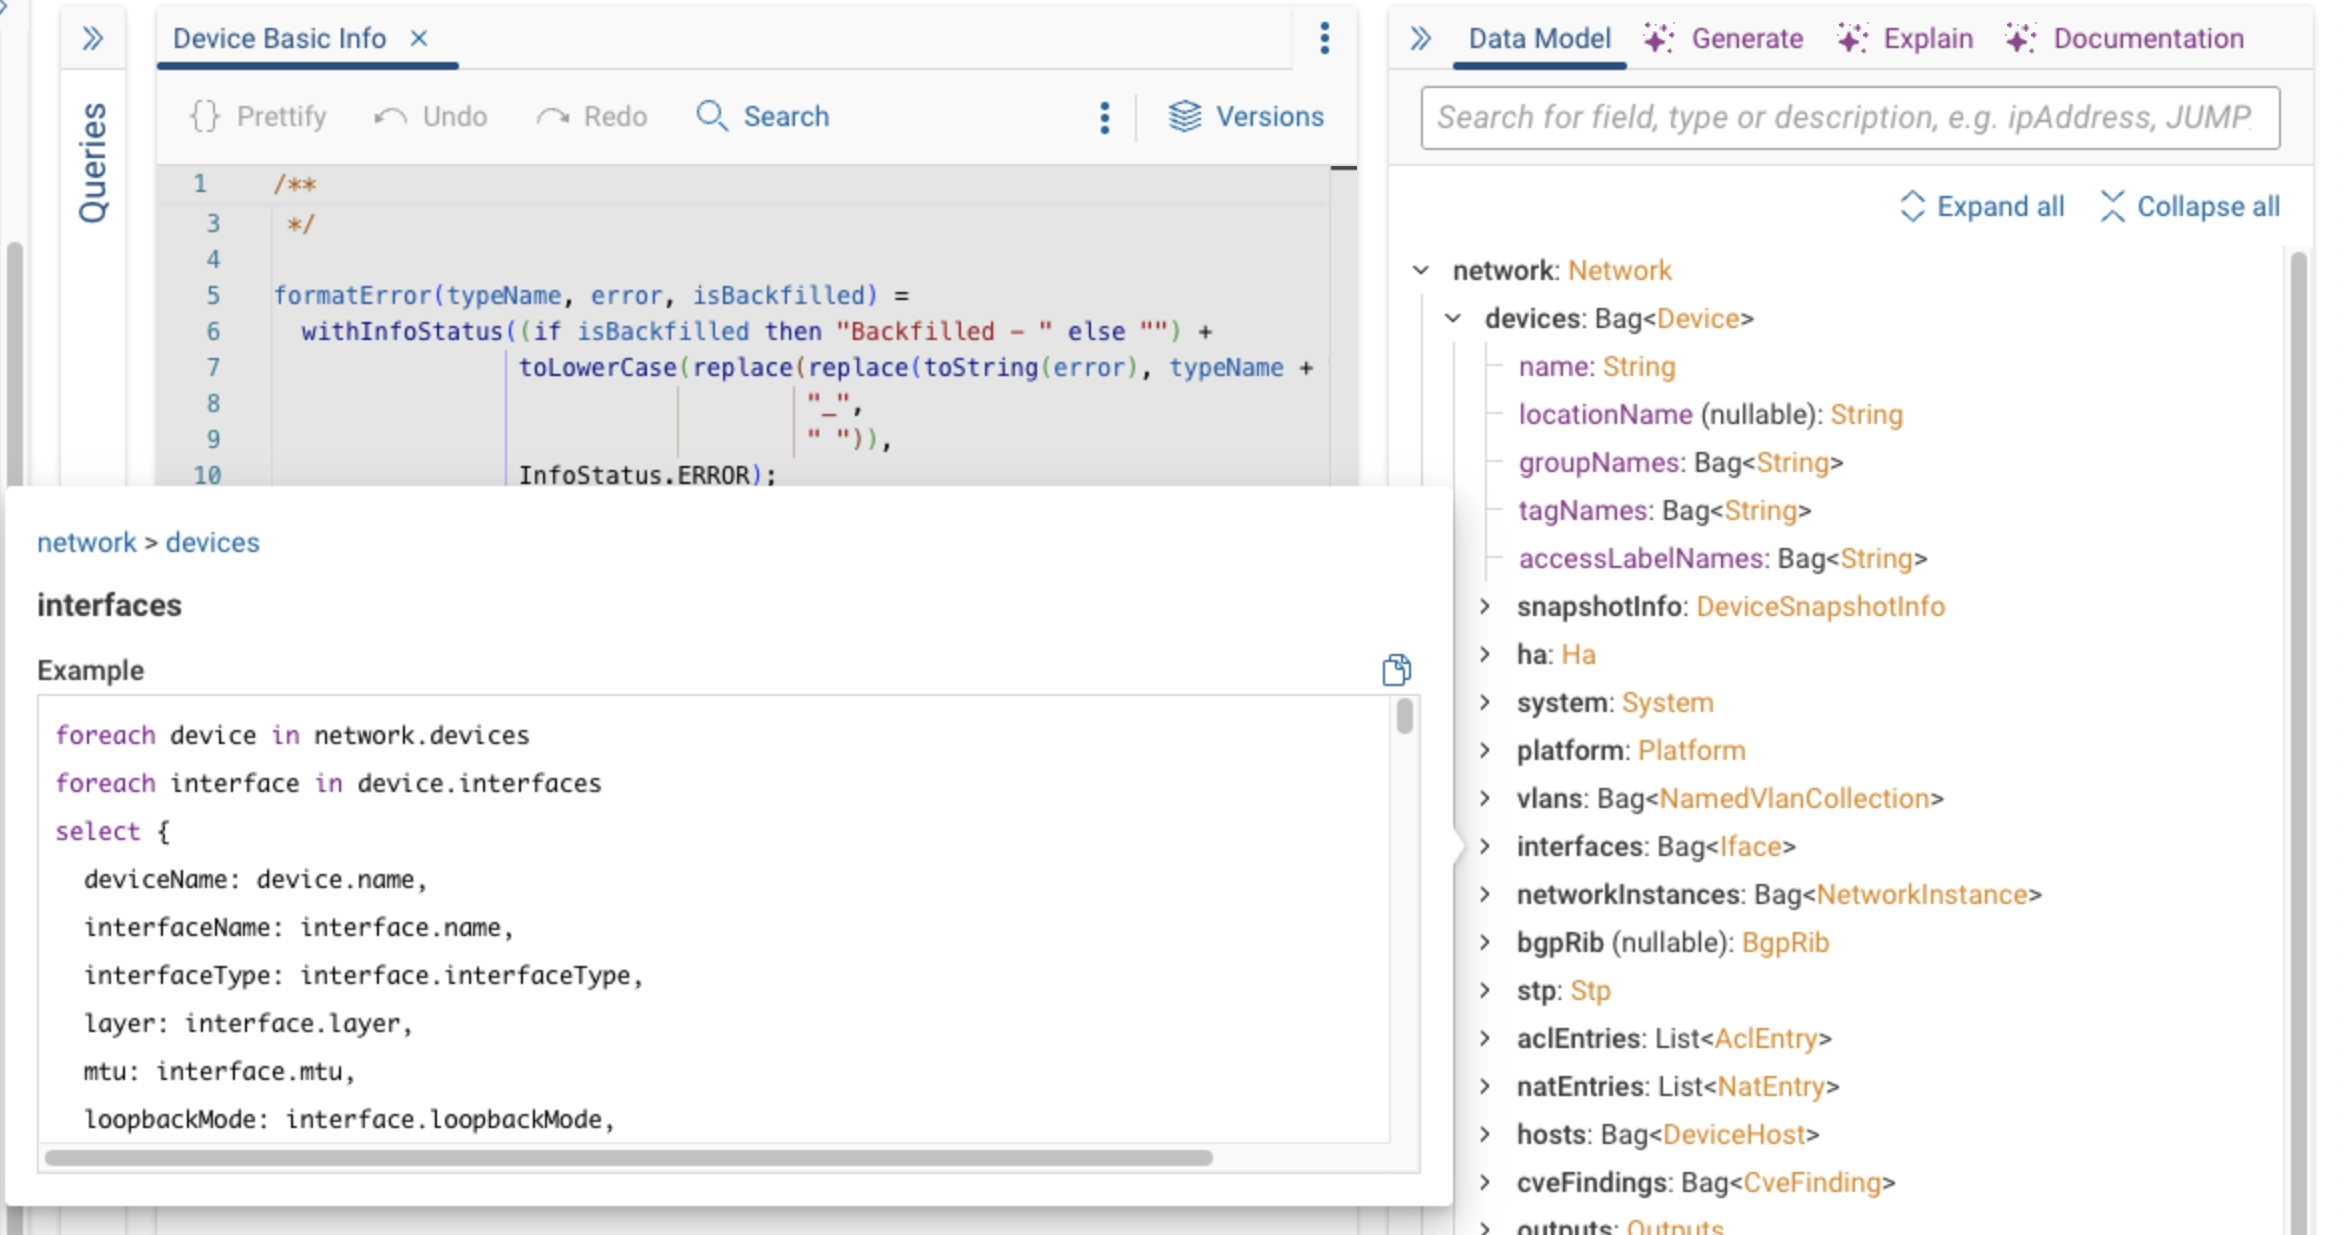
This pane offers access to the NQE Data Model, and NQE AI Assist. It's a valuable resource for understanding the structure of a query, finding definitions, and leveraging the NQE AI Assist functionalities.
All sections are collapsible and resizable (except for the Editor pane) to allow you to manage the screen space more efficiently.
NQE AI Assist
NQE AI Assist is a set of three features designed to help users generate, explain, and find relevant documentation for NQE queries using natural language prompts. These three functions simplify the process of working with NQE queries, making it accessible to users of all skill levels.
The three core functions of NQE AI Assist are:
- NQE Query Generator AI Assist: Generates accurate NQE queries based on natural language prompts.
- NQE Query Explainer AI Assist: Provides AI-generated explanations of existing NQE queries.
- NQE Docs AI Assist: Answers questions and provides examples based on NQE documentation.
NQE AI Assist is only available for SaaS deployments.
Data privacy
All data remains securely within the Forward platform hosted on AWS. No information is shared with external services. Prompts, generated queries, and feedback are used solely to improve the accuracy and functionality of NQE AI Assist while safeguarding your privacy and network information.
NQE Query Generator AI Assist
NQE Query Generator AI Assist simplifies the creation of NQE queries by interpreting natural language prompts and generating queries based on relevant network data. Powered by a fine-tuned large language model (LLM) specialized in network-related terminology and the NQE data model, it allows users to create accurate queries without needing in-depth knowledge of NQE syntax.
Getting started with NQE Query Generator AI Assist
- Navigate to the NQE Library.
- Create a new query or edit an existing query to open the Query Editor.
- In the Generate tab, type your prompt (e.g., “Show devices with high CPU usage over the last 24 hours”).
- Click Generate Query to create a query based on your prompt. You can then run and modify the query as needed.
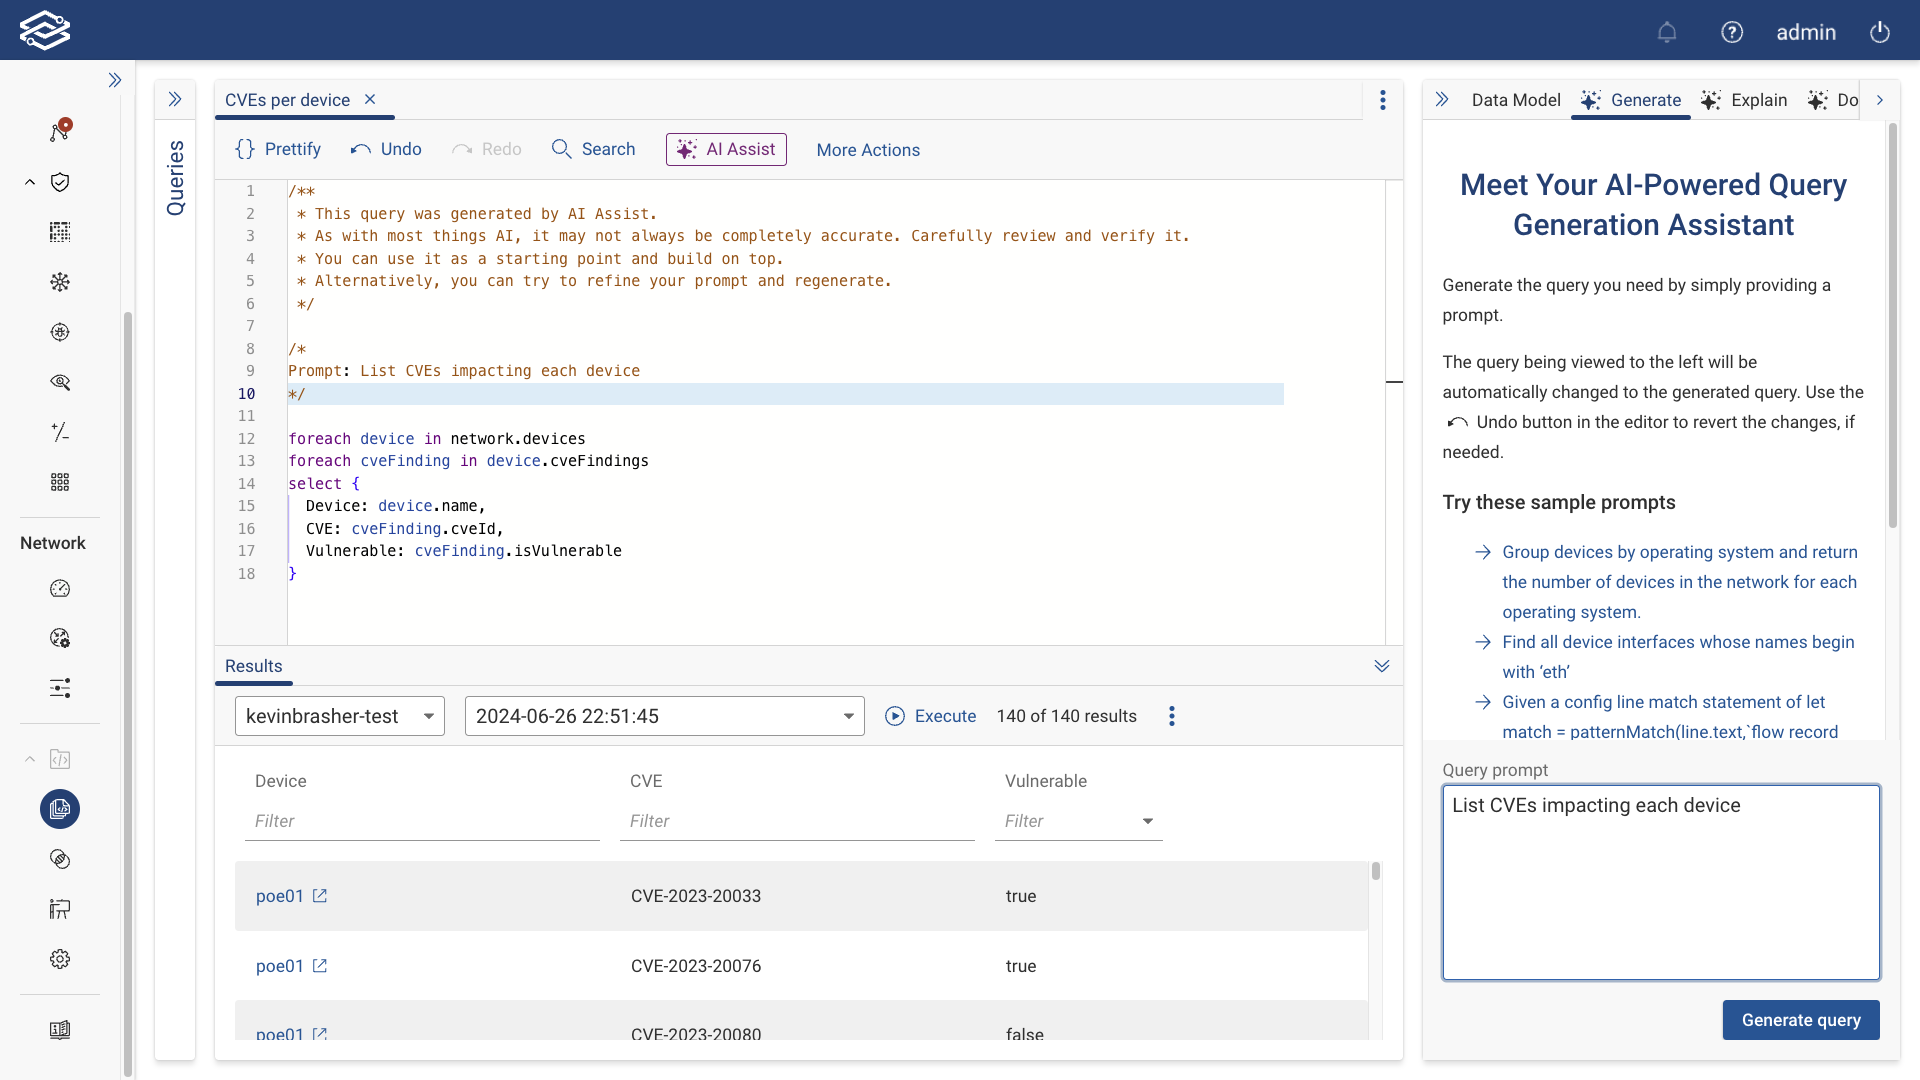
Example prompts:
- "List all IPv6-enabled interfaces on Cisco routers."
- "Find all devices running Cisco IOS and list their OS version."
- "List how many critical severity CVEs impact each device in the network."
- "Show devices with SSH access enabled."
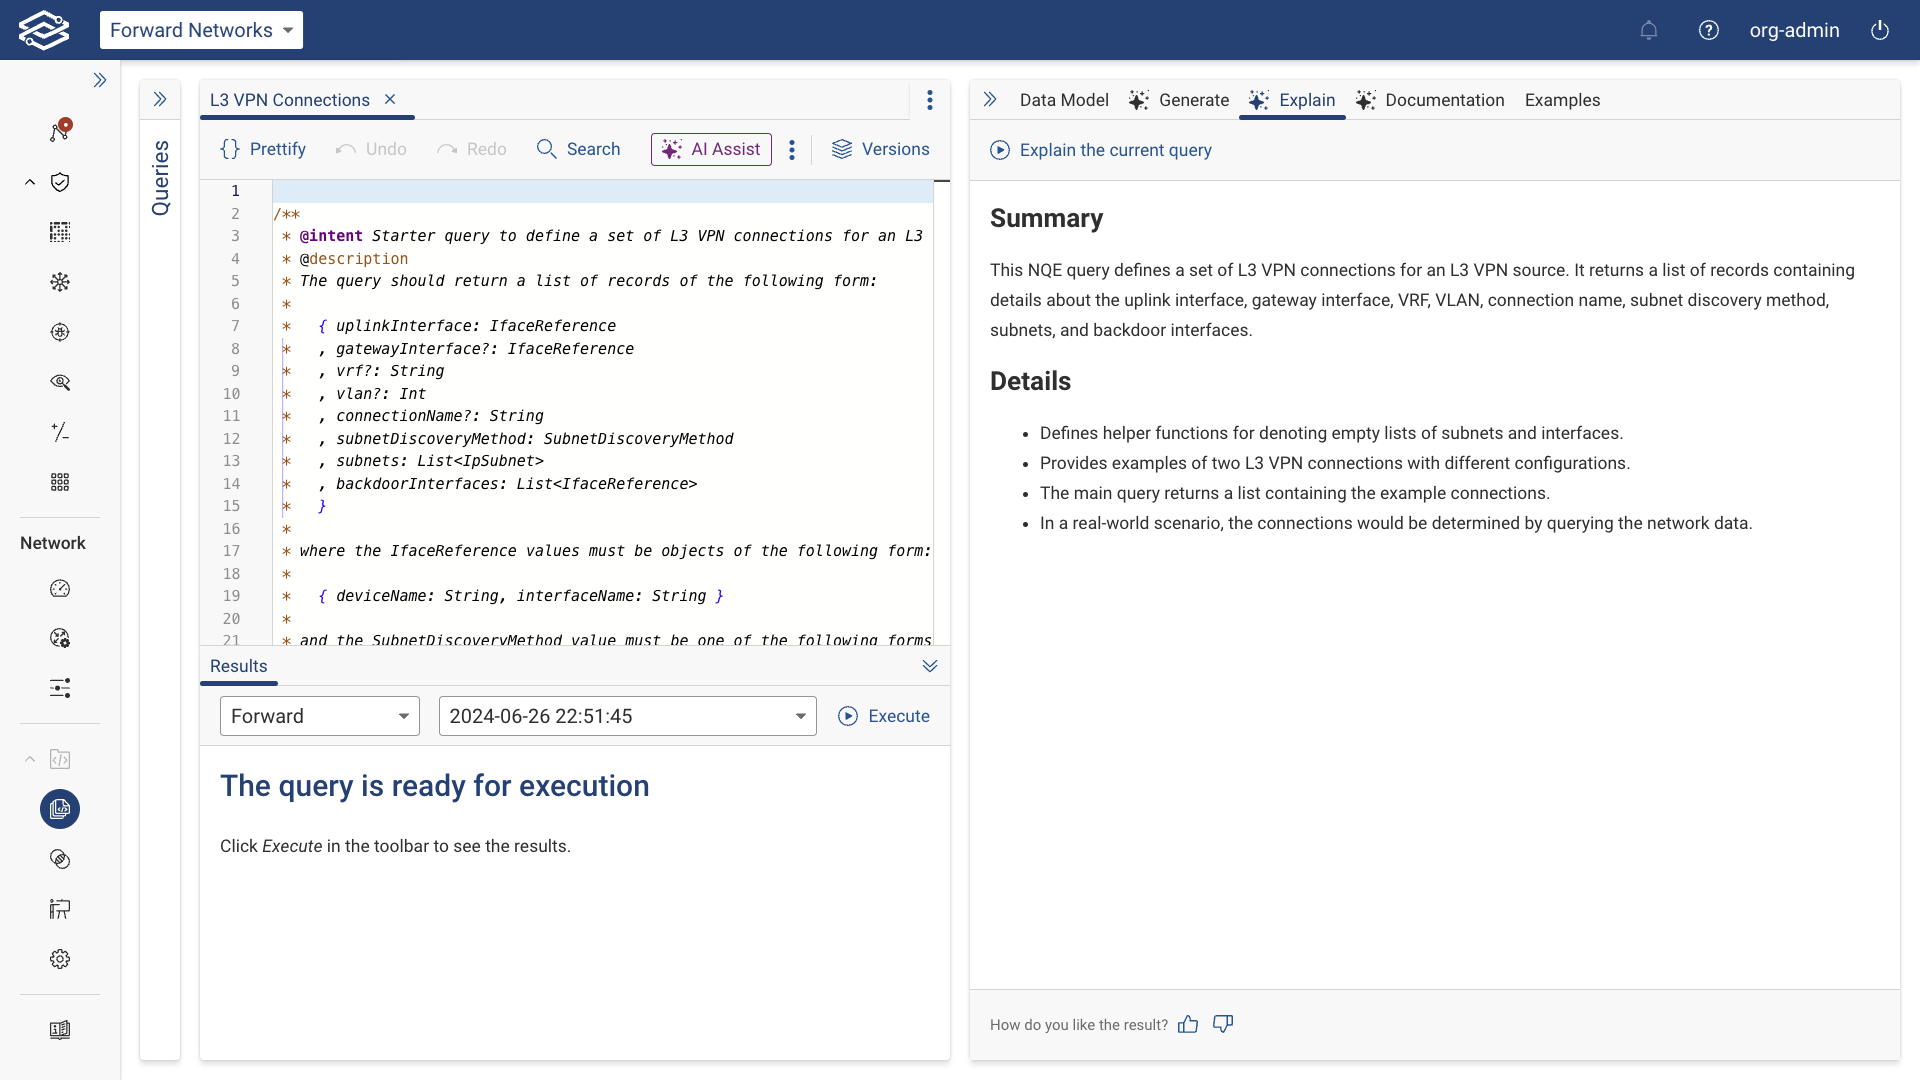
NQE Query Explainer AI Assist
NQE Query Explainer AI Assist provides detailed, AI-generated explanations of existing NQE queries, making it easier to understand complex queries by breaking them down into simple summaries. This helps users who may not be familiar with the underlying logic of a query to understand how it works and what data it pulls.
Getting started with NQE Query Explainer AI Assist:
- Navigate to the NQE Library, and open an existing query.
- In the Explain tab, click Explain the current query to generate an explanation of the query, including a summary and additional details on how it operates within the NQE framework.
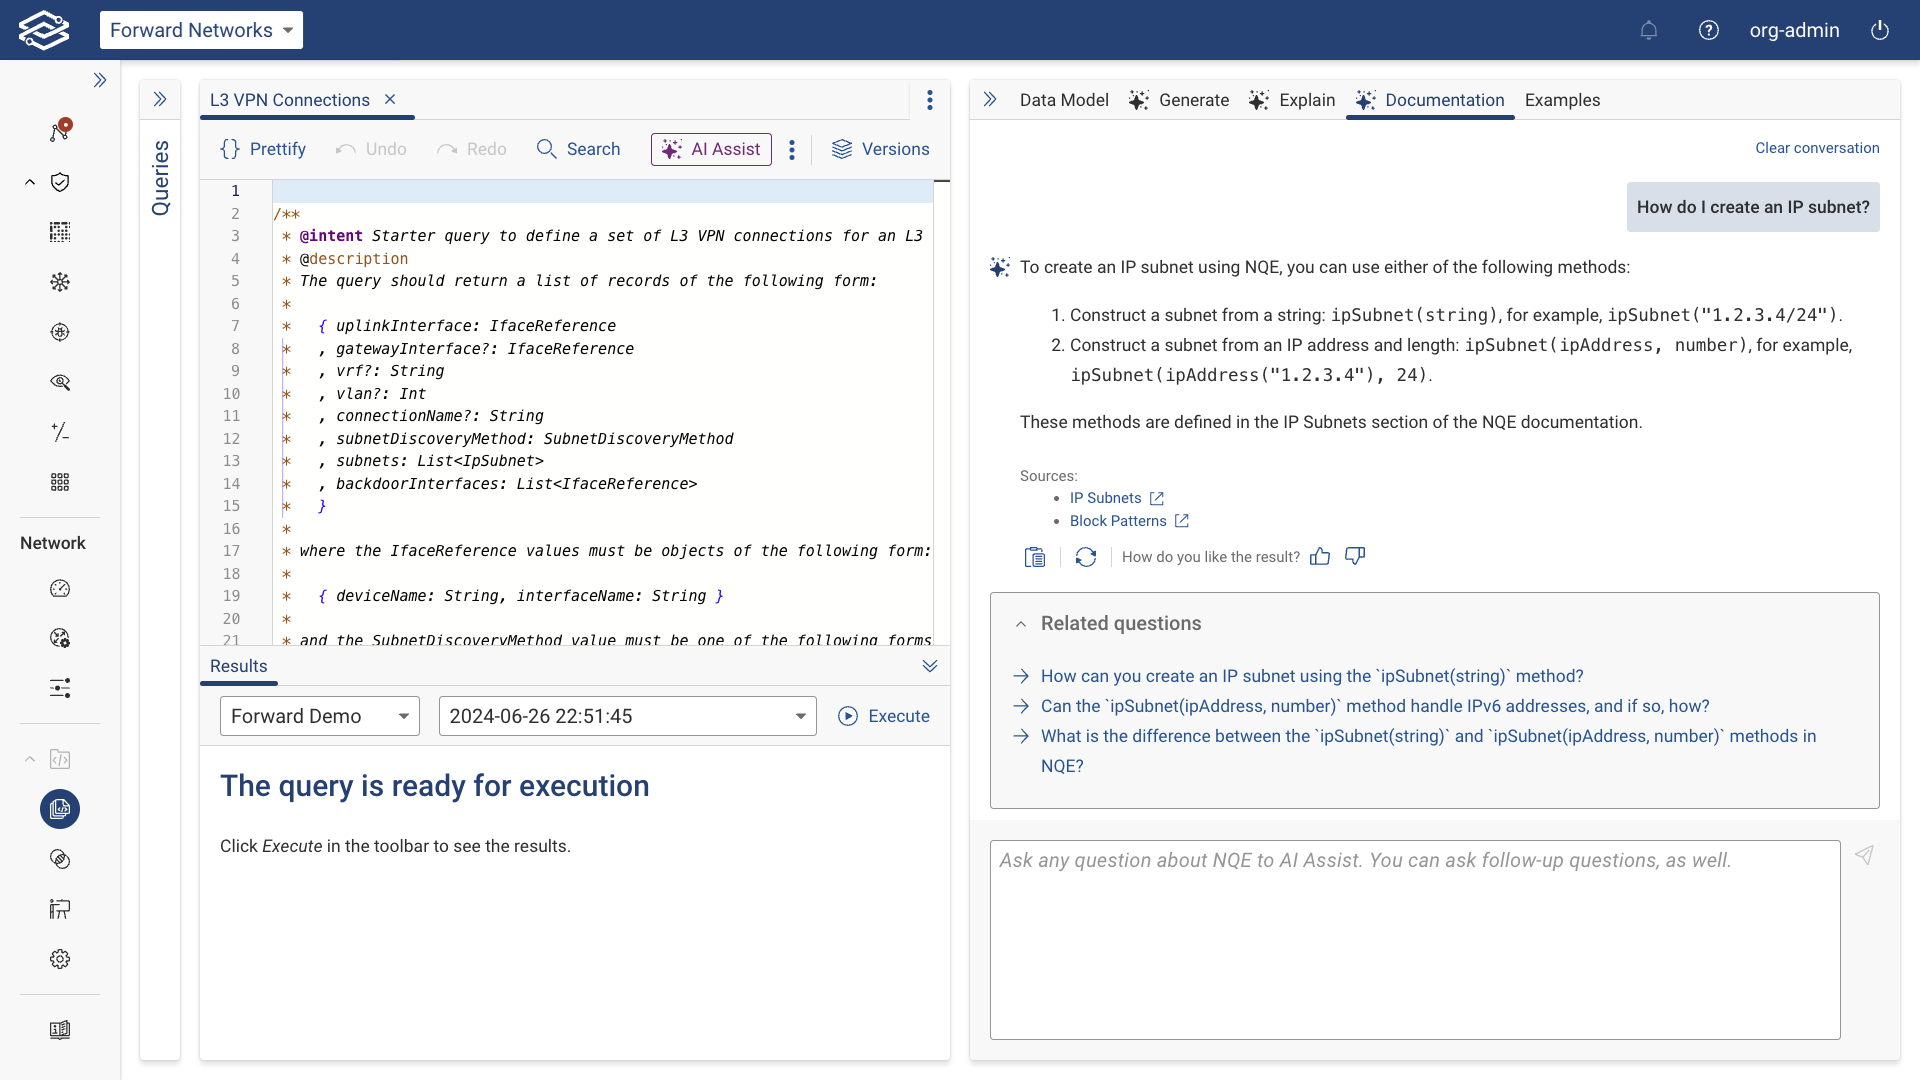
NQE Docs AI Assist
NQE Docs AI Assist helps users quickly find relevant documentation related to NQE queries or features by searching through Forward’s documentation. It provides information based on relevant sections of the documentation and a list of sources with links to relevant documentation.
Getting started with NQE Docs AI Assist:
- Navigate to the NQE Library.
- In the Documentation tab, ask a question related to the information you're looking for.
- NQE Docs AI Assist will return relevant sections of the official Forward Networks documentation, with links to its sources. Additional followup questions can be asked to better refine searches.
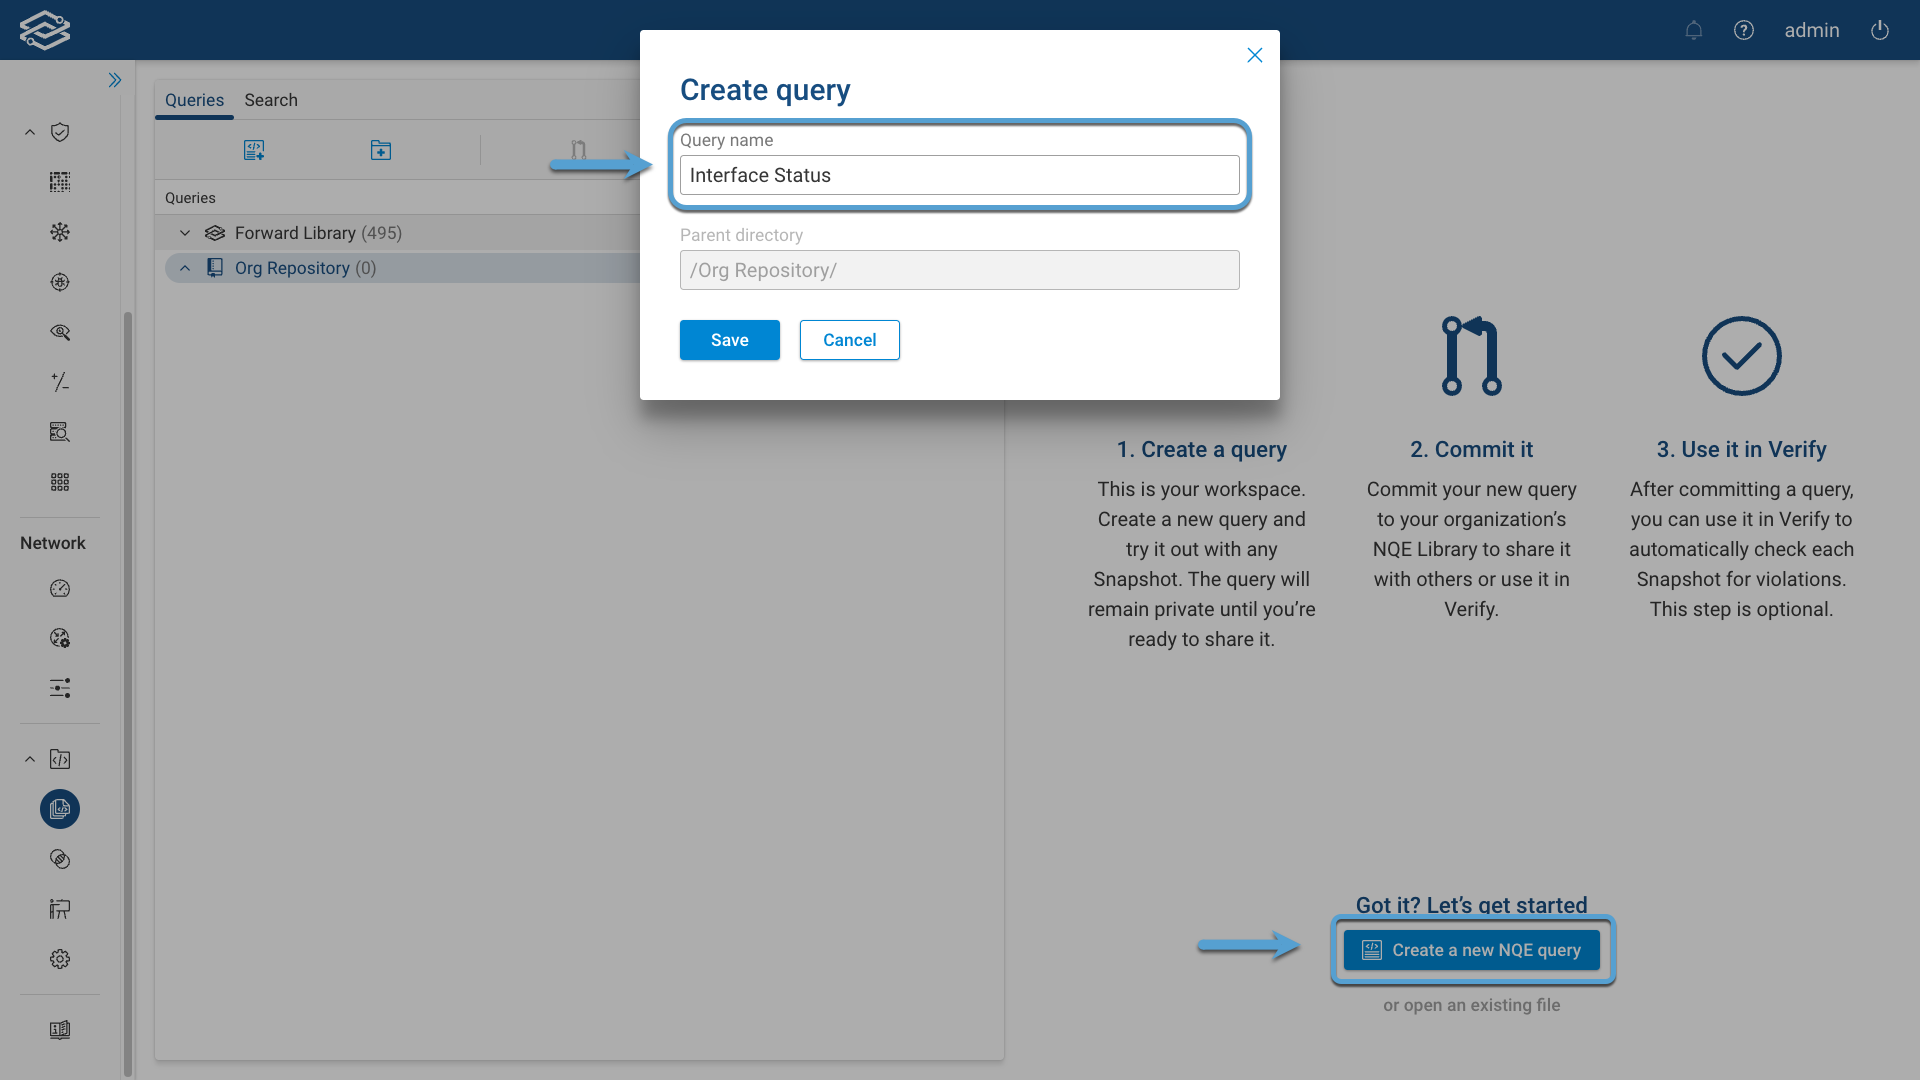
Creating a Query
For first-time use, click on Create a new NQE query to start the process. This also works when all query tabs have been closed in the Query Editor.
Additionally, you can create a query by selecting the New Query icon located at the top of the Files Pane or by selecting Create Query within the Additional Options Menu icon of a folder will start the same process.
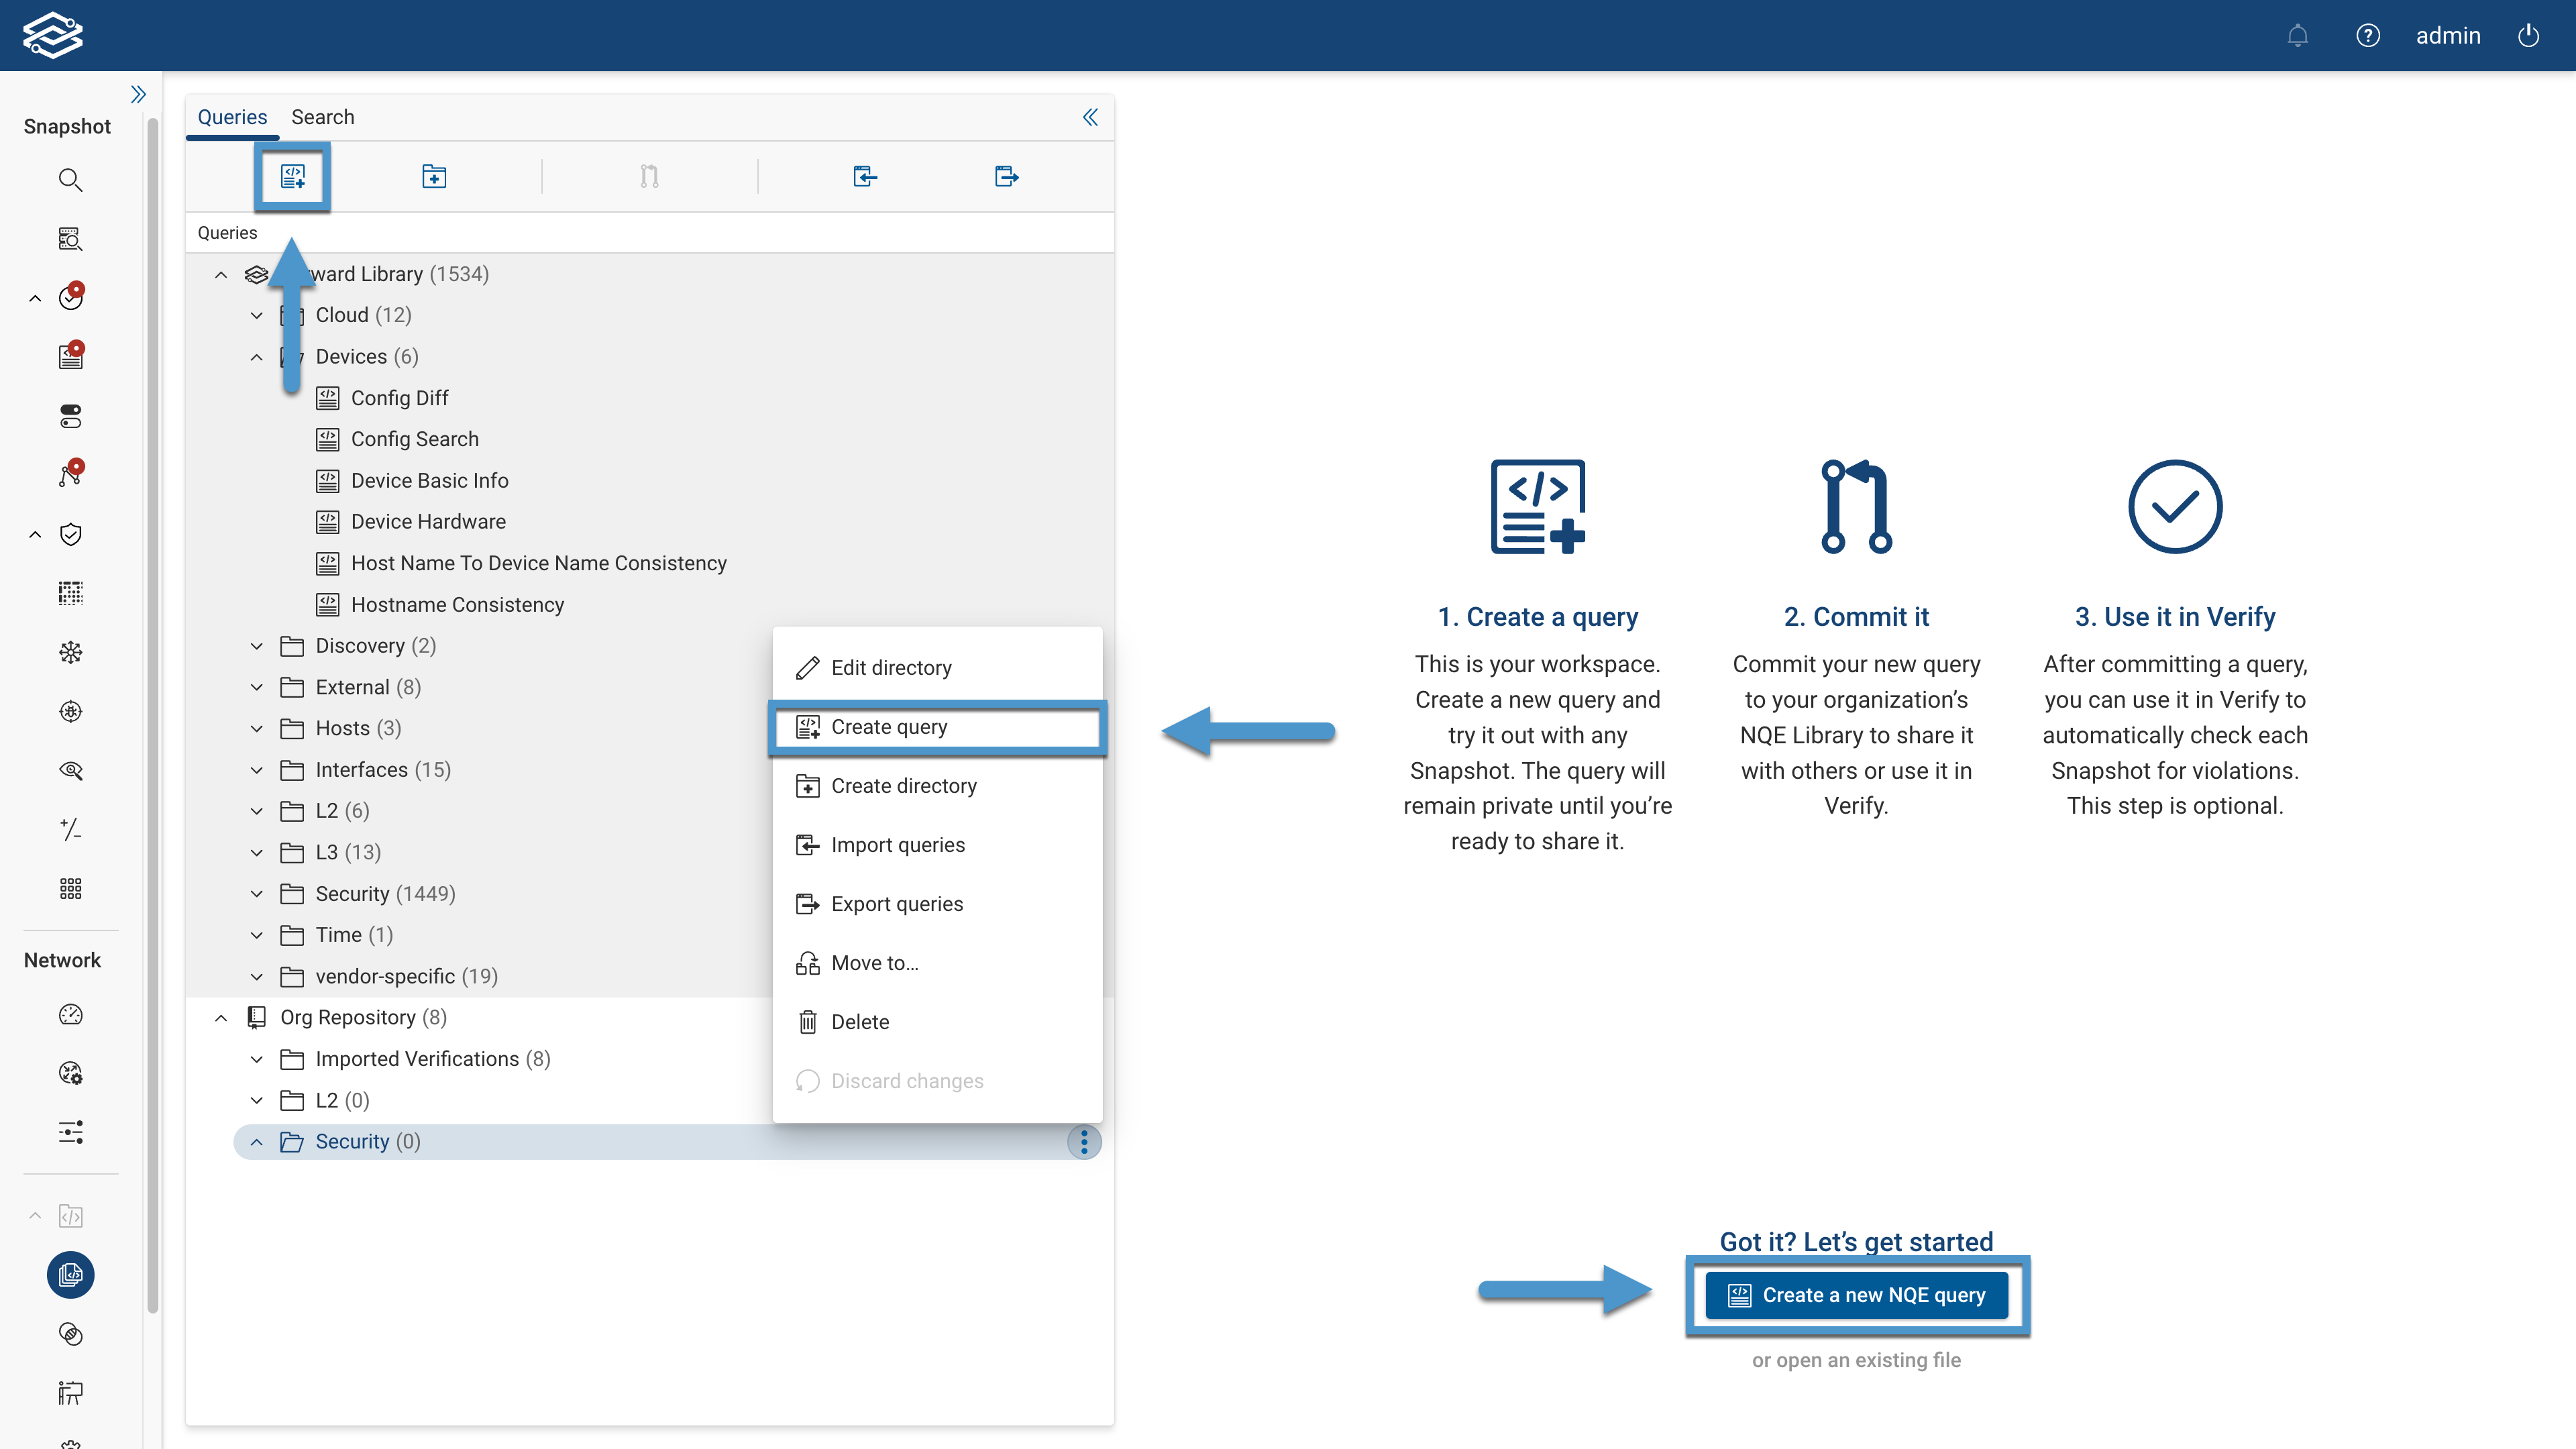
Provide a Query name and select Save.
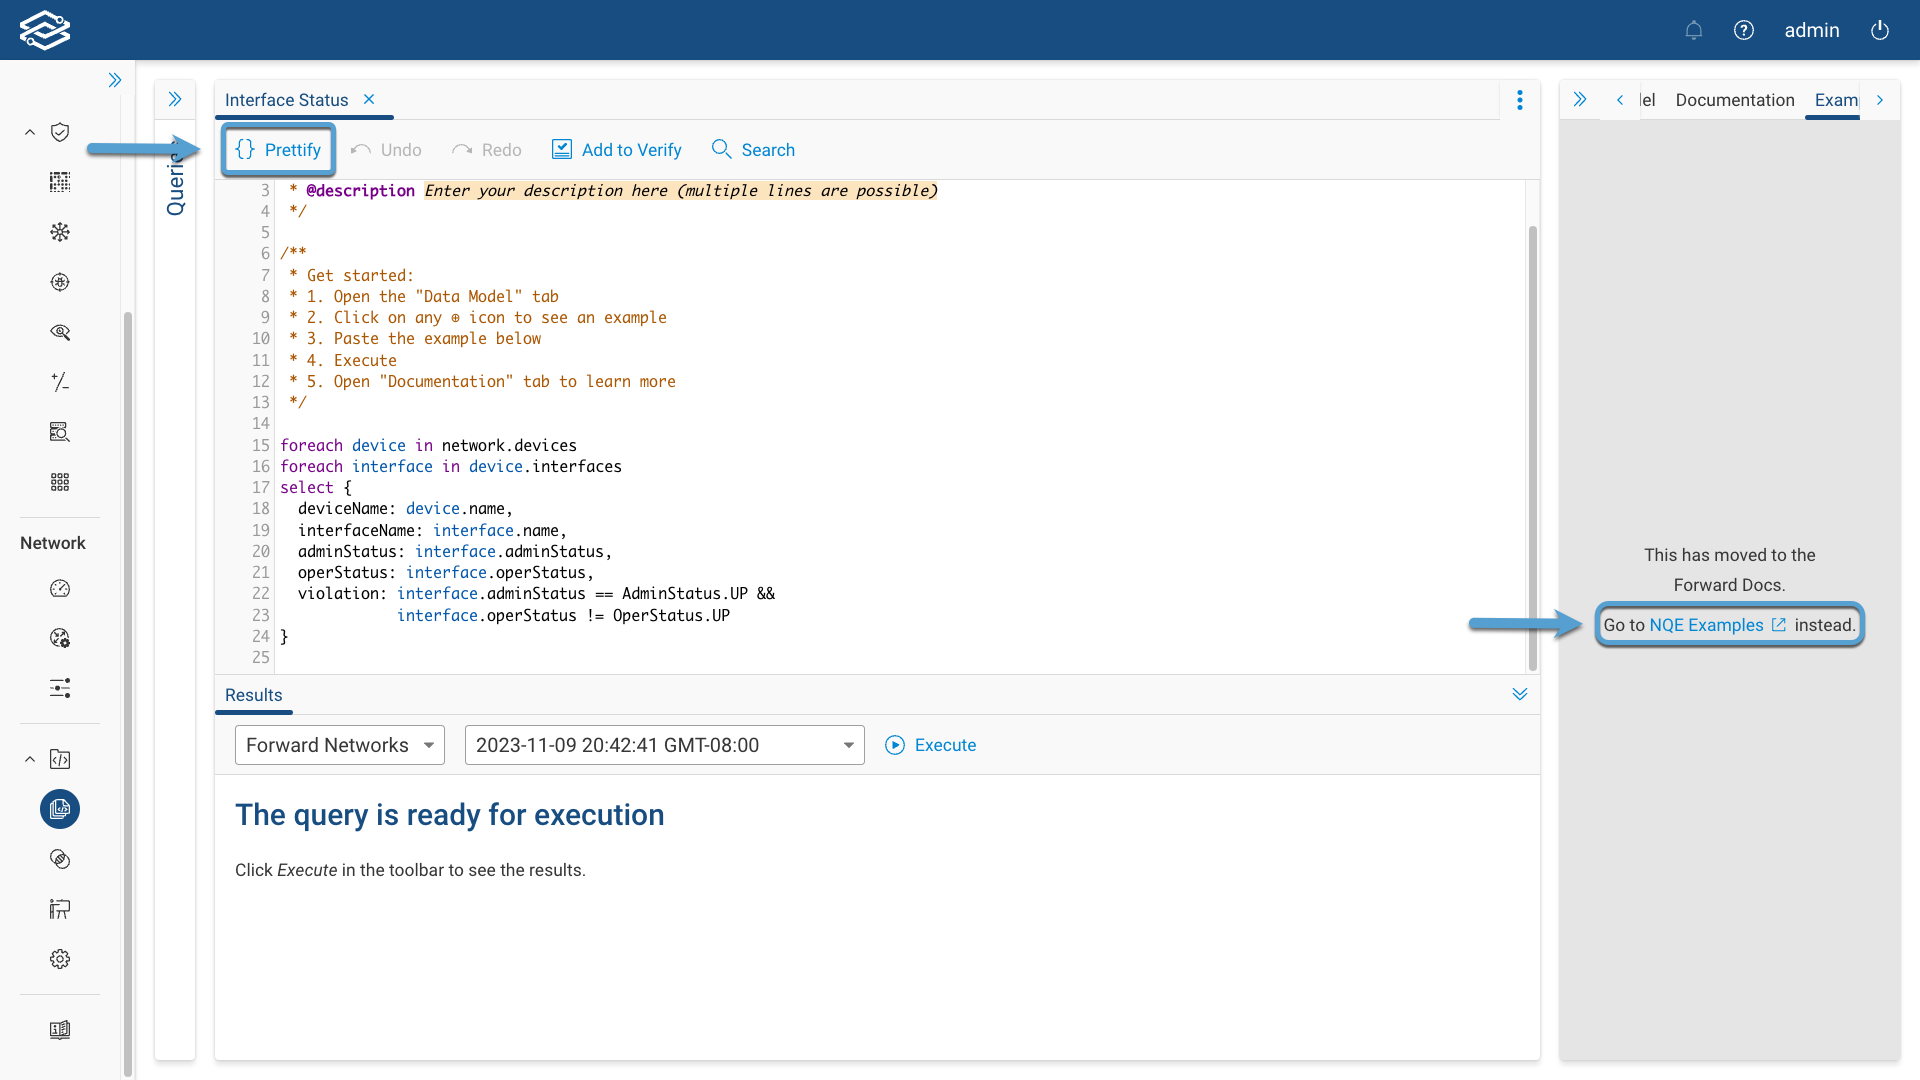
Editing a Query
You can now edit your first NQE query in the Query Editor.
You can either write the query from scratch or leverage the NQE Query Generator AI.
Optionally, selecting Prettify will properly align all the lines in the query to make it more readable.
The NQE Editor supports many useful features like auto-completion, auto-save, query history, and automatic error fix suggestions based on the Data Model.
For more information, check the Documentation tab in the Help pane.
Testing a Query
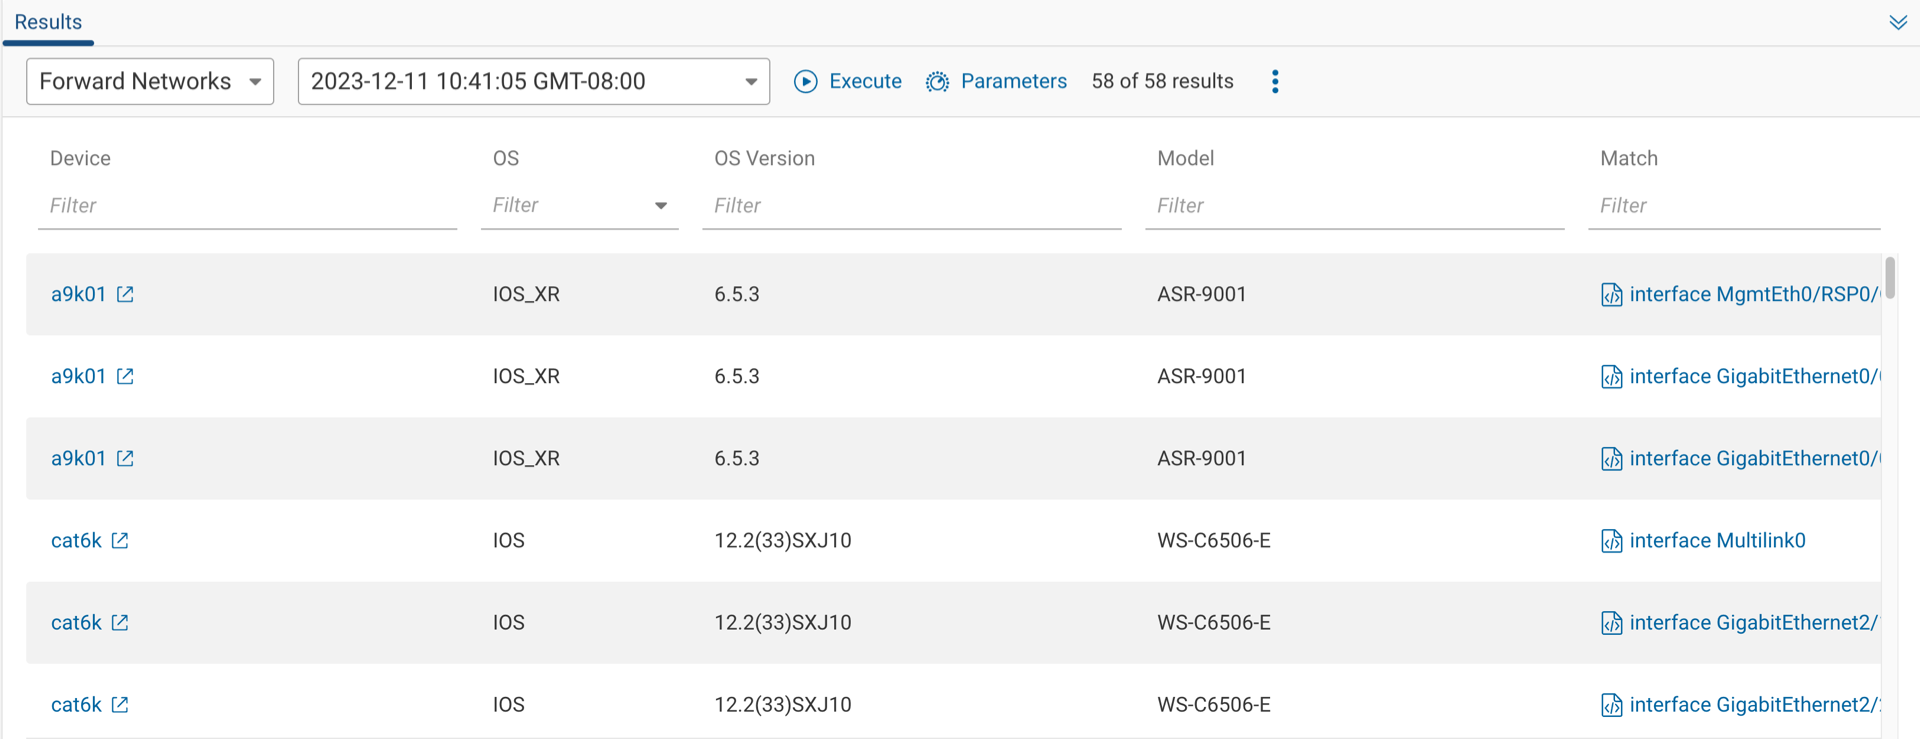
Within the Results pane, select the network and snapshot from the dropdowns and run the query by clicking on Execute. The Results Pane will then display the outcome, allowing you to assess the accuracy and effectiveness of your query.
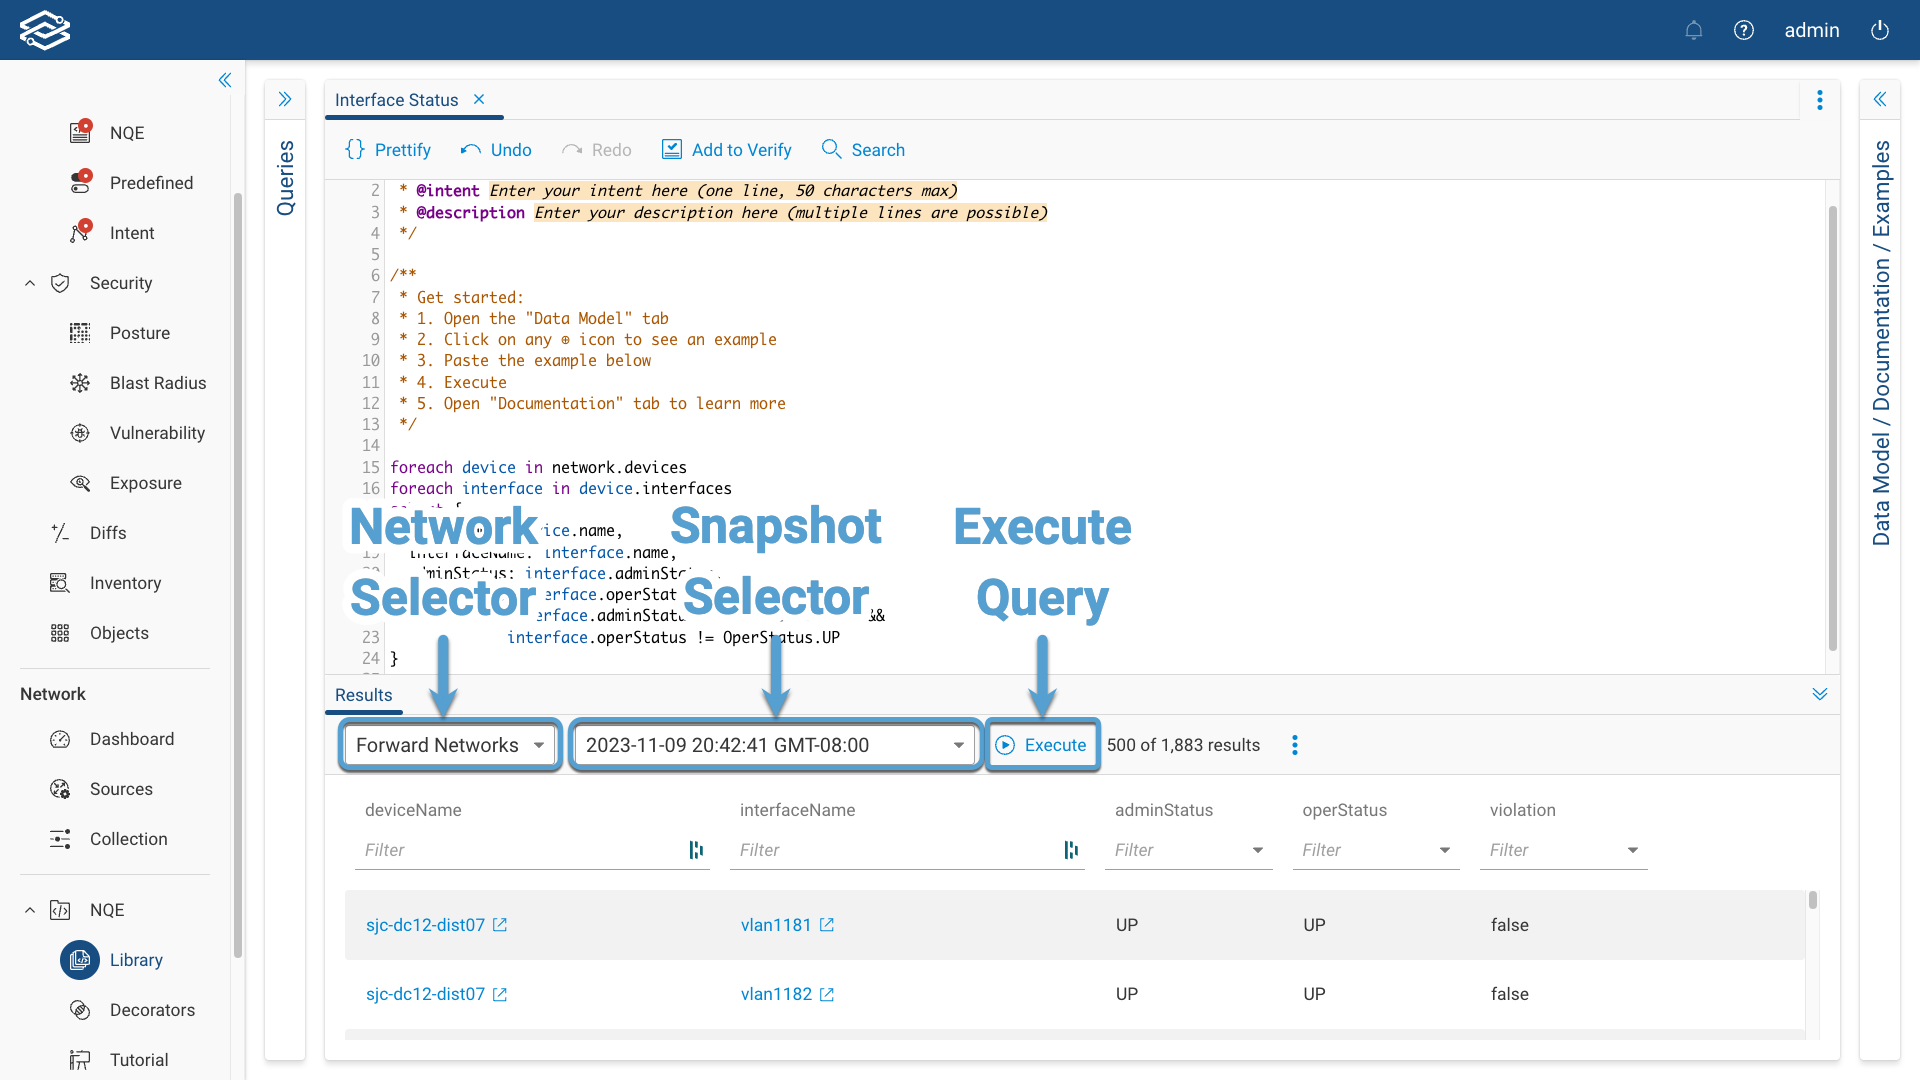
Filtering is available for each of the columns and will help narrow down the query results.
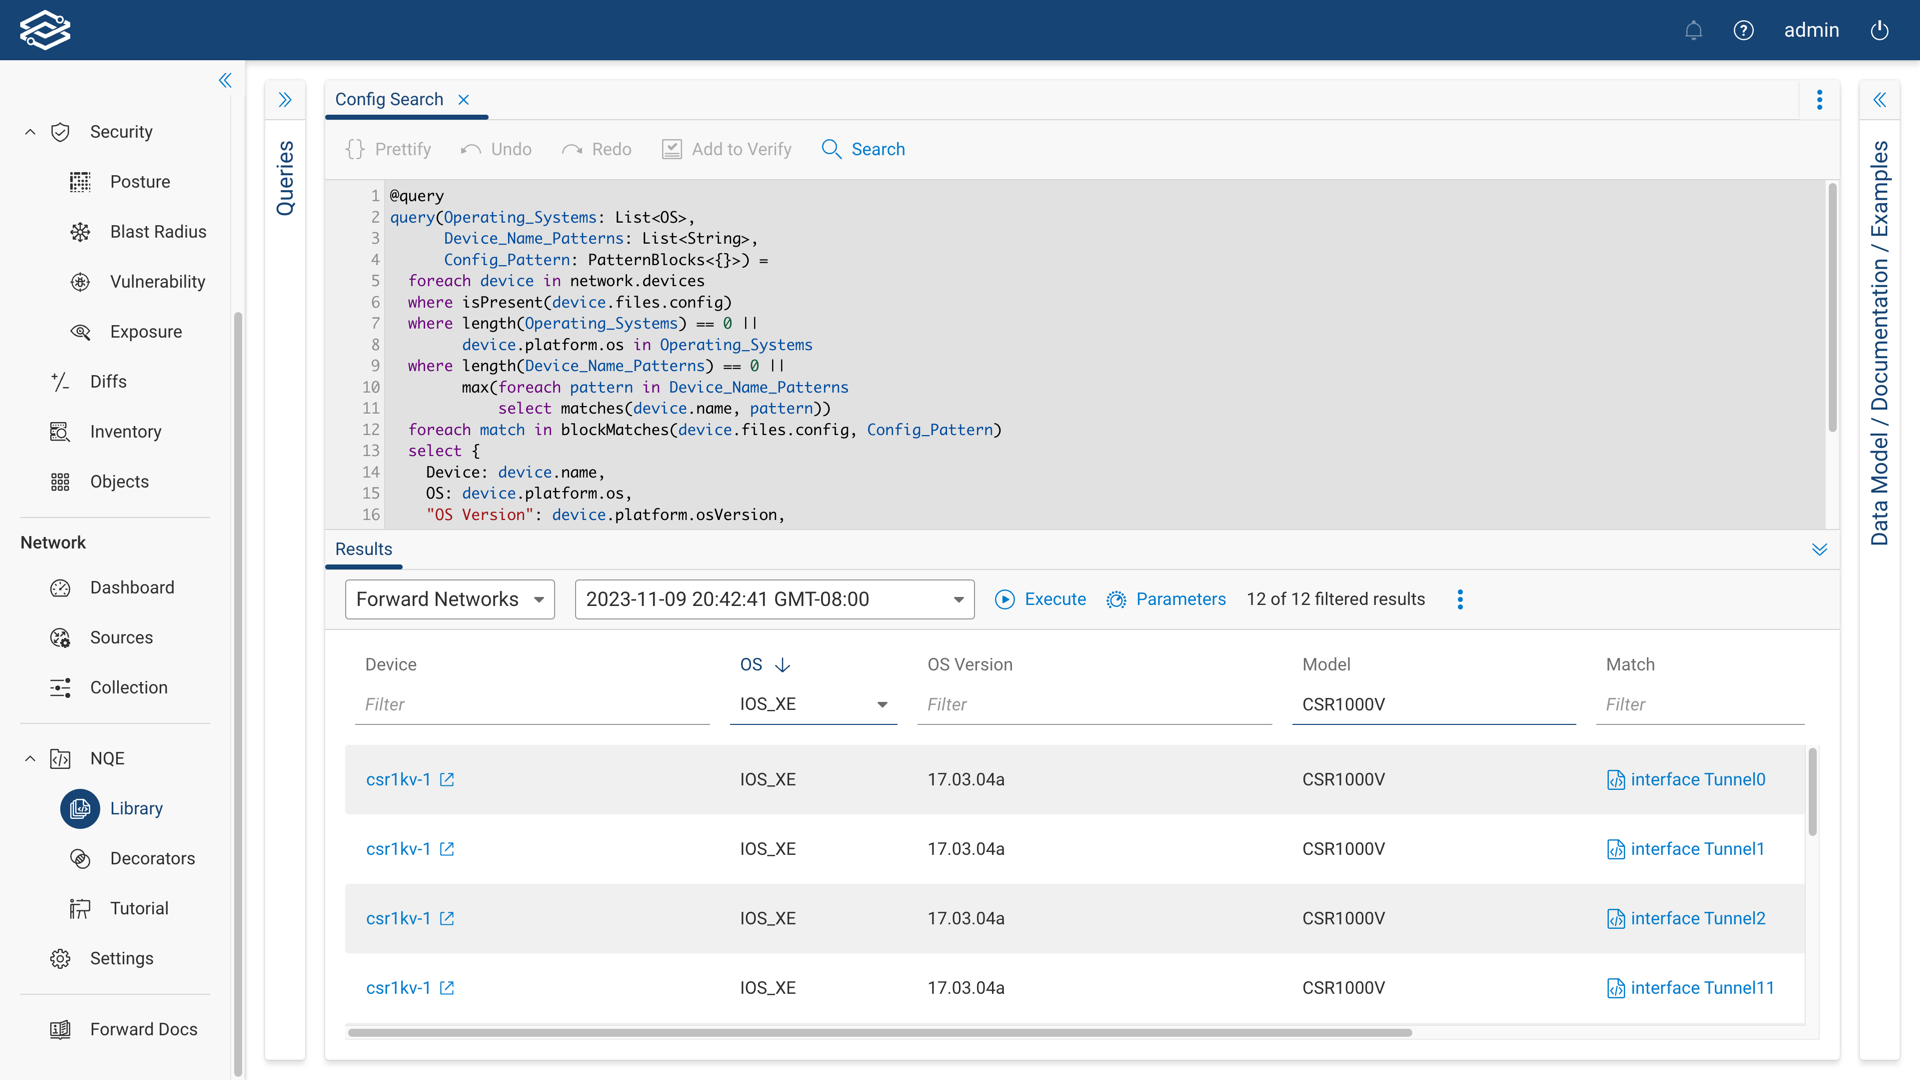
If additional parameter values are required, click the Parameters icon, and enter the values for each field.
For more information, visit the Parameterized Queries section below.
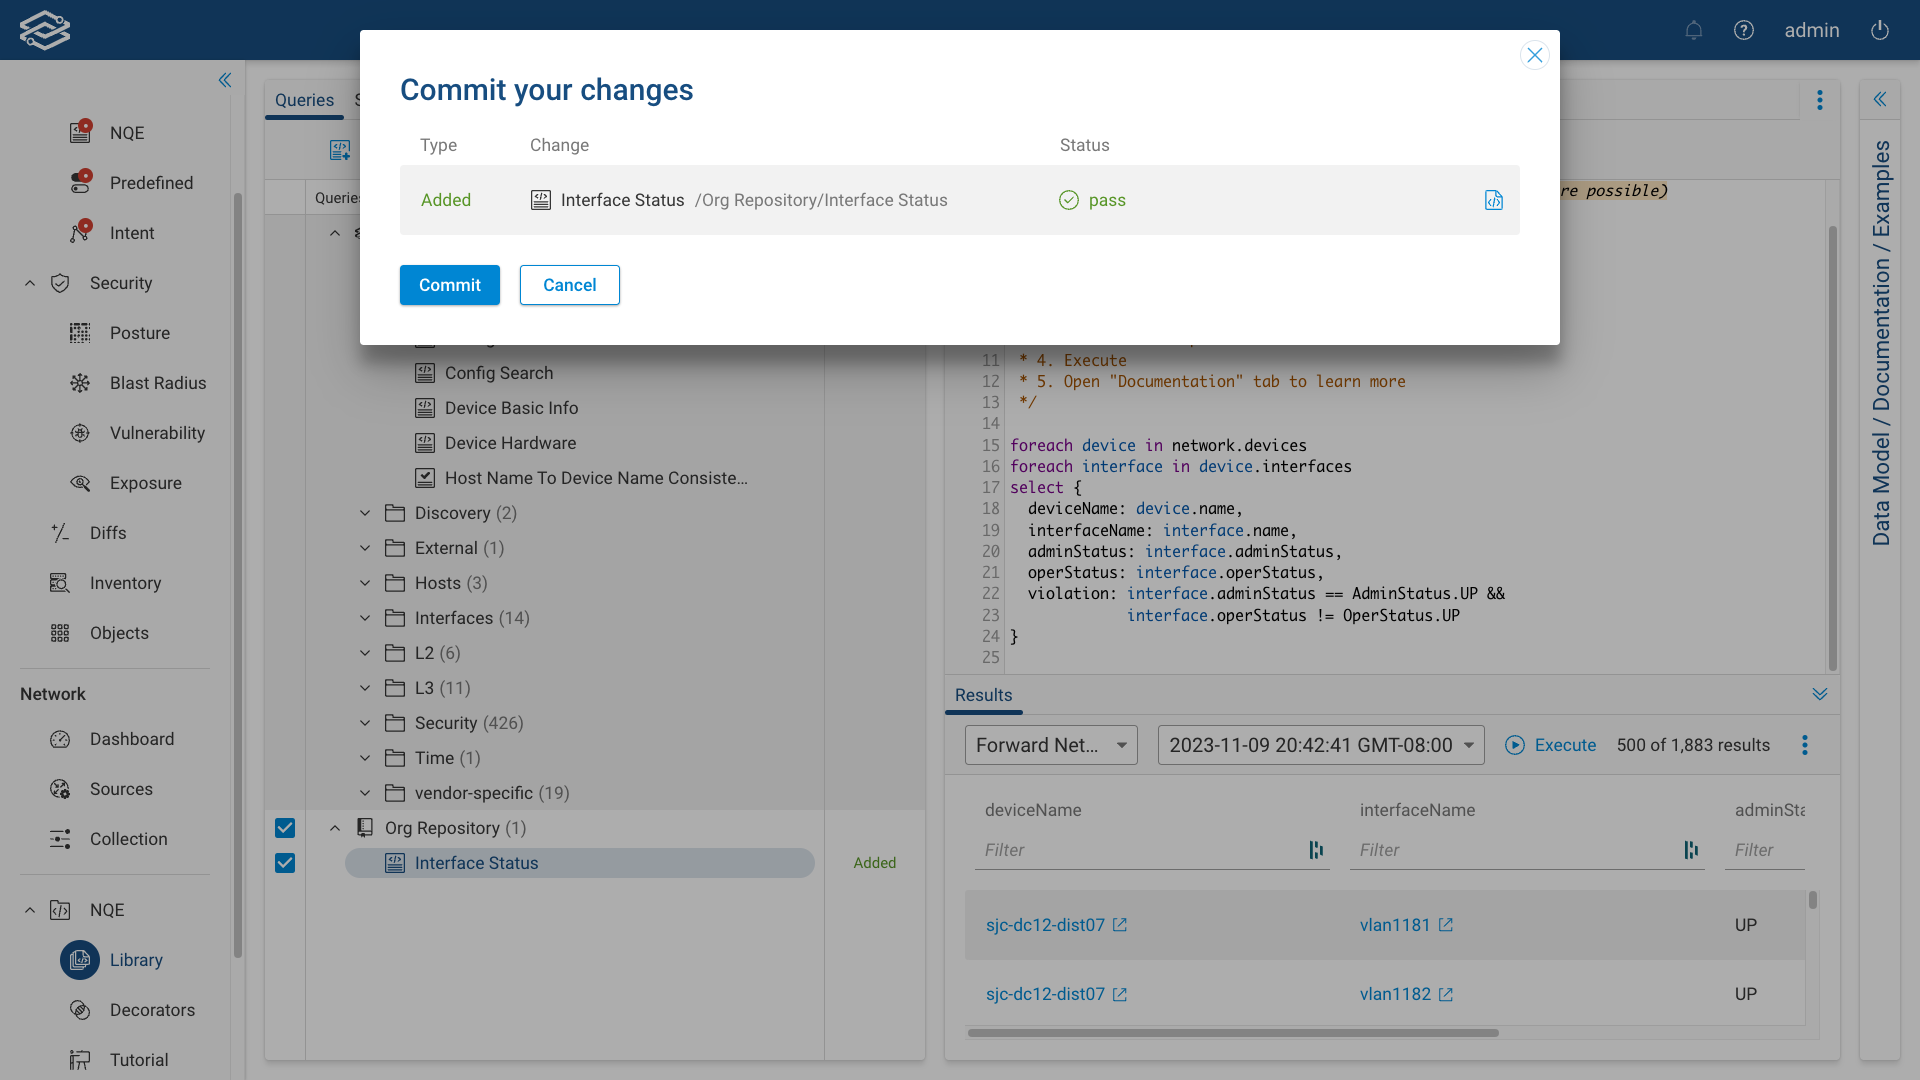
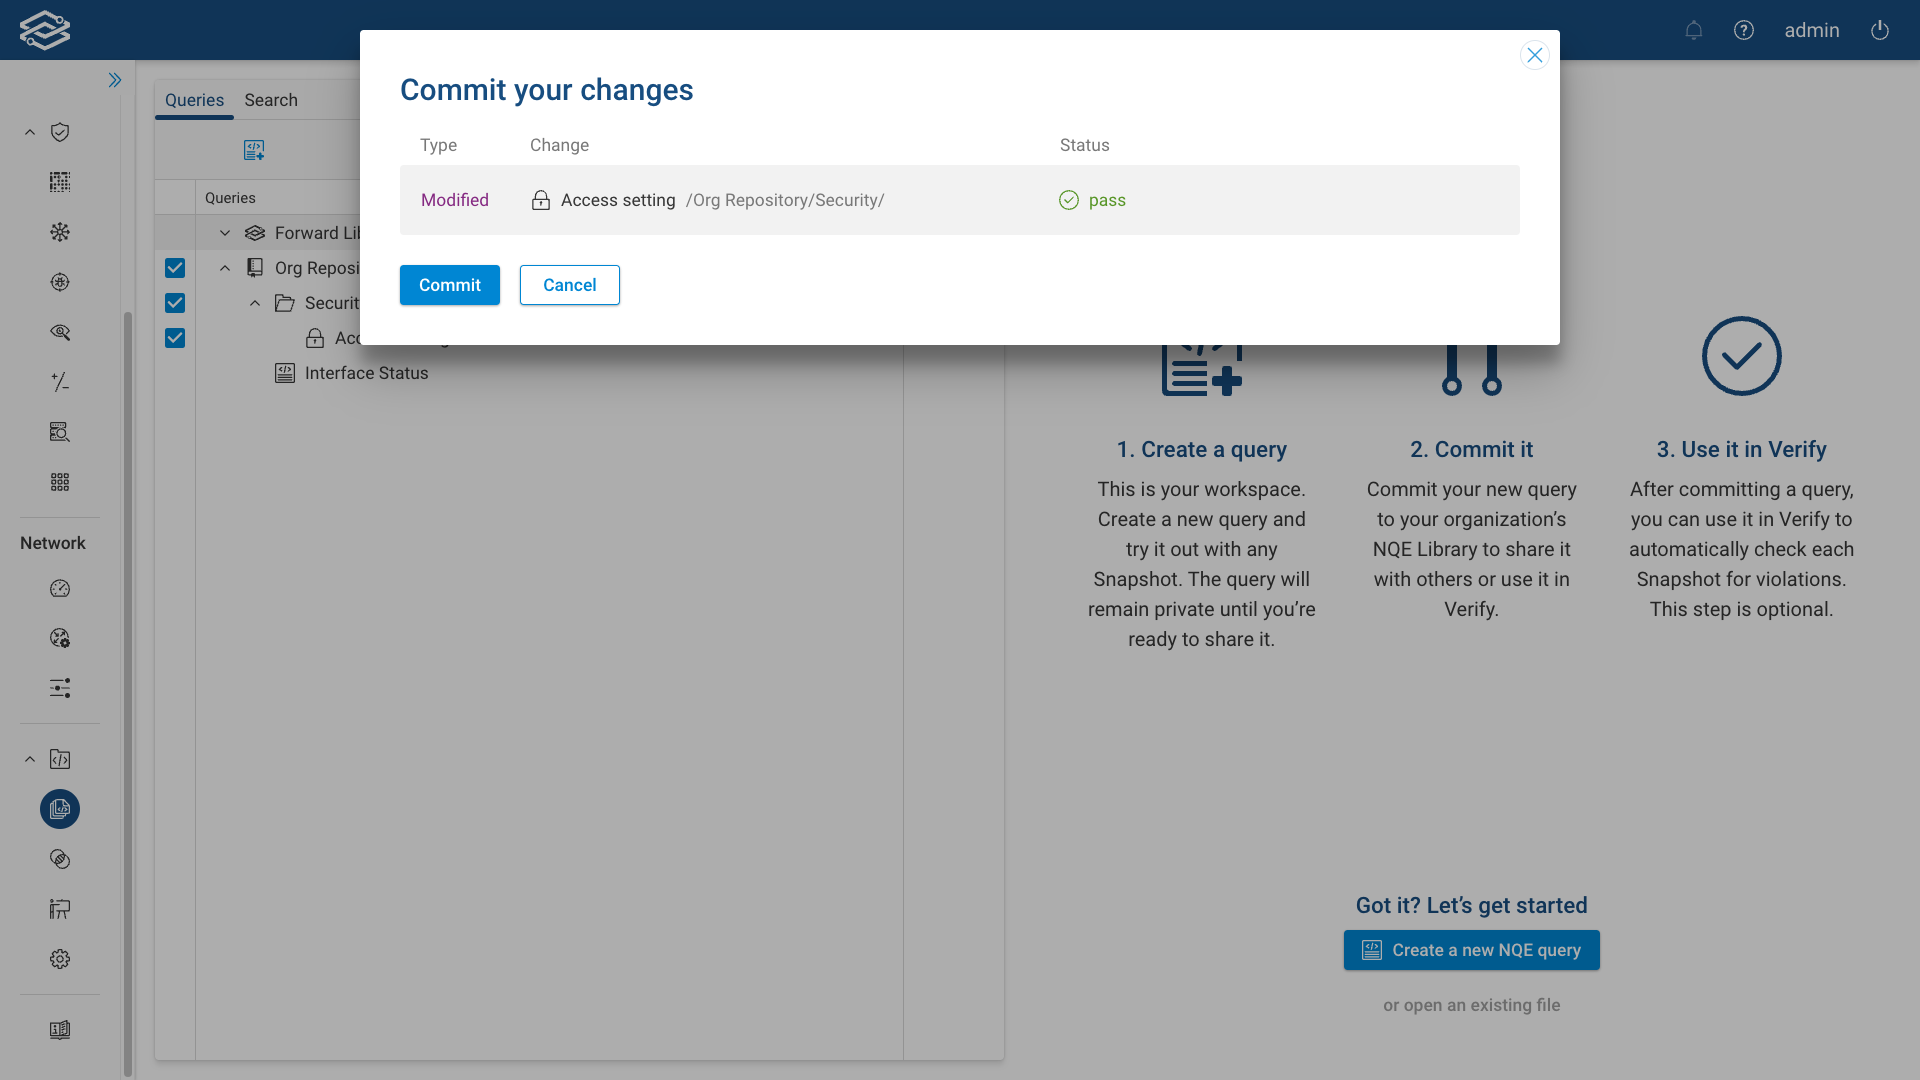
Committing Queries
All the changes made to a query are automatically saved but are only visible within your environment of the NQE Library. You can commit an NQE query so that it can be available by everybody in your organization as well as being used as an NQE Verification.
To commit one or more queries at once, select the queries in the Files pane and click the Commit icon located at the top of the section.
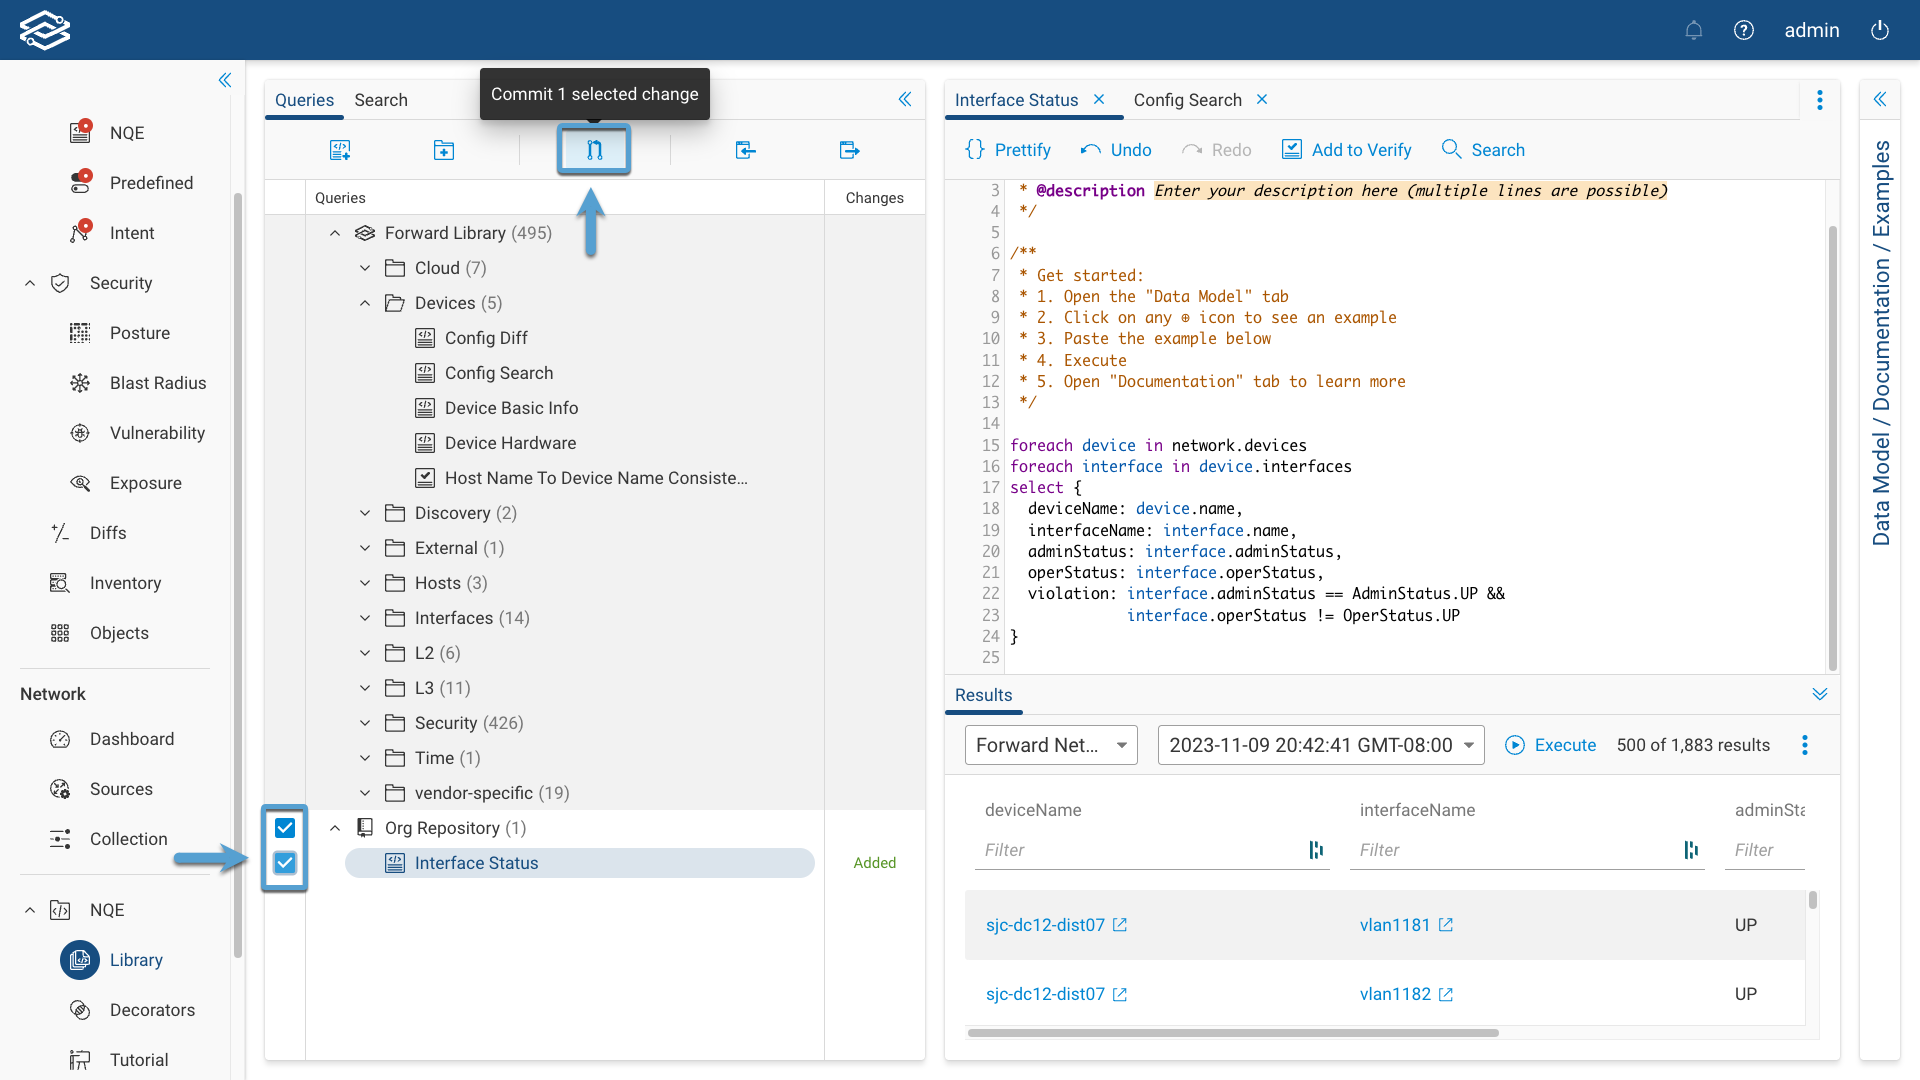
The confirmation window will display and list a summary of the NQE queries to be committed. Select Commit to complete the process and commit the queries.
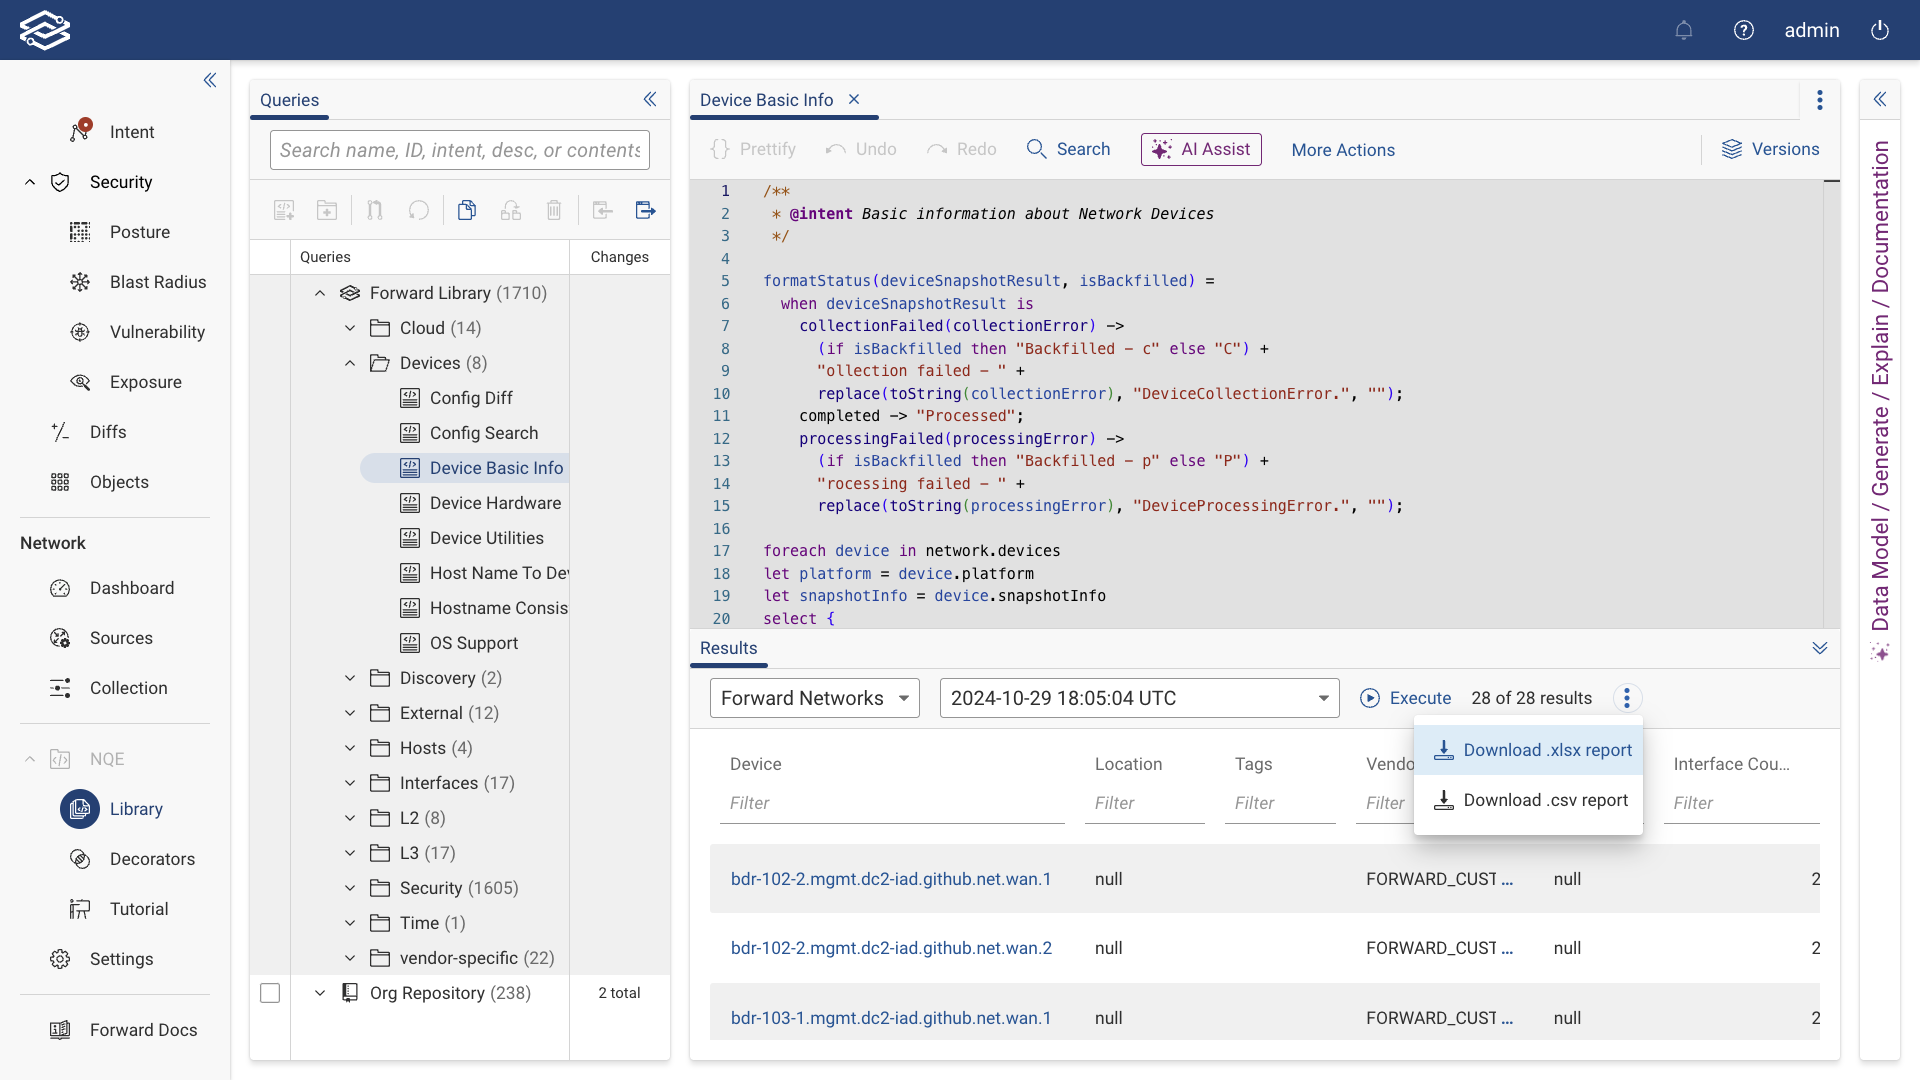
Downloading a Report
The NQE Library allows users to export query results in various formats for analysis or compliance purposes. Available export formats include CSV, XLSX, and CKLB.
Downloading a CSV and XLSX Report
- Open the NQE Library and execute your desired query.
- In the results pane, click the kebab icon (three vertical dots) at the top-right corner.
- Select one of the following options from the dropdown:
- Download .csv report
- Download .xlsx report
- The selected report will download to your system.
CKLB Export
CKLB Export generates STIG compliance reports in a DoD-compliant CKLB format. This export option is available only for queries that include all the required columns found in any of the STIG Findings queries (e.g., STIG Findings - Cat I, STIG Findings - Cat II, or STIG Findings - Cat III). While additional columns can be added to the query, none of the required columns can be removed.
To download a STIG report:
- Open the NQE Library and locate any of the STIGs Findings queries.
- Run the query to generate results.
- In the results pane, click the kebab icon (three vertical dots) at the top-right corner.
- Select Download .ckl report (STIG) from the dropdown.
- The selected report will download to your system.
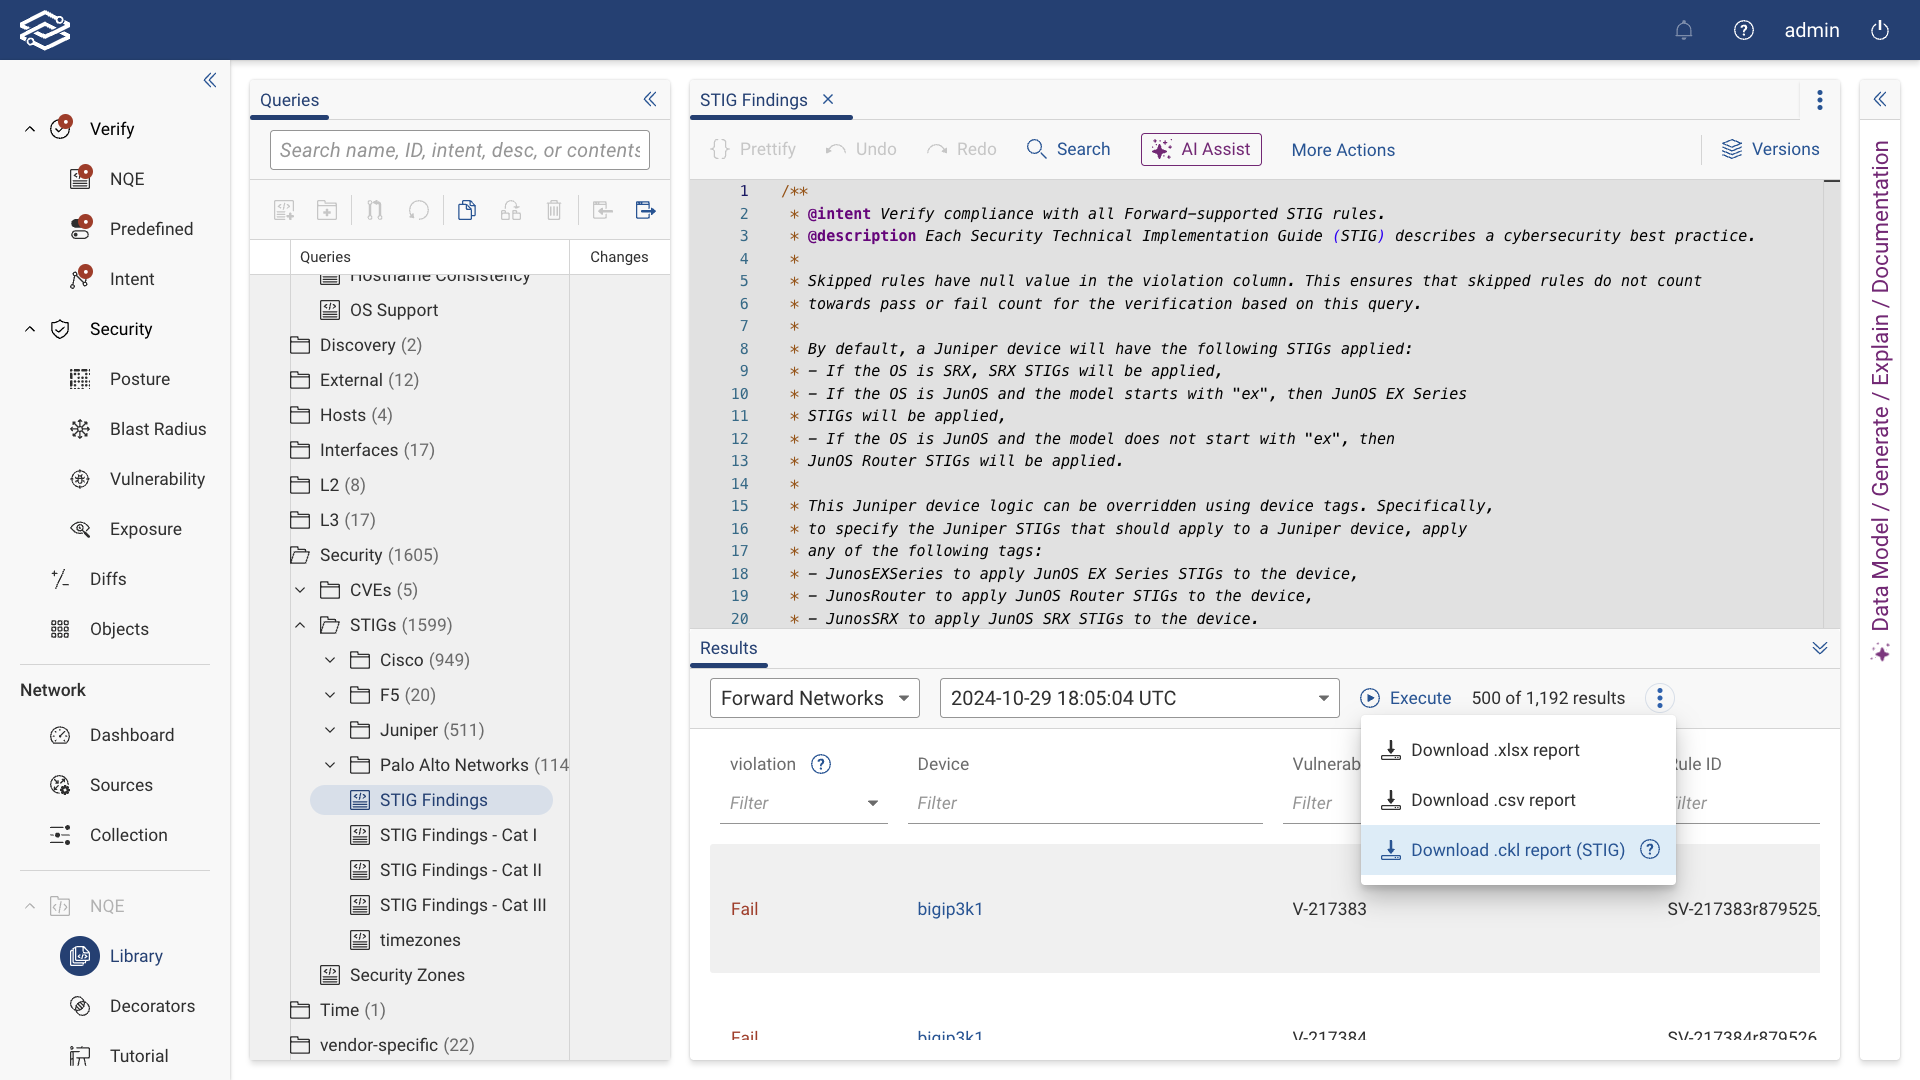
The CKLB export can then be used with DoD tools like STIG Viewer for further analysis.
NQE Query History
NQE queries are managed through a Git-like version control system within the NQE Library. This feature enables users to access their entire query history, compare different versions, and understand how their queries have evolved over time.
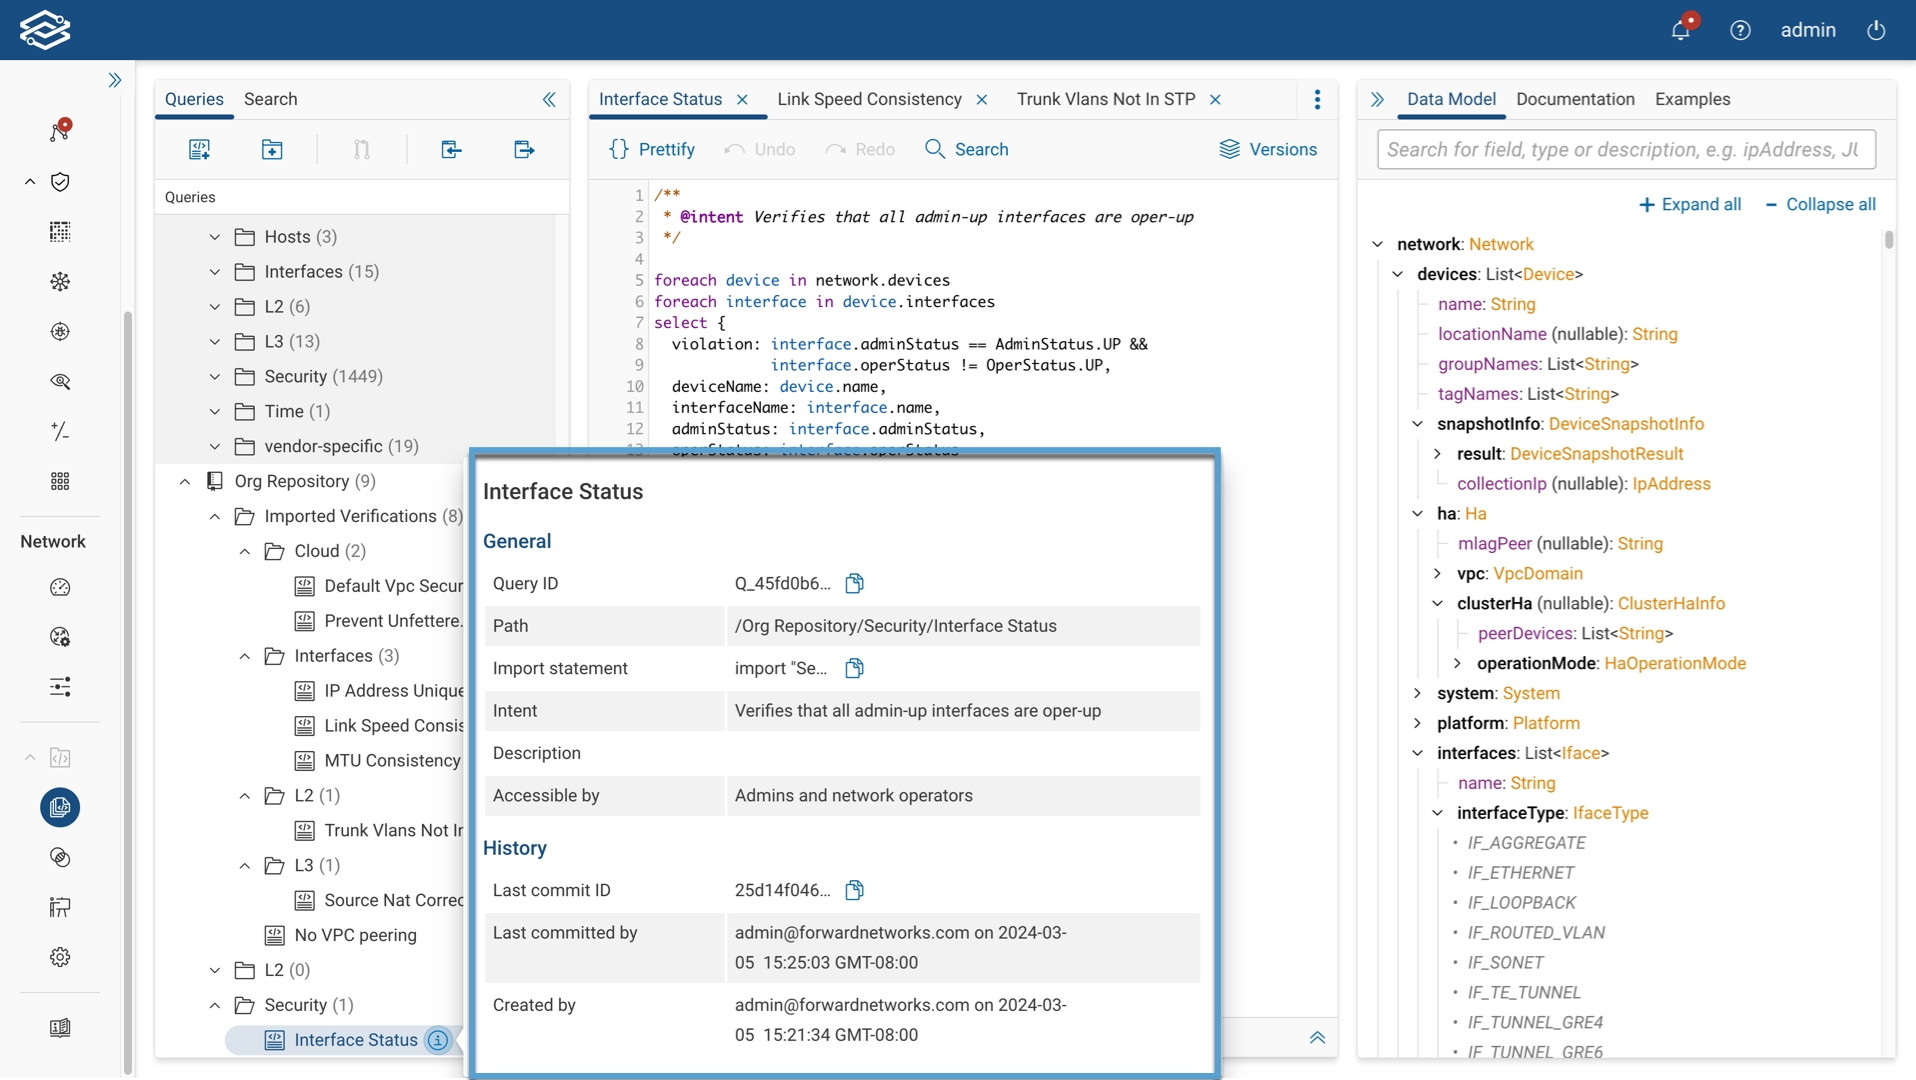
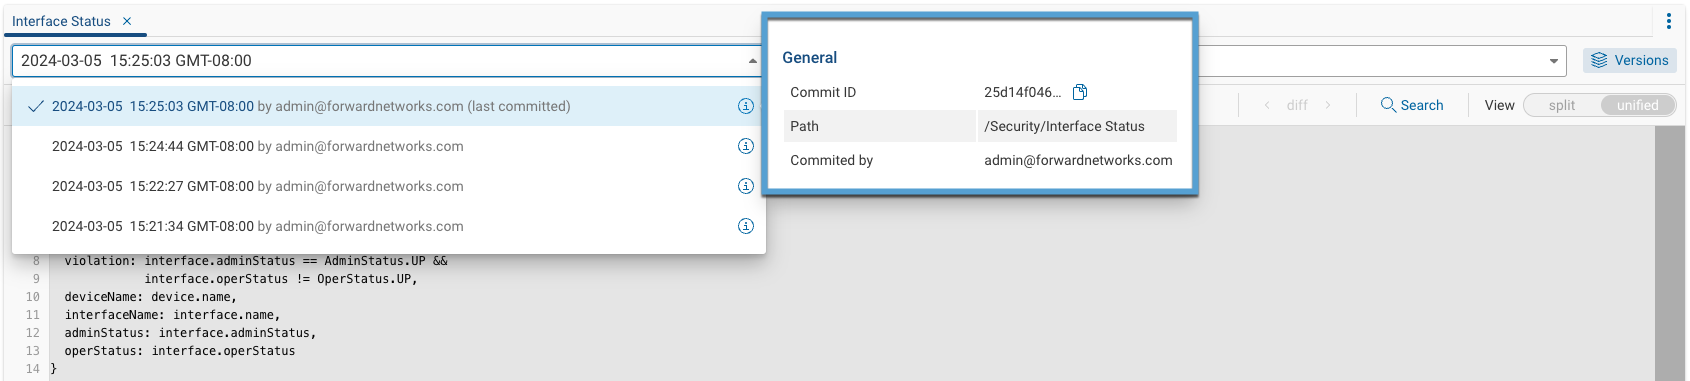
To view a query's history, select a previously committed query from the Directory and select the Versions icon from the NQE Editor.
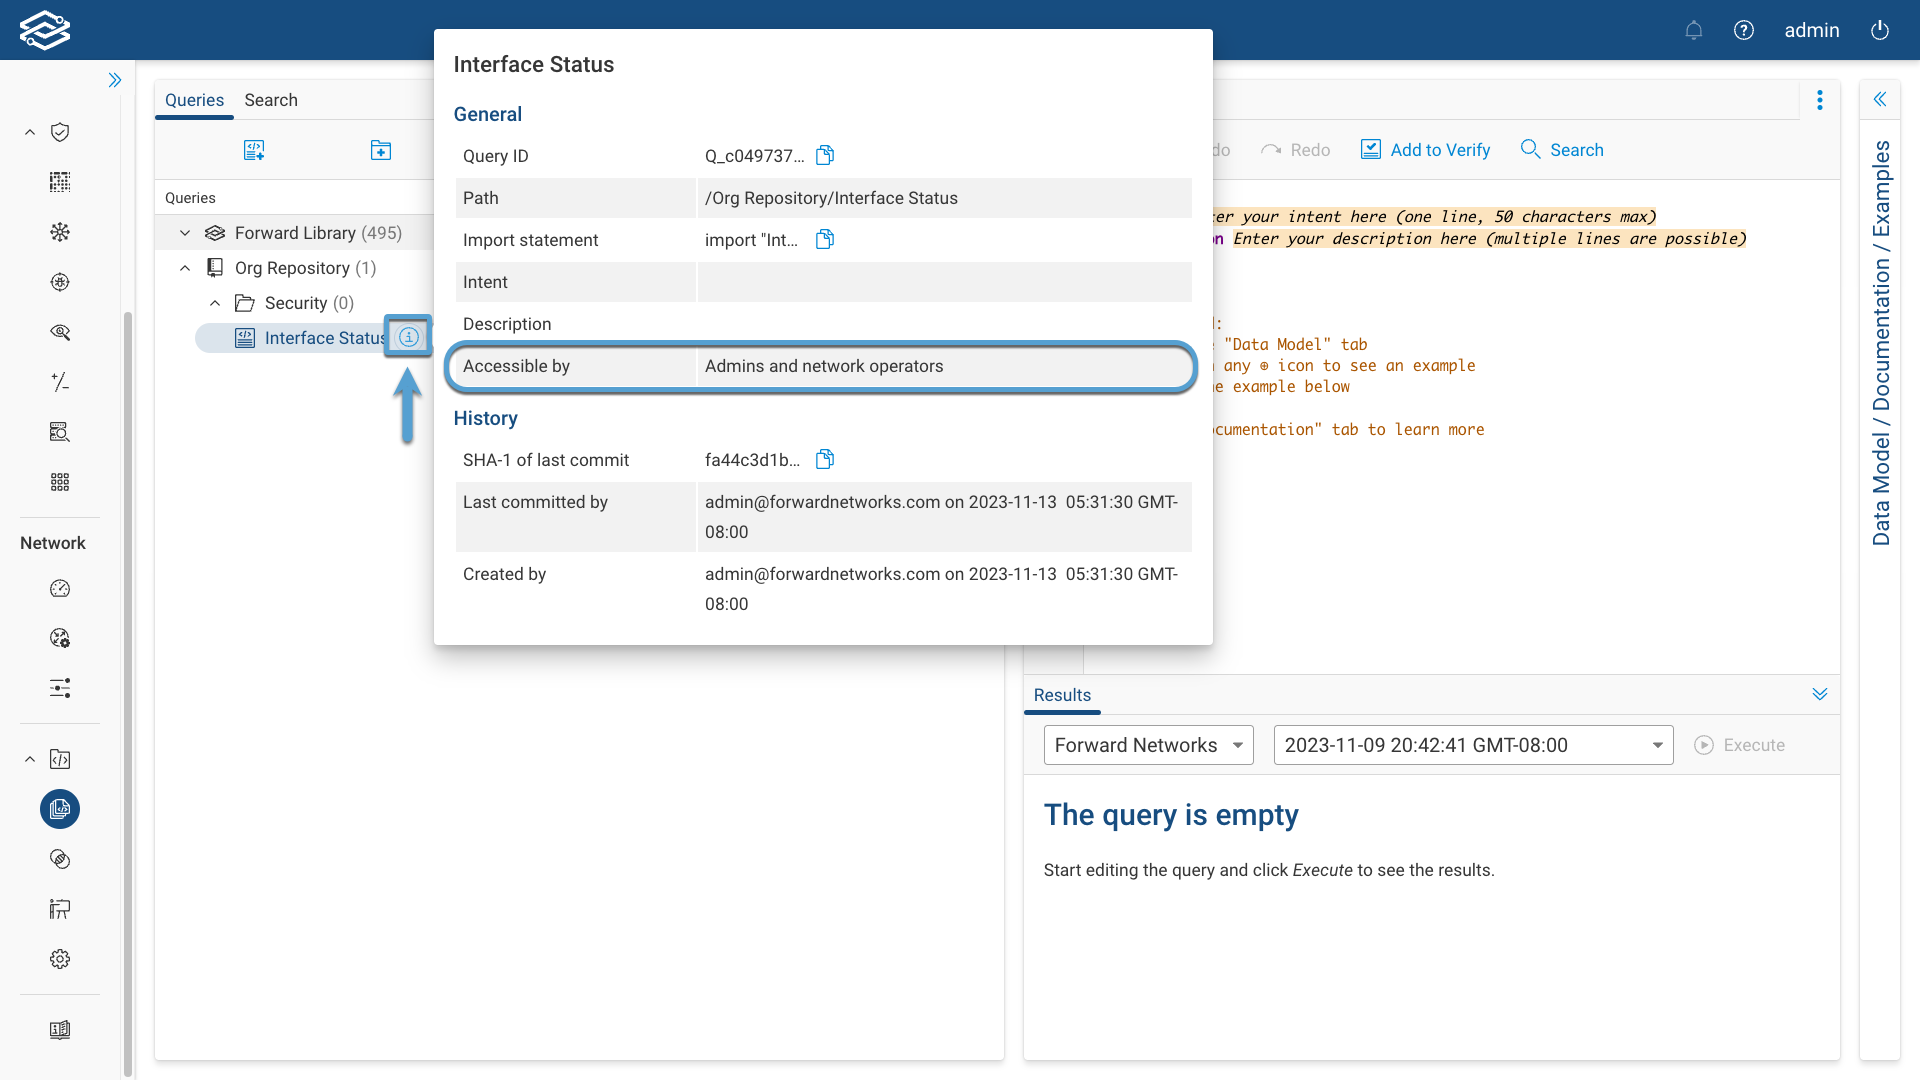
If the Versions icon is unavailable, verify that the query selected has been previously committed. To do this, find the query in the directory and hover over the Information icon of the query. If the query was previously committed, details regarding the query's commit ID, when it was last committed, and who it was created by will be displayed within the History section.
Viewing Versions
Clicking on the dropdown lists all the committed versions of a query. Hovering over the information icon at the end of each row provides additional version details, such as the commit ID, which can be copied and used in the public NQE query-running API to run that version of a query.
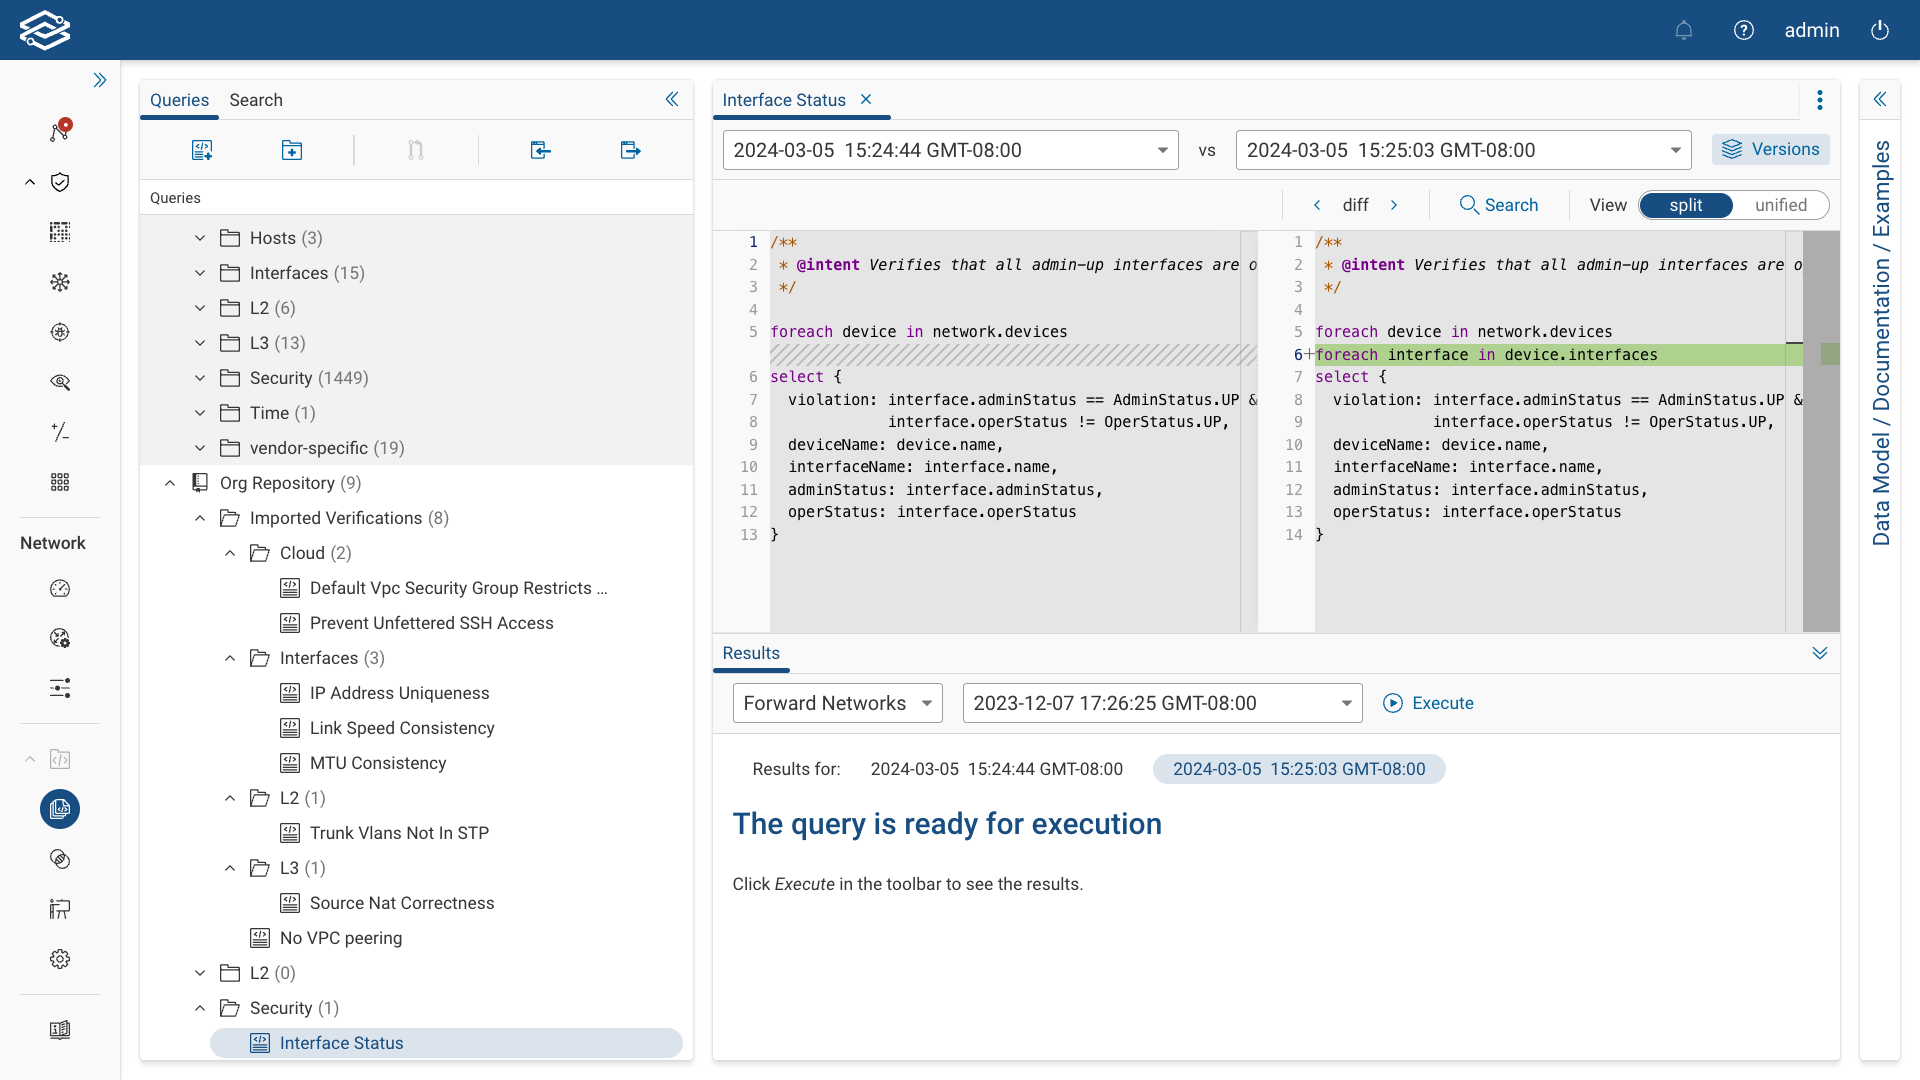
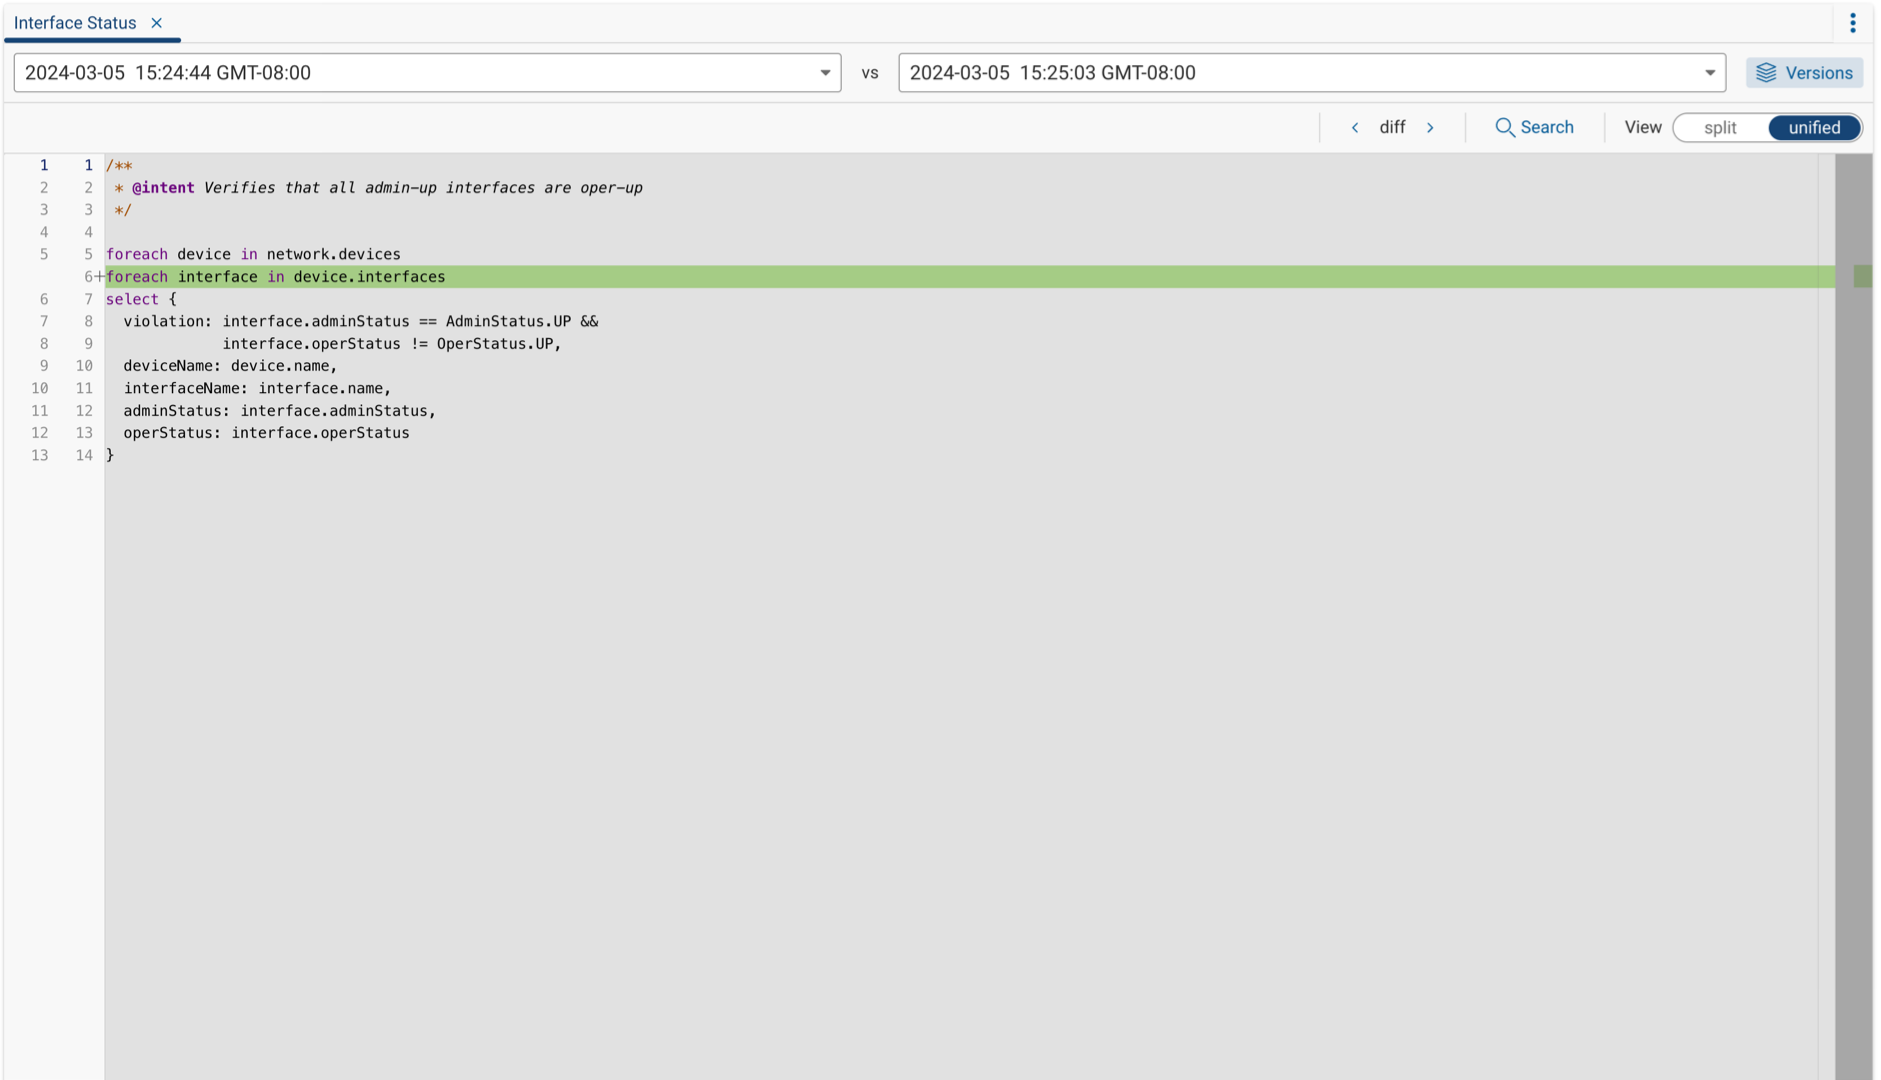
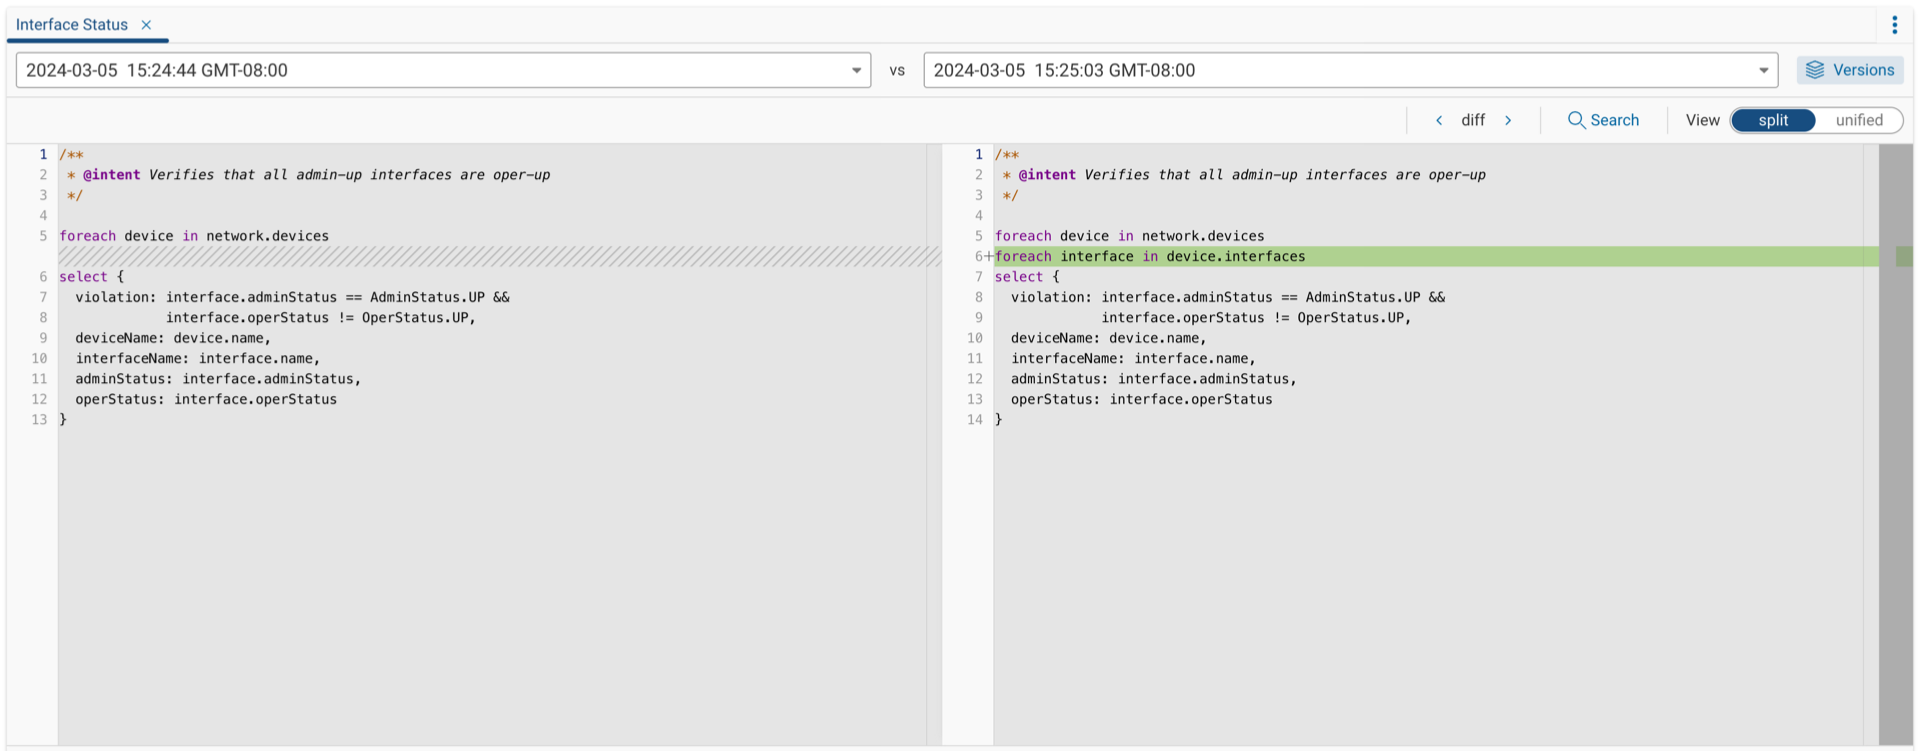
Comparing Versions
To compare two different versions of a query, select two versions from the dropdowns in the NQE Editor.
By default, a unified view of both queries is displayed. This view merges the changes from both versions into a single editor, making it easier to follow for quick reviews and edit small changes.
Selecting Split View from the NQE Editor compares both versions of a query side-by-side, providing a more comprehensive view of each version and all changes made between them.
You can change the focus and highlight another change by using the previous diff and next diff arrows in the Query Editor.
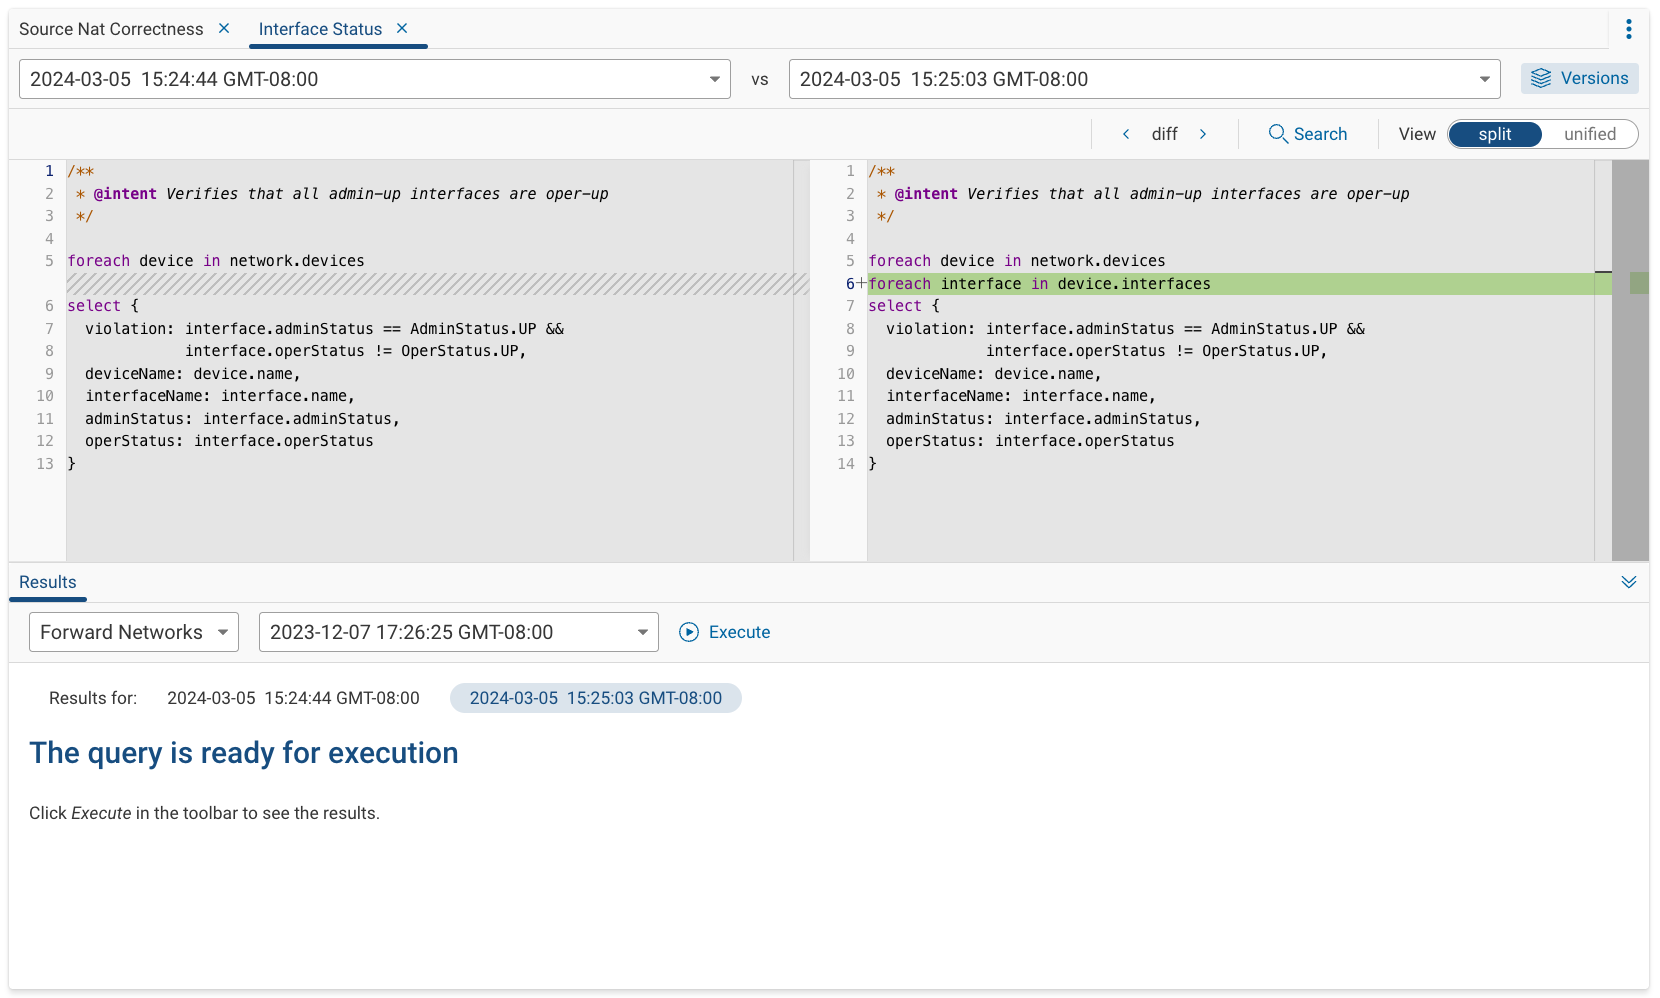
Testing Versions and Viewing Results
While comparing versions, you can test each one and view the results of each by selecting the query versions tab within the Results pane and pressing Execute to run the query to display results.
Adding Queries to NQE Verifications
After committing, you can add the query as an NQE Verification in the Verify Application.
Organizing NQE Queries
You can create new NQE queries and organize them in the Queries pane.
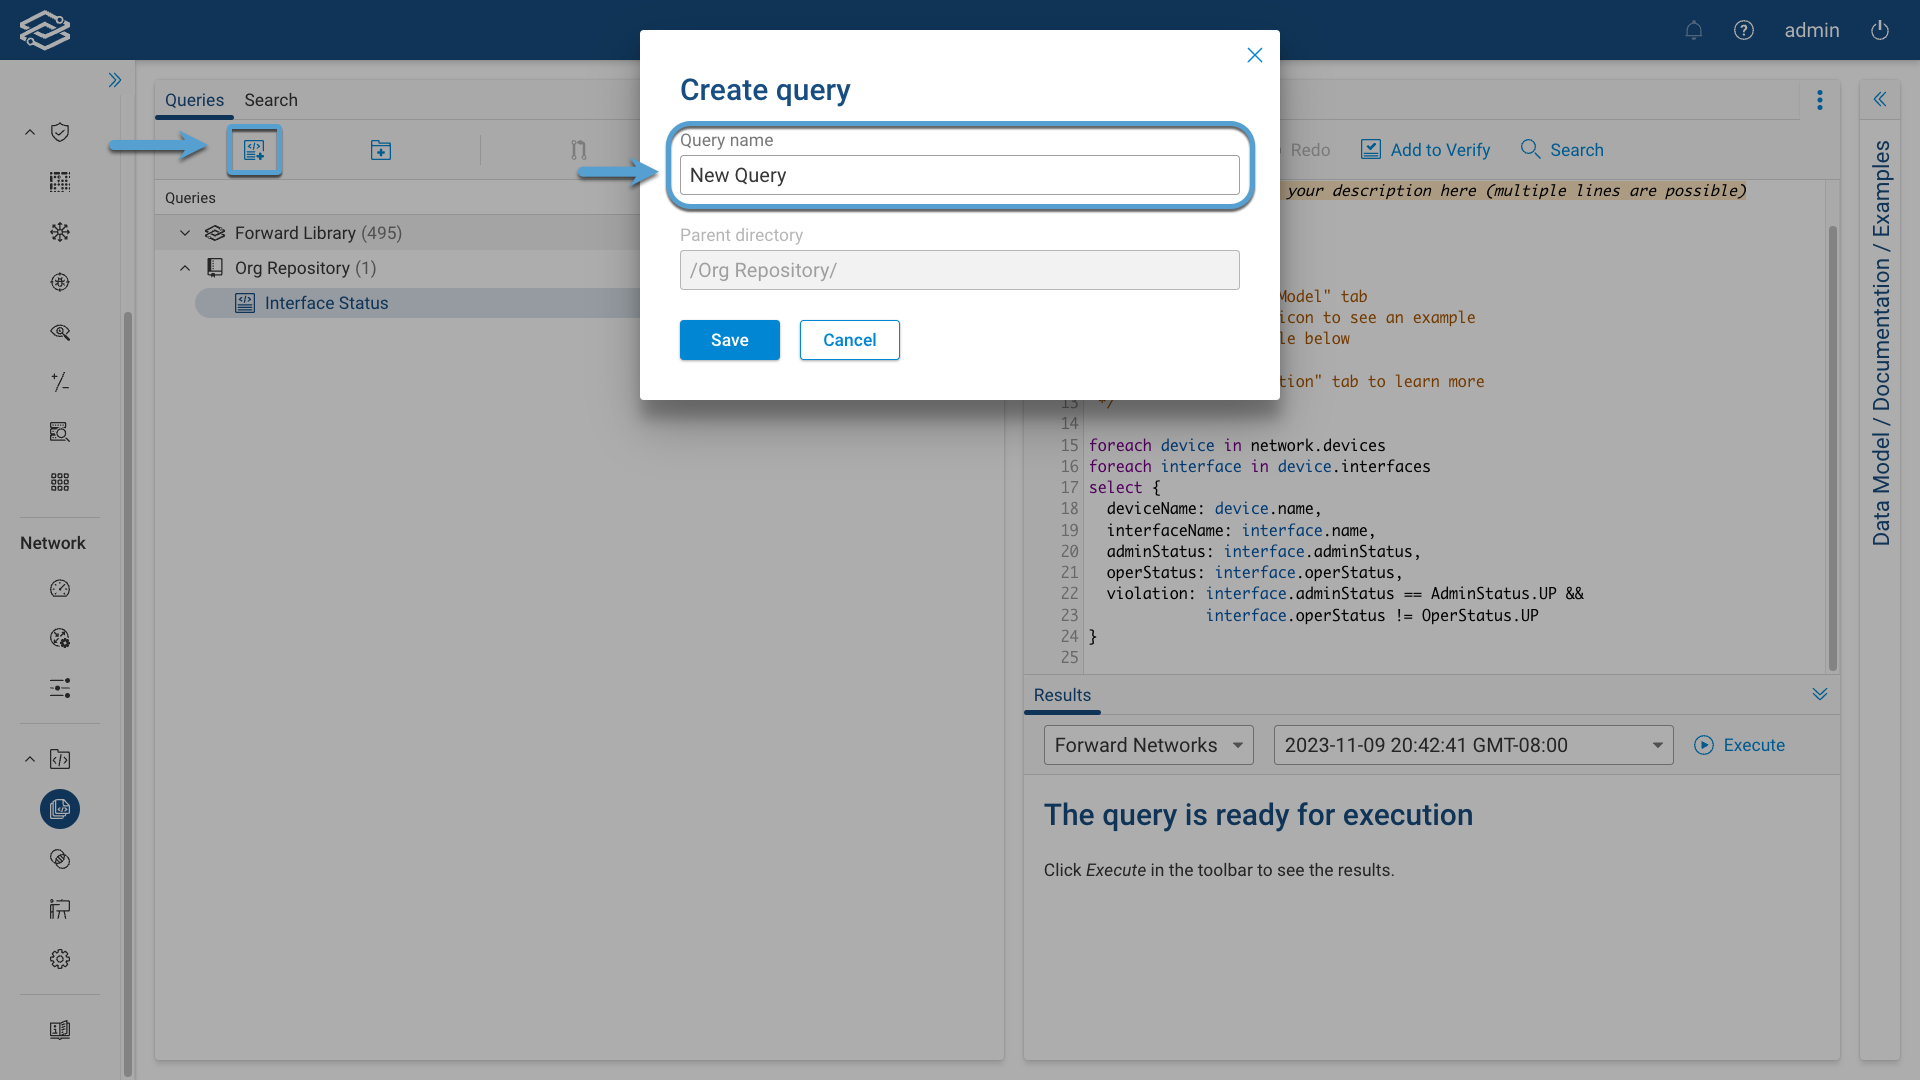
Create a New Query
Click on the New Query icon and provide a Query Name and select Save:
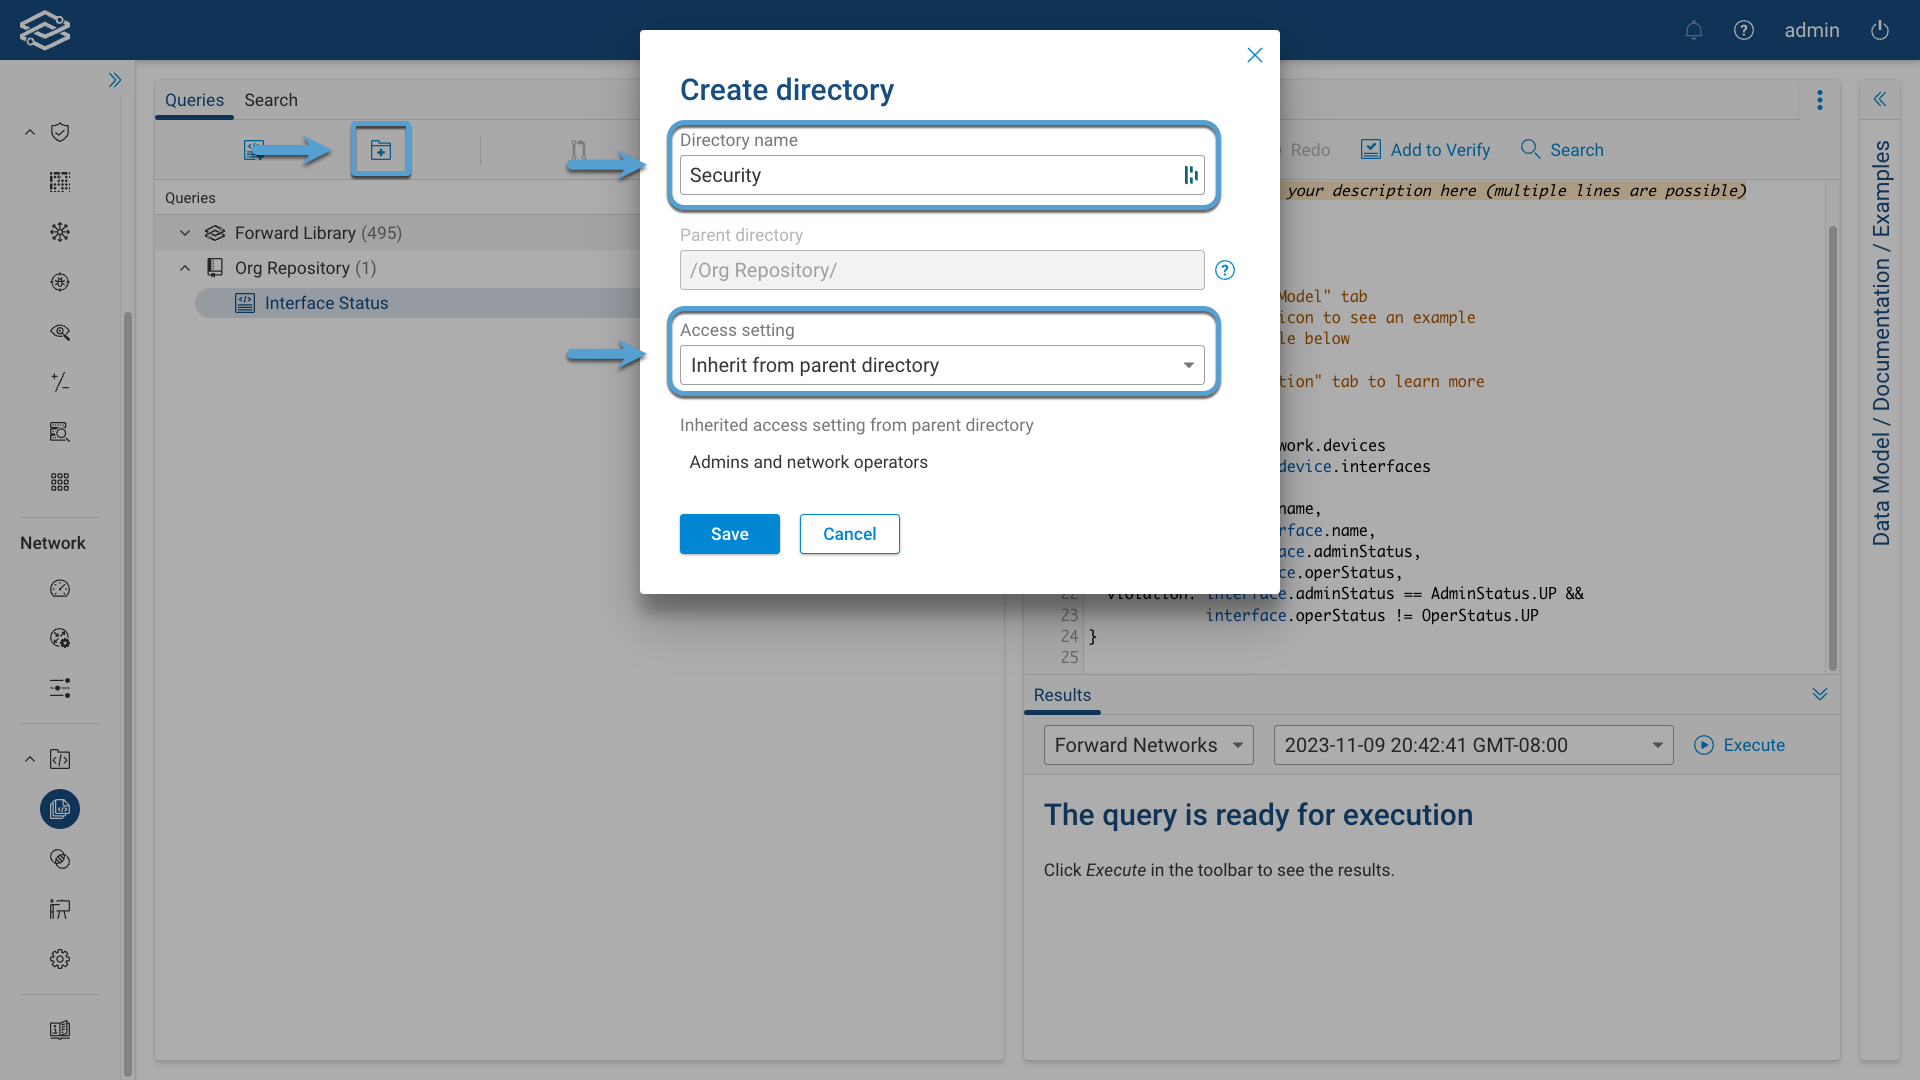
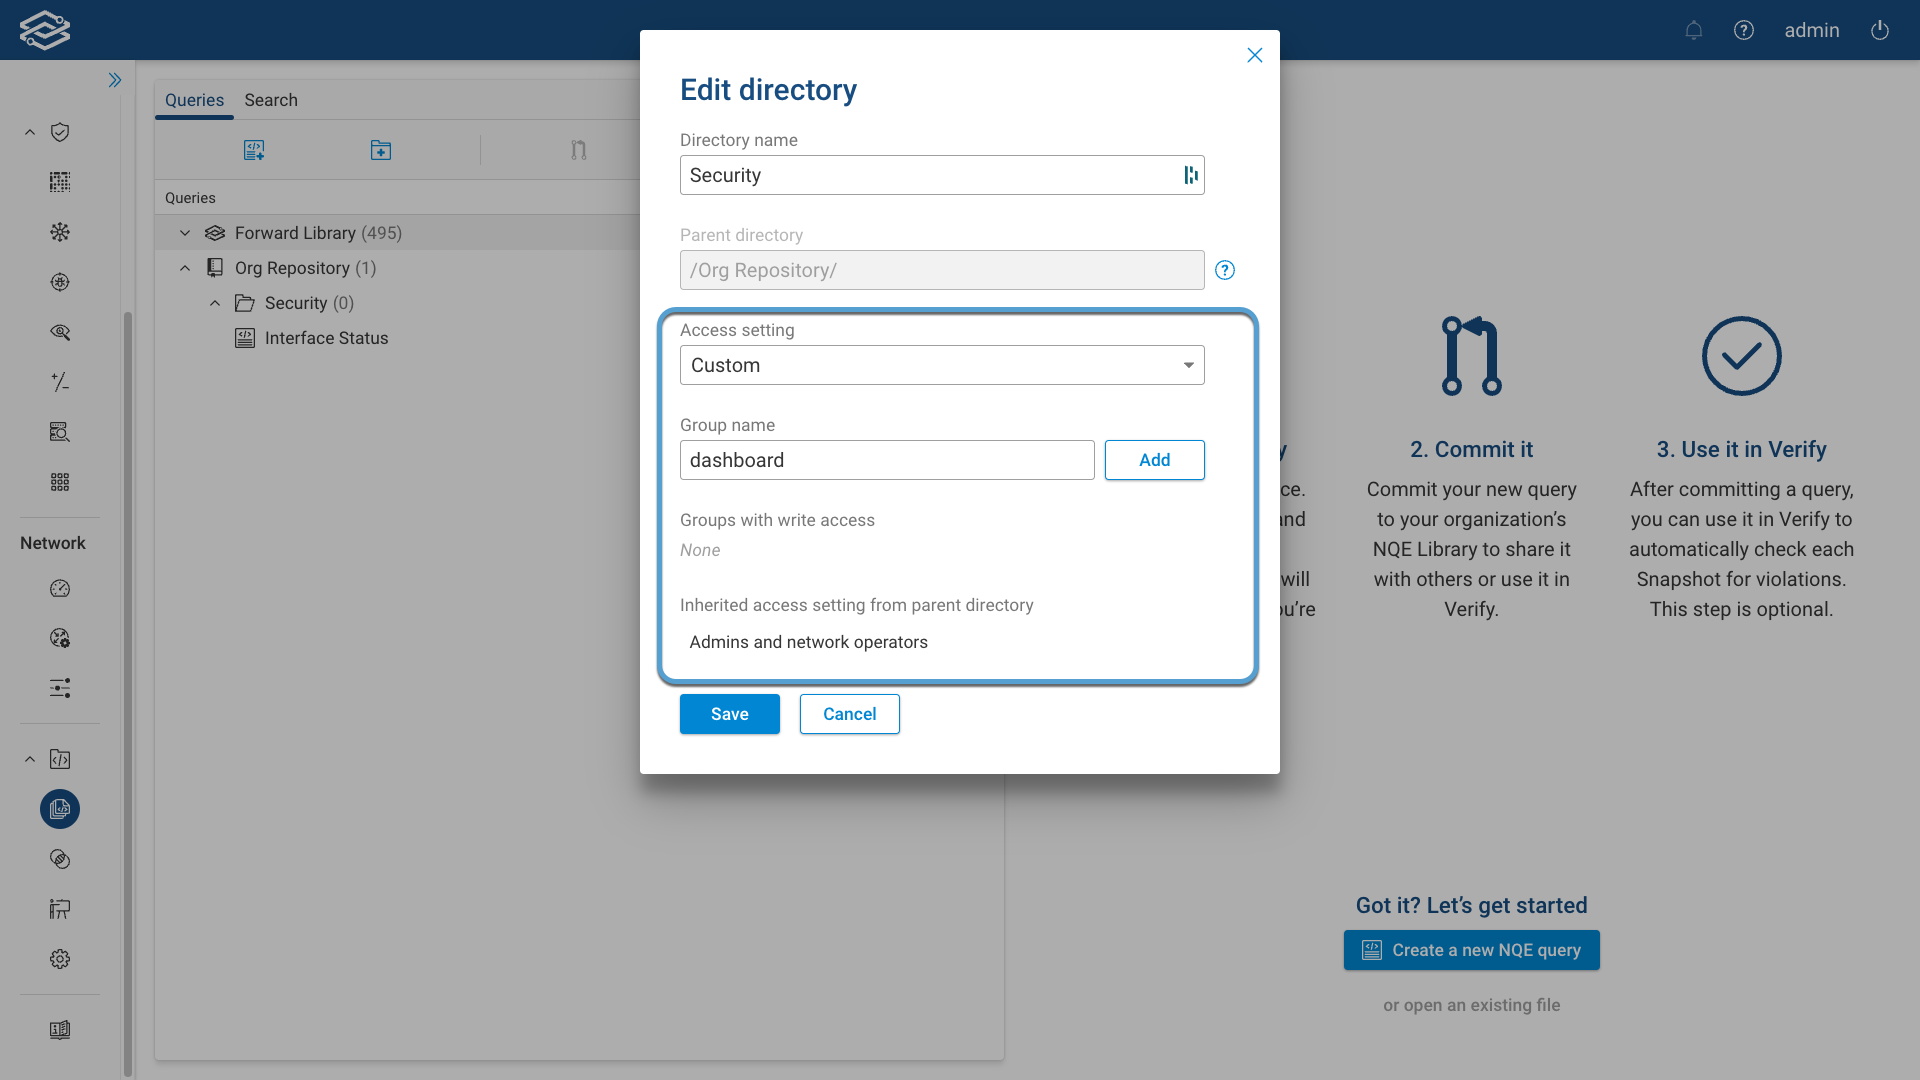
Create a New Directory
Click on the New Directory icon and provide a Directory Name and select an Access Setting.
Available options for access settings:
- Inherit from Parent Directory (default): access is inherited from the parent directory.
- Admins and Network Operators: only Admins and network operators can add or make changes to queries in the directory. Other users will have read-only permission and the queries will be grayed out.
- Custom: allows to grant write access to users in one or more access control groups only. To add an access control group, select it from the Group name drop-down menu and click Add.
Select Save to create the directory
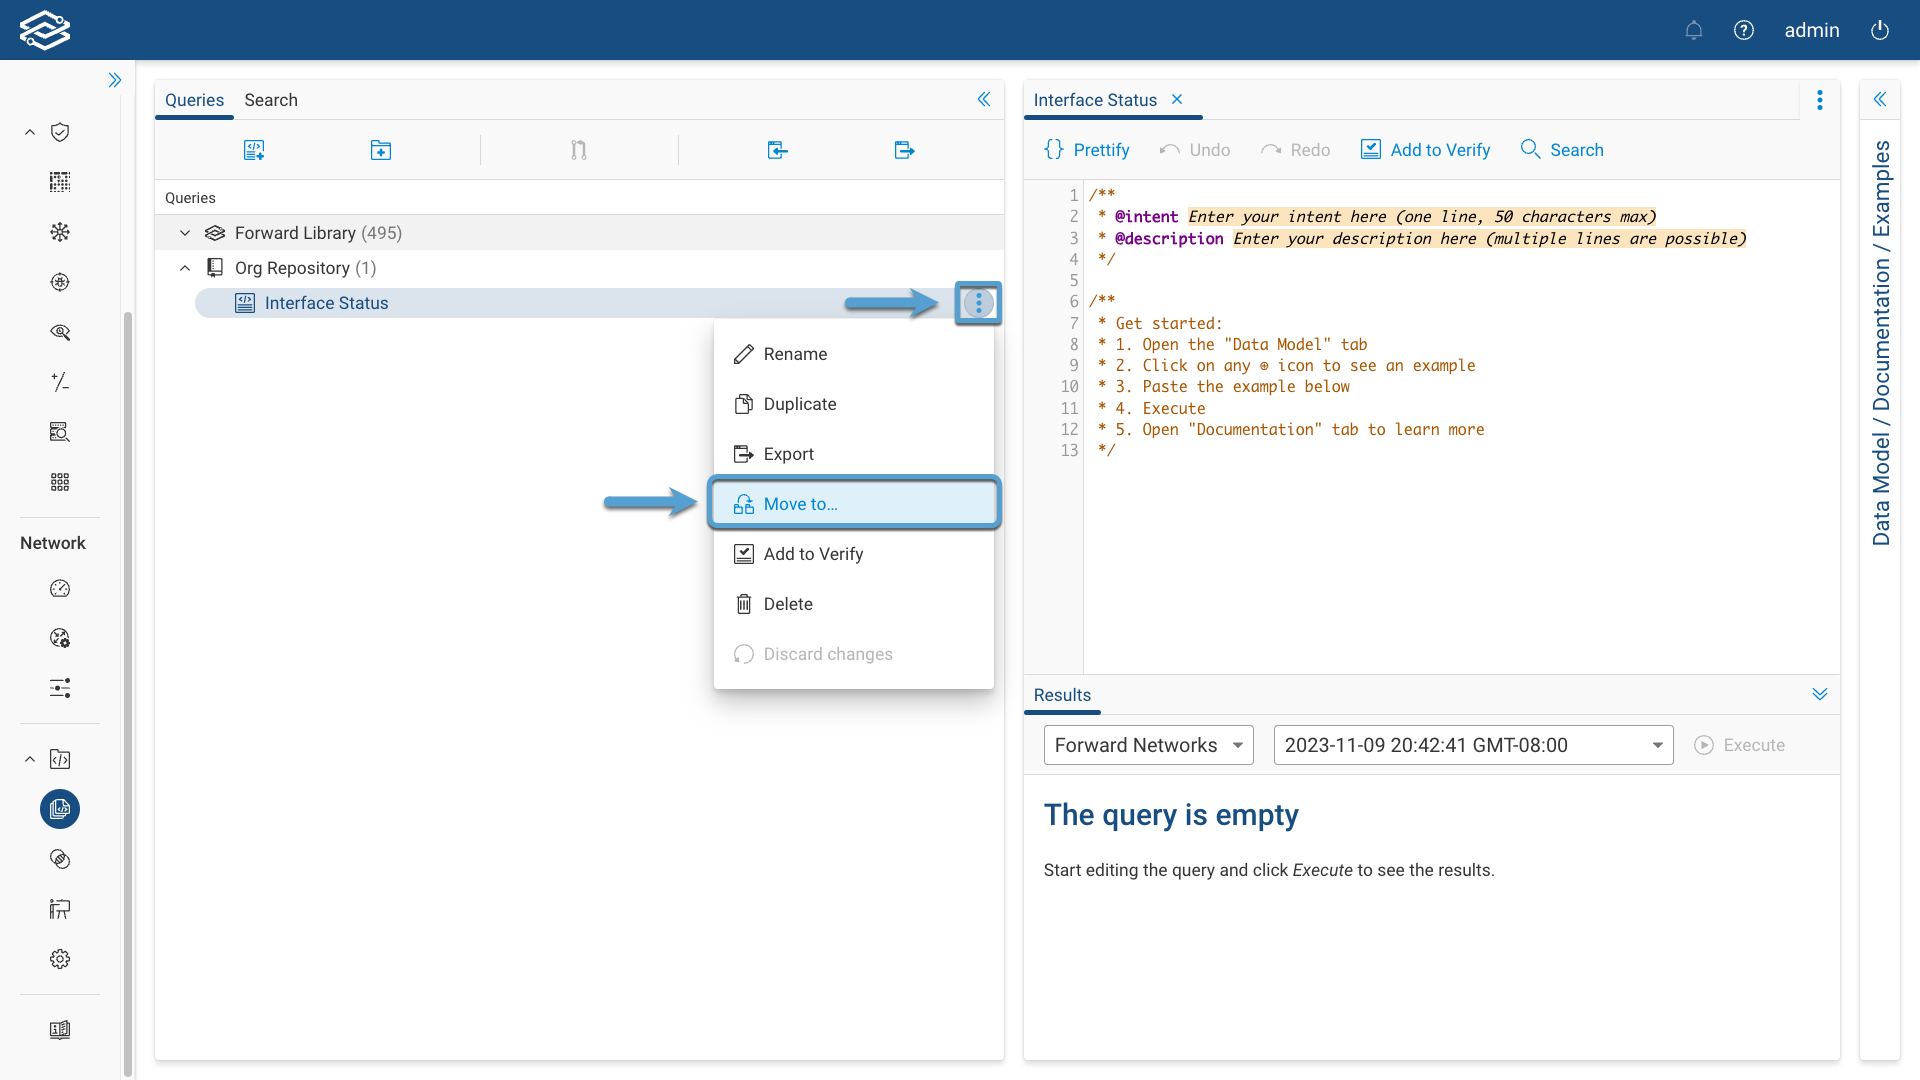
Moving an NQE Query or Directory
Click on the kebab button on the right side of the NQE query or directory you want to move, click on Move to ..., select a directory to move it to and, finally, click on Move.
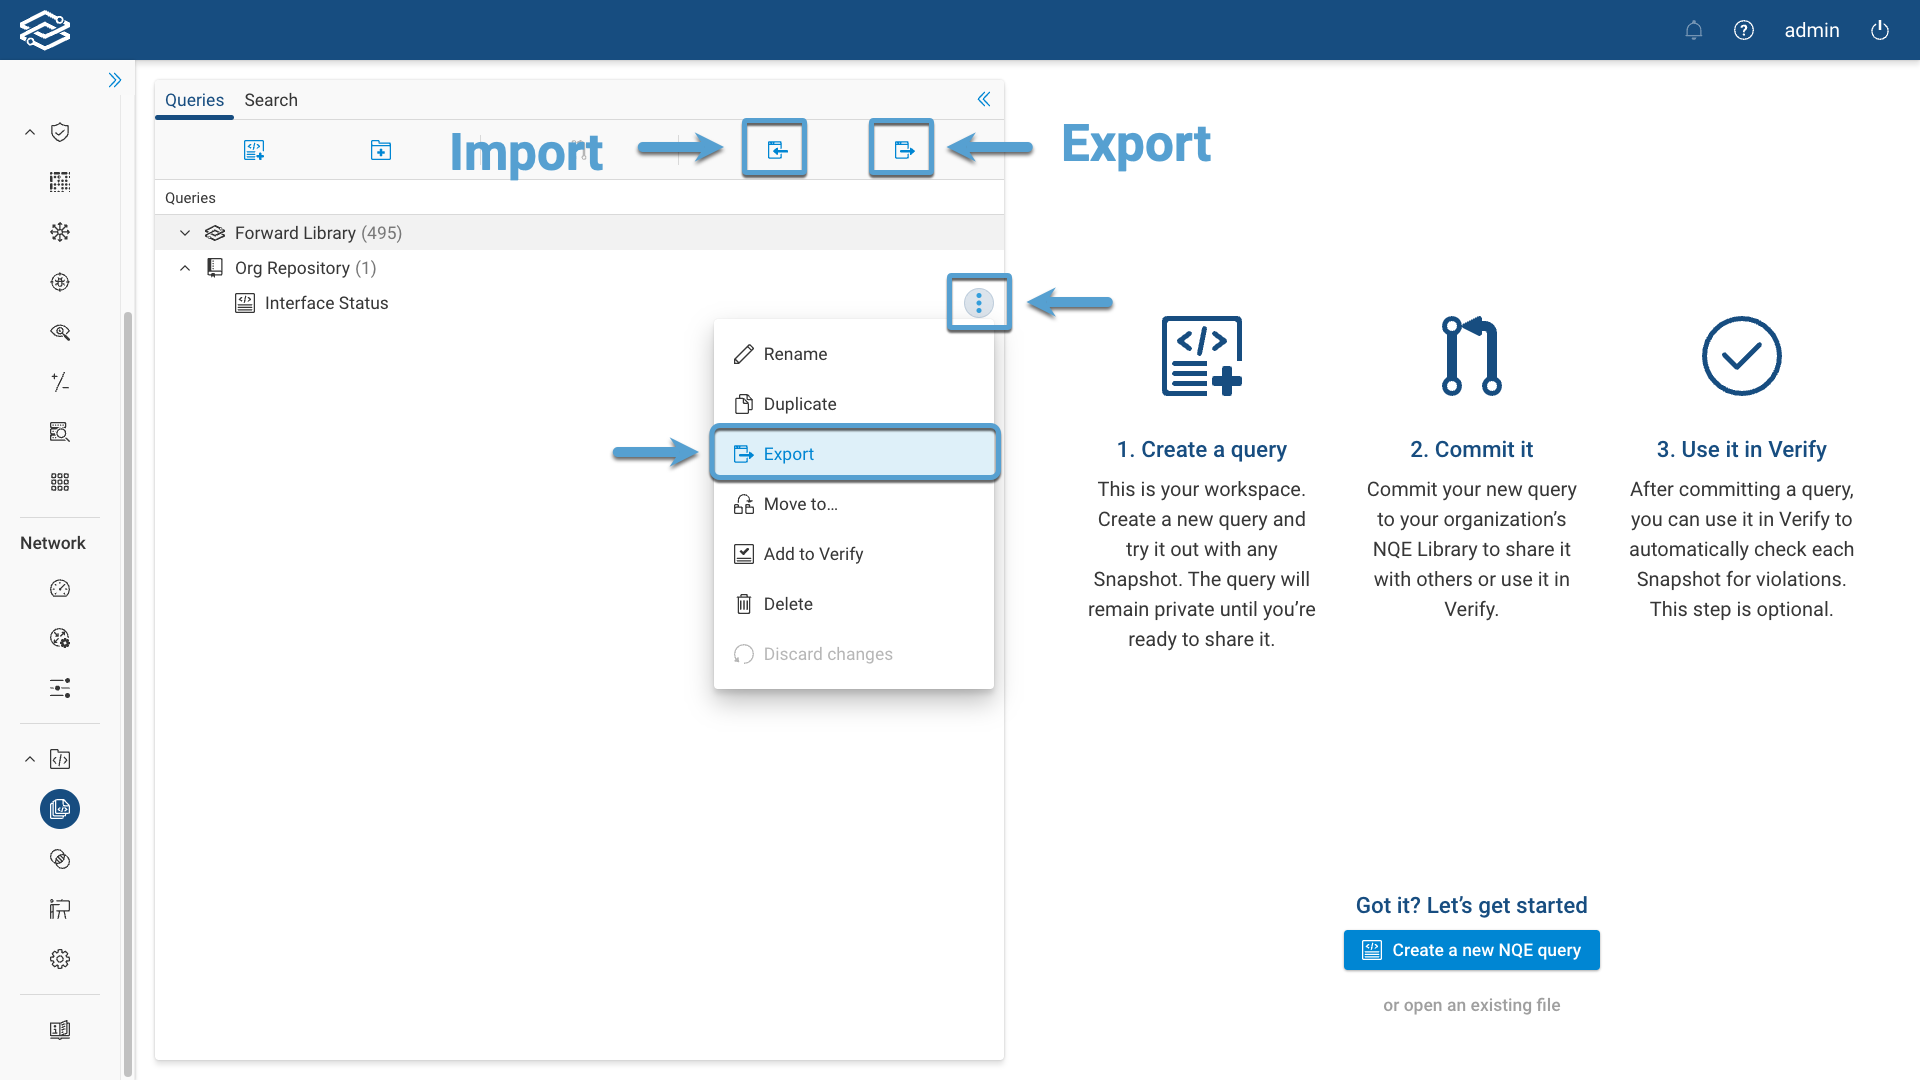
Export/Import NQE Queries
Select a directory, then select the Export Queries icon. A zip file will download to your system that contains all queries in the folder. You can then import the file to another system by using import.
You can also import and export directly into a folder by clicking on the kebab button on the right side of the NQE query directory and select the proper action from the list provided.
More Options
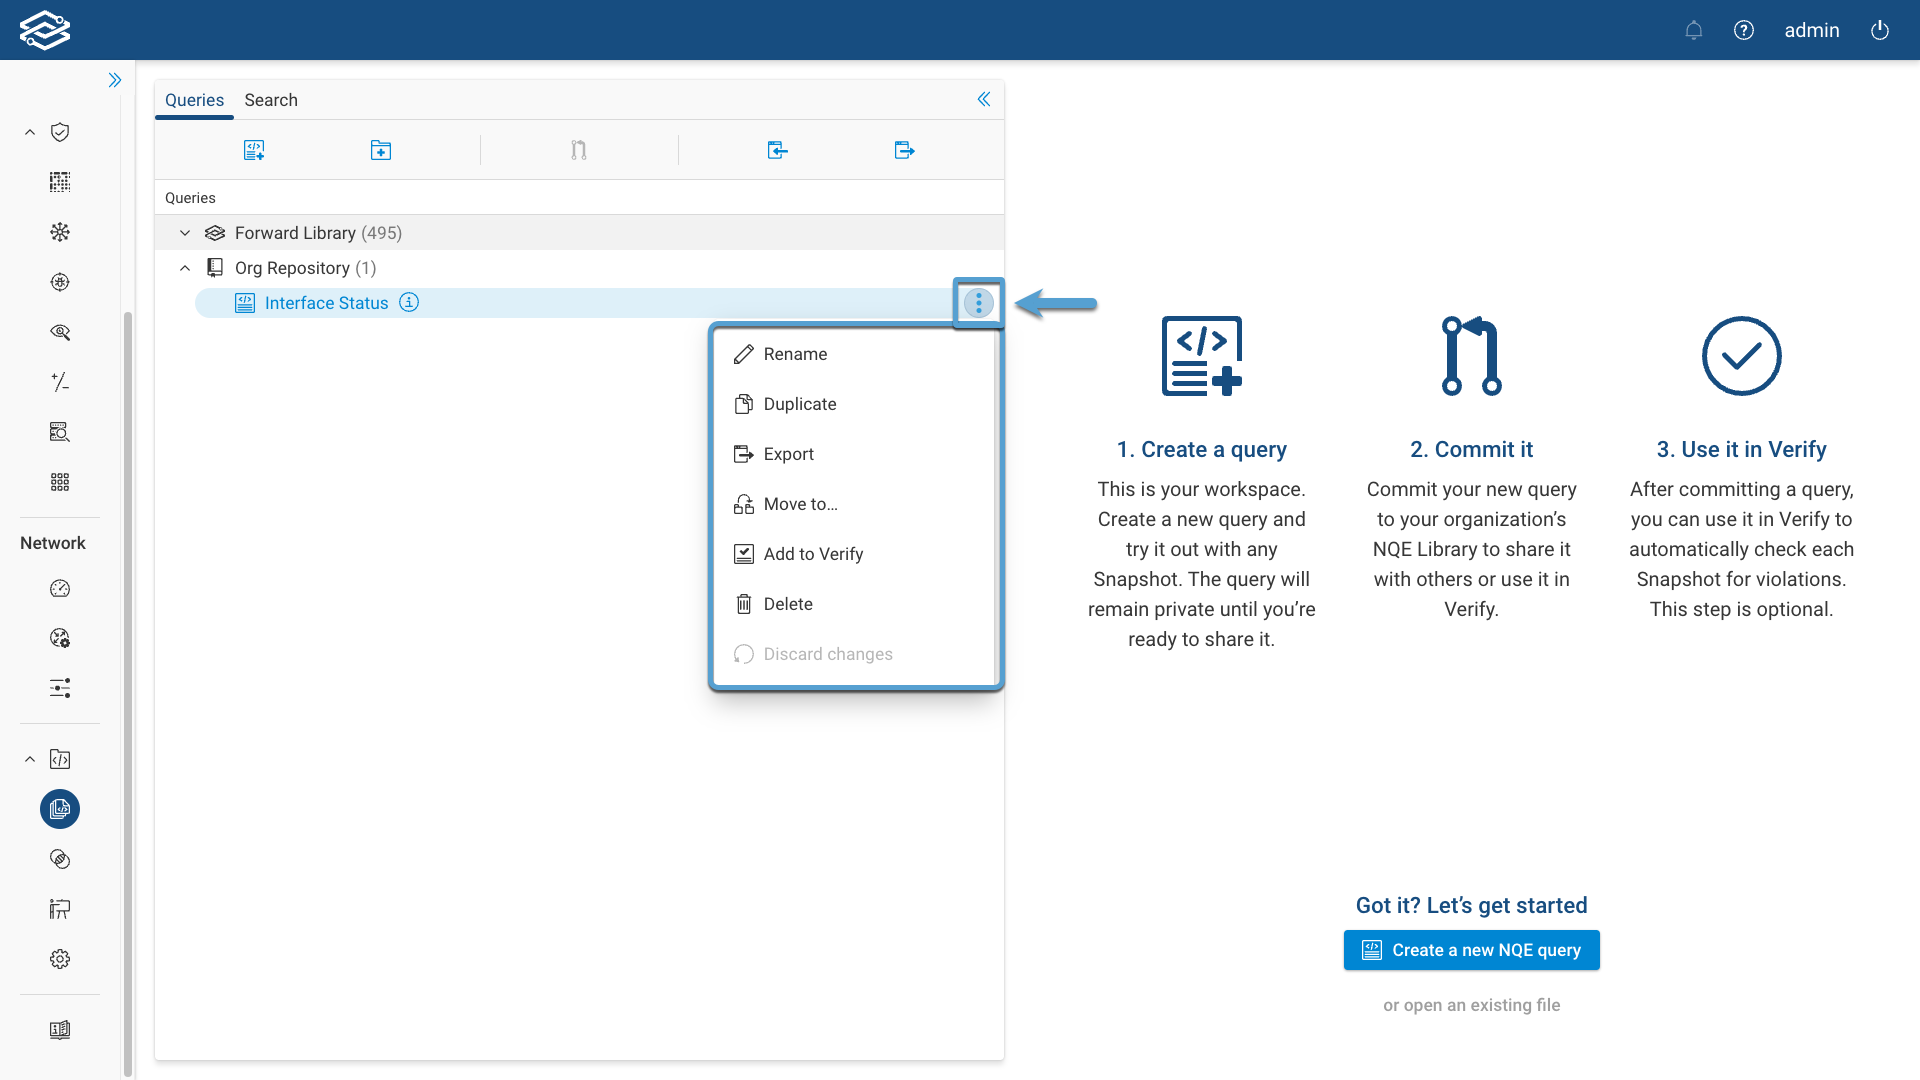
Selecting the kebab button on the right side of the NQE query or directory provides more options to Rename, Duplicate, Delete, Discard changes.
Directory Permission
By default, users with an admin or network operator role have full write access to NQE queries.
Forward allows users to define permissions on directories within the NQE Library to control which set of users are permitted to edit individual files and change the contents of directories.
The approach followed in managing directory access is that a child directory has the same access setting as the parent, plus any specific access granted to the child. This means that the access might keep expanding, as you go down in the directory hierarchy, from parent to child. In other words, stricter access at the root directory, and possibly wider and wider access at the child directory level.
To change directory permission, click on the kebab button on the right side of the directory and then on Edit directory.
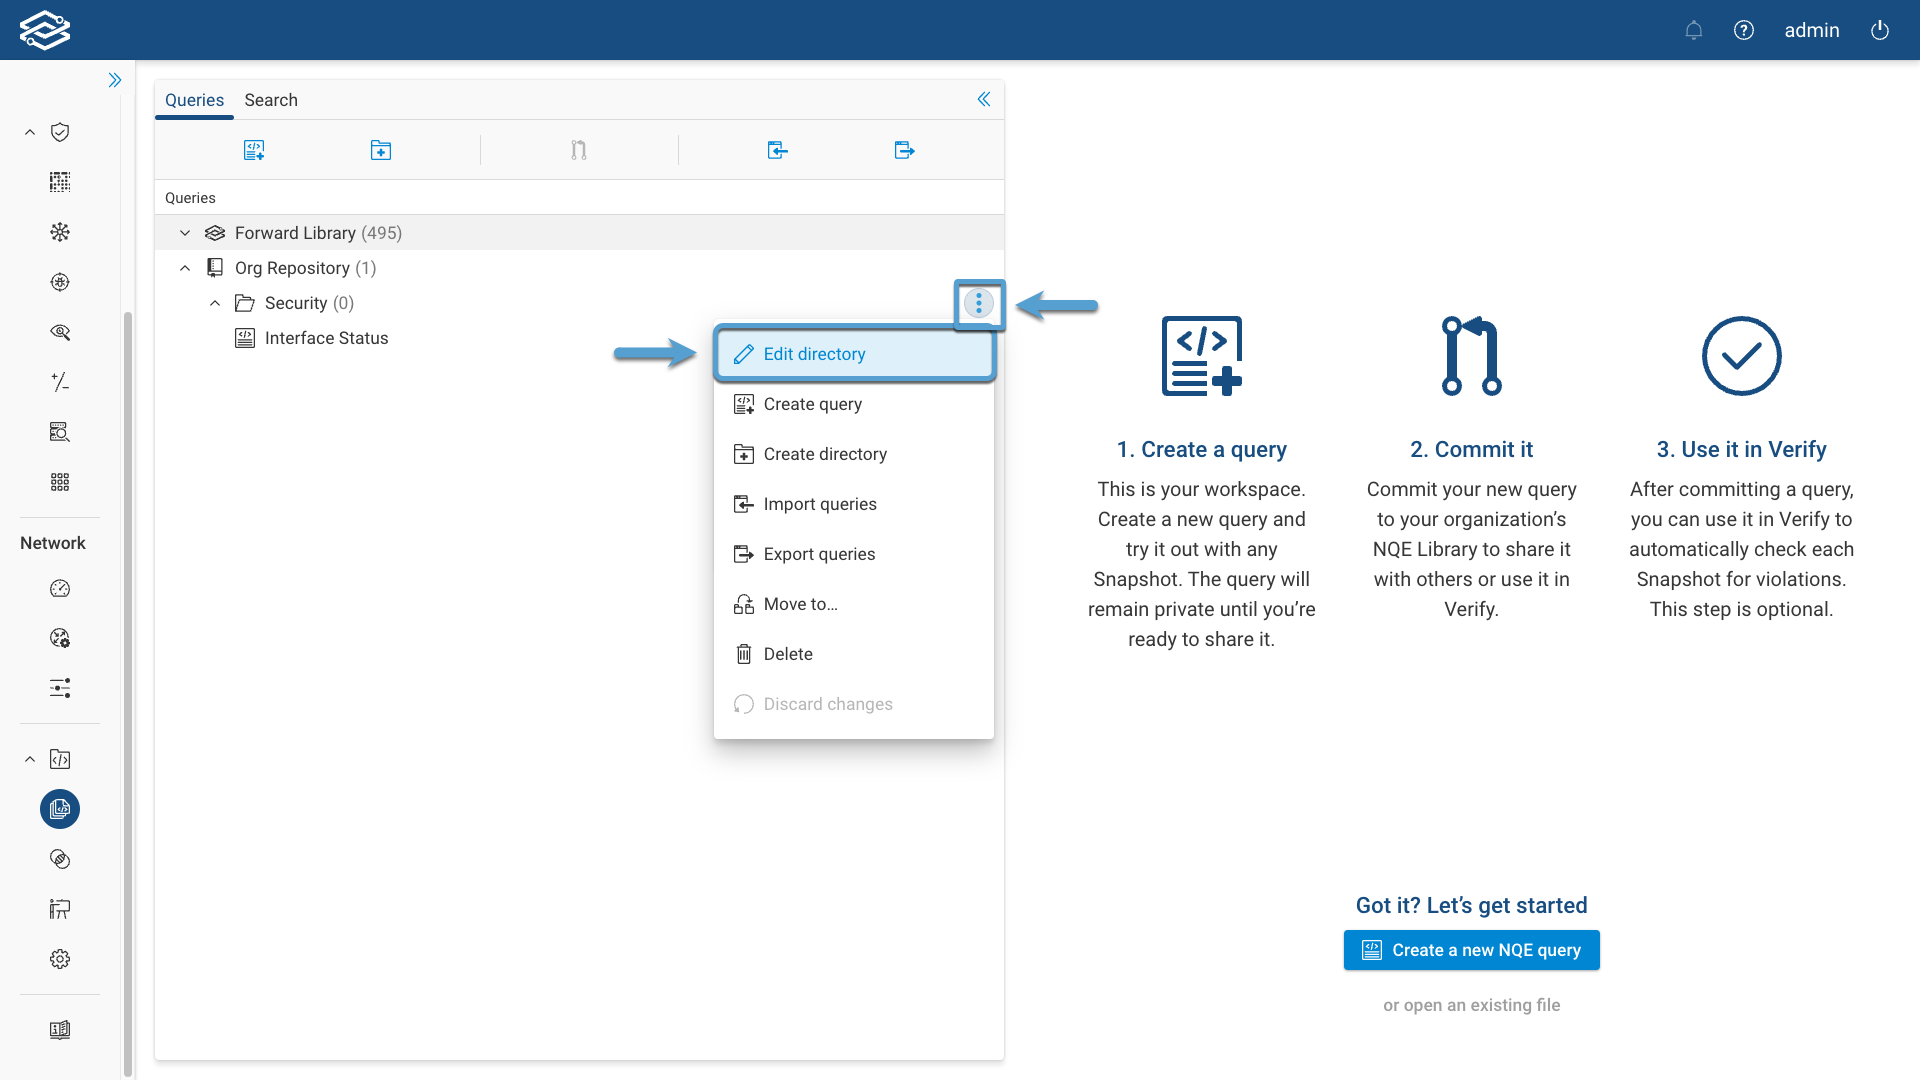
An Edit directory dialog opens.
The Access setting provides three options:
- Inherit from parent directory (default): access is inherited from the parent directory
- Admins and network operators: only Admins and network operators can add or make changes to queries in the directory. Other users will have read-only permission and the queries will be grayed out
- Custom: allows to grant write access to users in one or more access control groups only. To add an access control group, select it from the Group name drop-down menu and click Add.
The Inherited access setting from parent directory section at the bottom of the dialog provides the access summary.
Changes to any directory access are automatically saved, and are visible only to the current user, until they commit the changes, like any other change to the NQE Library. Once committed (if permitted), the permissions are enforced for all further commits. Changes to directory permissions will be displayed with an Access setting entry and a lock icon in the given directory.
Access permission are shown in the query info dialog as well.
Parameterized Queries
Depending on the use case, you may encounter situations where the results of an NQE query are too broad, prompting the need for additional parameter values to precisely tailor and narrow down the outcomes. The utilization of parameterized queries allows for a finer level of customization, enabling users to adapt existing queries more effectively and produce results that are precisely suited to the unique requirements of any given situation.
Before running a parameterized query for the first time, additional parameter values need to be set. This can be done by selecting the Parameters icon within the Results pane, entering the values of each listed field, and selecting Save. Parameter values are private and accessible only to you, allowing you to continue running your query with the last saved parameter values, even after logging out. Parameterized queries will keep their set values if renamed, or moved to a new directory.
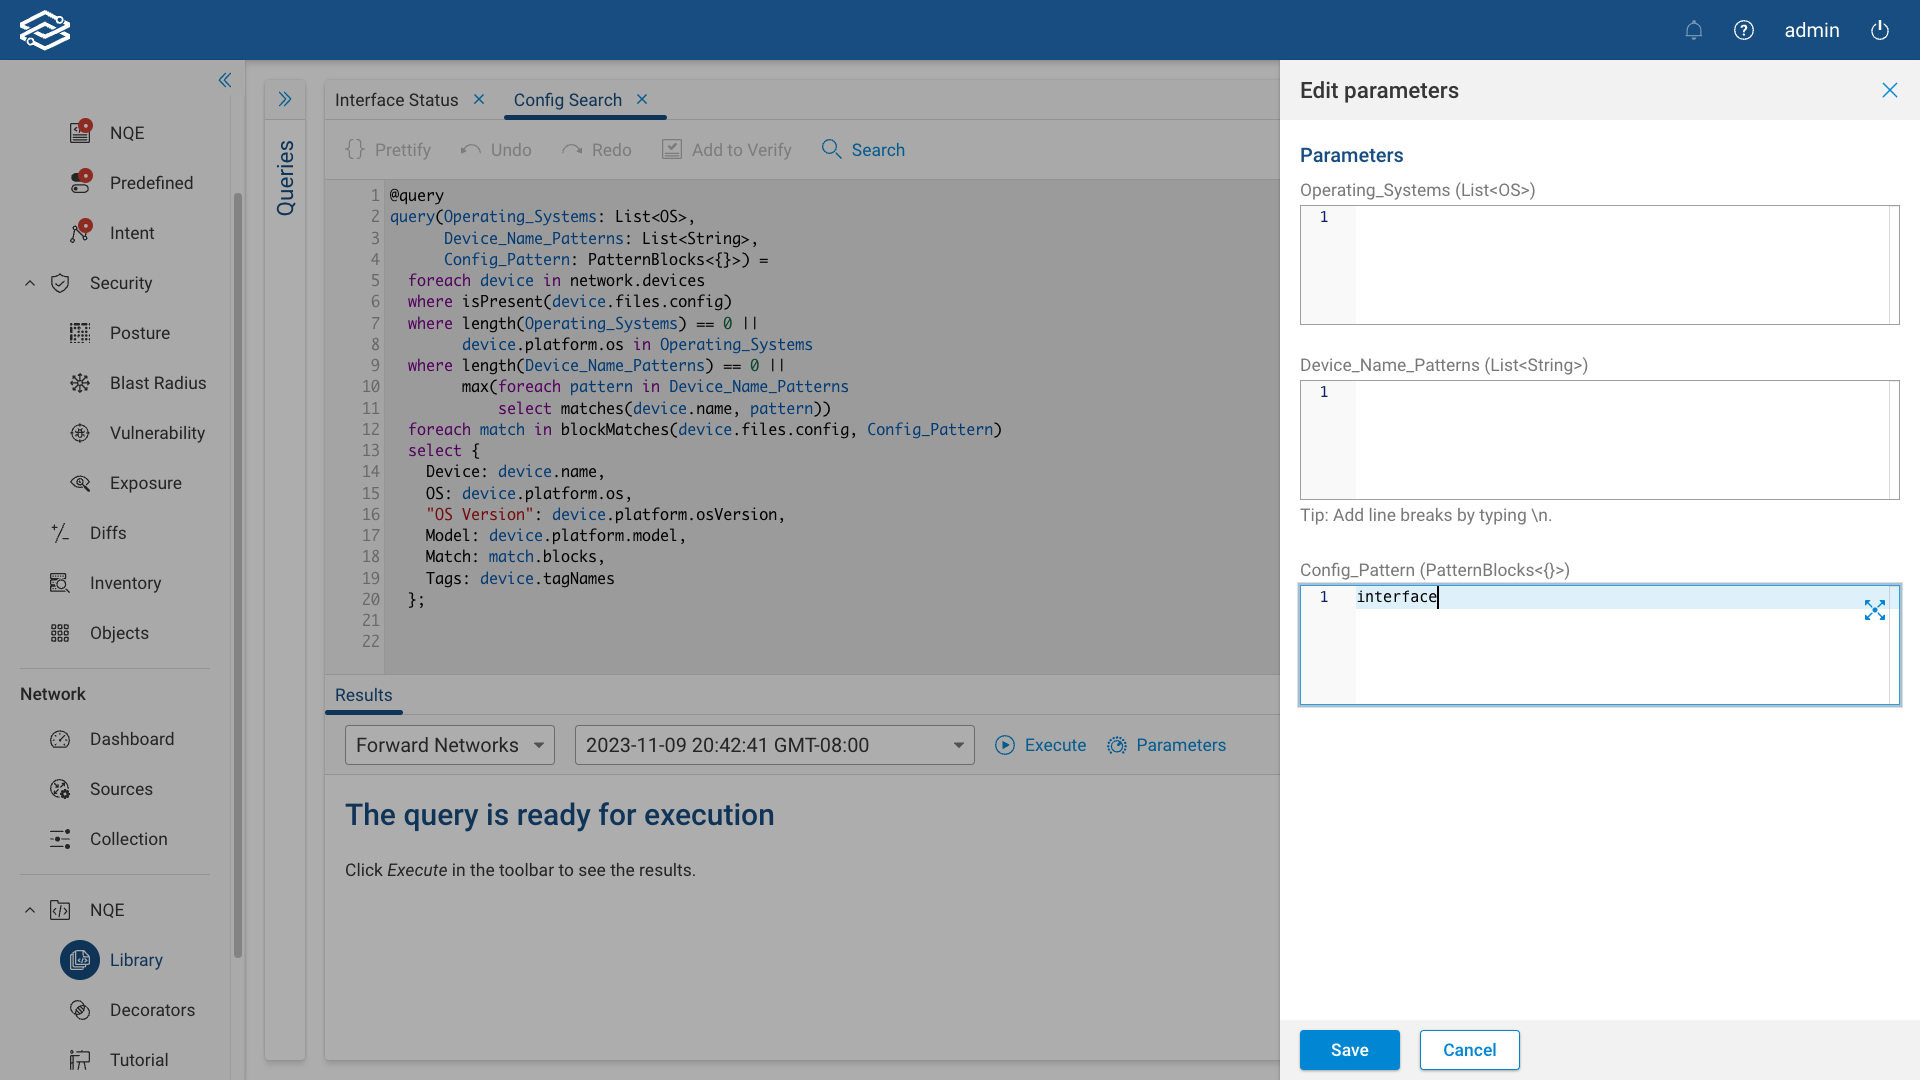
For more information on writing your own parameterized queries, visit the NQE Parameterized Queries page.
Forward Library
Forward Library is a set of built-in queries that can be used by customers for common use cases.
Cloud
-
Default VPC Security Group Restricts All Traffic: Verifies that the default security group of every VPC restricts all traffic. CIS-4.3 from CIS Amazon Web Services Foundations v.1.2.0 - 05-23-2018 See https://www.cisecurity.org/benchmark/amazon_web_services A VPC comes with a default security group whose initial settings deny all inbound traffic, allow all outbound traffic, and allow all traffic between instances assigned to the security group. If you don't specify a security group when you launch an instance, the instance is automatically assigned to this default security group. Security groups provide stateful filtering of ingress/egress network traffic to AWS resources. It is recommended that the default security group restrict all traffic. The default VPC in every region should have its default security group updated to comply. Any newly created VPCs will automatically contain a default security group that will need remediation to comply with this recommendation
-
High IP address utilization: Verifies that IP utilization of a subnet does not exceed 75% Such an issue can prevent automation from creating new VMs.
-
Prevent Unfettered RDP Access: Verifies that no security groups allow ingress from
0.0.0.0/0toport 3389CIS-4.2 from CIS Amazon Web Services Foundations v.1.2.0 - 05-23-2018 See https://www.cisecurity.org/benchmark/amazon_web_services Security groups provide stateful filtering of ingress/egress network traffic to AWS resources. It is recommended that no security group allows unrestricted ingress access to port 3389. -
Prevent Unfettered SSH Access: Verifies that no security groups allow ingress from
0.0.0.0/0toport 22CIS-4.1 from CIS Amazon Web Services Foundations v.1.2.0 - 05-23-2018 See https://www.cisecurity.org/benchmark/amazon_web_services Security groups provide stateful filtering of ingress/egress network traffic to AWS resources. It is recommended that no security group allows unrestricted ingress access to port 22
AWS
- Routes with invalid next hop: Verifies, for AWS projects, compute instances that are targets of routes that exist and are up.
Devices
-
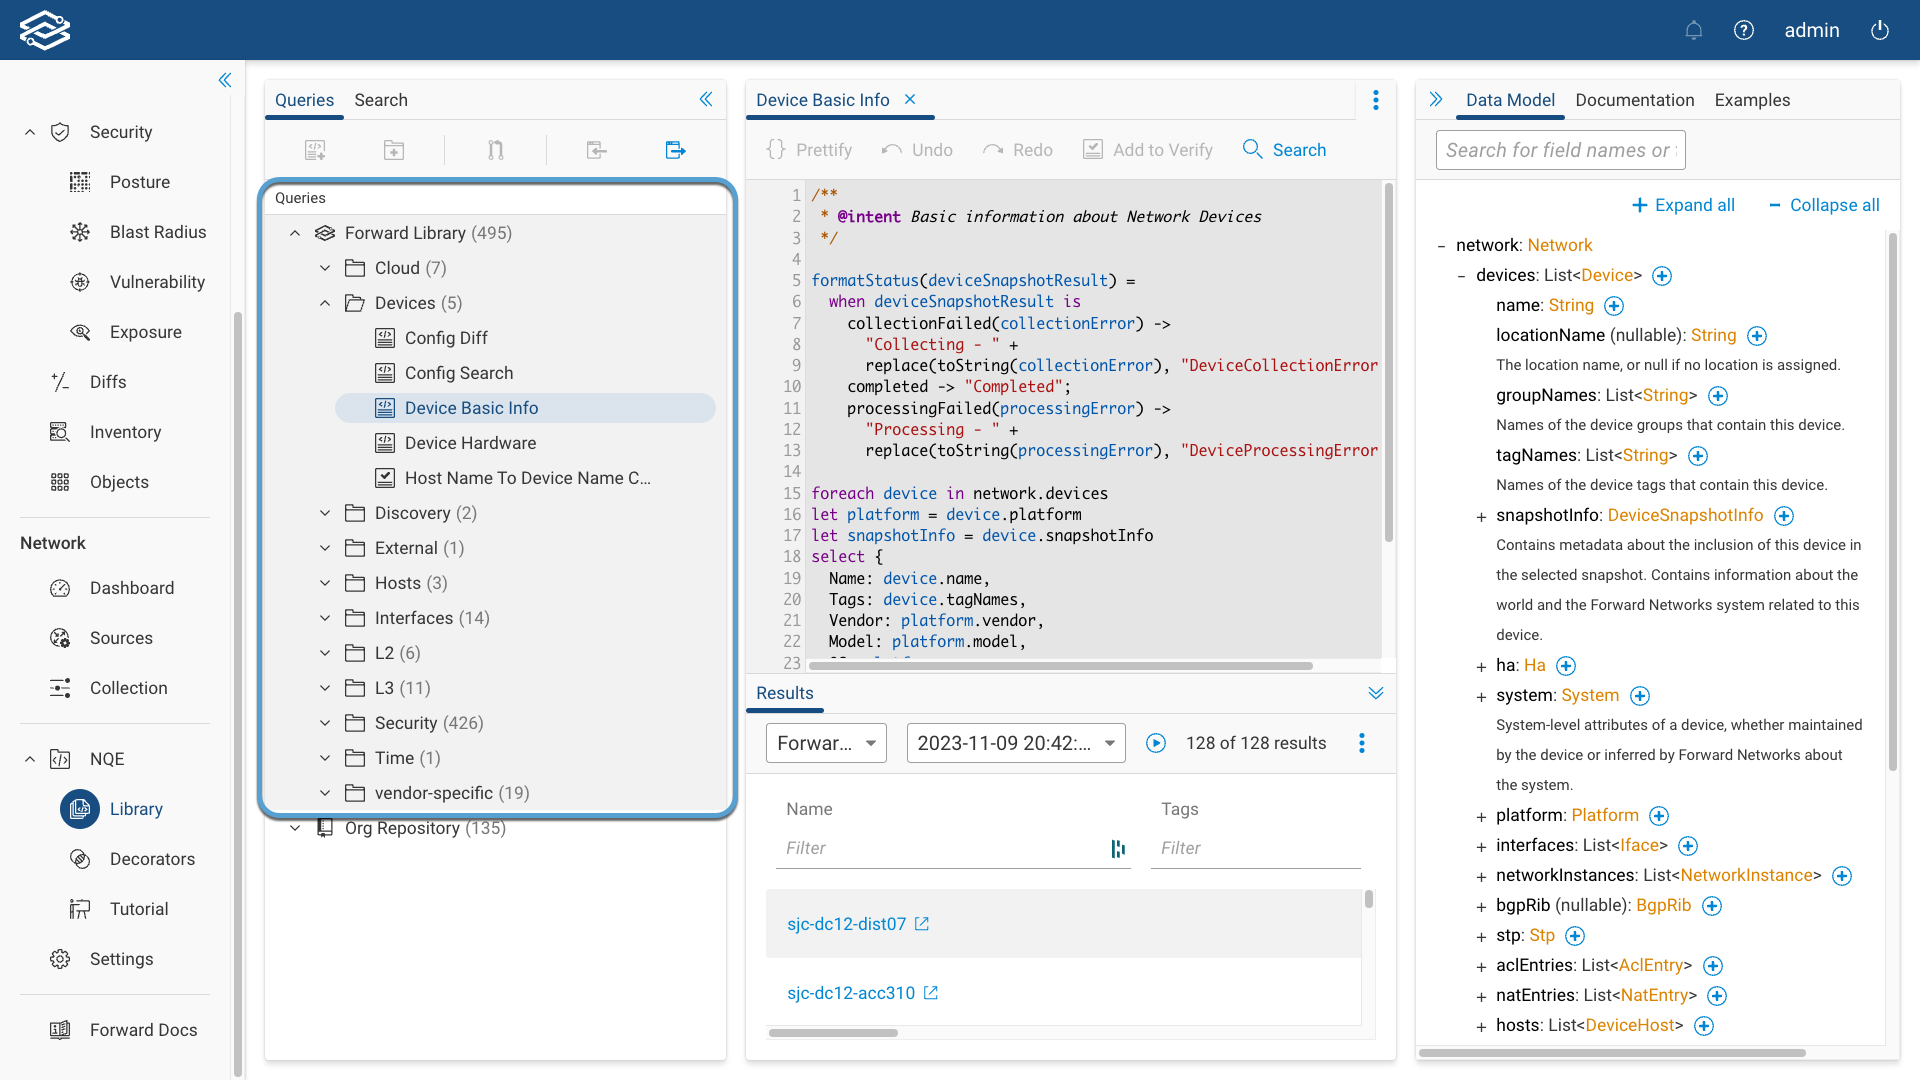
Device Basic Info: Basic information about Network Devices
-
Device Hardware: Information about device hardware
-
Host Name To Device Name Consistency: Finds devices where device name and host name do not match Compares the device names as configured in the Forward Platform with host name as it appears within the device's configuration. Applies to Cisco, Fortinet, Juniper, and Palo Alto Networks devices.
Discovery
-
Uncollected CDP-LLDP neighbors: Finds names of devices found in CDP/LLDP but not in Forward inventory
-
Uncollected next hops: Find next hops not on collected devices Find any IP addresses of next hops in Routing or BGP tables that are not on collected devices. This helps with discovery without having to do a full discovery.
Hosts
-
Hosts With Interface MACs: Finds hosts whose MAC address matches an interface MAC address A host whose MAC address matches an interface MAC address is typically not actually a host. Rather it indicates that some network devices are not being collected (not in the snapshot)
-
IPs Used By Multiple Hosts: Finds IPs that are used by multiple hosts Finds cases in which the same IP appears with different MAC addresses on the same VRF. Excludes all IPs associated with MAC addresses that are assigned to interfaces. Excludes IPs that appear on only one device or are associated with only one MAC address.
Interfaces
-
Ethernet Port Usage: Reports ethernet port usage. Displays the count of all the ethernet ports, all up/up ethernet ports, and then calculates the percent of up/up ethernet interface compared to all the ethernet interfaces.
-
IP Address Uniqueness: IP addresses assigned to device interfaces should be unique across each VRF in the network. Excludes devices that are in HA backup mode, as well as ESXI devices. It excludes interfaces that are administratively down. Limitations: Only considers IP addresses assigned to subinterfaces and SVI interfaces. Also, does not exclude anycast rendezvous point loopback interfaces.
-
Interface IPs: Helper function to get all IP subnets for all IP interfaces on a device
-
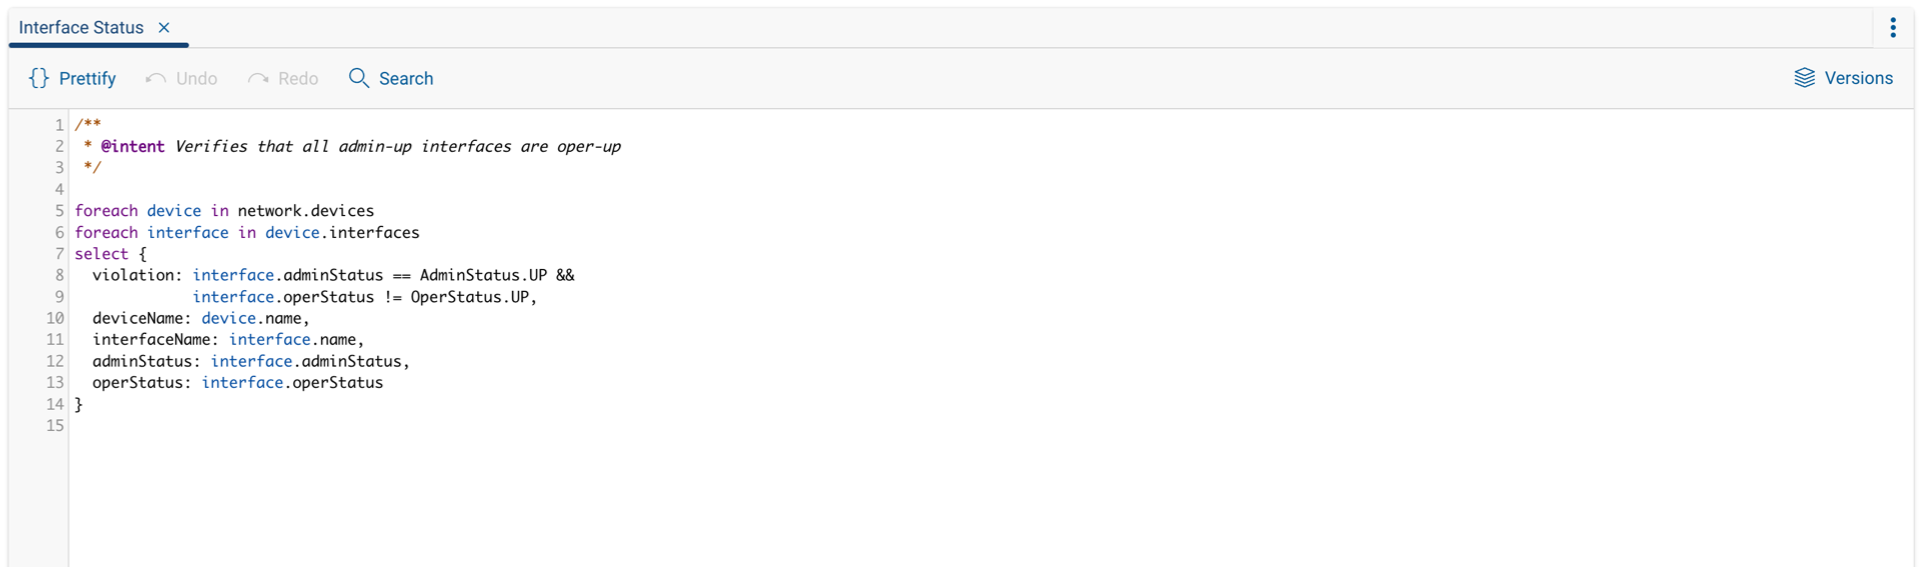
Interface Status Query: Check that all admin-up interfaces are oper-up
-
Interfaces Have Descriptions: Checks that connected interfaces have descriptions. Limited to Ethernet interfaces that are connected to another device.
-
Interfaces With Wide Subnets: Verifies that interfaces have IP subnets whose subnet mask is at least 16 bits long.
-
Link Speed Consistency: Interfaces at both ends of each link should have the same link speed. It excludes ports with unknown speed.
-
MTU Consistency: Interfaces at both ends of each link should have the same MTU. Values are normalized to include only L3 fields and up.
-
VLAN Consistency: Verify that VLANs are configured consistently on all trunk ports. Start by finding Trunk Ports. Then see what type of port they are connected to. Whether the port it is connected to is another trunk port or a router port with subinterfaces. Then determine whether the configured VLANs are the same on both ends of the link.
L2
-
CDP and LLDP: Details about CDP and LLDP neighbor discovery
-
Layer 2 Interfaces: Displays information about the network layer 2 interfaces
-
MAC Entries: Details about the Network MAC addresses
-
STP Roots: Gets all root bridges for Rapid-PVST, RSTP, and MSTP instances. Finds any devices acting as root bridges for any VLAN. Can be used as the basis of a query that verifies that the root is correctly computed, for example, based on device naming conventions.
-
Trunk Vlans Not In STP: Finds any VLAN trunked on an interface that is not present in Rapid-PVST and MSTP. Searches each interface for trunk and builds a list of VLANs to compare with Rapid-PVST and MSTP.
-
VLAN: VLAN information
L3
-
BGP Peerings Advertising Default Route: Finds BGP peerings on which the default route is advertised. Can be used to review where the default route is announced.
-
BGP Peerings Not Established: Finds all BGP peerings that are enabled, but not established.
-
Layer 3 Interfaces: Details about the network layer 3 interfaces
-
Number Of RFC 1918 Routes: Gets the number of IPv4 and IPv6 routes in the network to RFC 1918 private subnets. Counts the number of distinct prefixes on routes across all devices and VRFs.
-
Route Leaking Between VRFs: Finds all routes that exist in multiple VRFs to find possible "route leaking". Traverse each VRF on all devices to find prefixes existing in multiple VRFs.
-
Source NAT Correctness: Verify that a device's source nat translations use source IPs belonging to the device's interface subnets.
-
Subnet Usage On Default VRF: Estimates the IP address utilization per SVI subnet based on ARP entries. Finds the subnets assigned to SVIs, and then groups the IP addresses occurring in ARP entries and the VLAN identifiers by the SVI subnet. Then for each subnet, the total number of IP addresses possible in the subnet is compared with the number of IPs actually active on any of the SVIs sharing the subnet. Limitation: the query does not consider per-VRF IP usage, so may overestimate IP address utilization.
-
VPC Mlag Route Consistency: Finds route inconsistencies among VPC/MLAG pairs. Checks the routing table between all VPC/MLAG pairs (Cisco NX-OS and Arista). Finds prefixes that are routed on one peer and not the other. Excludes VRFs named
management. Applies only to Cisco NX-OS and Arista EOS devices. -
VRFs: Lists the VRFs defined in the network
Security
CVEs
-
CVE Configuration Analysis Statistics: Measures how many CVE findings are eliminated on the basis of device configuration Every CVE depends on platform attributes such as the operating system and its version. Some CVEs also depend on the state of the device as determined by its configuration file. This query counts how many devices were not impacted by a particular CVE because of the state of its configuration file.
-
CVE violations by CVE: Verifies that every CVE impacts zero devices Includes the severity of each CVE and the number of affected devices
-
CVE violations by device: Verifies that every device is impacted by zero CVEs Output includes counts of each type of severity and each type of finding basis.
STIGs
The Forward Library includes more than 300 STIG (Security Technical Implementation Guide, Department of Defense (DoD) policy and security controls) queries. See the full list in the NQE Library application.
CKLB Export
CKLB Export generates STIG compliance reports in .ckl format, documenting findings from the STIGs Findings query in a DoD-compliant format.
To download a CKLB report:
- Open the NQE Library and locate the STIGs Findings query.
- Run the query to generate results.
- In the results pane, click Export and choose Download .ckl report (STIG).
The CKLB report can then be used with DoD tools like the STIG Viewer for further analysis.
vendor-specific
Cisco
-
BGP Route Maps Using Undefined Prefix Lists: All BGP IOS devices using route-map should be. Cisco IOS devices use route-map to control BGP traffics. Route-maps use prefix-lists as sources of IP addresses and subnets. If the route-map refers to a prefix-list that does not exist, then the route-map is wide open. This check follows this logic:
- look at router bgp config to find route-map names
- look at route-maps found in 1. and look for prefix-list name
- look for the existence of prefix-list in 2.
-
BPDU Guard enabled on access ports: Verifies that all access ports have BPDU Guard enabled Restricted to Cisco IOS and IOS-XE devices. BPDU can either be enabled on an interface directly, or can be configured indirectly by enabling spanning-tree portfast bpduguard and then enabling portfast on an interface. Both types of configuration are considered
-
Cisco Interface Count By Media Type: Gets number of interfaces for each distinct media type on Cisco devices Displays the media type for each interface of a Cisco device. Example media type values include
RJ45,10/100/1000BaseT, and10Gbase-SRas well asAuto Select,unknown, andunknown media type. -
Cisco Interface Transceiver Power Check: Finds interfaces where the rxPower is worse than -30db. Cisco-specific. Requires Custom Command collection. Specifically, ensure
show interfaces transceiveris collected. -
Cisco VTP Client or Server: Verifies that Cisco devices are not using the VLAN trunk protocol
-
Cisco WS-C3850 Overutilized TCAM check: Finds Cisco WS-C3850 devices with overutilized TCAMs. This logic is specific to Cisco WS-C3850. Requires custom command collection, specifically
show platform hardware fed switch active fwd-asic resource tcam utilizationmust be collected. A TCAM is considered over-utilized if used memory is 90% or more of max memory. -
Edge Ports With CDP Enabled: Finds all access interfaces on Cisco IOS where CDP enabled. Limited to Cisco IOS and IOS-XE devices, because the query uses vendor-and-OS-specific configuration patterns to extract the info. First, determine globally CDP enabled, then determine edge ports, then determine if CDP is enabled.
-
Host Name To Device Name Consistency - Cisco and Arista: Finds Cisco and Arista devices where device name and host name do not match. Compares the device names as configured in the Forward Platform with host name as it appears within the device's configuration.
-
Interfaces with error status - Cisco and Arista: Finds Cisco and Arista ports that are down due to an error This NQE evaluates the output of "show interface detail" to find ports on Cisco and Arista devices that have an error status, such as err-disabled.
-
NXOS Features: Compares actual versus enabled features on Cisco NX-OS devices. This is an example query that can be customized to compare against some set of features. Limited to Cisco NX-OS devices, since it uses vendor-specific config pattern matches.
-
VTY Ports Allowing Non SSH Protocols: Finds all protocols allowed on line vty ports, other than SSH. Limited to Cisco IOS and IOS-XE devices, because the query uses vendor-and-OS-specific configuration patterns to extract the info.
F5
- F5 NTP Servers: Gets the list of NTP servers on F5 devices. This query requires users to enable the collection of
custom command
show running-configfor F5 devices. If this custom command is not collected the query will return no rows.
Fortinet
- Host Name To Device Name Consistency: Finds Fortinet devices where device name and host name do not match Compares the device names as configured in the Forward Platform with host name as it appears within the device's configuration.
Juniper
-
Host Name To Device Name Consistency: Finds JunOS devices where device name and host name do not match Compares the device names as configured in the Forward Platform with host name as it appears within the device's configuration.
-
Interface filters: Lists IPv4 (inet) input and output filters for JUNOS Lists the interfaces that are configured with family inet (IPv4) Then list the input and output filters for those interfaces.
Palo Alto Networks
- Host Name To Device Name Consistency: Finds PANOS devices where device name and host name do not match Compares
the device names as configured in the Forward Platform with host name as it appears within the device's configuration.
The
_vsyshas been removed for the name comparison, but it will appear in the results table.