First Steps
Path Analysis — Getting Started / First Steps
Path Analysis helps you see how traffic behaves across your modeled network — which devices forward it, where policies apply, and whether it’s delivered, blocked, or dropped.
Forward does not simulate packets in real time. Instead, it uses the configuration and state collected from your
devices to build a mathematical model of your network.
When you run a path search, Forward interprets your query, matches it against the model’s indexed paths, and shows the
corresponding forwarding and policy outcomes.
What You’ll Learn
- How to run your first few path searches
- How to interpret results and outcomes
- How to focus on security-relevant hops
- How to use filters and traffic defaults
- Where to go next for deeper exploration
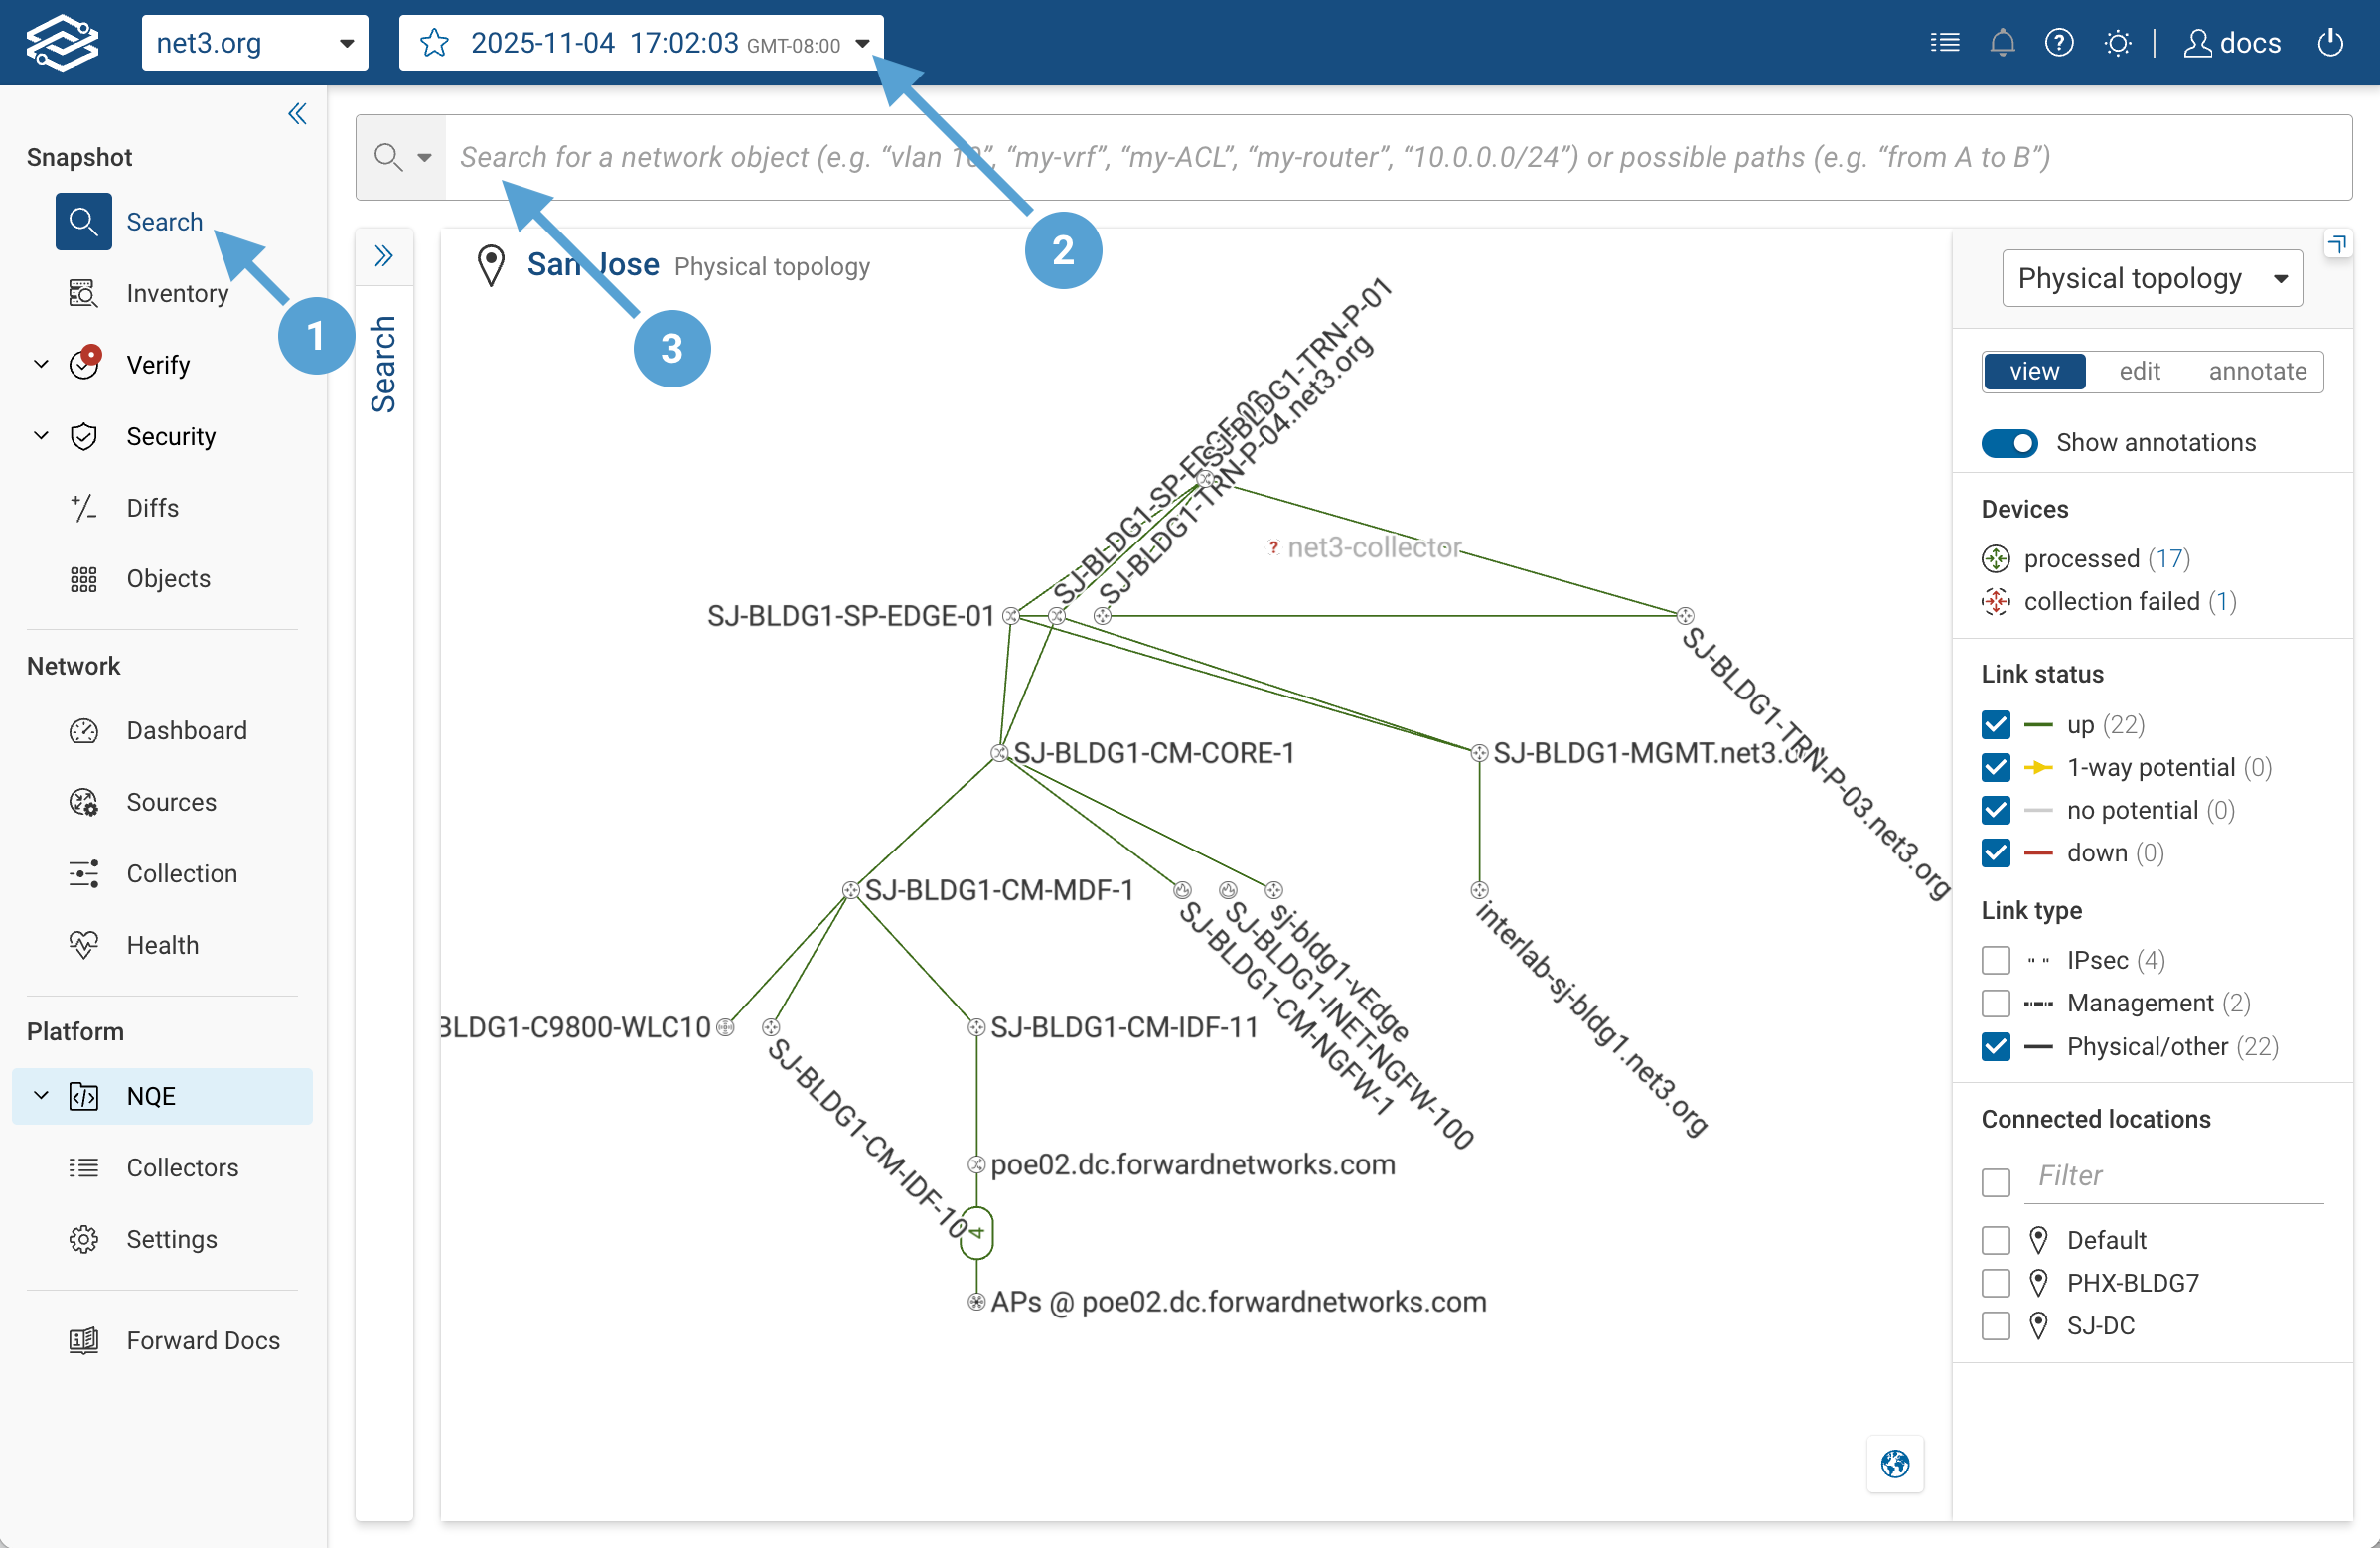
1. Launch Path Analysis
- From the application sidebar, open Search → Path Analysis.
- Select a snapshot that represents the network state you want to analyze.
- Click inside the search bar at the top.
Tip: If you’re not sure which snapshot to use, pick the latest successful snapshot — it represents your most recent collected state.
2. Run Your First Query
Try this simple example:
from(hostA) to(hostB)
This query searches for paths that start at hostA and end at hostB.
How will Forward know the IP address mapped to hostA and hostB?
If your organization’s Forward deployment has DNS zone transfer integration configured, Forward can automatically
resolve hostnames in your query to their corresponding IP addresses using data from your DNS servers.
That means you can type DNS names (for example, from(web01.corp.example.com)) instead of numeric IPs.
If the DNS zone transfer integration is not set up, hostnames must match objects already defined in your snapshot.
For more information about enabling DNS-based resolution, see DNS Resolution in Forward Networks
If you don’t have named hosts yet, you can use IP addresses directly:
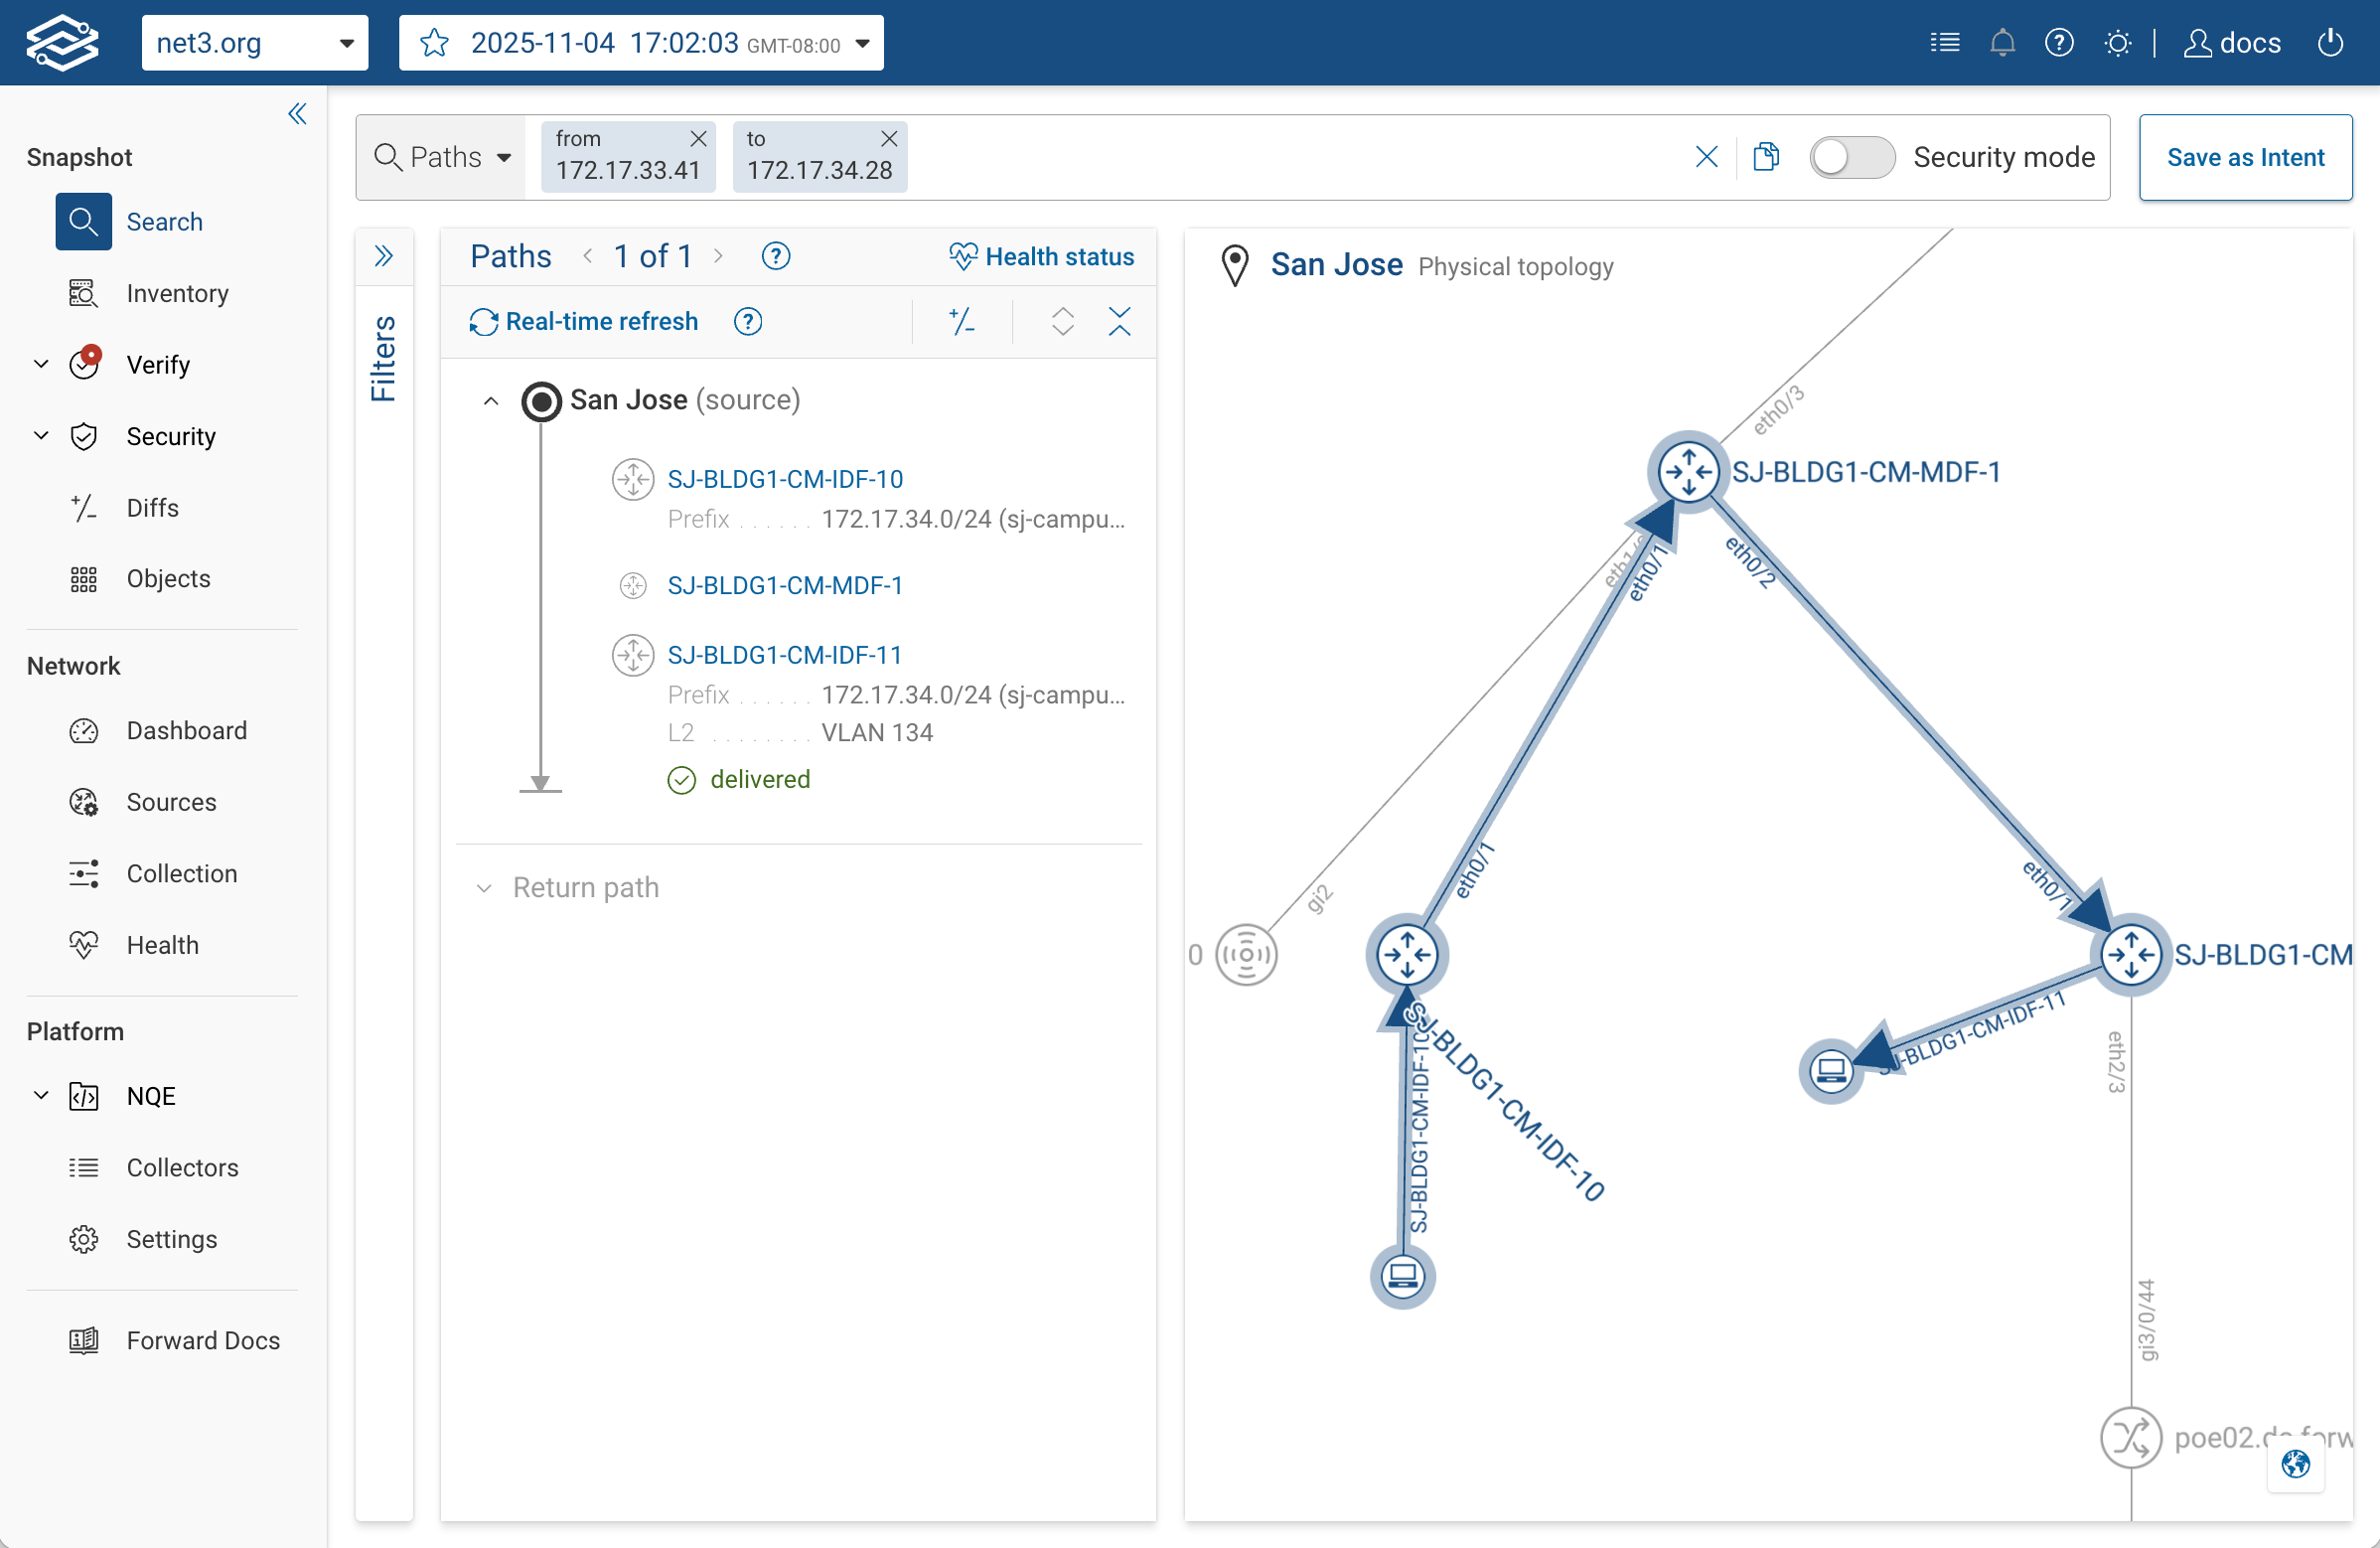
from(172.17.33.41) to(172.17.34.28)
Forward locates those IPs in the model—whether they belong to a device, appear in an ARP or ND table, or are reachable via routing—and returns all matching paths.
How from() and to() work: These functions define the start and end points of your path. When you enter a host, IP,
or VRF, Forward resolves it to to a concrete entry/exit location by checking:
- A device/interface that owns the IP (its own L3 address), or
- A device that has an ARP/ND entry for that IP (i.e., the host is behind that interface), or
- On pure L2 nodes, the broadcast domain pointing to the edge port toward the router that has the ARP/ND for that IP.
If multiple devices match, you will be prompted to disambiguate by adding at() (for a specific device) or in() (for
a logical network). Once both anchors are resolved, the model traces all feasible paths between them through the
network’s indexed topology.
3. Interpret the Results
When your path search completes, the results panel shows a step-by-step trace of every device hop between the source
and destination.
Each hop represents how one device handled the modeled packet, and each row can be expanded to reveal what the model
evaluated on that hop.
-
Hop List (left column) — A sequential view of the devices the packet traverses.
-
Details panel (middle column) — Clicking a hop opens detailed insight into what happened at that point in the network.
You can see:- The ingress and egress interfaces where the packet entered and exited.
- Header changes, including MAC addresses, VLAN tags, IPs, tunnel encapsulations, etc
Function-level breakdowns, such as routing decisions, ACL rule matches, NAT translations, PBR redirection, etc - A clear statement of the forwarding decision — for example:
“Routed to next hop IP 172.17.6.49 via eth0/2.110.”
-
“See device state” links — Open the original collected state or configuration data that governed this behavior.
These links bring up routing table entries, ARP/ND mappings, ACLs, interface configurations, or other state and configuration files providing traceability from the modeled result back to the real network data captured in your snapshot. -
Sample Packet (top of the details panel) — Shows the header fields currently being evaluated at that hop.
Any transformation (for example, NAT, VLAN change, or encapsulation) is highlighted, so you can see exactly how the packet evolved through the path. -
Topology Map (right panel) — A graphical representation of your network.
When you select a path, all relevant devices and links involved in that path are highlighted in blue.
The rest of the topology remains gray for context.
The blue-highlighted links represent the interfaces and connections the traffic may traverse for this modeled flow.
Use the hop details and See device state links together to understand not only what happened, but also why.
If something looks unexpected, drill down into the hop’s routing, ACL, or NAT view to see the exact table entry or
configuration line that determined that decision.

4. Specify Anchors in Your Query
You can refine your search query to inspect how traffic flows through specific devices or interfaces,
or to verify whether packets can reach their destination while bypassing certain network elements.
This helps test both connectivity and segmentation intent.
Inspect paths through a specific device or link:
from(hostA) to(hostB) through(firewall1)
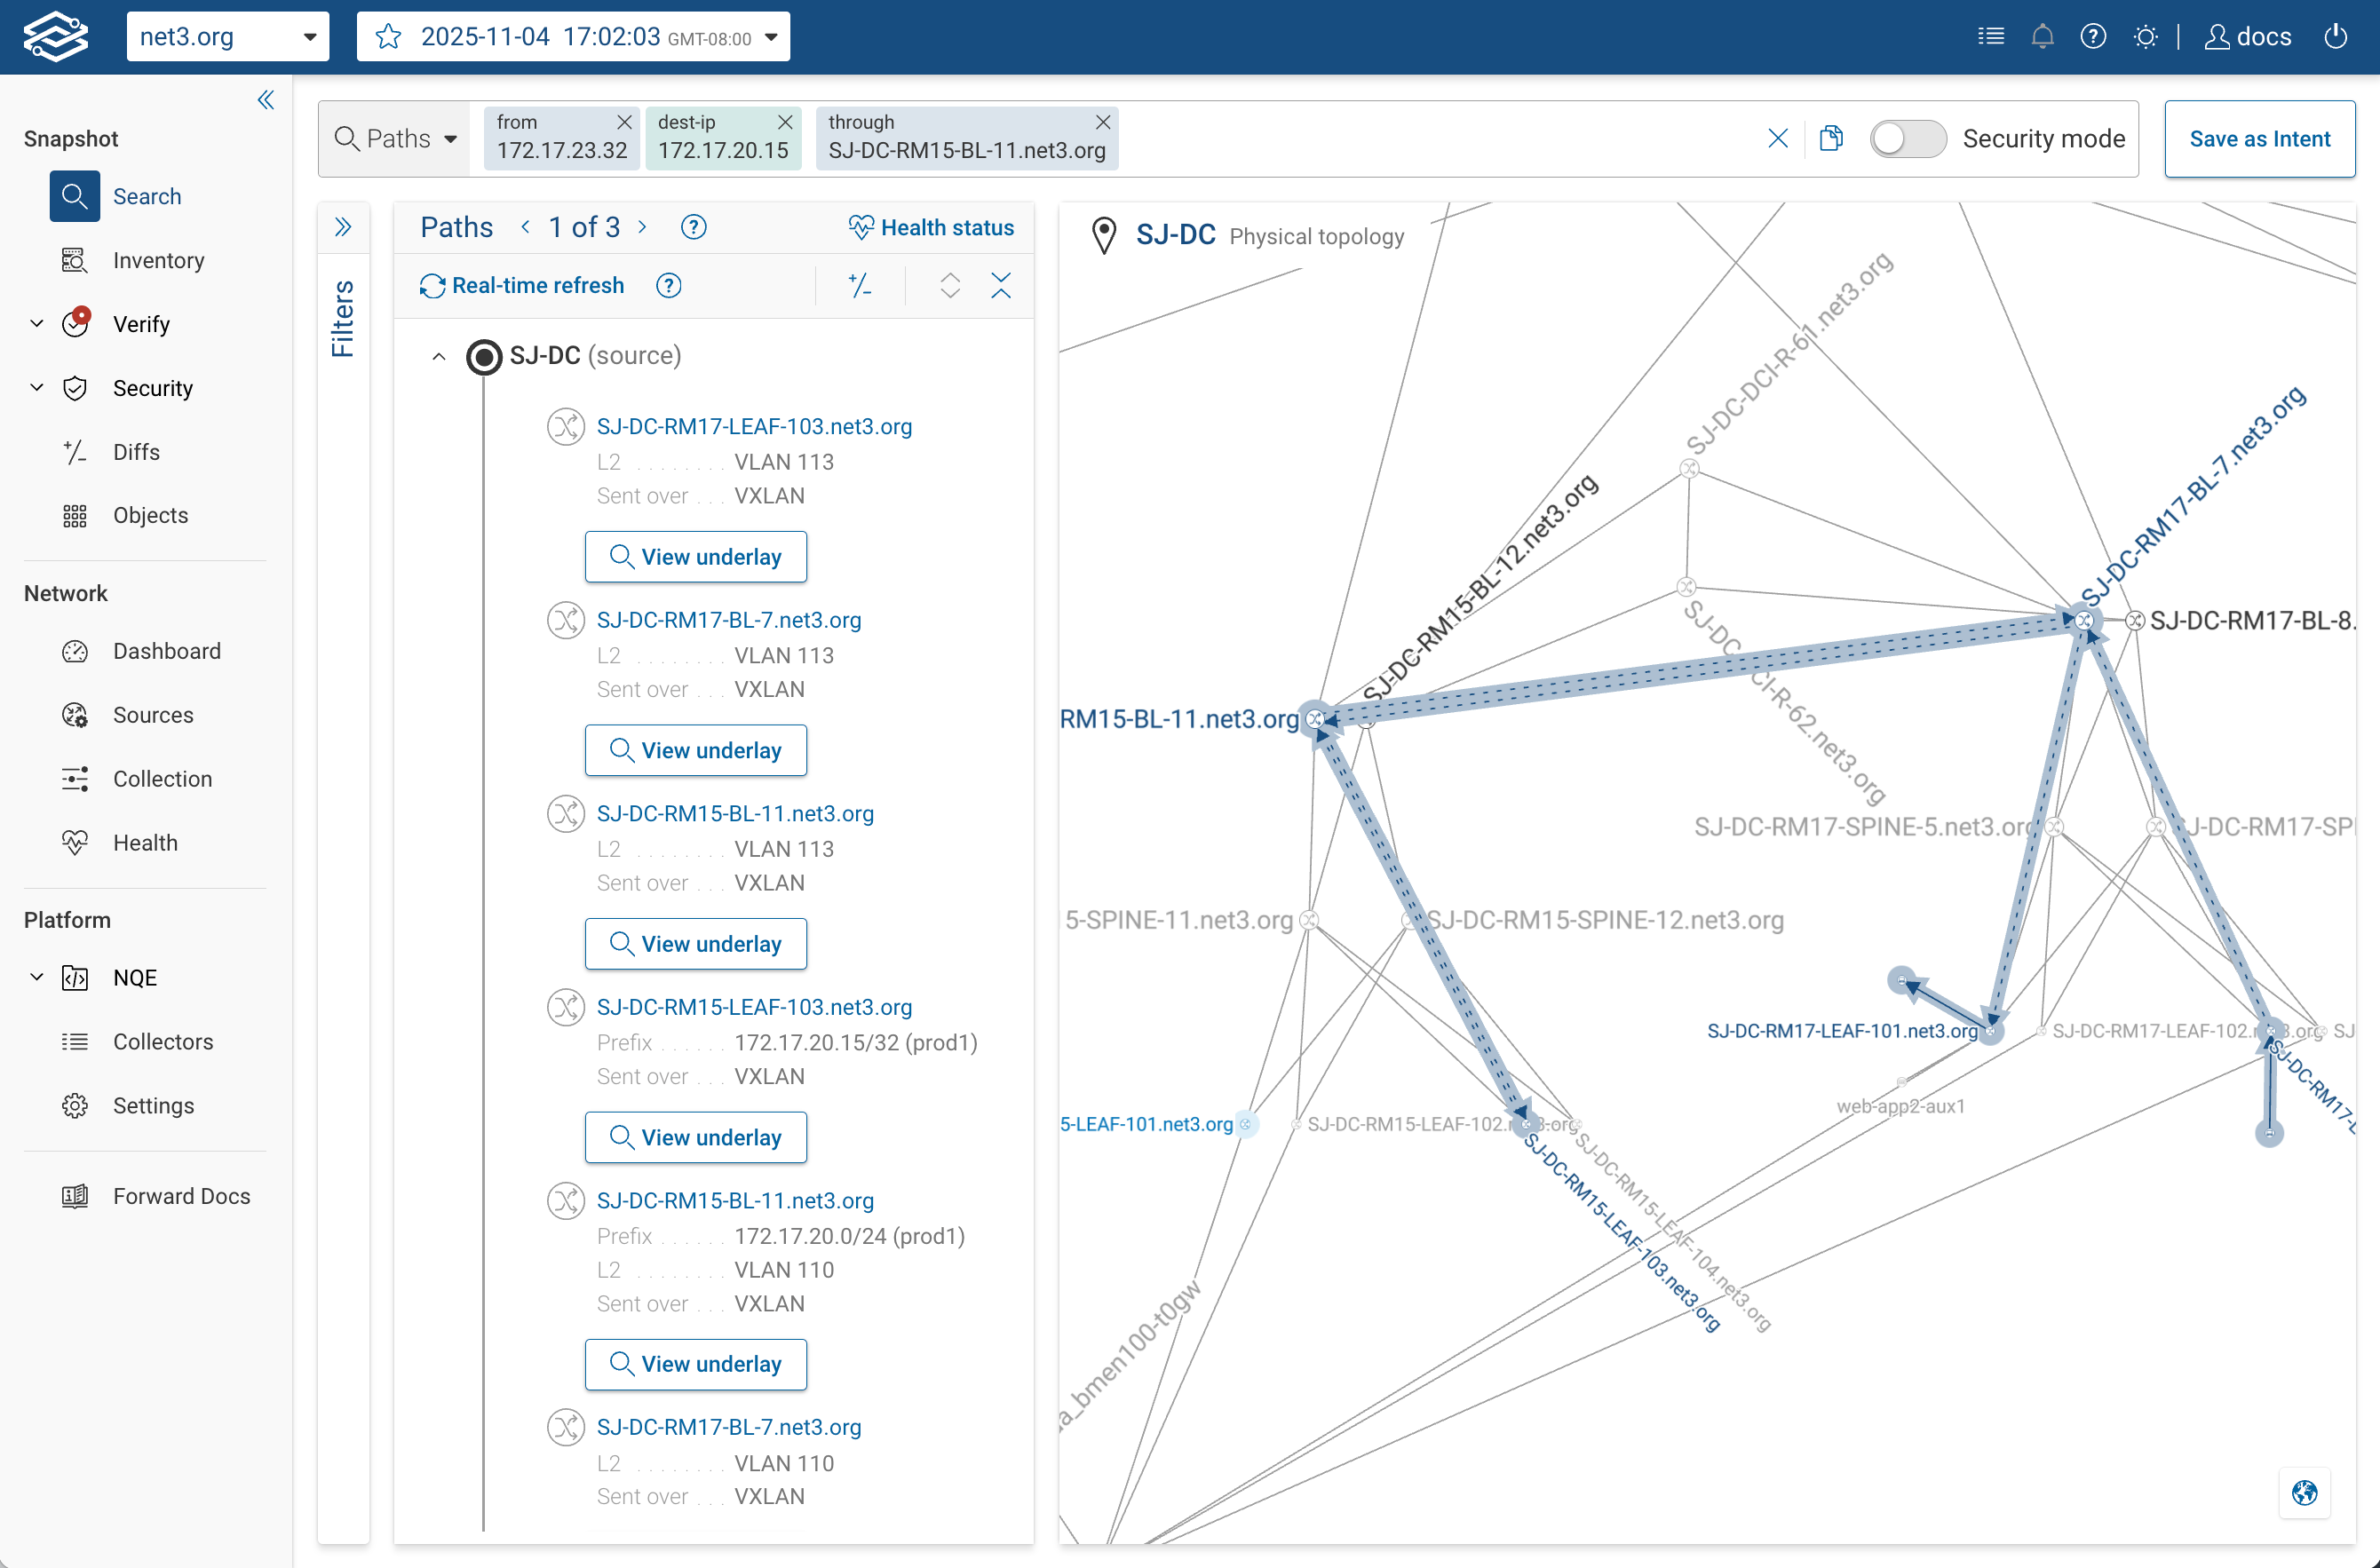
Use this to confirm that traffic between two points indeed traverses a particular enforcement point,
such as a firewall, router, or load balancer.
Check for alternate forwarding paths (bypass):
from(hostA) to(hostB) bypass(firewall1)
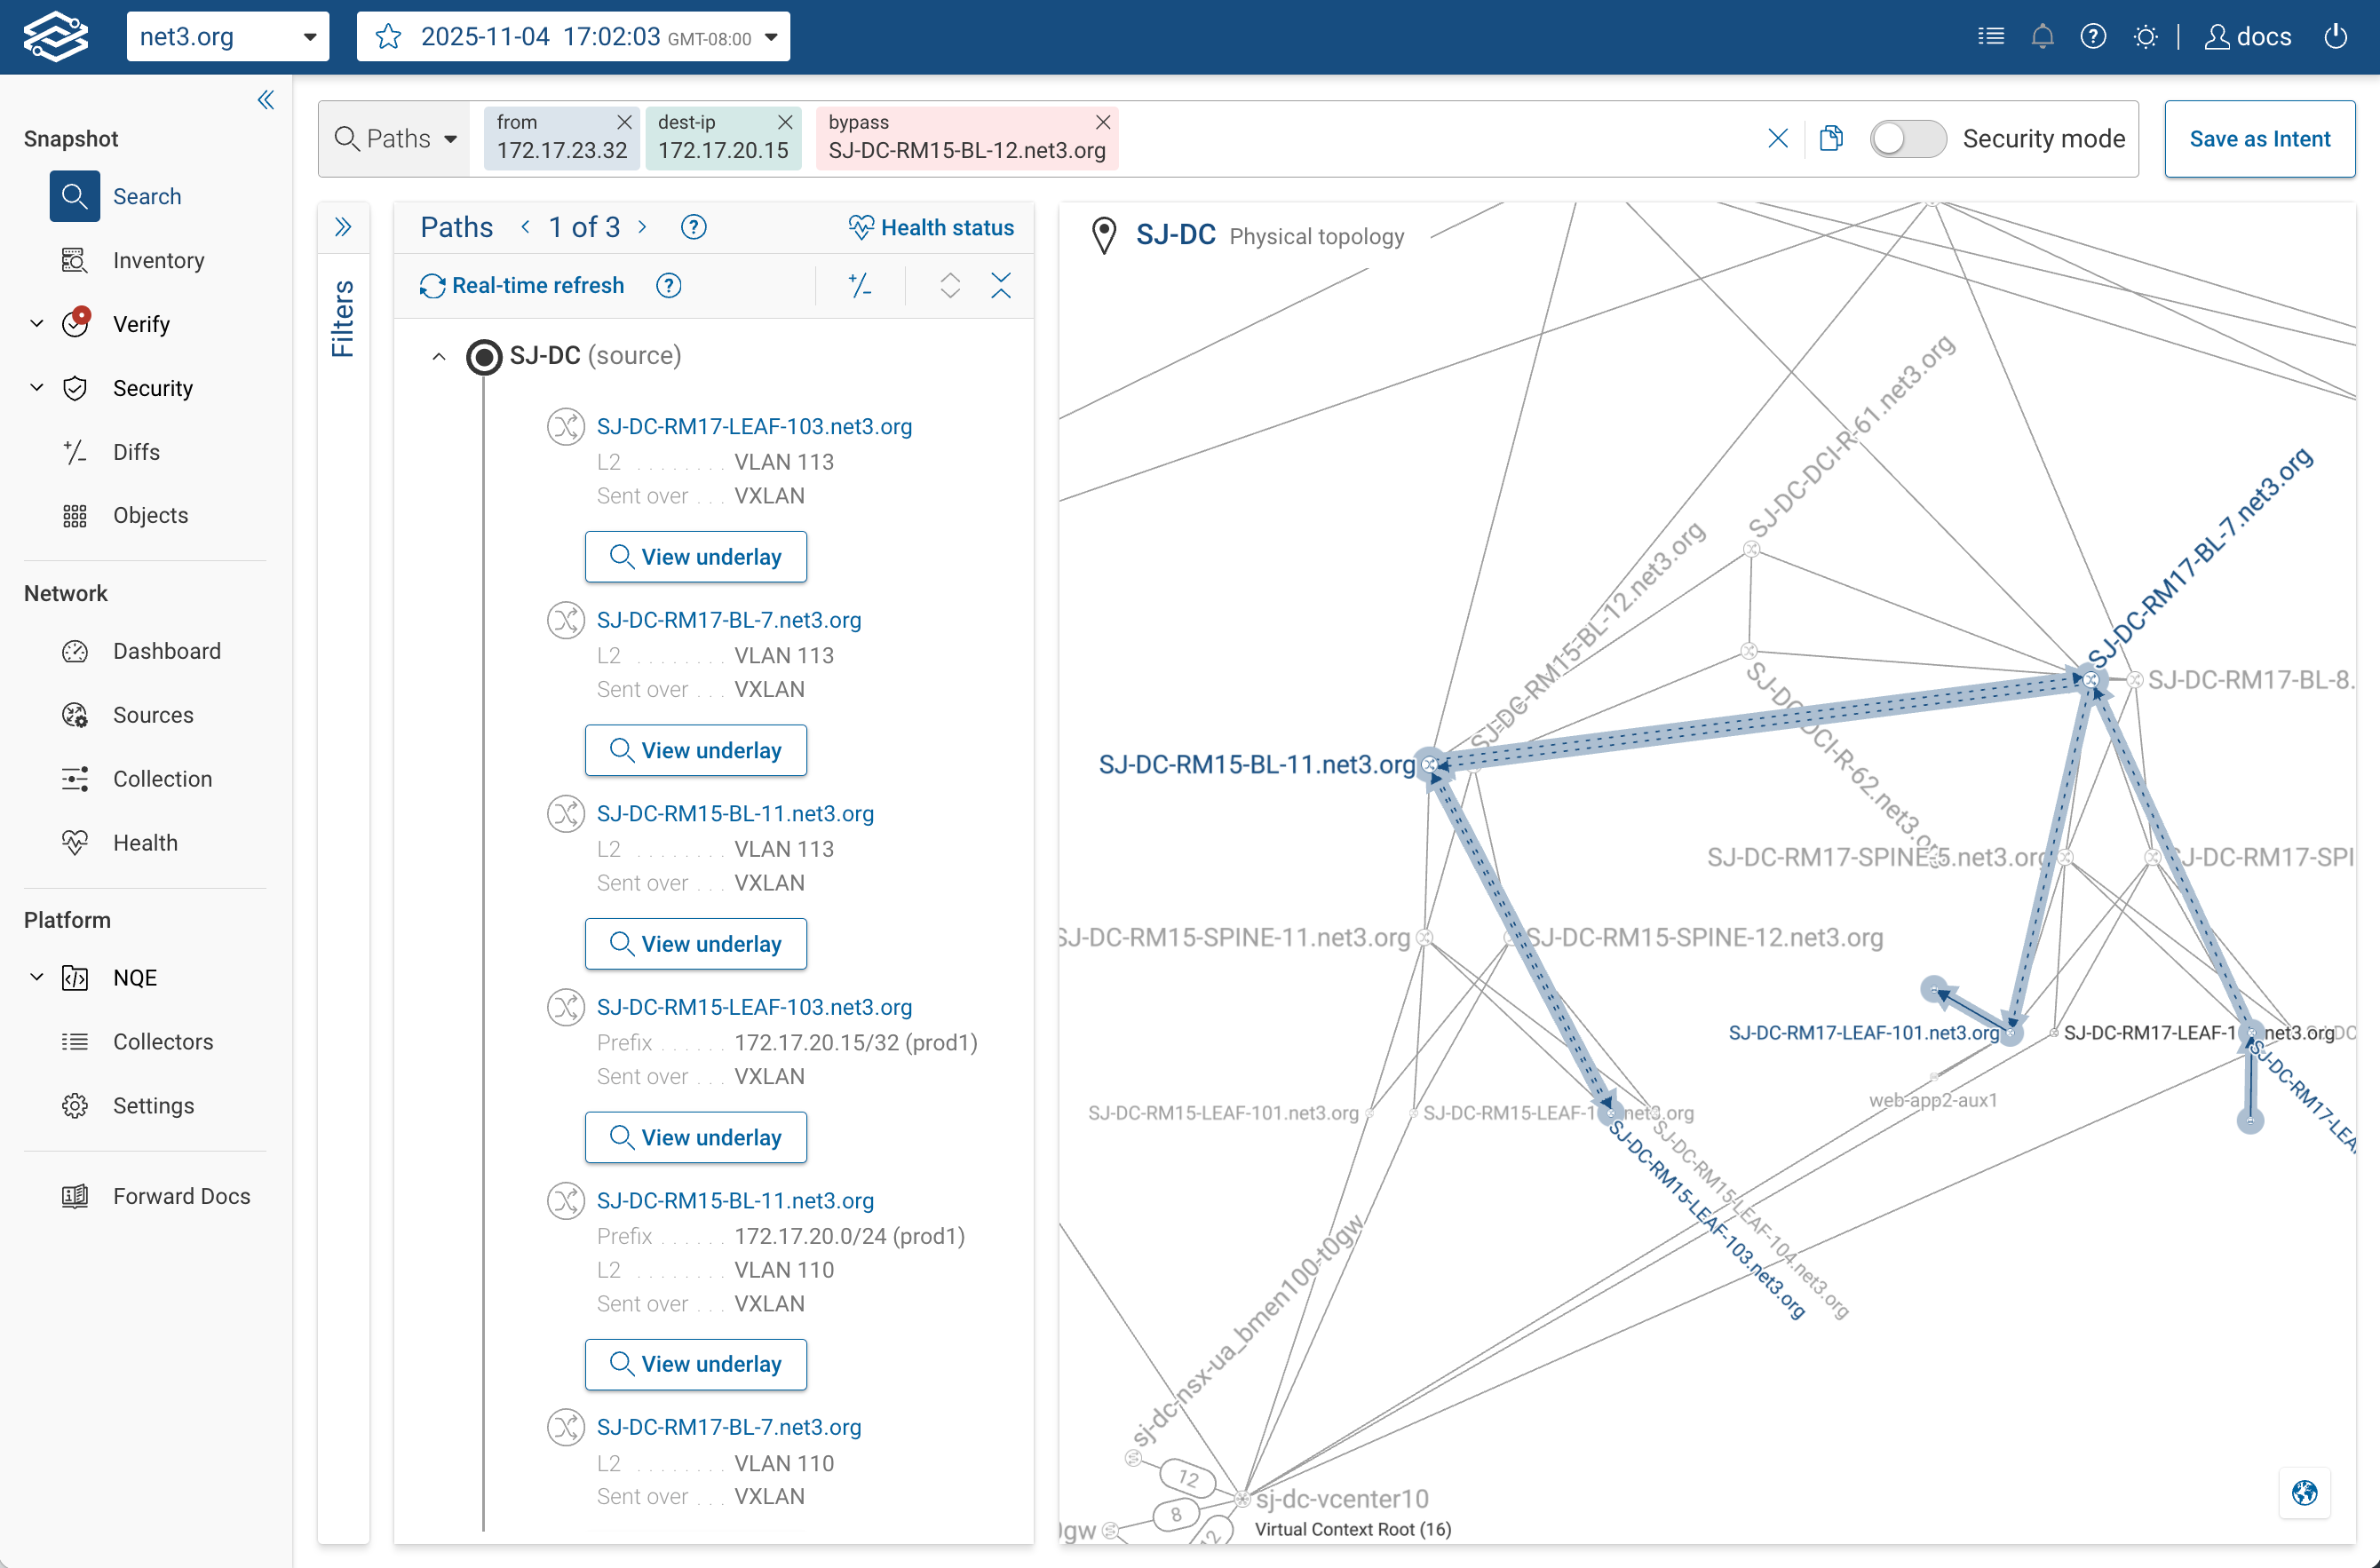
This lets you verify whether packets could be delivered without going through a required policy device —
a common check when validating segmentation or east–west isolation.
Constrain entry or exit points:
from(hostA) ingress(core-1) to(hostB)
from(hostA) to(hostB) egress(edge-fw xe-0/0/2)

These clauses restrict the model to paths that enter (ingress) or exit (egress) through specific interfaces or devices.
Each additional clause further narrows the candidate paths that match your search.
You can use multiple clauses to describe exactly how the traffic should flow.
5. Focus on Security: Security Mode
Security Mode is designed for security engineers who only need to see enforcement points — not every L2/L3 hop.

When toggled on, it filters the path to show:
- Firewalls and policy devices
- ACL and rule enforcement points
- NAT translations or address rewrites
Paths that only differ in intermediate L2/L3 hops but have the same enforcement points are consolidated.
It applies to:
- Forward paths
- Return paths
- Path Diffs (snapshot comparisons)
| Security mode off | Security mode on |
|---|---|
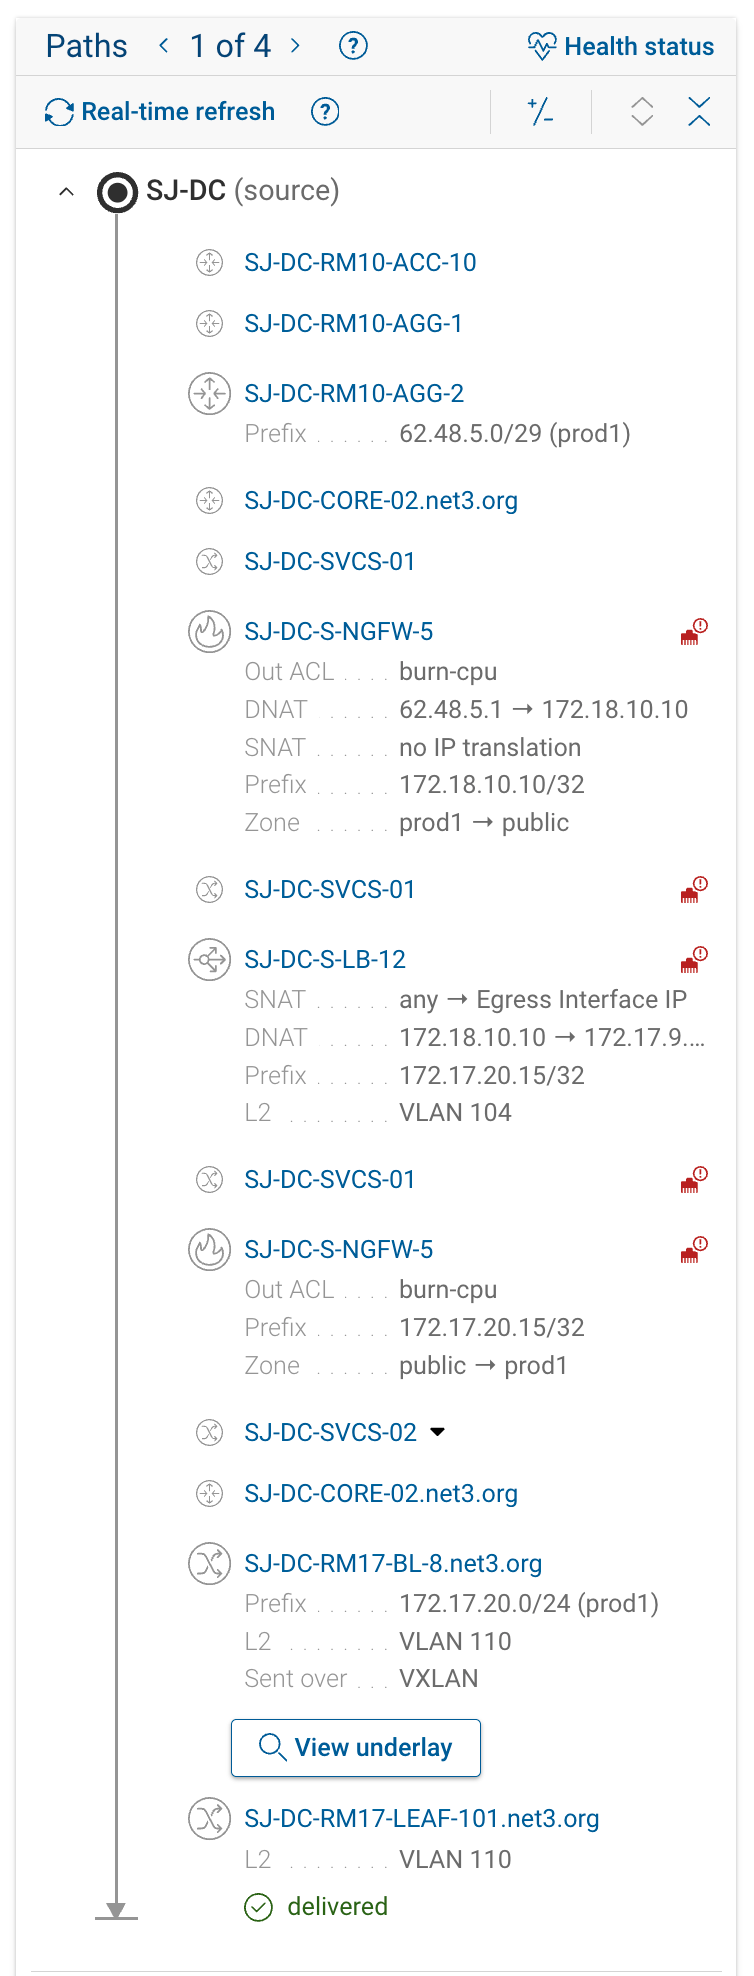 | 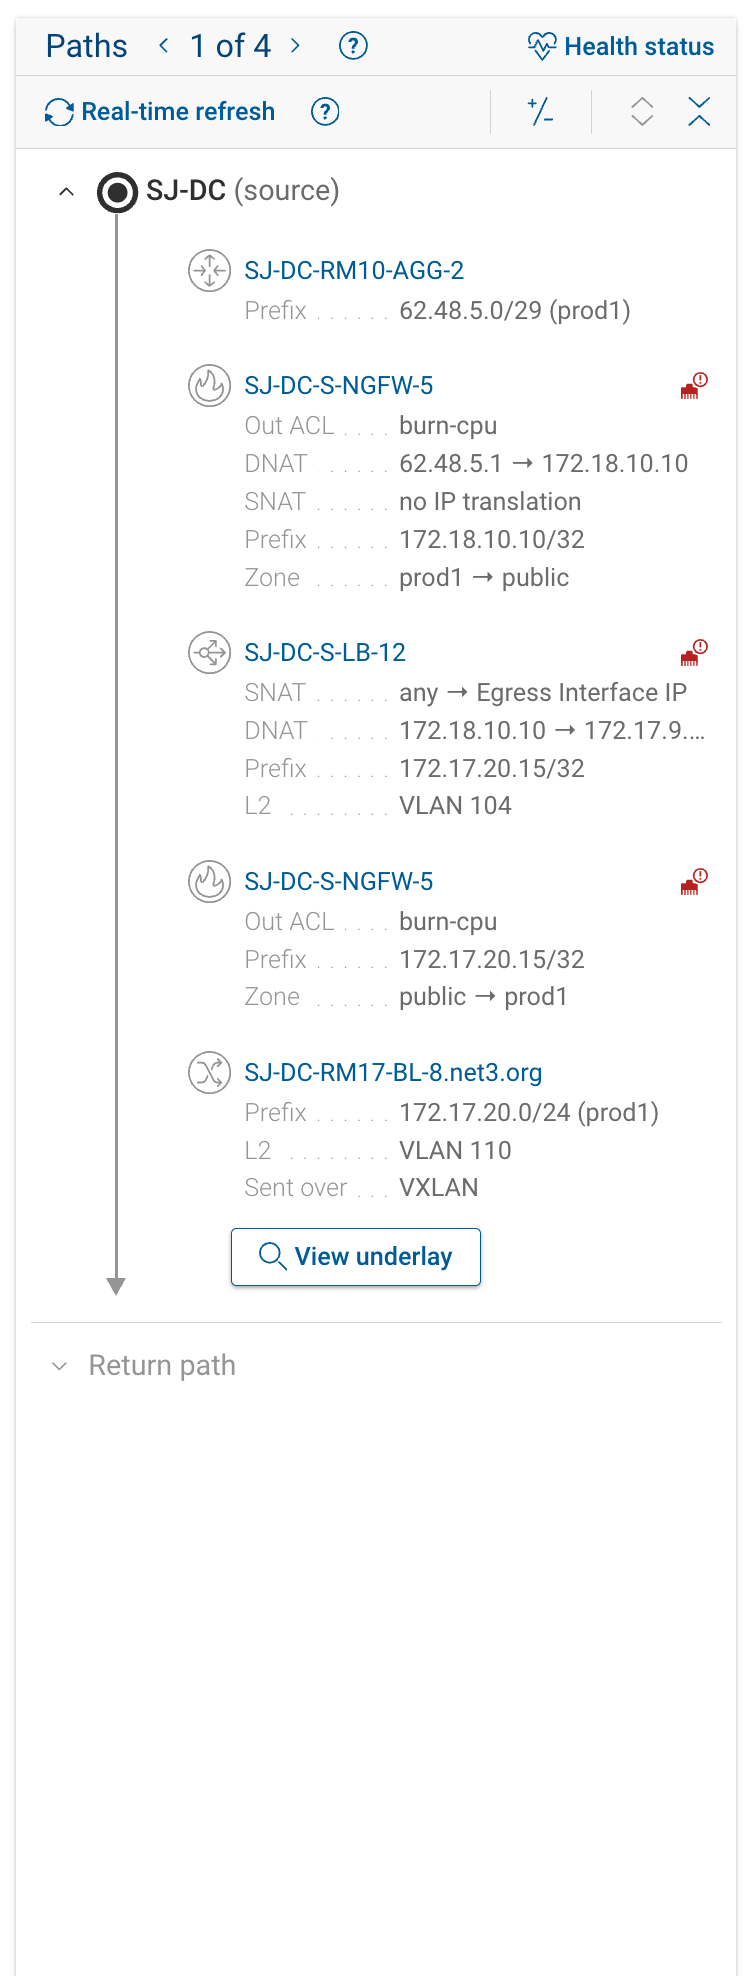 |
Use Security Mode to quickly validate segmentation or confirm that traffic passes through the expected enforcement devices.
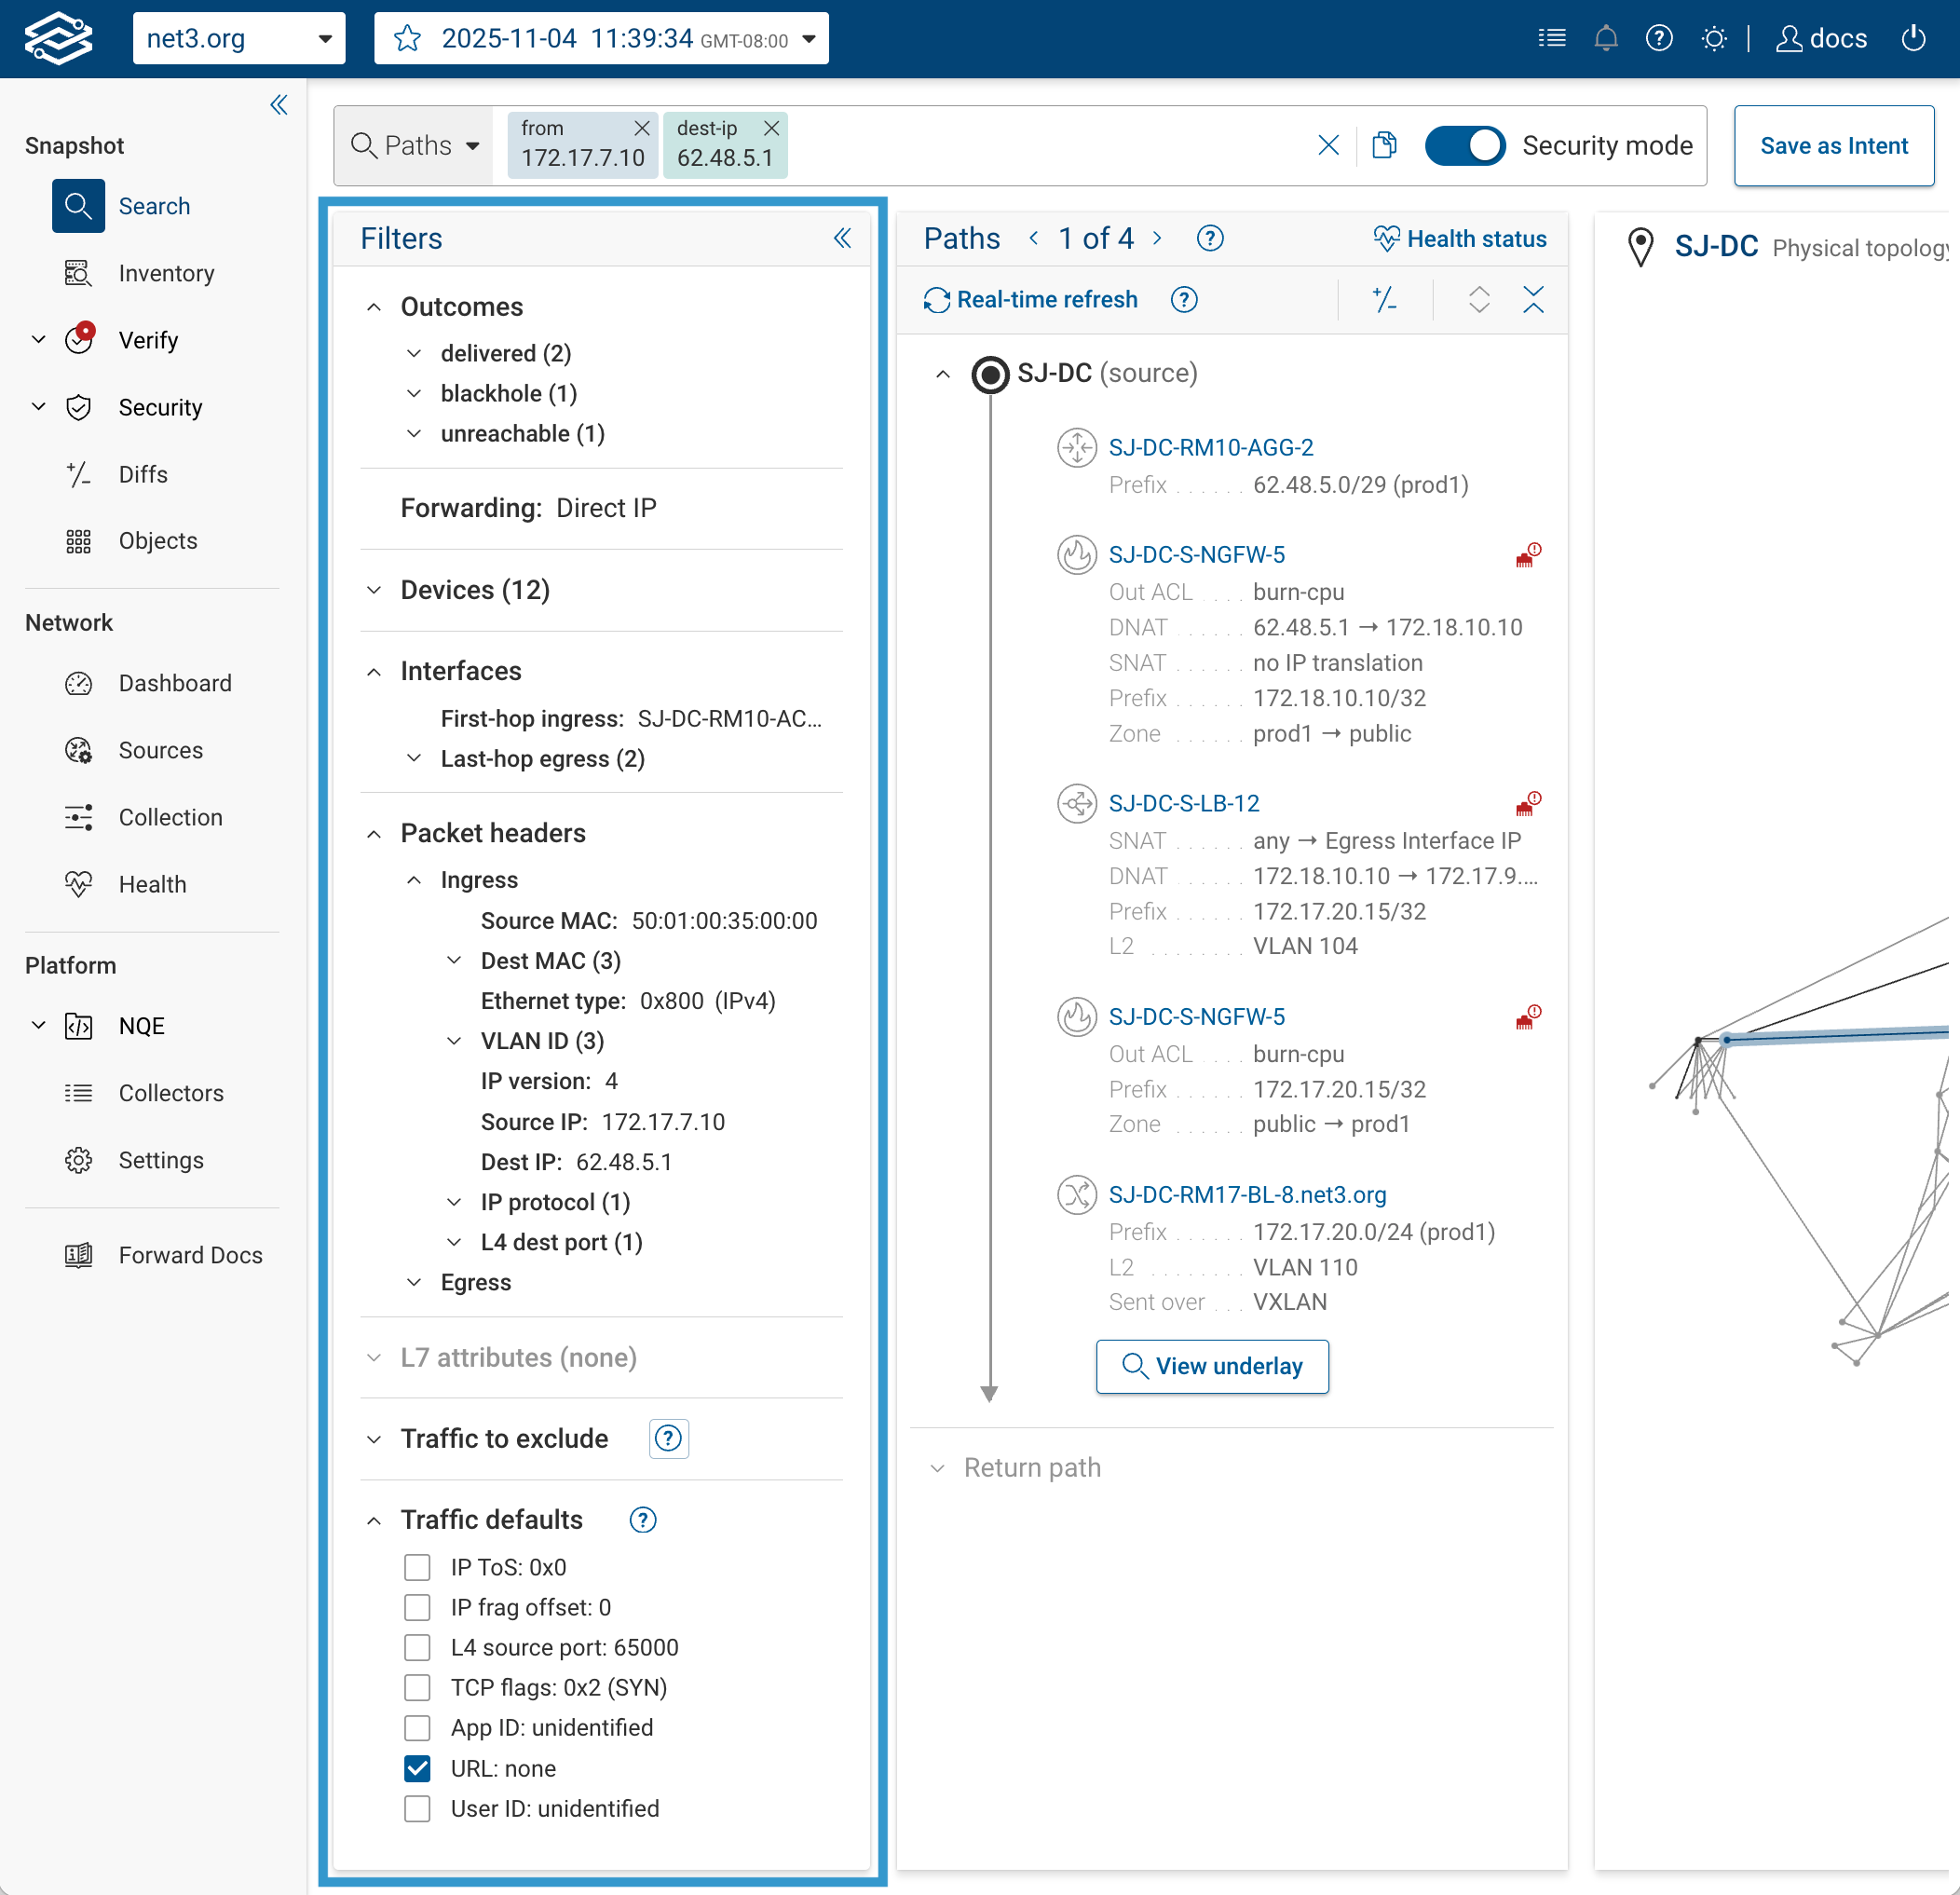
6. Refine Results with Filters
The Filters panel on the left side isn’t just a visual helper — it directly modifies the path search query
you’re running.
Every time you select or clear a checkbox, Forward rewrites the query and re-evaluates it against the model.
You can think of the filters list as a graphical shortcut for adding or removing query clauses, without typing them
manually.
- For example, checking
Outcomes → deliveredadds the same constraint as if you’d written
from(A) to(B) status(delivered)in the search bar. - Likewise, setting
IP protocol = TCPadds the appropriate header clause for TCP traffic.
Beyond convenience, the filters also show you a quick summary of what’s been found so far —
the counts beside each item (for example, "Outcomes → delivered (2)”) represent how many matching criteria currently
exist.
This lets you explore variations in outcomes or header combinations within the current result set.
- Clearing a filter broadens the search; adding one narrows it.
- The active filter state is included in the shared search URL, so collaborators see identical conditions.
Use the filters panel as both a query builder and a quick analysis tool.
Start broad, then progressively select attributes to isolate specific path types or policy behaviors.
If results disappear, re-enable excluded traffic or relax header constraints — over-filtering can eliminate valid
paths.
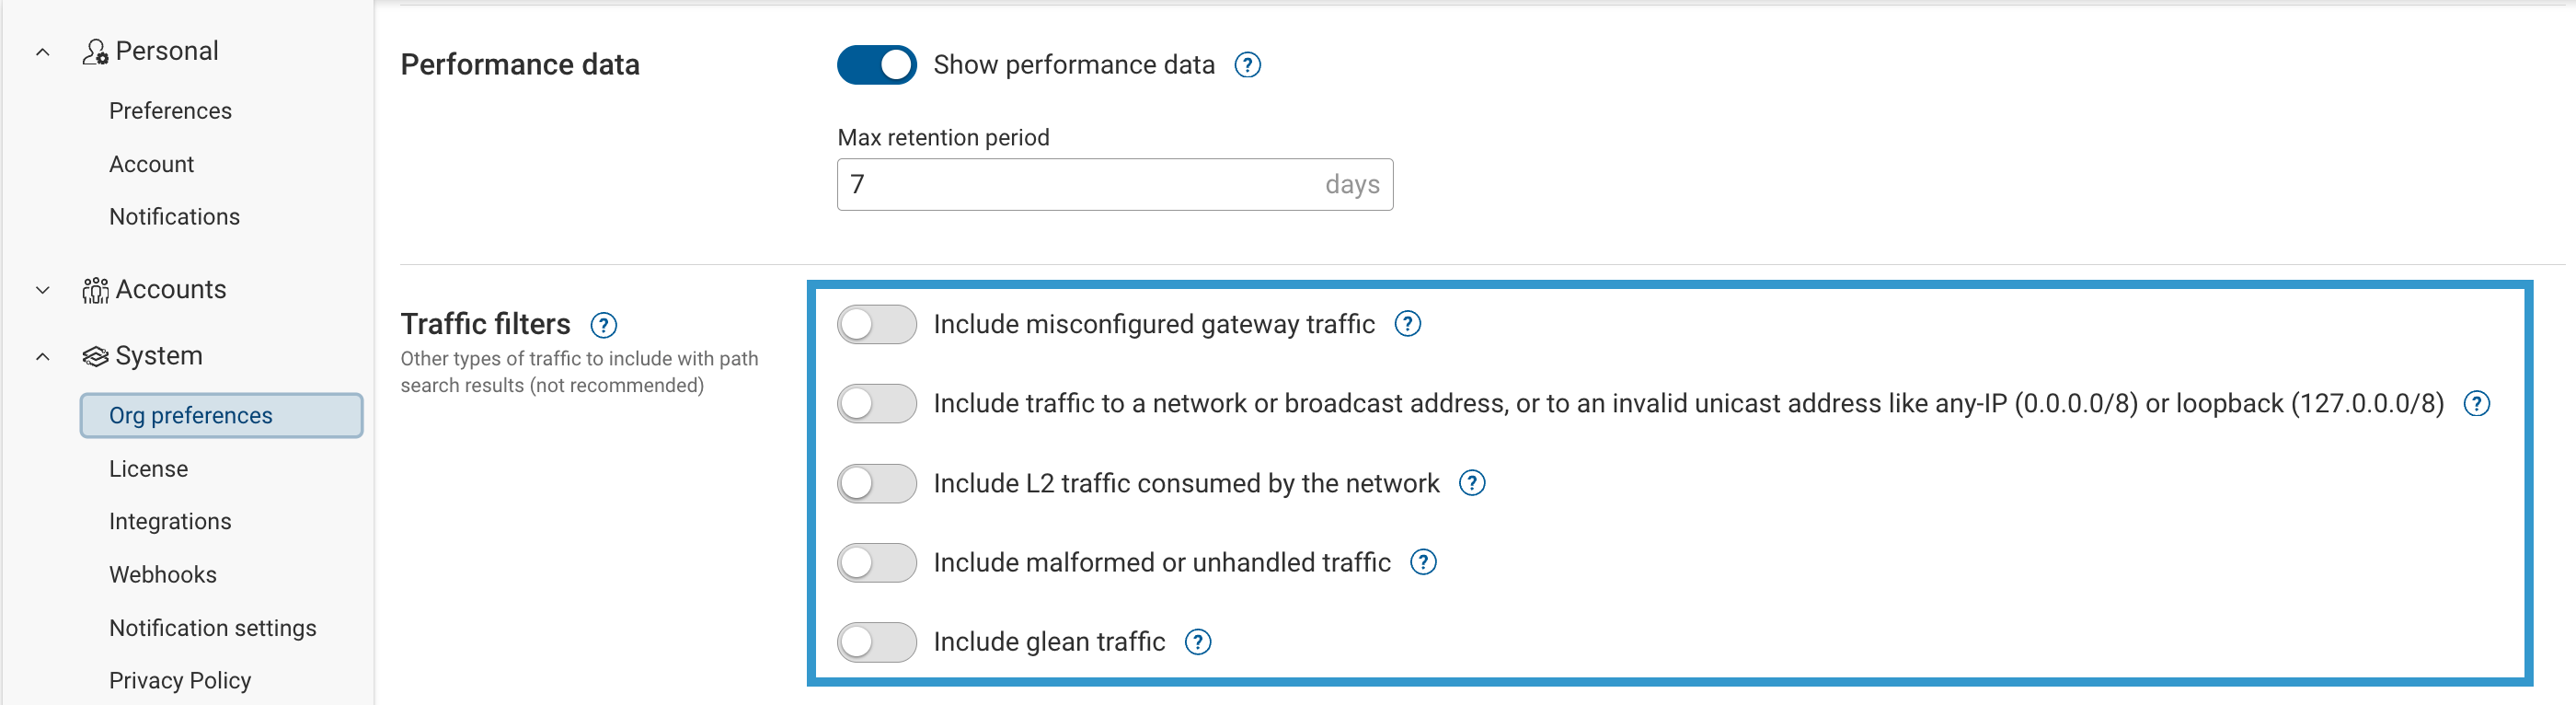
6.1 Traffic filters (org) vs Traffic to exclude (per-search)
There are two places to control whether uncommon/noisy traffic types are considered in Path Analysis:
- Org-level: System → Org preferences → Traffic filters
These switches define your organization’s default posture for what kinds of traffic are considered in searches.
- Per-search: Filters panel → Traffic to exclude
These checkboxes apply to the current search only and typically exclude the same traffic categories for cleaner, more realistic results.
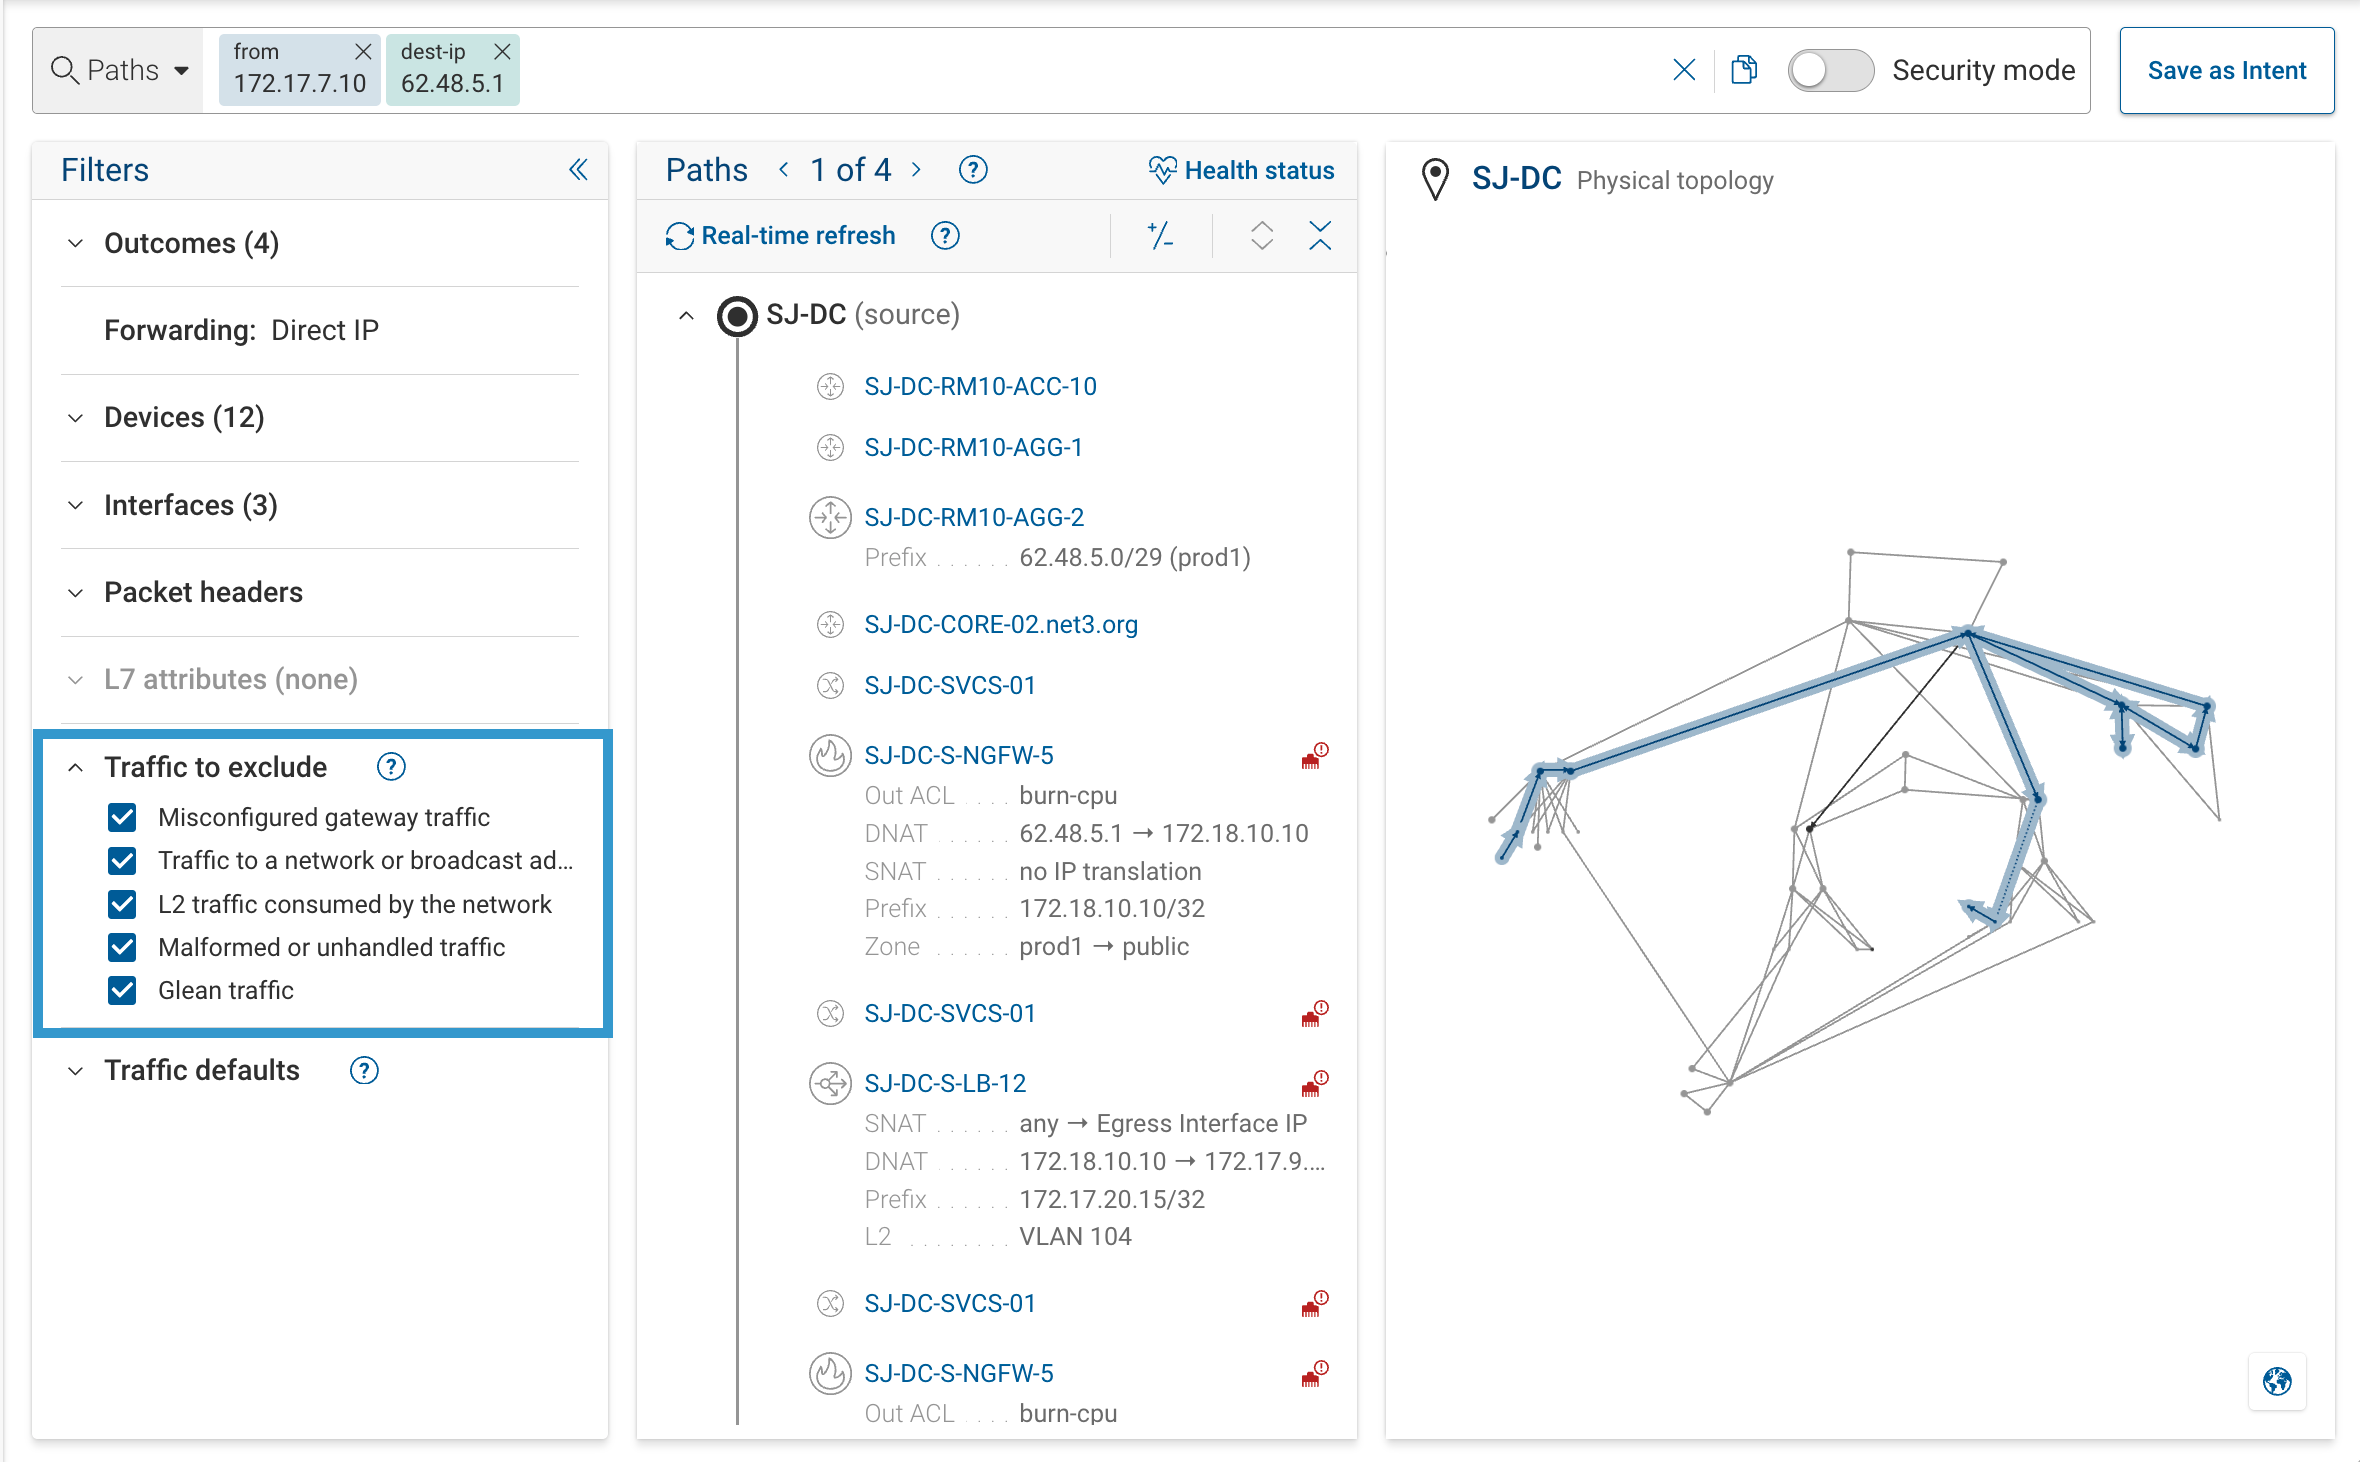
What these options mean
By default we exclude the following traffic types (recommended):
- Misconfigured gateway traffic
Flows where the source host sends traffic to an unexpected next-hop MAC address instead of its proper default gateway.
Example: a host in192.168.10.0/24sending traffic to10.10.10.10but using a destination MAC other than the router’s interface MAC (192.168.10.1 / router-MAC).
This can happen when a host uses the wrong gateway, or when ARP resolution is misconfigured or corrupted.
Such traffic is rare in production networks and excluded by default. - Traffic to a network/broadcast/invalid/loopback address
Includes packets to any-IP (0.0.0.0/8), broadcast or multicast networks, or loopback (127.0.0.0/8).
These are not valid end-to-end flows. - L2 traffic consumed by the network
Frames that are handled locally by devices (control or management frames) rather than forwarded between endpoints. - Malformed or unhandled traffic
Packets that violate protocol rules or cannot be parsed/processed by the model. - Glean traffic
Discovery traffic where a device attempts to learn a next hop (for example, ARP requests).
Typically excluded because it doesn’t represent real user data flows.
Recommendation: Keep these excluded (checked in Traffic to exclude, and off at Org preferences → Traffic filters) for realistic results. Turn them on only when debugging edge cases that require investigation. Enabling them can increase noise and inflate the number of paths returned.
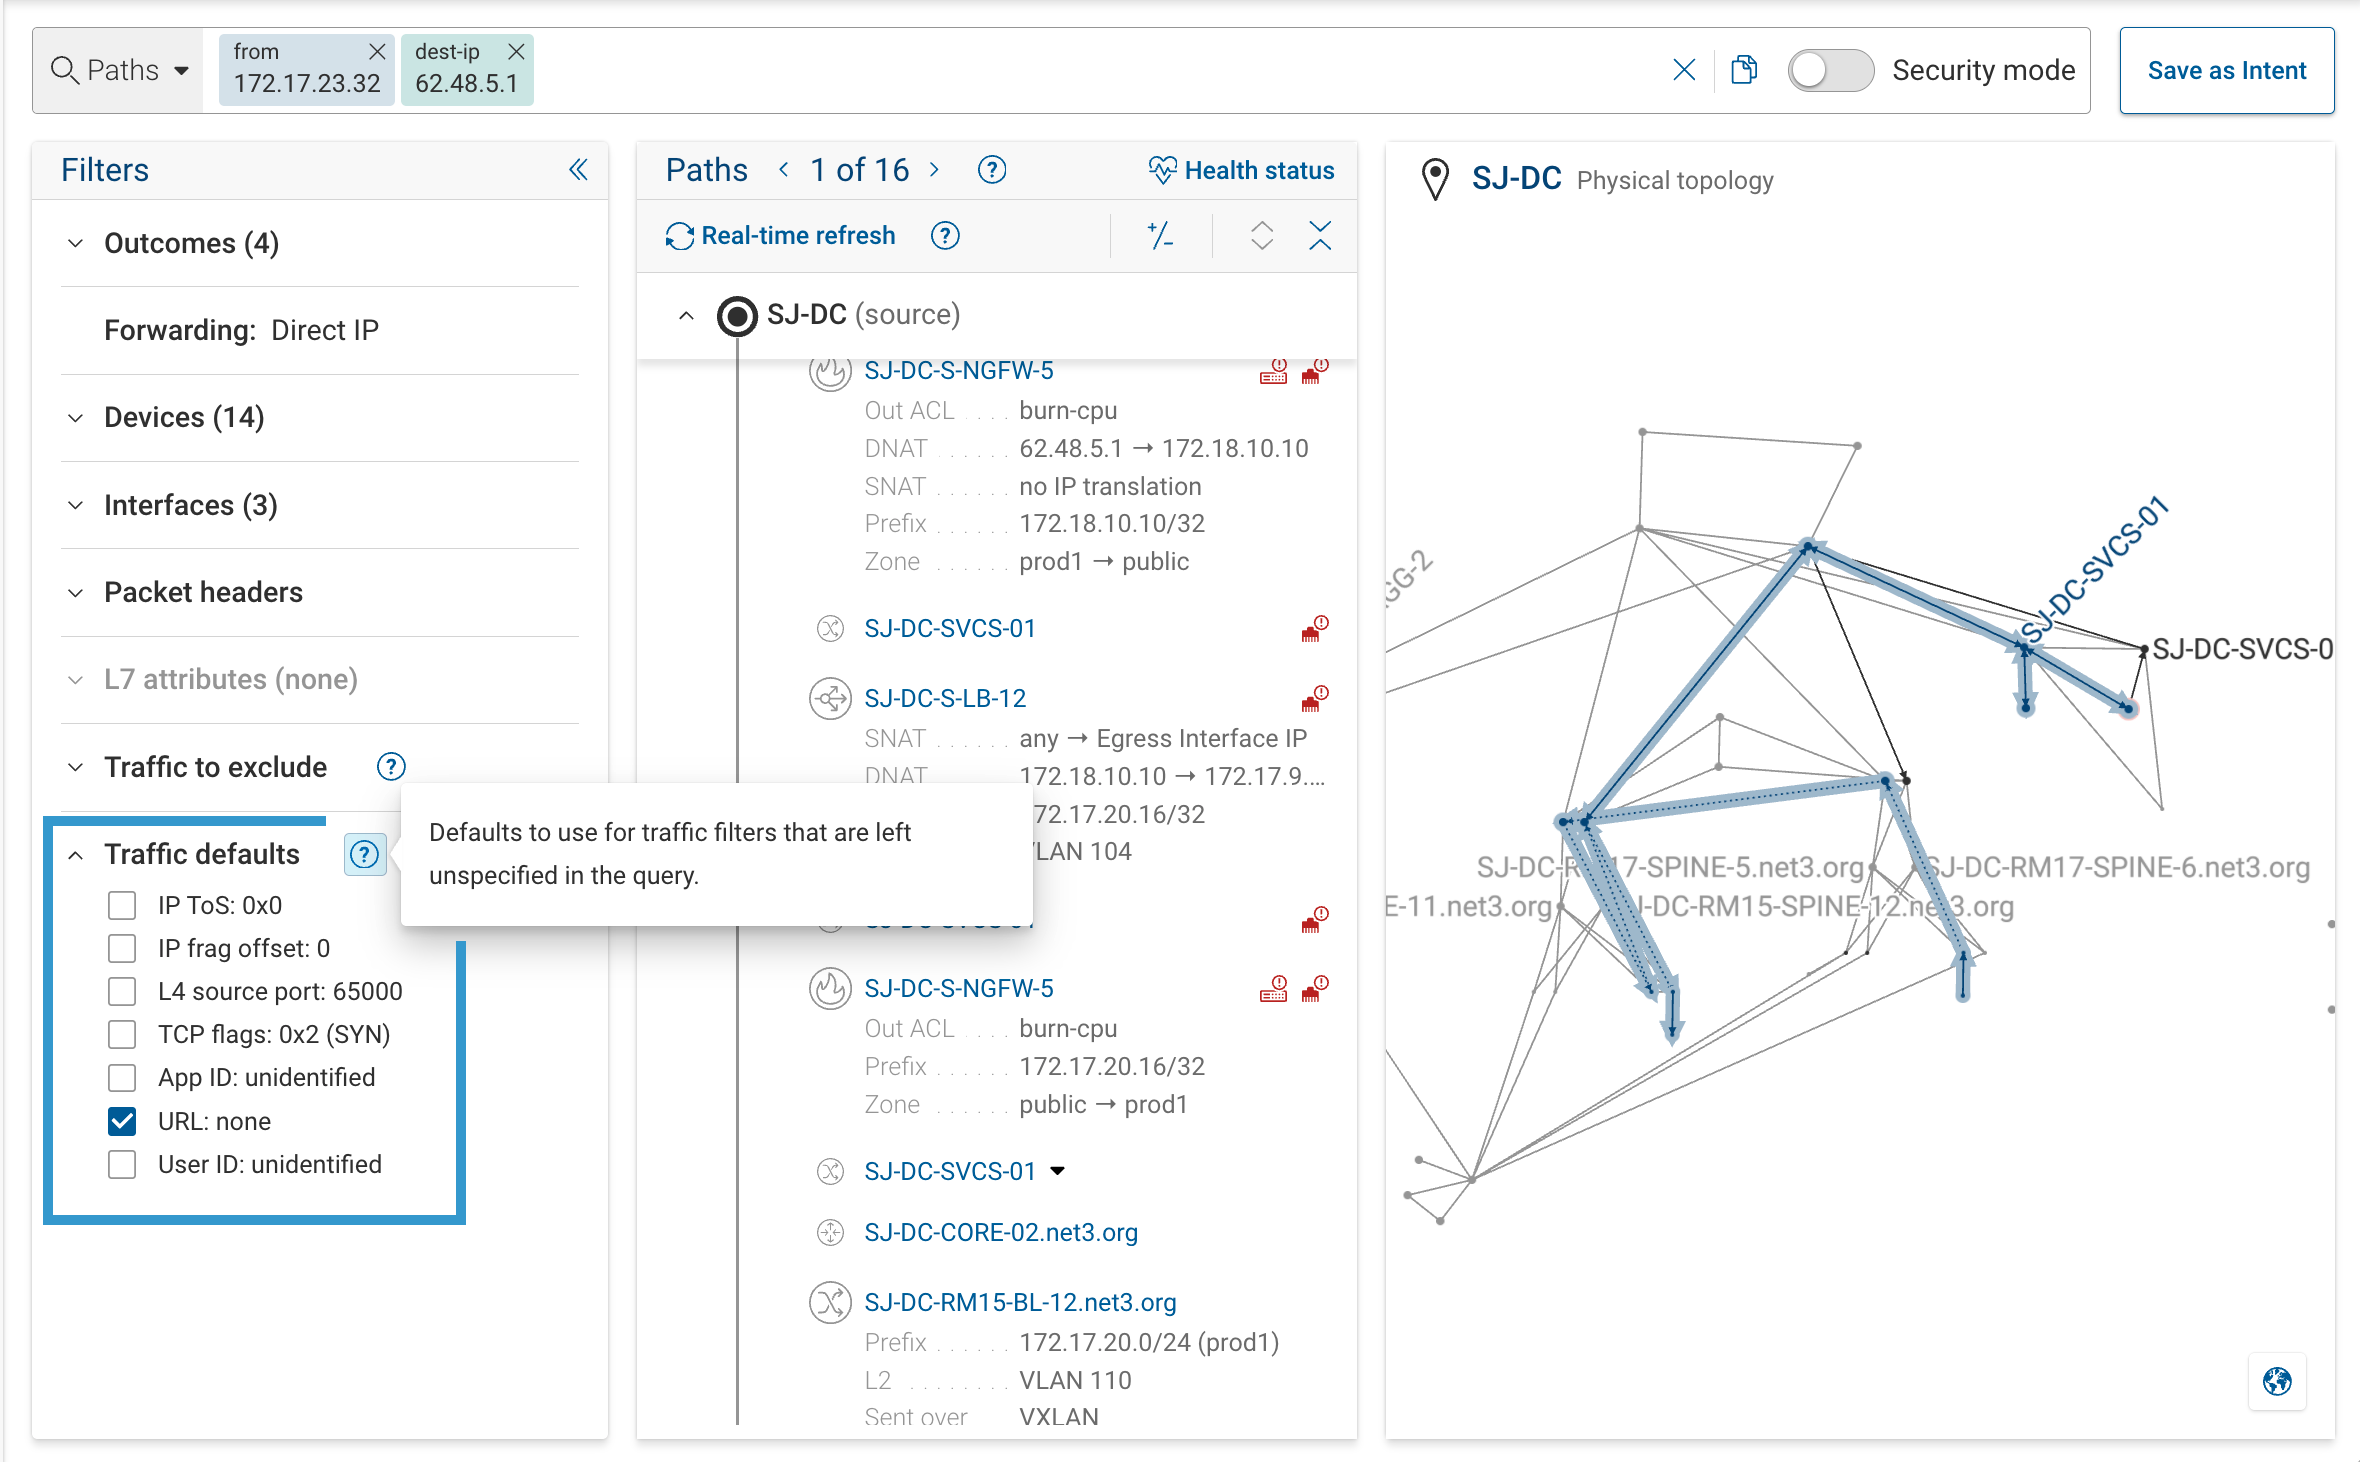
7. Adjust Traffic Defaults
Traffic Defaults define header values when your query doesn’t specify them.
You can configure defaults:
- Globally – in Settings → System → Org Preferences → Traffic Defaults
- Per search – within the Filters panel
| Field | Default | Applies When |
|---|---|---|
| IP ToS | 0x0 | All protocols |
| IP Frag Offset | 0 | IPv4 only |
| L4 Source Port | 65000 | All TCP/UDP flows |
| TCP Flags | SYN (0x2) | When protocol = TCP |
| App ID / URL / User ID | unidentified / none / unidentified | As available |
If your firewall rules check for specific TCP flag combinations (e.g., only ACK traffic is allowed after a session is
established), update the TCP Flags default before running your search.
8. View Return Paths and Diffs
After viewing a forward path, you can:
-
Return Path:
Switch to the Return view to see how traffic flows in the reverse direction.
The return path shows the modeled flow back from the destination to the source, following reverse routing and policy behavior.
(Useful for confirming asymmetric routing or missing reverse rules.) -
Path Diff:
Compare forward paths between two snapshots to identify changes in routing or policy.
Diffs highlight what changed — for example, a new next hop, an ACL rule modification, or a VRF transition.Note: Path Diffs are only available for forward paths. Return paths are not diff-capable.

9. Practice Examples
Before trying these examples, it helps to prepare a few known endpoint pairs in your network snapshot.
The goal is to explore how different scenarios look in Path Analysis — same-subnet forwarding, routed paths, filtered
traffic, and dropped paths.
Prerequisites
To get the most out of these examples, identify the following in your environment:
- Two hosts in the same Layer-2 domain
- They should share the same subnet (for example,
10.1.10.15and10.1.10.30on VLAN 10). - These will show intra-subnet (L2) forwarding behavior where the router is not involved.
- They should share the same subnet (for example,
- Two hosts in different Layer-2 domains
- Preferably separated by a firewall or router so the path includes L3 routing and possibly policy evaluation.
- For instance,
10.1.10.15 → 10.2.20.10throughfw-prod-01. - These will illustrate routed paths and the impact of ACL/firewall decisions.
- One host offering a service
- Choose a host that runs an application such as an HTTPS web server or API endpoint.
- This lets you experiment with header filters such as
tp_dst(443)for port 443 traffic.
- A known blocking policy or ACL
- Identify a source-destination pair that is denied by a firewall or ACL.
- This will help you test dropped paths and the permit-all mode, to see how the network would forward the packet if no security restriction were applied.
Example of long and complex query with multiple filters

Try These Queries
1. Basic L2 reachability
Show direct Layer-2 forwarding between hosts in the same subnet:
from(10.1.10.15) to(10.1.10.30)
Look for an outcome of delivered and note that no L3 routing occurs.
2. Routed communication across domains
Trace a typical Layer-3 path between subnets:
from(10.1.10.15) to(10.2.20.10)
Check which router or firewall performs the routing and whether policies are applied.
3. Enforced security path
Confirm that traffic crosses a firewall or inspection device:
from(10.1.10.15) to(10.2.20.10) through(fw-prod-01)
If multiple paths exist, compare with and without the through() clause.
4. Service-specific traffic
Focus on application traffic, such as HTTPS:
from(10.1.10.15) to(10.2.20.10)
Then open Filters → Packet Headers and set:
- IP protocol: TCP
- Destination port: 443
Observe how ACLs or NAT rules handle this traffic type.
5. Dropped path and permit-all comparison
Use your known blocking pair:
from(hostA) to(hostB)
Filter Outcome → Dropped to locate the denied path.
Then rerun with permit-all mode to ignore ACL/firewall enforcement and see how Forward renders the underlying L2/L3
connectivity.
Comparing normal vs. permit-all views helps separate policy effects from forwarding-plane reachability.
10. Troubleshooting Basics
If you get no results:
- Verify that both endpoints exist in the snapshot (known via ARP/ND).
- Remove filters or disable noise filters.
- Try permit-all mode (ignores ACLs/firewalls) to test pure reachability.
If the path looks incomplete or wrong:
- Check that source/destination IPs localize correctly.
- Add a
through()clause to restrict the search scope. - Ensure all intermediate devices are collected in the snapshot.
If the path shows “dropped”:
- Click the firewall hop to see the matched rule in Policy Details.
- Toggle Security Mode for a simplified enforcement view.
Permit-all mode:
- temporarily disables ACL and firewall enforcement when computing the path.
Instead of stopping a path at a policy drop, the model continues to evaluate all remaining forwarding functions (Layer-3 routing, Layer-2 switching, policy-based routing, tunnels, encapsulations, etc.).
This helps isolate pure connectivity issues from policy enforcement. - Use permit-all mode when you need to answer questions like “Would this packet be deliverable if there were no security restrictions?” or to verify L2/L3 reachability independently of firewall/ACL logic.
For deeper help, see Troubleshooting & FAQ.
Where to Go Next
| Next Step | Description |
|---|---|
| Overview | Conceptual background and architecture |
| Running a Path Analysis | Learn advanced keywords (through, bypass, ingress, egress), etc |
| Filters & Traffic Defaults | Full list of filters, headers, and default values |
| Understanding Results | Interpreting topologies, hops, and policy views |
| Policy & Routing Evaluation | ACL, NAT, VRF, and routing analysis |
| Advanced Syntax Reference | Operator and function reference |
| Troubleshooting & FAQ | Common scenarios and resolutions |