Single Sign-On (SSO)
General Information
Forward Enterprise supports SAML-based Single Sign-On (SSO) to allow organizations to access Forward Networks application (SP) using any identity provider (IDP) of their choice.
At least one assertion is required in the response from the IDP. Login will not be allowed if the response from the IDP does not include any assertions.
To populate the username, email, and the Groups to match the Access Control Group configuration use the username, emailaddress and usergroups fields in the Assertions.
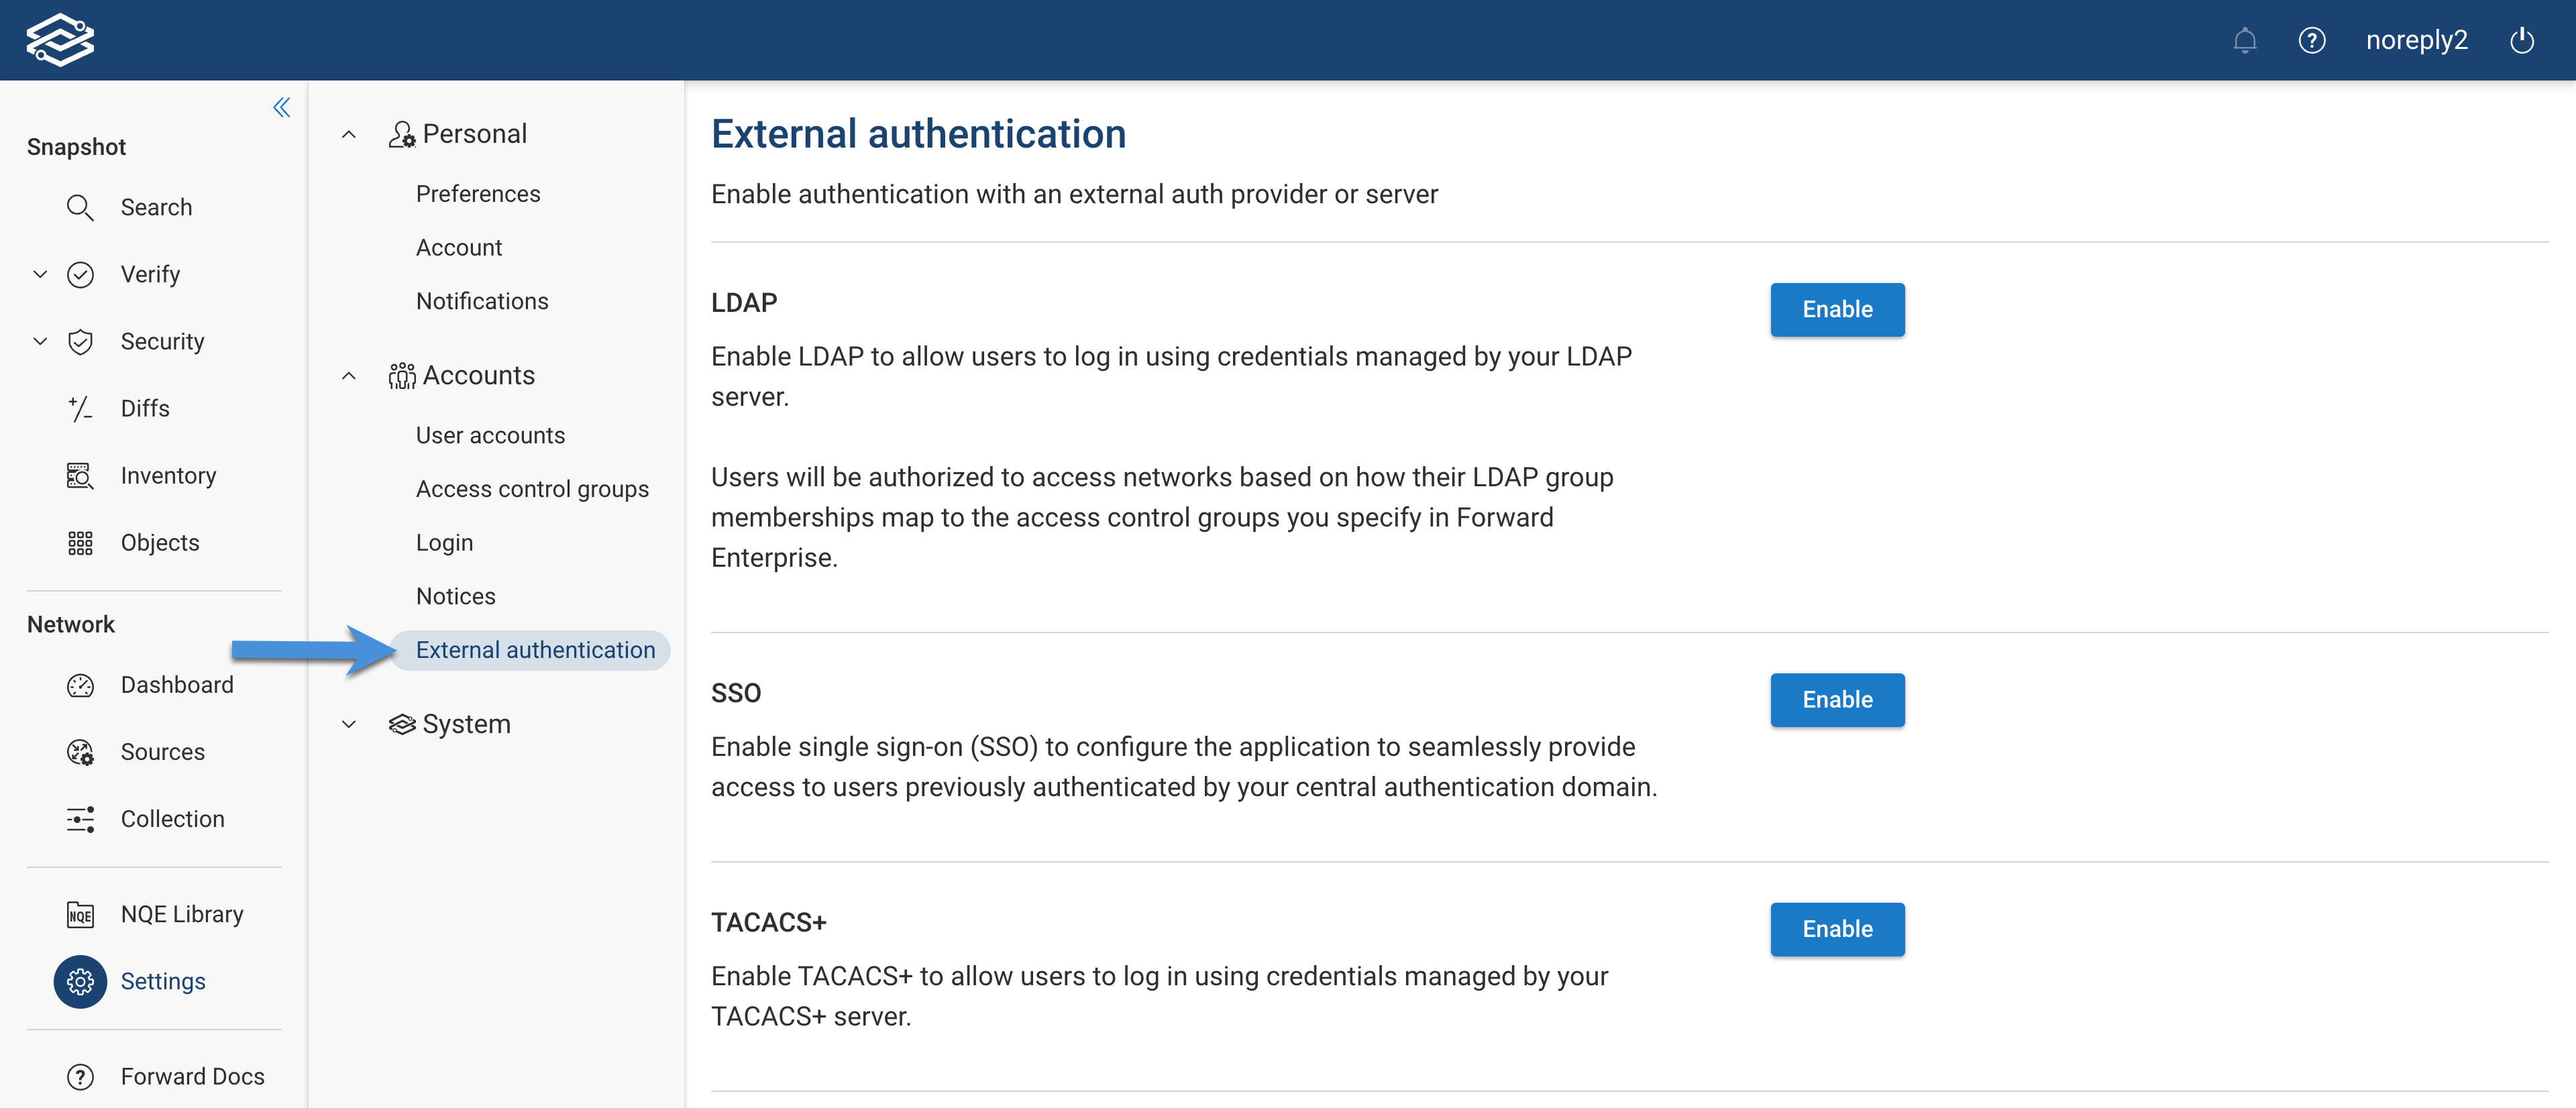
Enable SSO in Forward Enterprise
Navigate to Settings > Accounts > External Authentication and click on the Enable button in the ** SSO** section to enable SSO authentication.
Configure SSO in Forward Enterprise
The process is slightly different depending on your Forward deployment model, on-premises or Cloud.
Configure SSO for on-prem
The SSO configuration page is presented as soon as you enable SSO. Configure the settings appropriately:
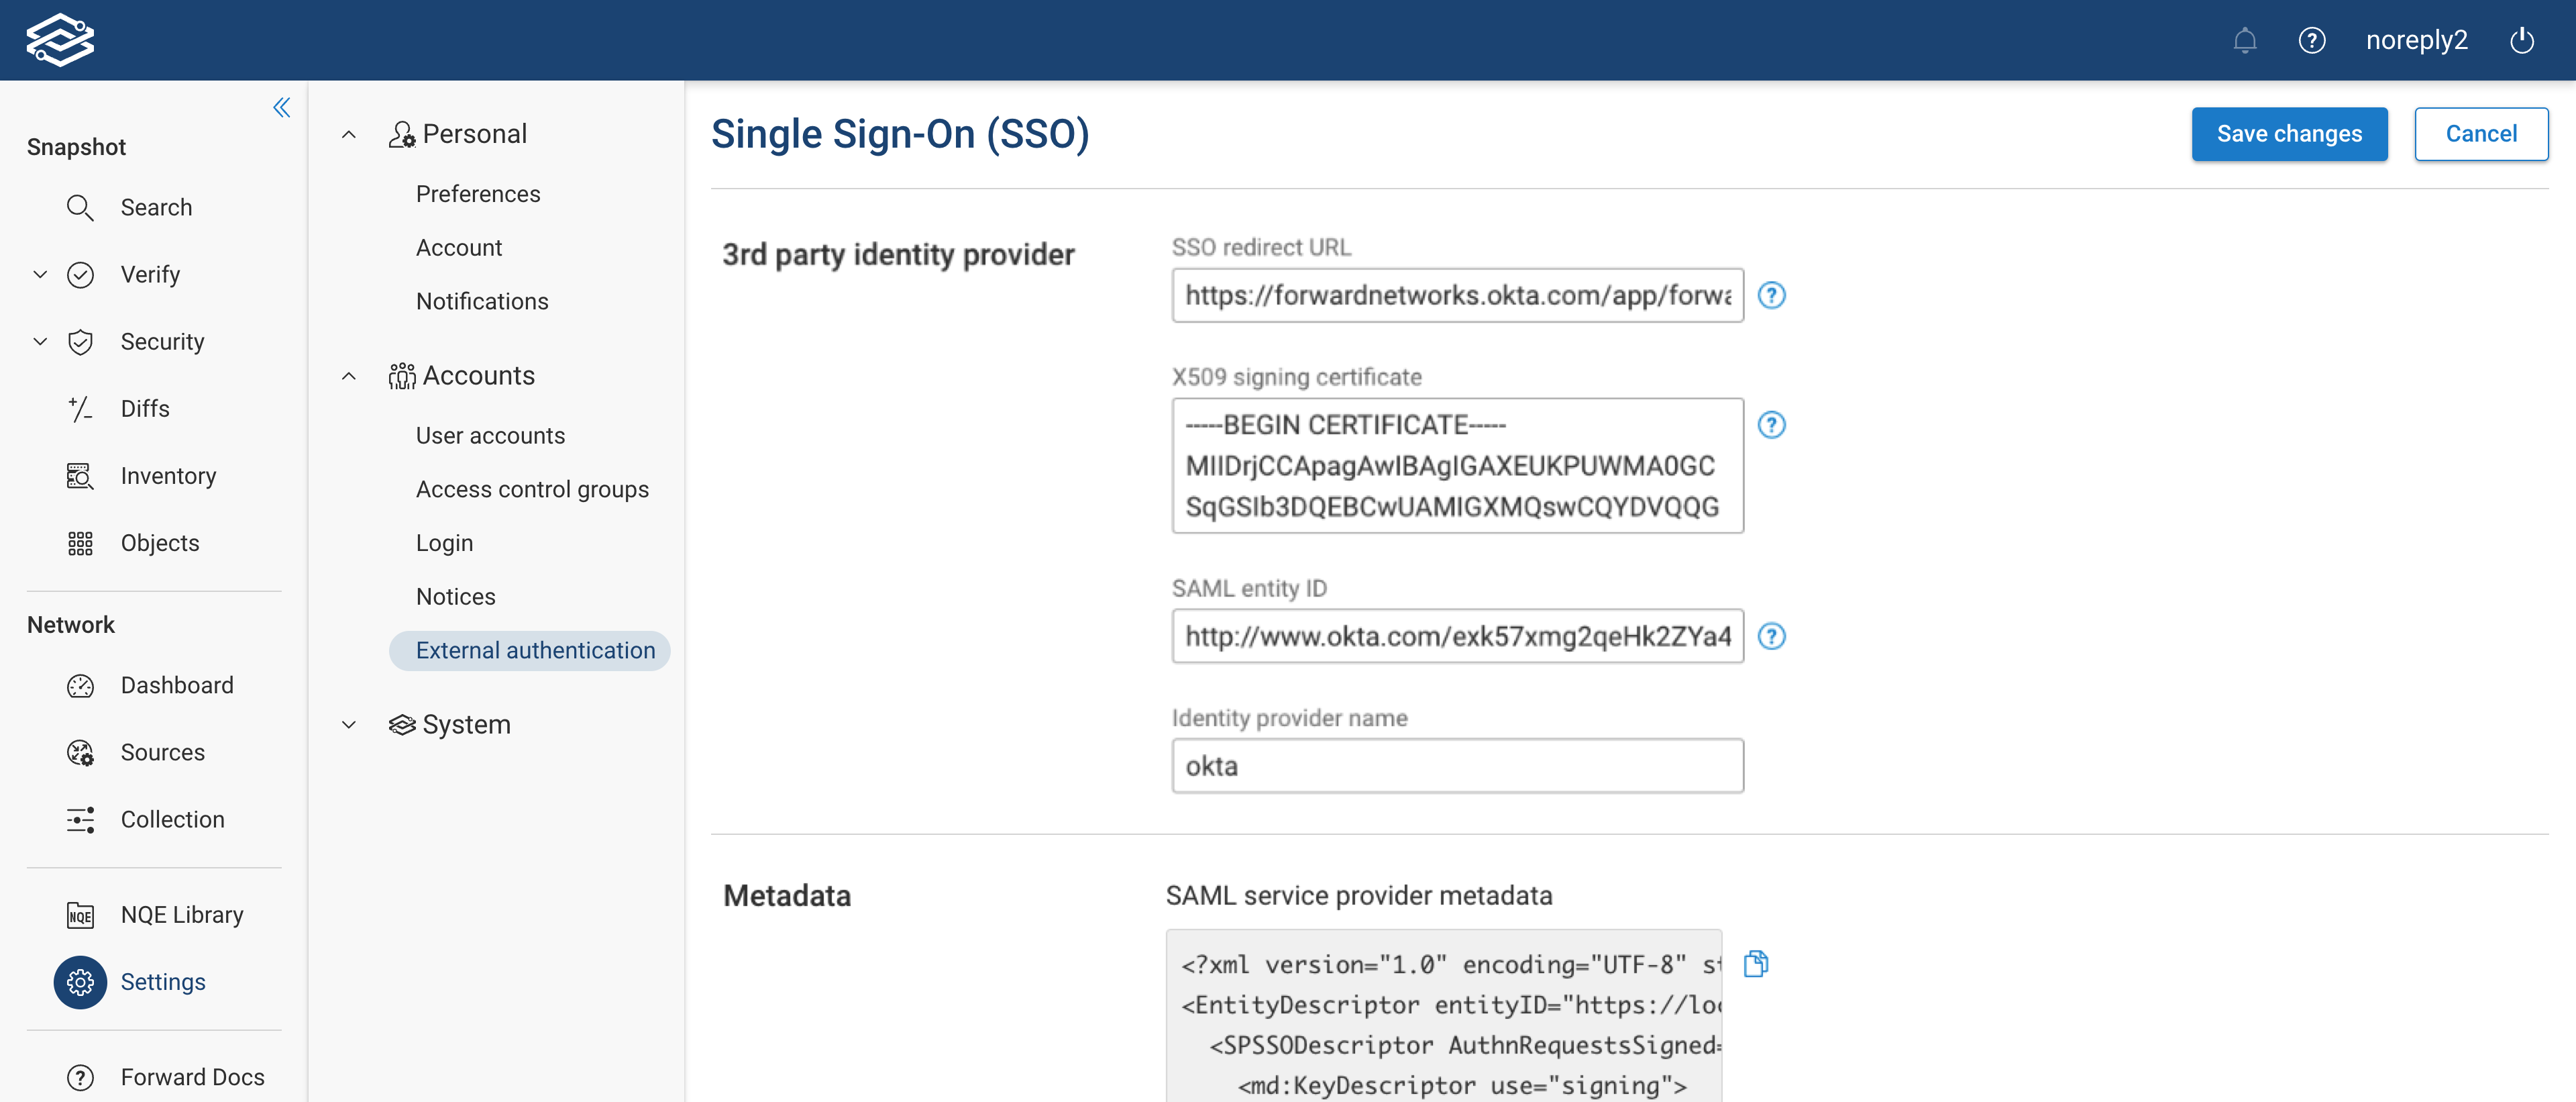
3rd party identity provider:
- SSO redirect URL: The URL of the sign-in page a user will use to log in.
- X509 signing certificate: This certificate is used to verify the SAML response IDP sends to Forward Enterprise. It should be a Base64-encoded PEM certificate. To get the certificate, please see the documentation of your IDP.
- SAML entity ID: Also known as Unique Identifier for the IDP. Typically an endpoint or a URL that can be obtained from your IDP. Please see the documentation of your IDP for more information.
- Identity provider name: The name of the IDP being used. For example if okta is being used for authentication, set this to “Okta”. This may be cryptic if you wish.
Metadata:
As soon as all details are filled in, you’ll see the SAML service provider metadata. You can use this metadata to Configure your Identity Provider (IDP).
Configure SSO on Forward SaaS
The SSO configuration page is presented as soon as you enable SSO. Configure the settings appropriately:
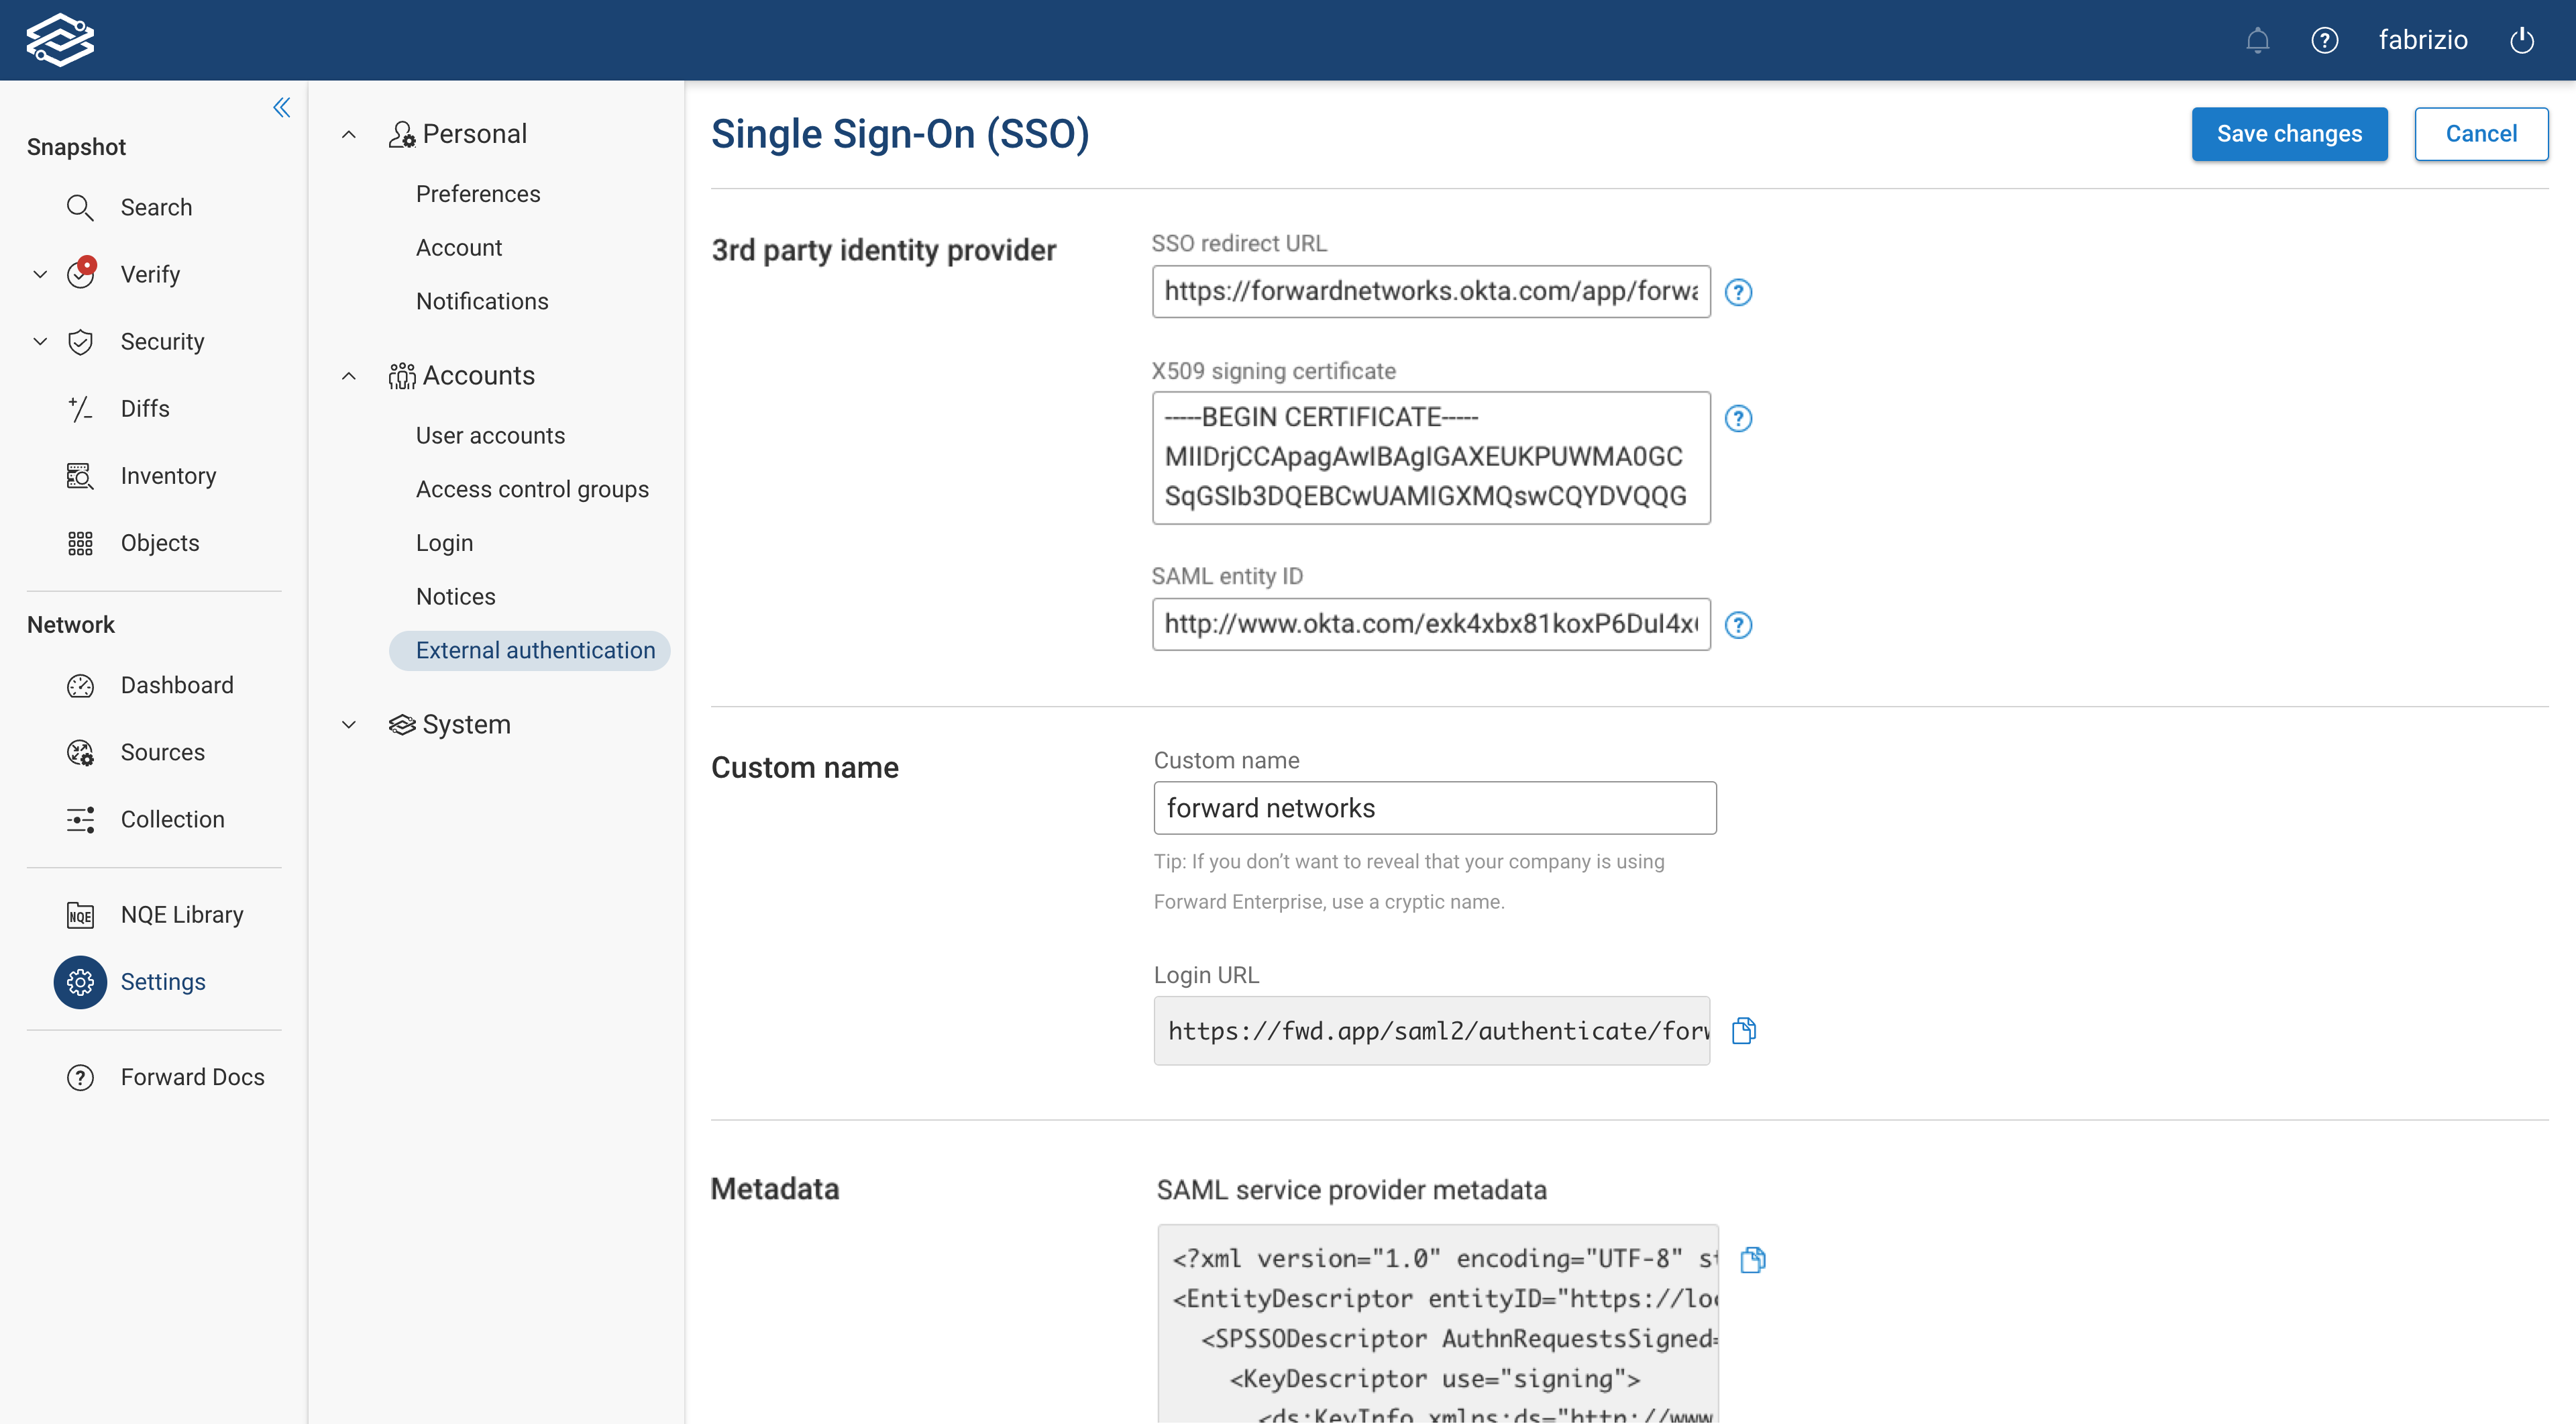
3rd party identity provider:
- SSO redirect url: The URL of the sign-in page a user will use to log in
- X509 signing certificate: This certificate is used to verify the SAML response IDP sends to Forward Enterprise. It should be a Base64-encoded PEM certificate. To generate the certificate, please see the documentation of your IDP.
- SAML entity ID: Also known as Unique Identifier for the IDP. Typically an endpoint or a URL that can be obtained from your IDP. Please see the documentation of your IDP for more information.
- Identity provider name: The name of the IDP being used. For example if okta is being used for authentication, set this to “Okta”. This may be cryptic if you wish.
Custom Name:
- Login URL: After SSO is enabled, this will be the URL you can use to log in into Forward Enterprise or land on log in page and provide this custom name to log in via SSO.
Metadata:
As soon as all details are filled in, you’ll see the SAML service provider metadata. You can use this metadata to Configure your Identity Provider (IDP).
Configure your Identity Provider (IDP)
The IDP (e.g. Okta) needs to be configured to allow authentication requests from the SP (Forward Enterprise).
Usually the IDP requires the following information from SP:
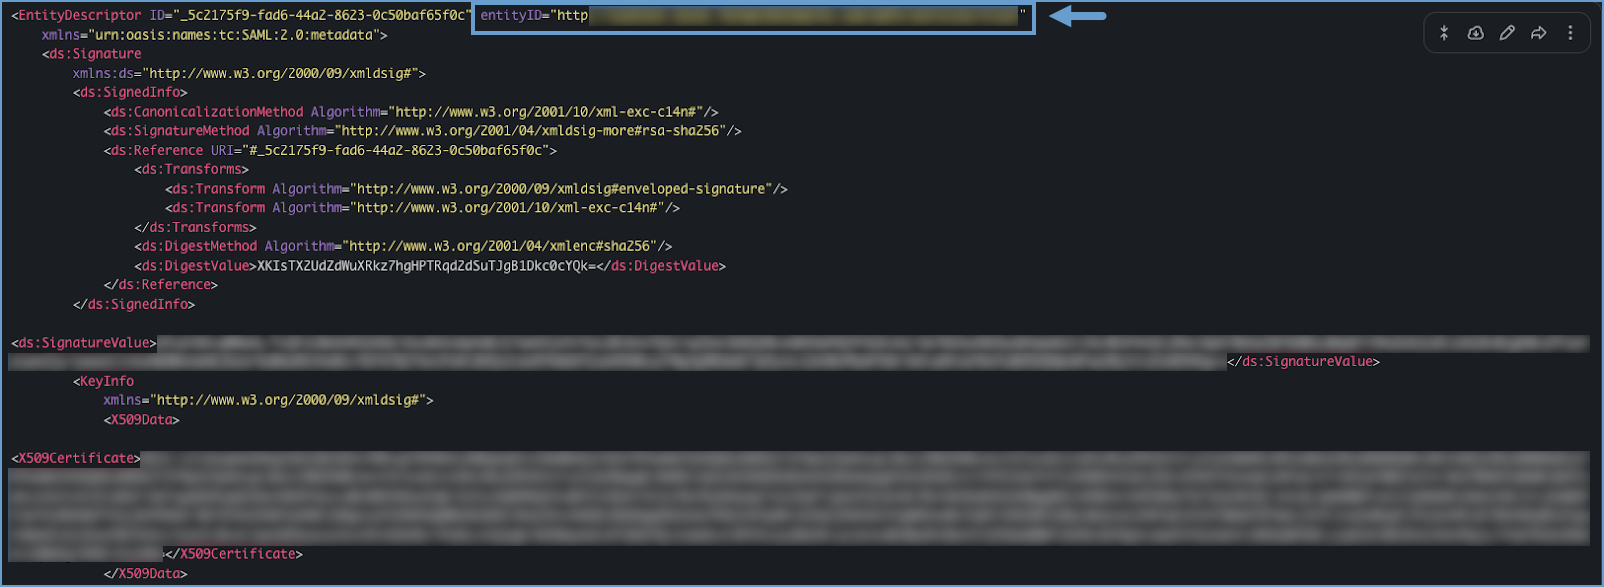
- Entity ID: The SP entityId that you can configure in the IDP. See entityID in EntityDescriptor in the example provided below
- X509 certificate: The signing certificate used by SP to sign the SAML authentication requests. This can be used by IDP to verify the authenticity of SAML requests from SP. See <ds:X509Certificate>
- Assertion consumer url: The url to which the SAML authentication response should be sent by IDP. See Location in AssertionConsumerService
If the certificate/key is rolled over by the IDP, you'll need to update it in Forward.
Example of SP metadata :
<?xml version="1.0" encoding="UTF-8" standalone="yes"?>
<EntityDescriptor entityID="https://fwd.app/saml2/service-provider-metadata/forward-networks" xmlns="urn:oasis:names:tc:SAML:2.0:metadata">
  <SPSSODescriptor AuthnRequestsSigned="true" WantAssertionsSigned="true" protocolSupportEnumeration="urn:oasis:names:tc:SAML:2.0:protocol">
    <md:KeyDescriptor use="signing">
      <ds:KeyInfo xmlns:ds="http://www.w3.org/2000/09/xmldsig#">
        <ds:X509Data>
          <ds:X509Certificate>MIIDlDCCA...omit...HMrwQupk=</ds:X509Certificate>
        </ds:X509Data>
      </ds:KeyInfo>
    </md:KeyDescriptor>
    <NameIDFormat>urn:oasis:names:tc:SAML:2.0:nameid-format:persistent</NameIDFormat>
    <AssertionConsumerService index="0" isDefault="true" Binding="urn:oasis:names:tc:SAML:2.0:bindings:HTTP-POST" Location="https://fwd.app/login/saml2/sso/forward-networks"/>
  </SPSSODescriptor>
</EntityDescriptor>
The above metadata can be seen on SSO configuration page in Forward App UI after all the fields are filled in.
Test SSO log in
Test SSO log in on-premises
The expected behavior for Forward on-premises deployments is:
- The users created before SSO was enabled can still log in
- Creation of new users is also allowed
- TACACS users can still log in
- In addition, users can use SSO to log in
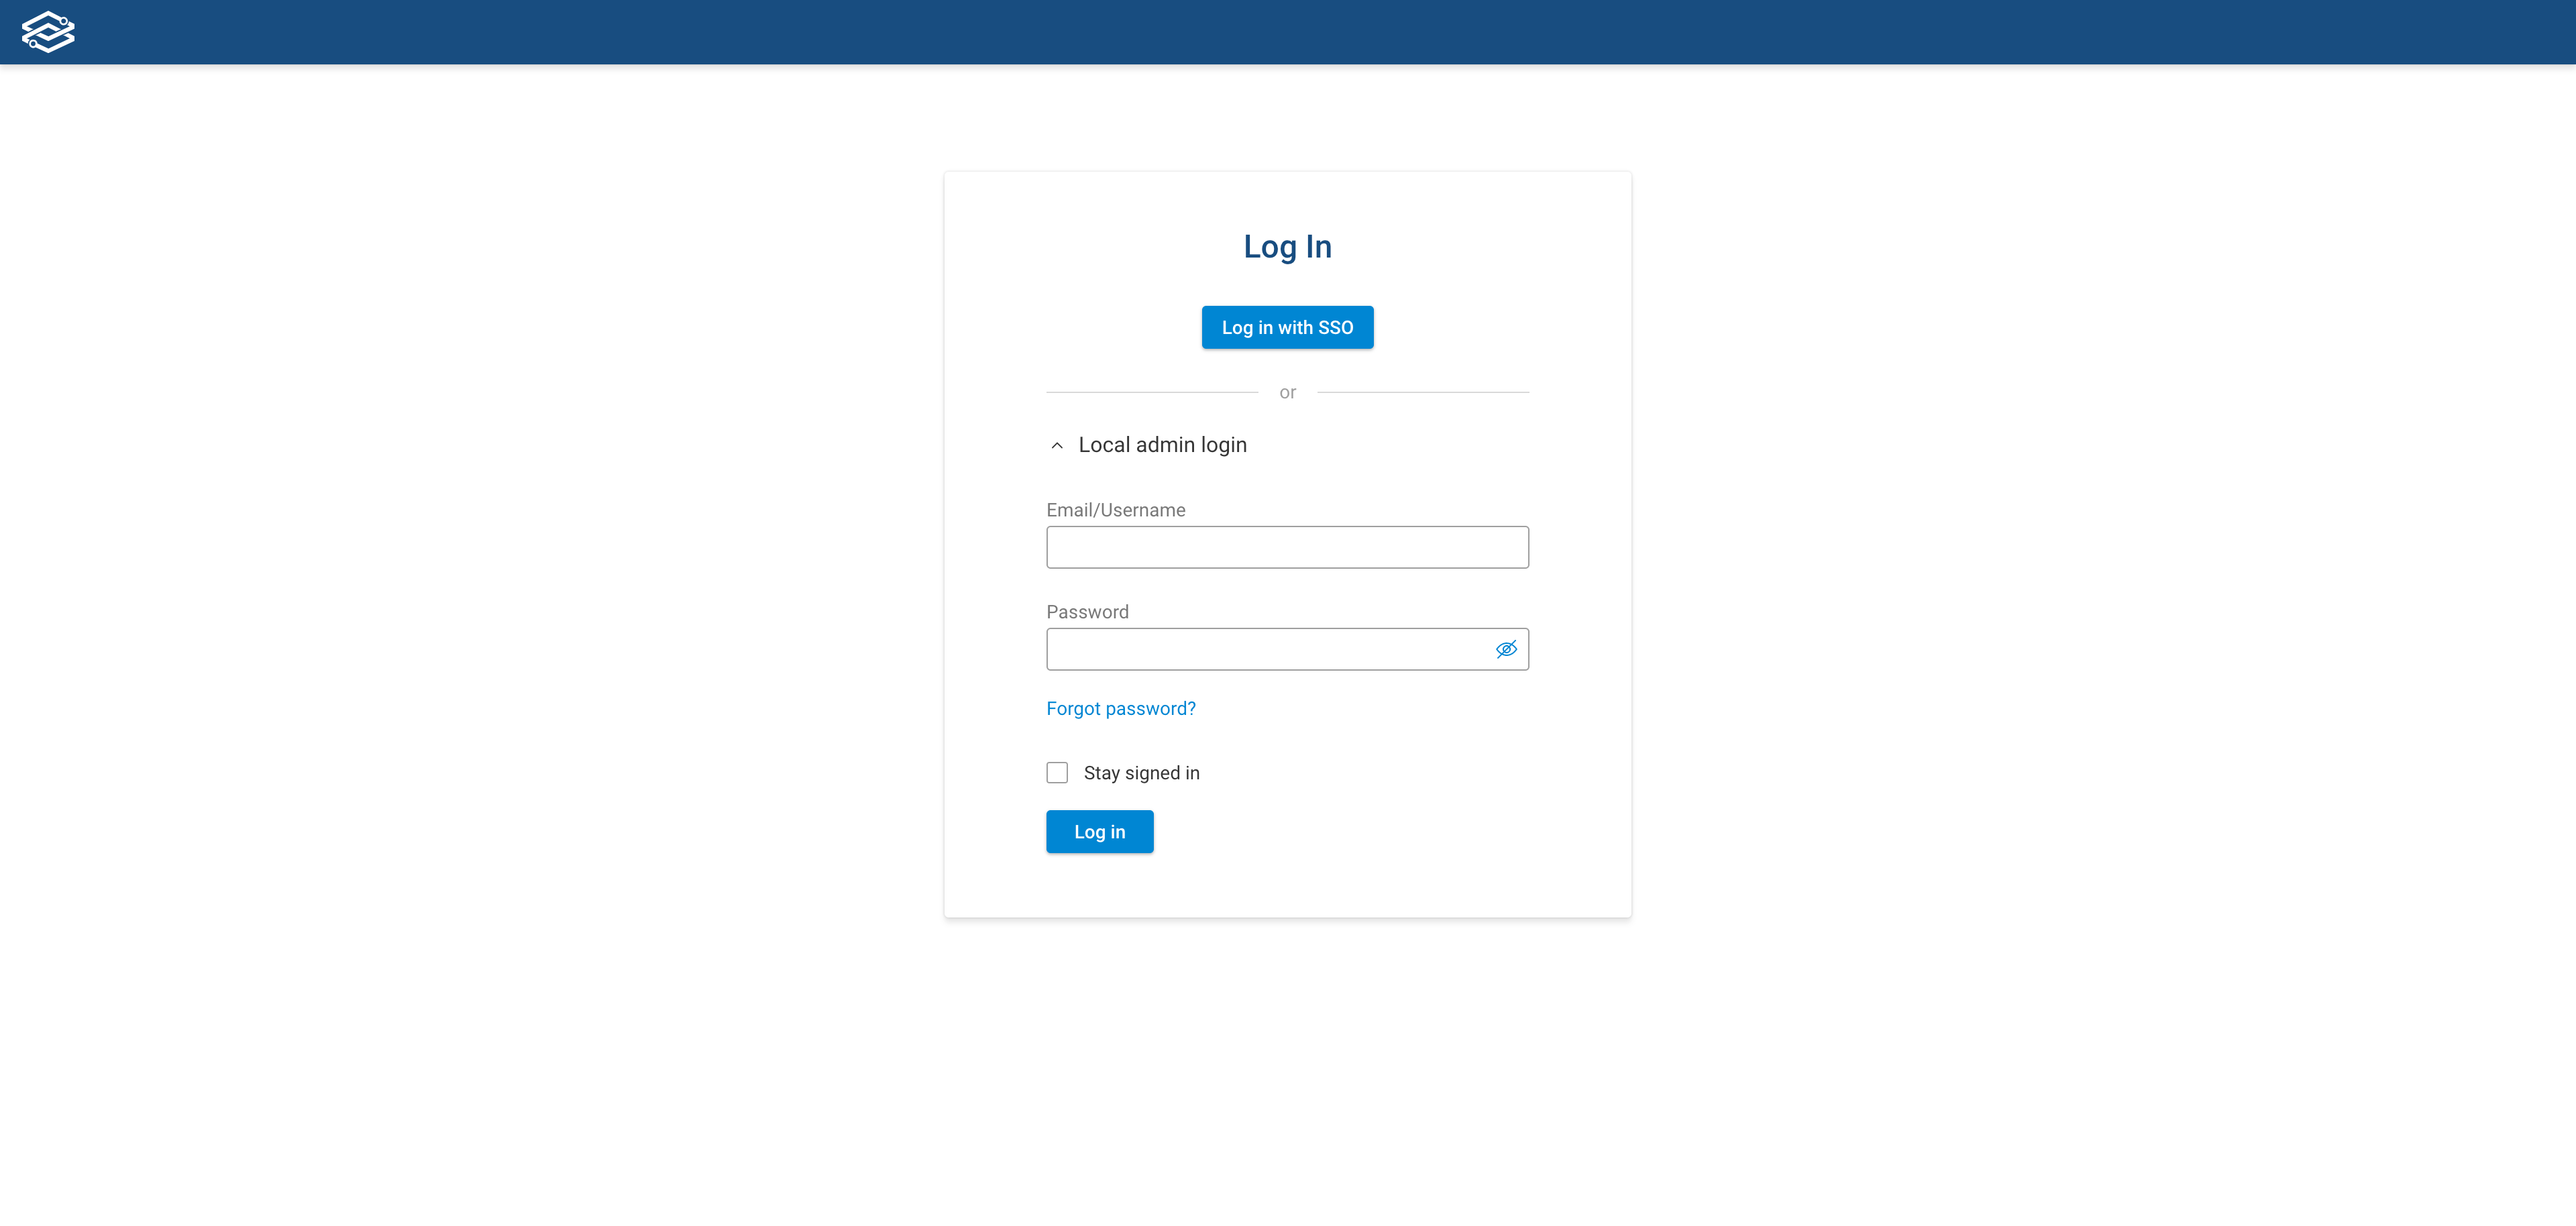
Navigate to your Forward on-premises log in page and click on Log in with IDP name, where IDP name is the
Identity Provider of your choice. In our example the IDP is Okta:
You should be redirected to your IDP’s log in page:

Once authenticated by the IDP you should get logged in to Forward Enterprise with network permissions as assigned by your org-admin.
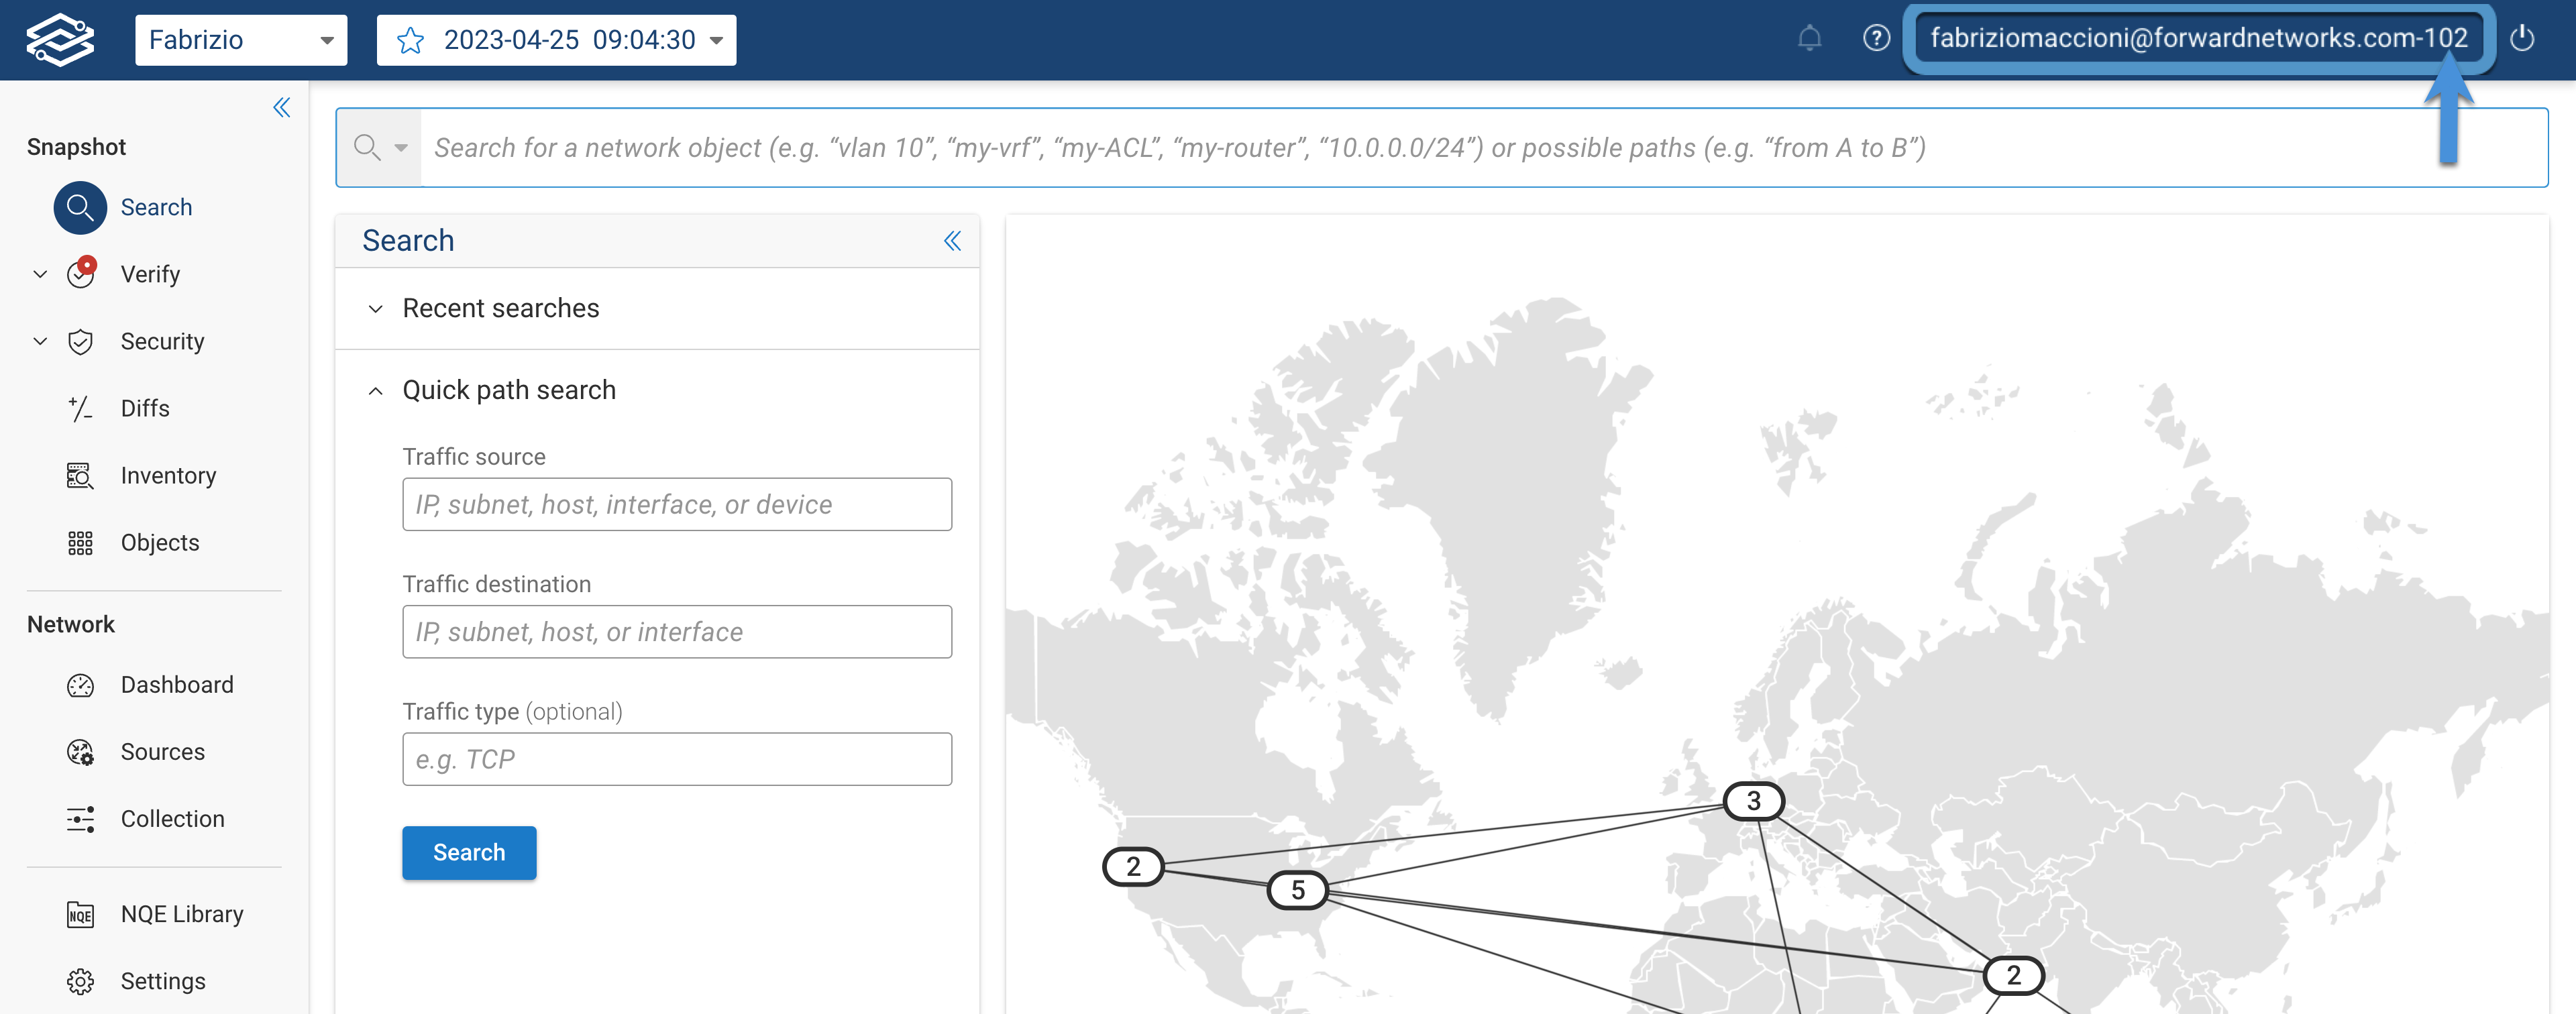
the number appended to your username on the upper right, is your organization ID.
Test SSO log in on Forward SaaS
The expected behavior for Forward SaaS deployments is:
- The users created before SSO was enabled should still be able to log in.
- Creation of new users should still be allowed.
- In addition, users can use SSO to log in.
Navigate to the Forward SaaS log in page (https://fwd.app/login) and click on Use custom login (SSO):
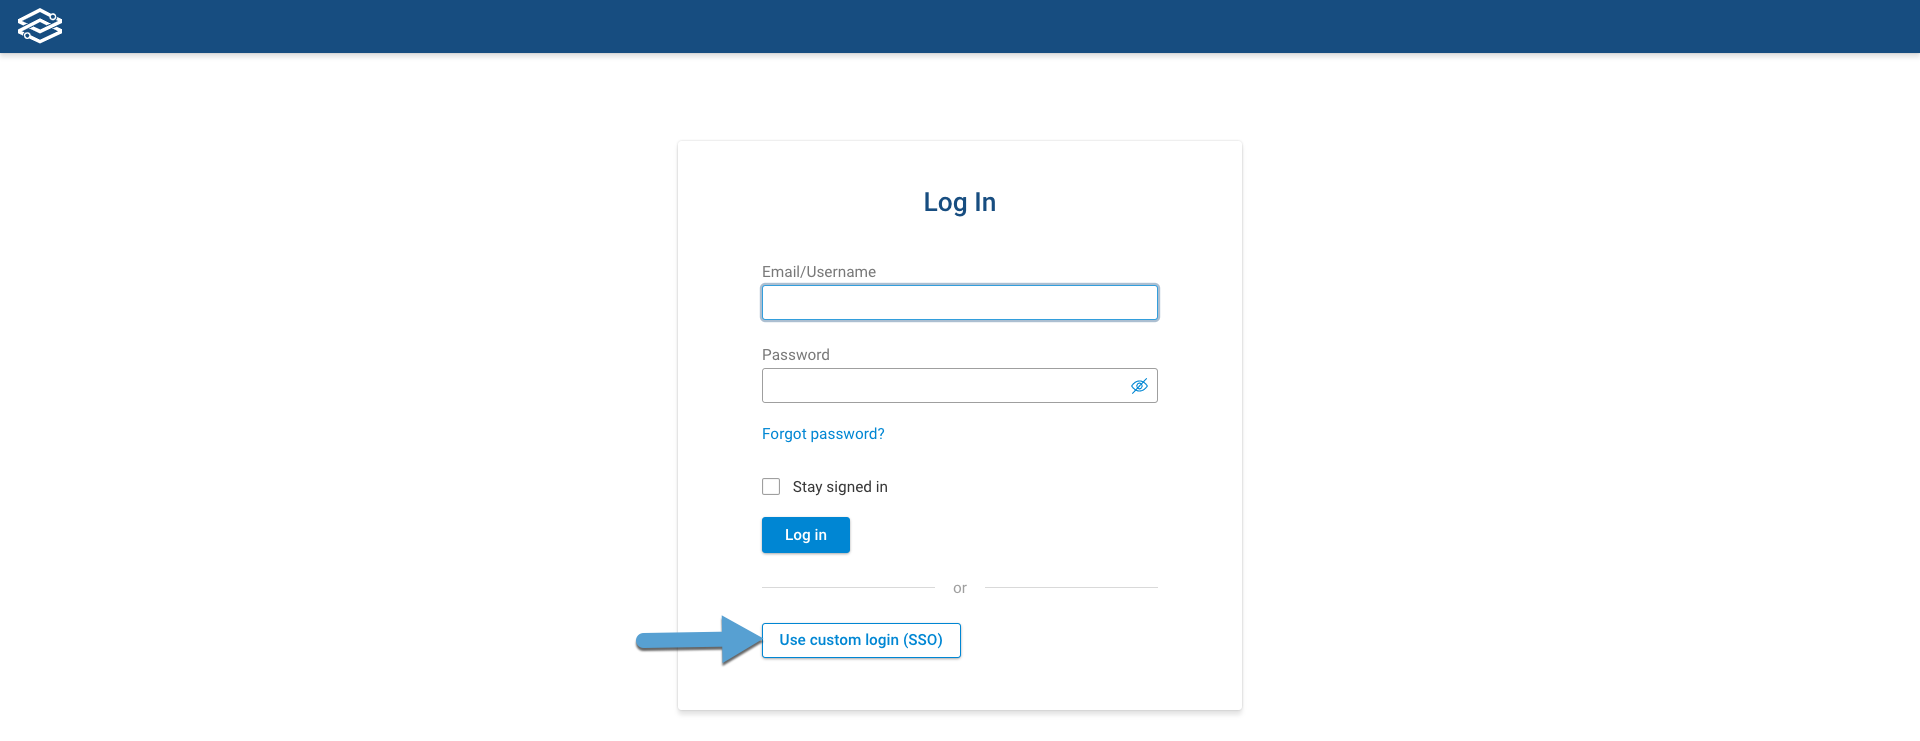
Provide the Custom name for your SSO login and click on Continue:

You should be redirected to your IDP’s log in page:
Once authenticated by the IDP you should get logged in to Forward Enterprise with network permissions as assigned by your org-admin.
the number appended to your username on the upper right, is your organization ID.
SSO Common Issues and Solutions
I see “No assertions found in response”. What should I do?
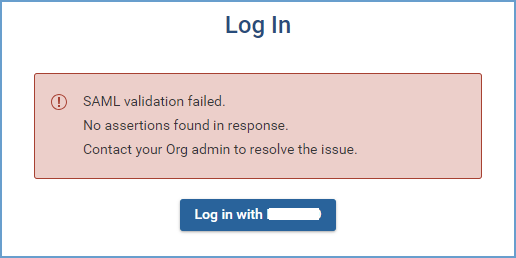
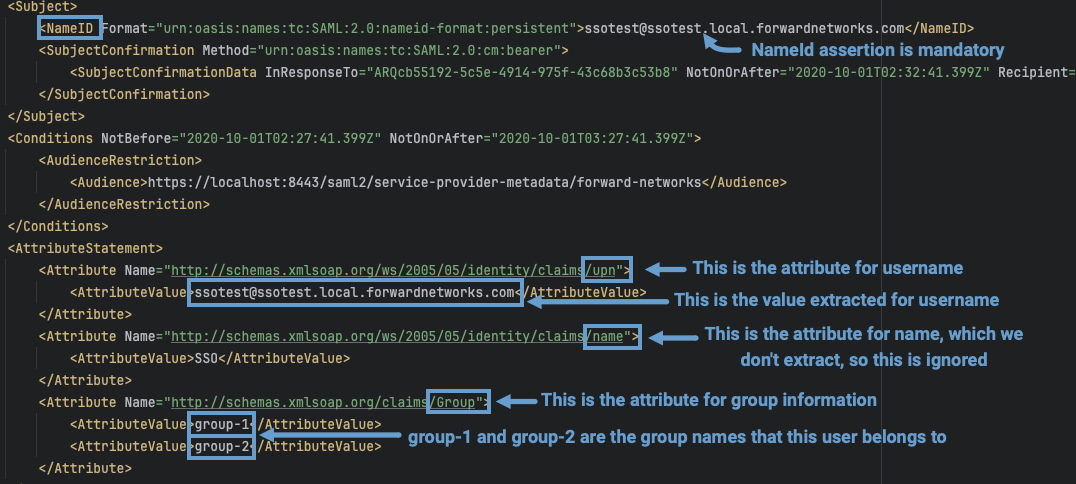
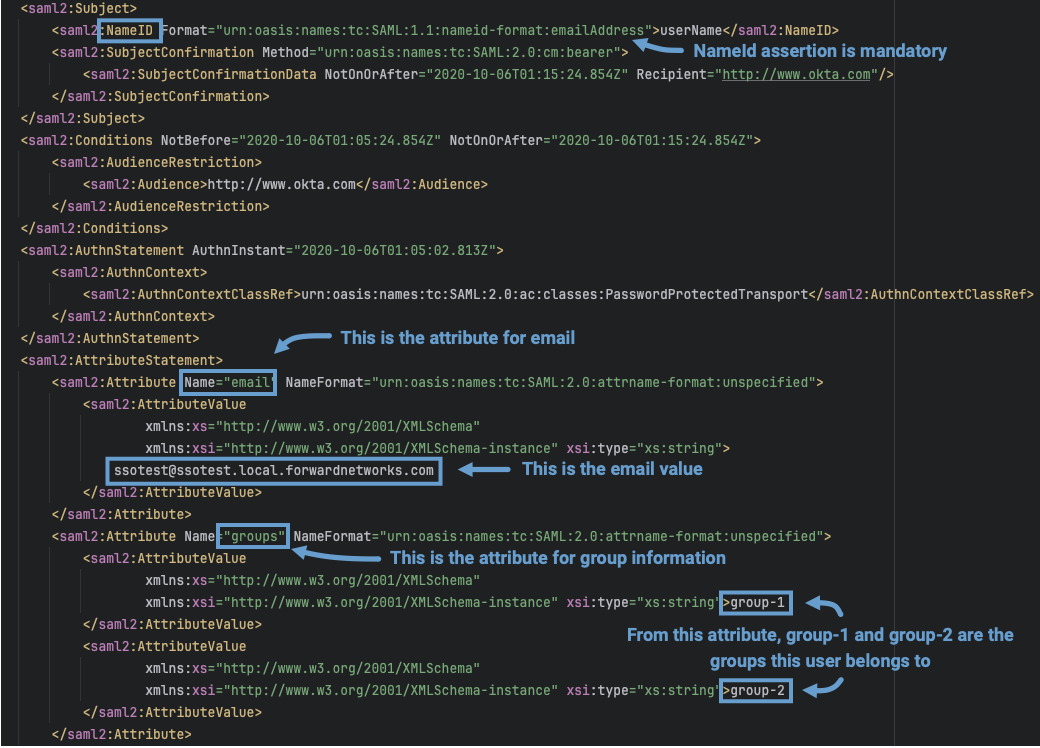
The SAML response received from the Identity Provider (IDP) is validated in the Forward Application. It checks that the assertions sent are non-empty. The required assertion is NameID. The other assertions that the application processes (case insensitive) include:
upnorusernameemailgrouporroleormember(for group information)
If you encounter this error, check your IDP configuration to ensure these attributes are included.
-
ADFS response example:
-
Okta response example:
No assertions are sent in the SAML response. How can I fix this?
To verify that claims are configured correctly in your IDP:
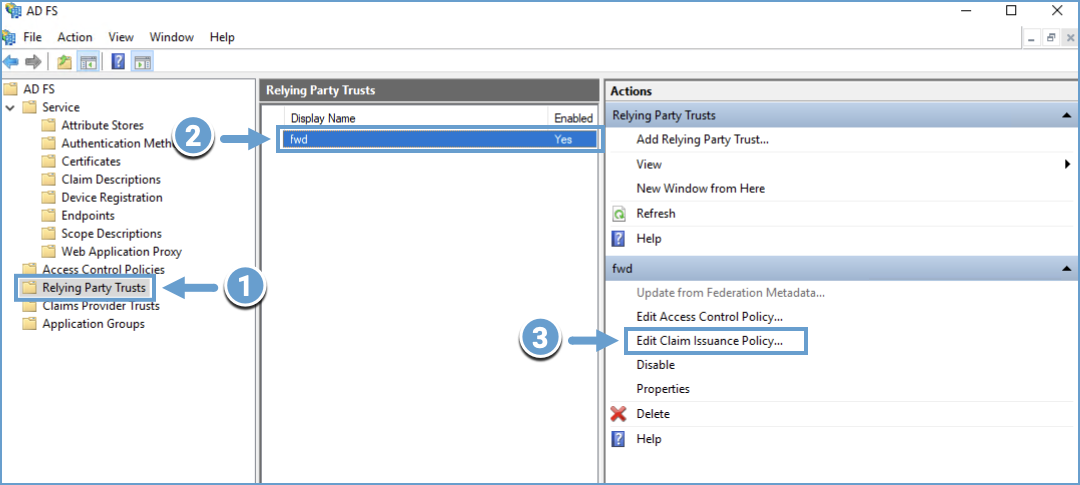
For ADFS:
-
Navigate to Relying Party Trusts.
-
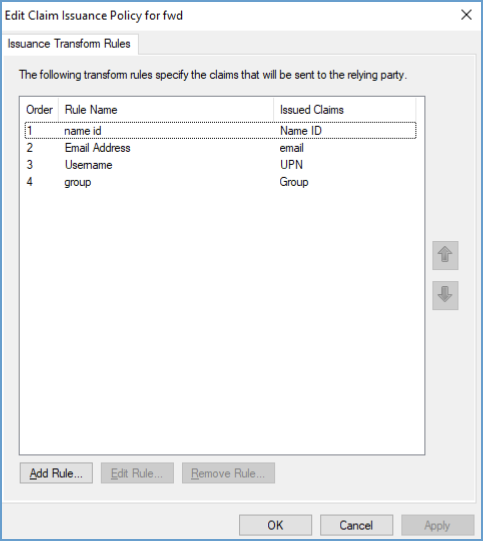
Select the relying party and click Edit Claim Issuance Policy.
-
Ensure that the required claims are present.
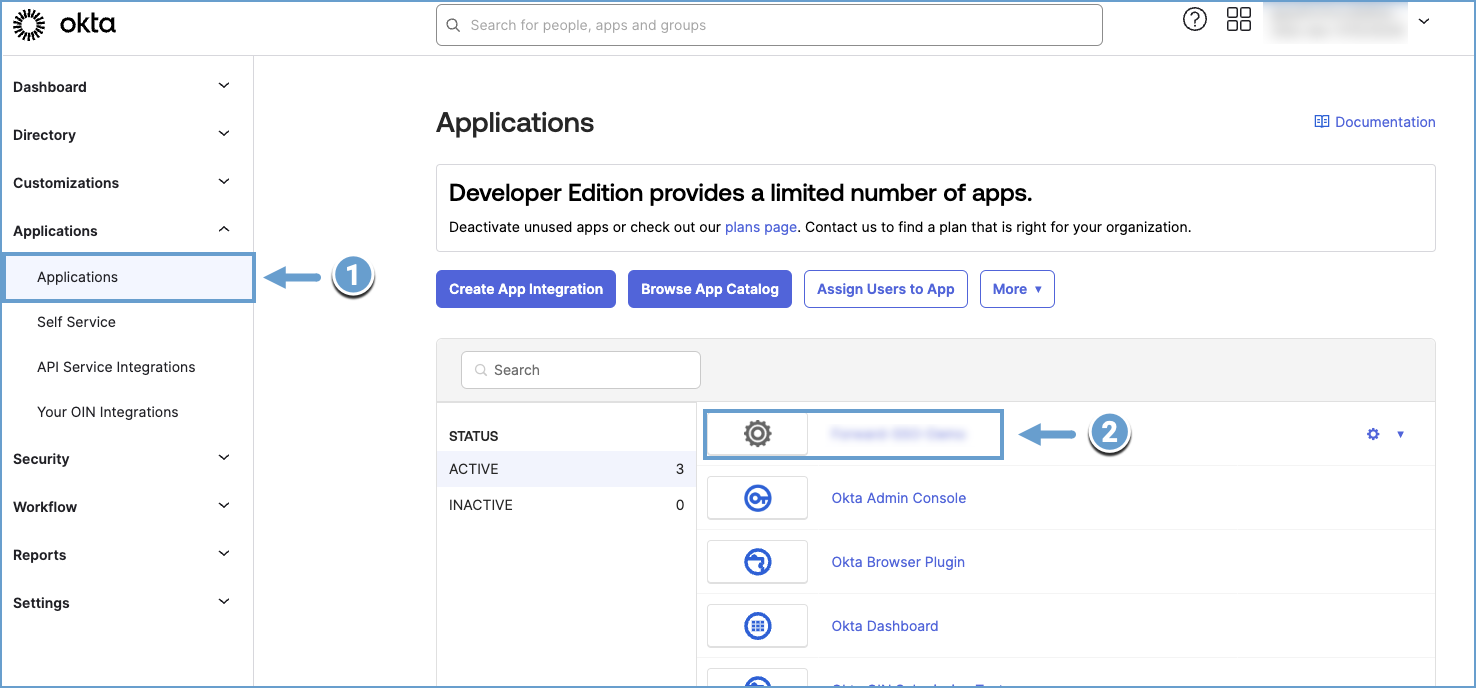
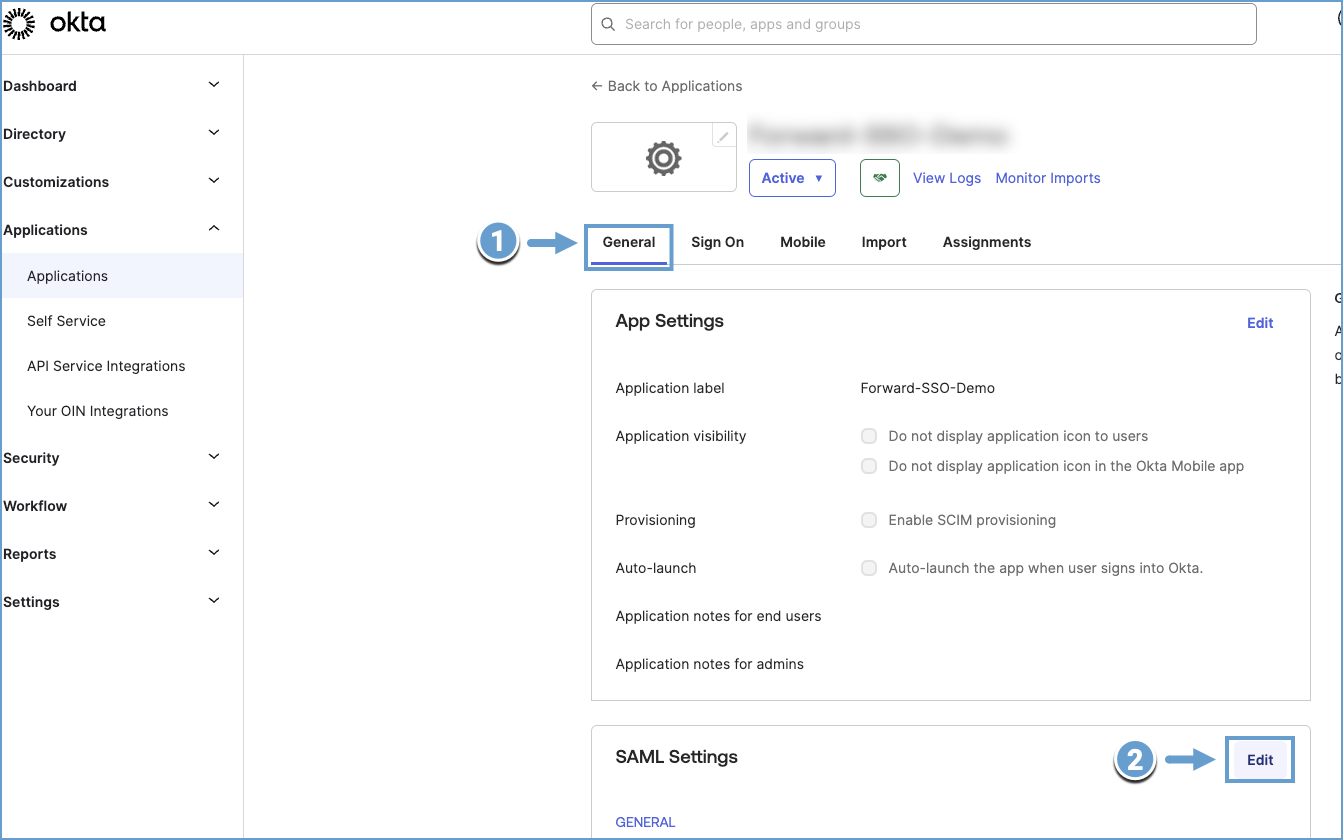
For Okta:
-
Navigate to Applications and select the Forward Application.
-
Under the General tab, click Edit in the SAML settings section.
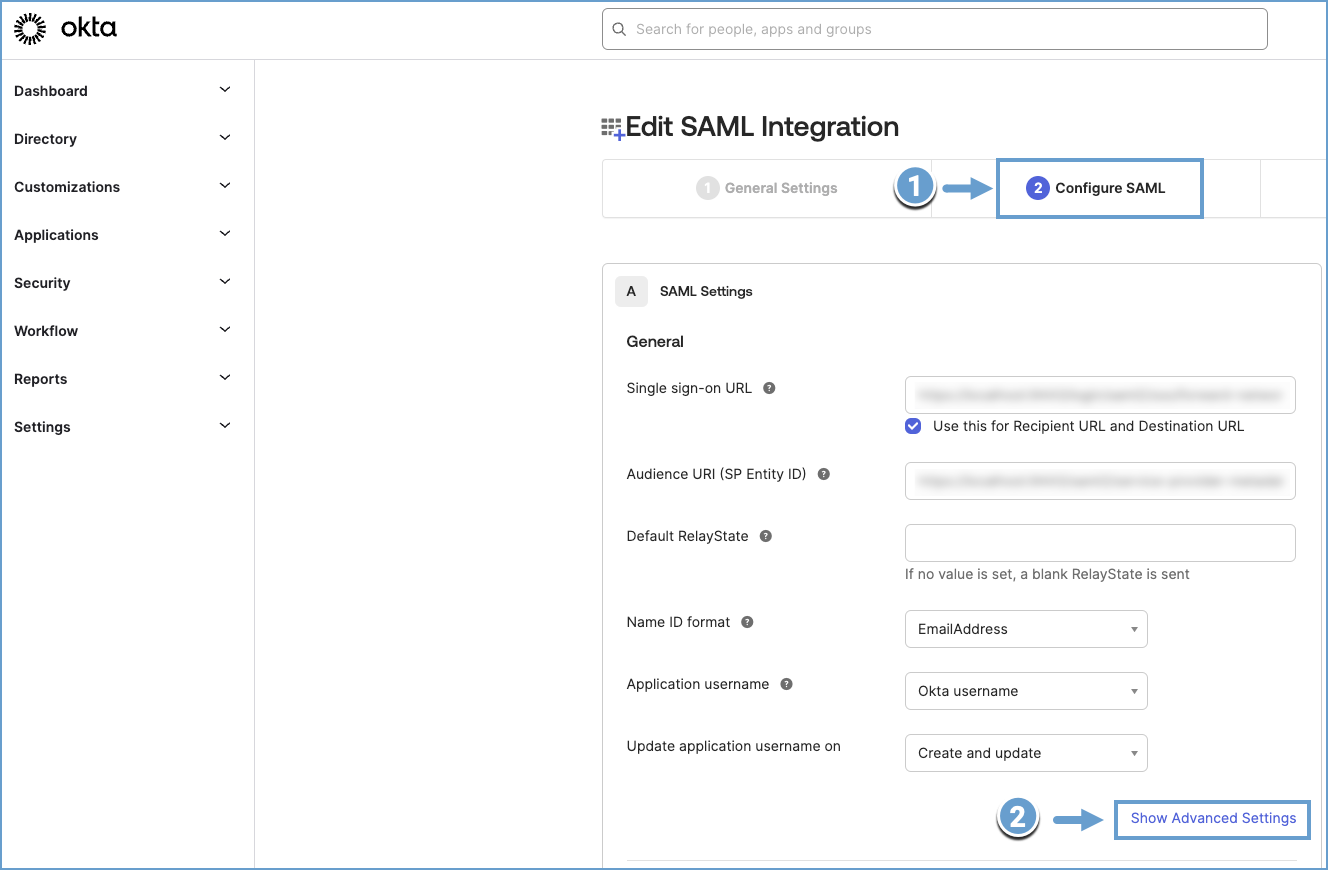
-
Open the Configure SAML tab and expand Advanced Settings.
-
Ensure that attributes like
NameID,email, andgroupare configured.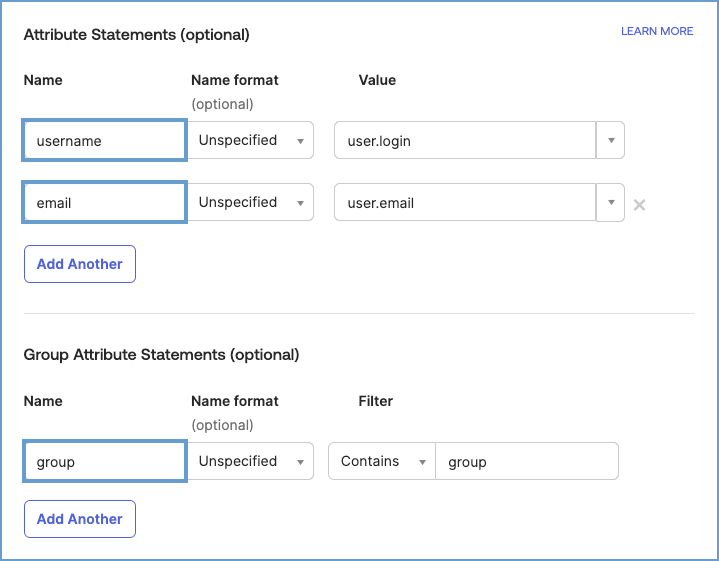
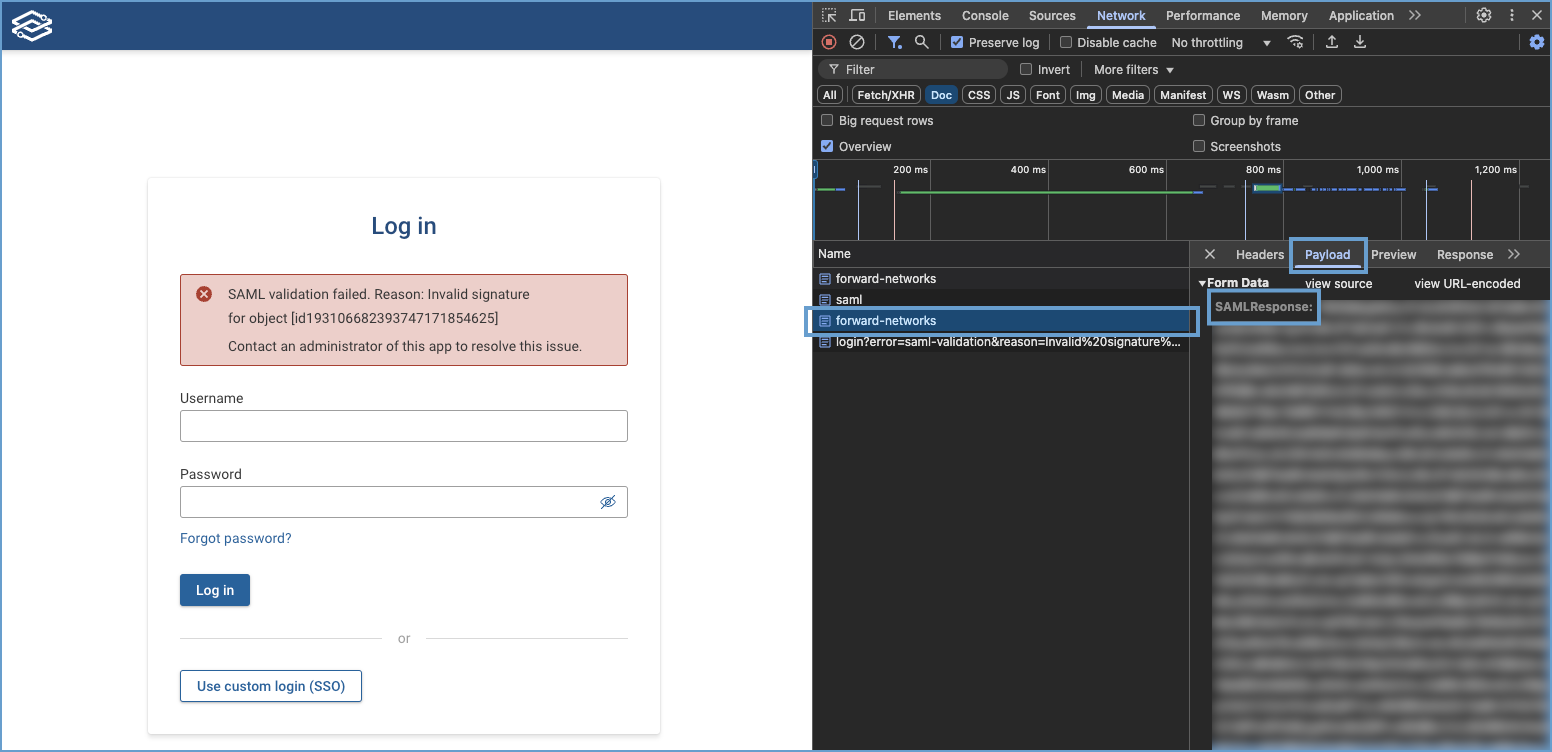
"Invalid signature for object" error. How can I fix this?
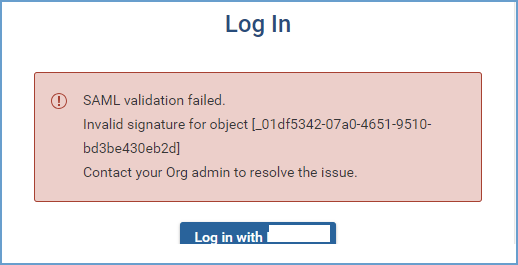
If you see this error, check the following:
- The X509 signing certificate in Forward Networks must match the public key from your IDP.
- The SAML entity ID configured in Forward must match the one in your IDP settings. Ensure:
- No extra spaces or characters.
- The correct protocol (HTTP or HTTPS).
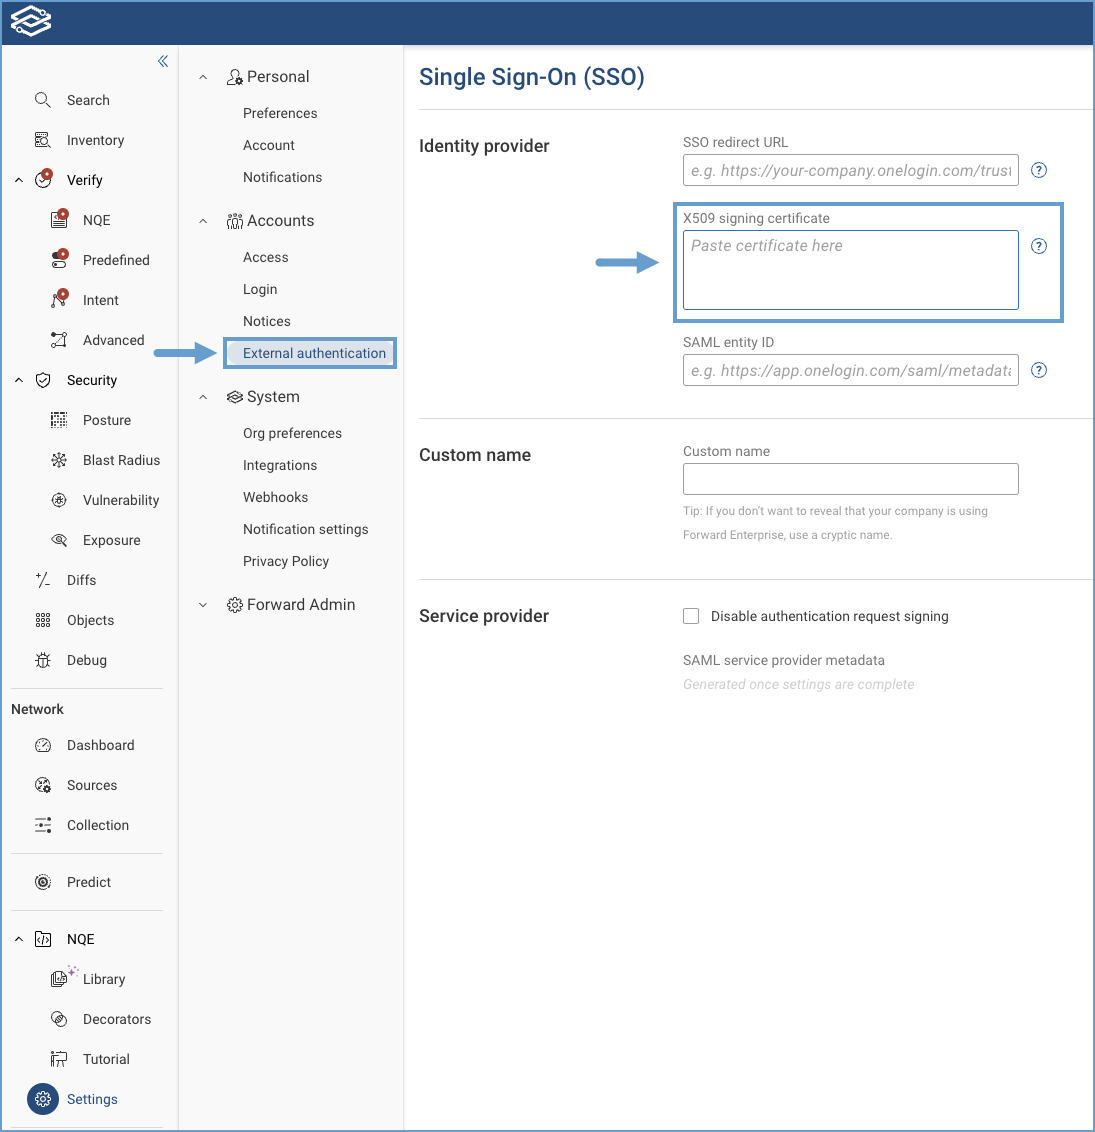
Getting the signing certificate:
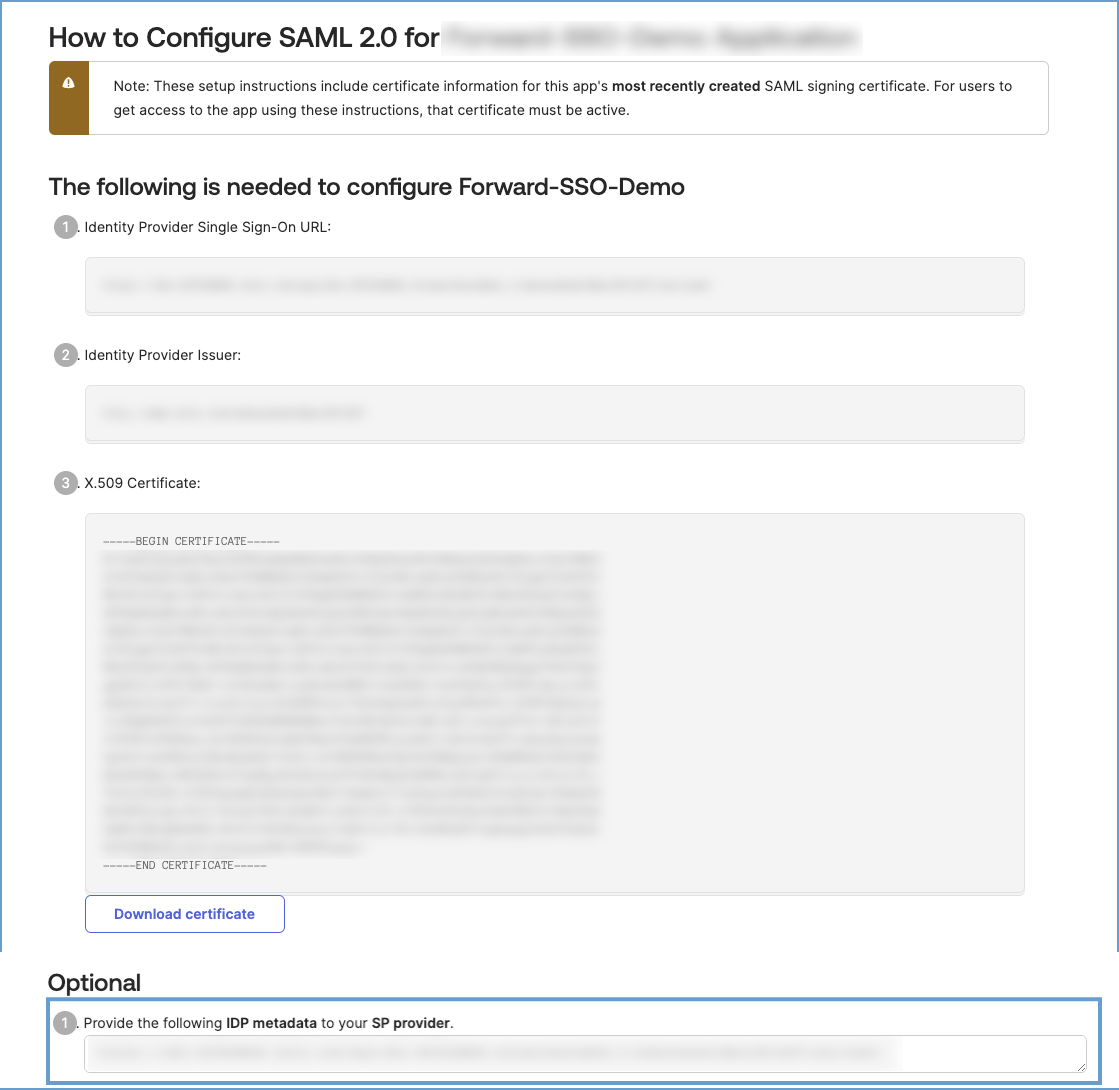
For Okta:
- Navigate to Applications and select the Forward Application.
- Under the Sign On tab, click View SAML setup instructions.
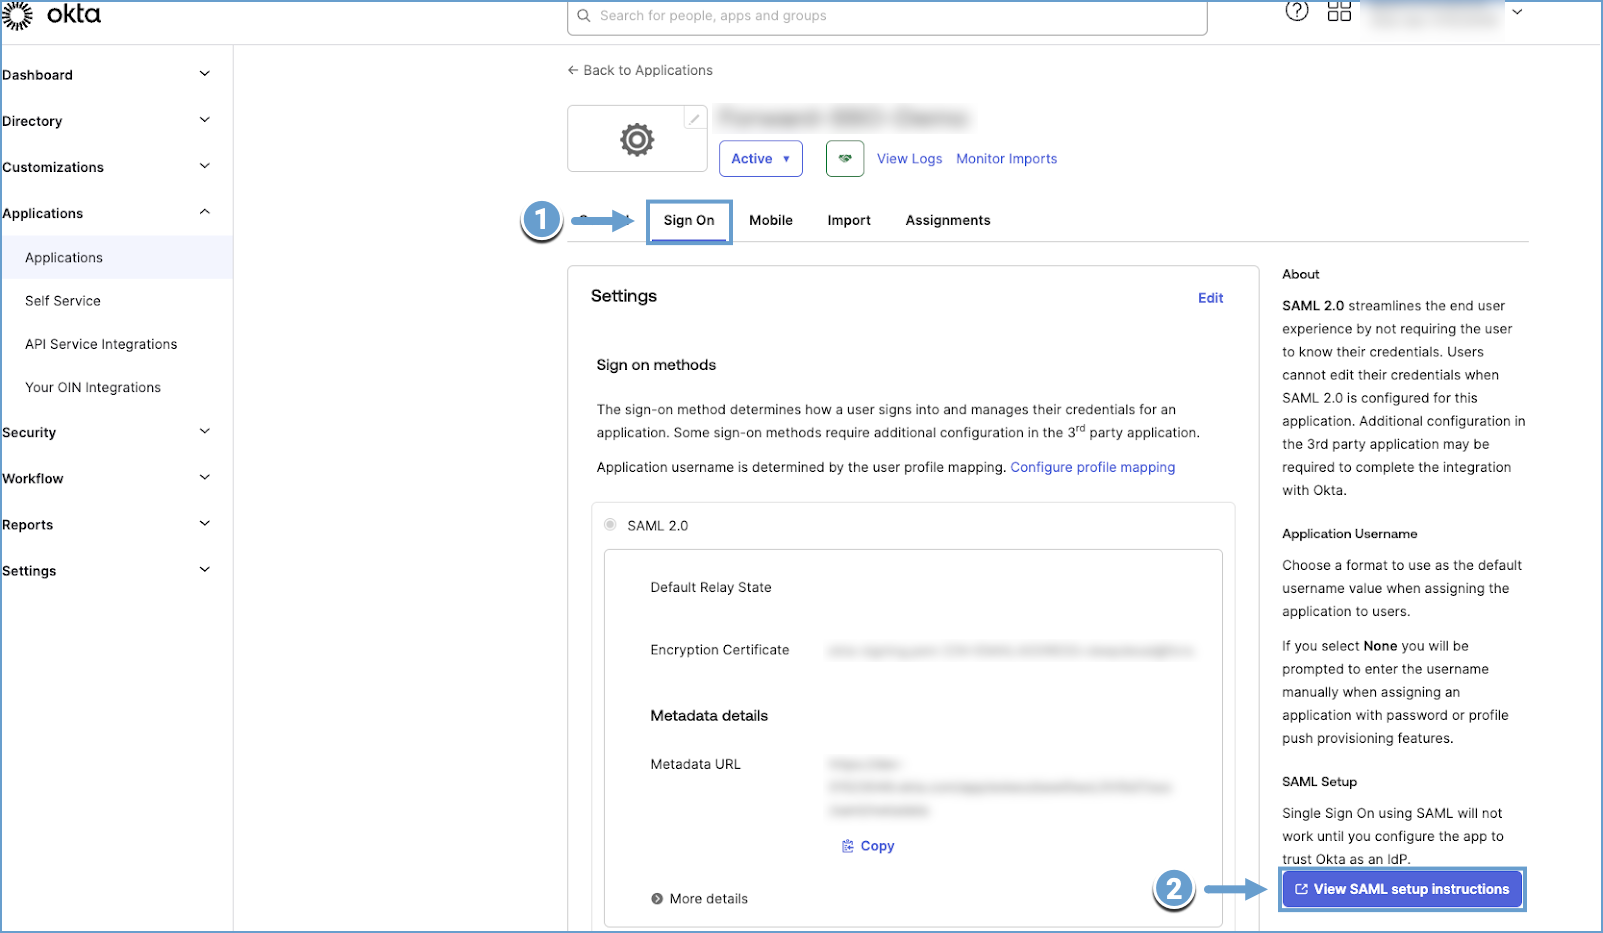
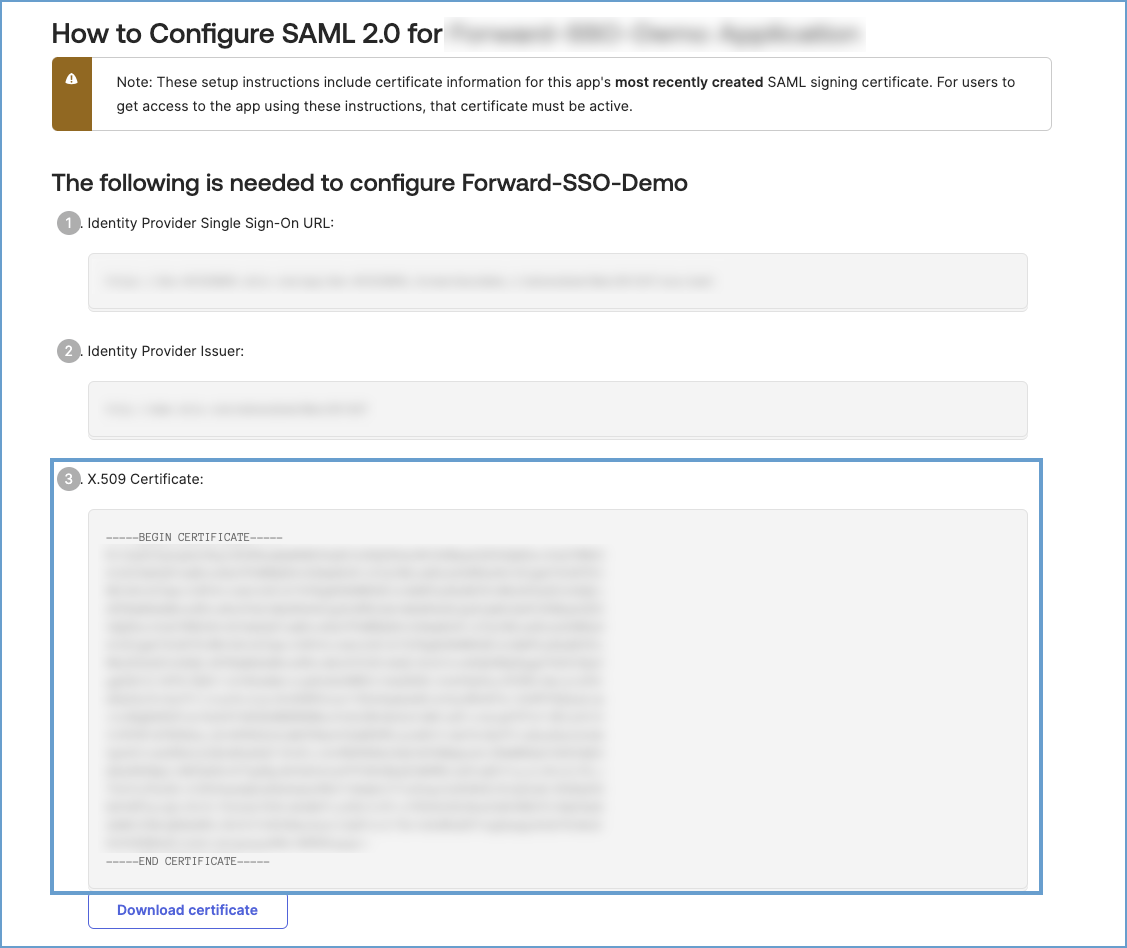
- Copy the X-509 certificate provided:
For ADFS:
-
Open AD FS Management and navigate to Services > Certificates.
-
Right-click Primary Token-Signing Certificate, and select View Certificate.
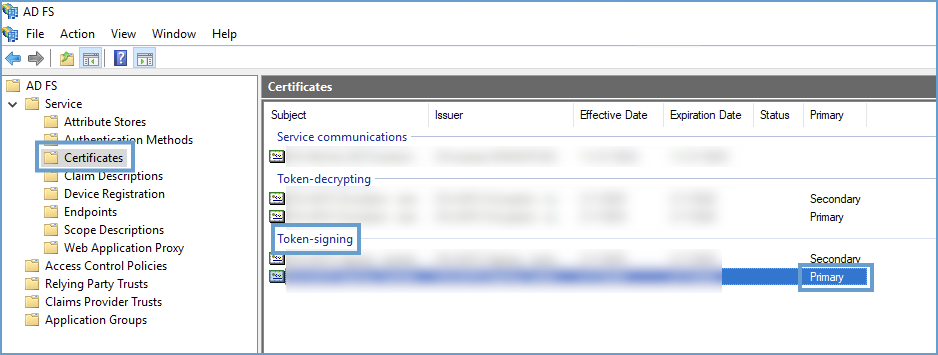
-
Export and copy the certificate.
Once the certificate is copied, verify it in the Forward Application:
- Go to Settings > Accounts > External Authentication.
- Verify that the X509 certificate matches the one copied from the IDP.
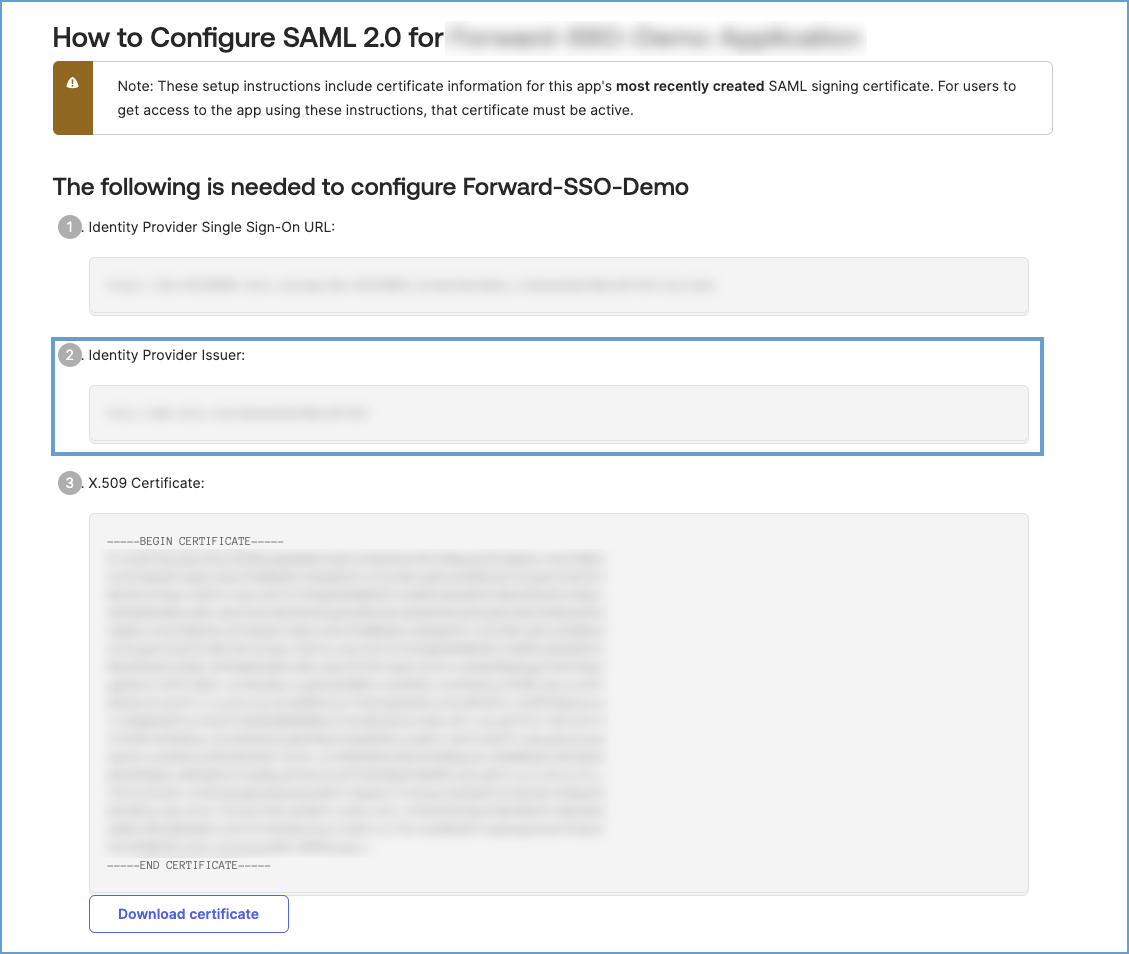
How do I verify if the entity ID matches?
For Okta:
- Navigate to Applications and select the Forward Application.
- Under the Sign On tab, click View SAML setup instructions.
- Copy the Identity Provider Issuer provided:
For ADFS:
- Retrieve the IDP metadata by going to
https://\<your-adfs-server\>/FederationMetadata/2007-06/FederationMetadata. xml - Open the XML and copy the Entity ID.
Verify in Forward Networks:
- Navigate to External Authentication in the Forward Application and confirm the Entity ID matches the one from your
IDP.
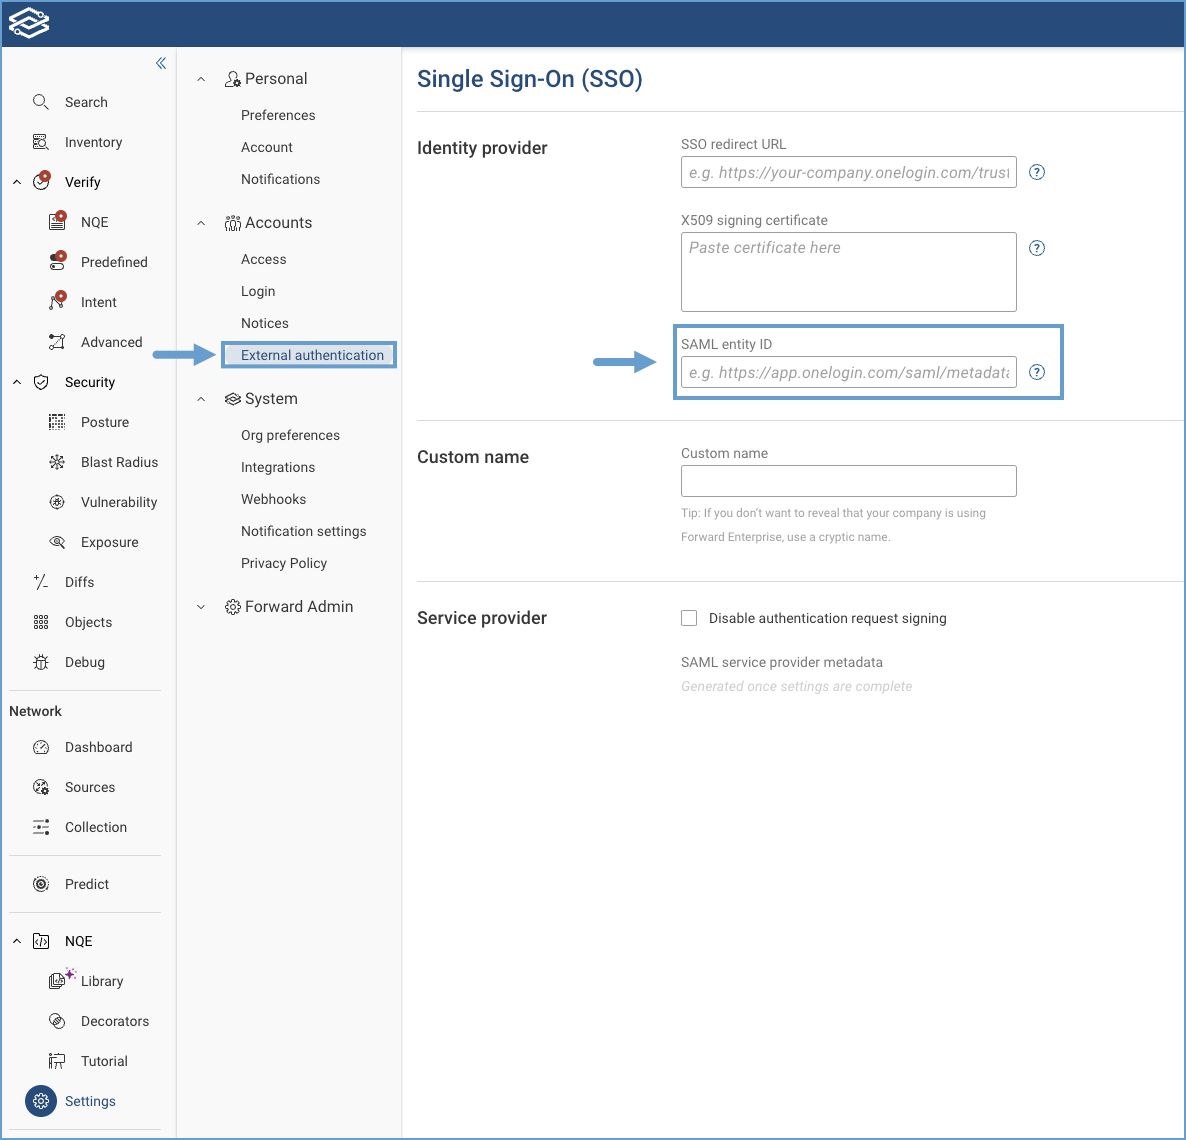
Ensure that the entity ID matches exactly. Check for extra spaces and confirm if it uses HTTP or HTTPS.
Where do I get the IDP metadata?
For Okta:
- Navigate to Applications and select the Forward Application.
- Under the Sign On tab, click View SAML setup instructions.
- Copy individual fields or download the IDP metadata XML and upload it to the Forward Application.
For ADFS:
- Retrieve the IDP metadata by going to
https://\<your-adfs-server\>/FederationMetadata/2007-06/FederationMetadata.xml.
How do I capture an SAML response for troubleshooting?
When troubleshooting, capturing an SAML response can help diagnose authentication issues.
- Before logging in, right-click on the page and select Inspect.
- Open the Network tab, enable Preserve Log, and filter for Doc requests.
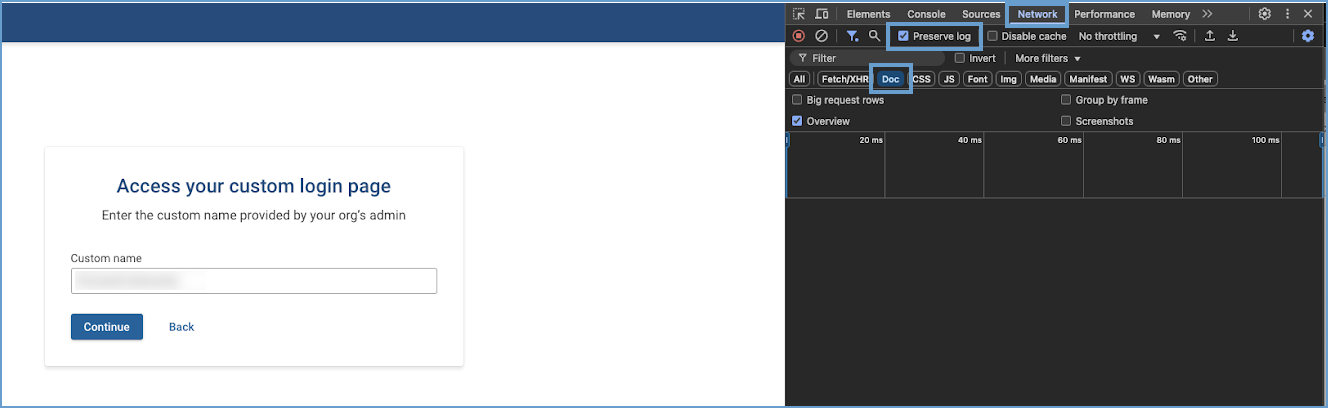
- Attempt to login.
- Look for SAML requests/responses in the Network tab.
- Select a request with your custom name.
- Navigate to the Payload tab.
- The payload will contain your SAML response.