Infoblox
The Infoblox integration enables you to export discovered network data from Forward Networks into Infoblox IP Address Management (IPAM). Using authenticated API access, the platform automatically updates IP addresses, network prefixes, and related metadata in your Infoblox network views to help maintain accurate, current IPAM records.
This integration uses NQE queries to extract network data from Forward Networks snapshots, map that data to Infoblox fields, and push it into designated Infoblox network views. Profiles are configured and managed entirely through the web interface, with support for both manual and automatic synchronization.
How Forward handles existing Infoblox data
Forward Networks does not overwrite manually-curated data that already exists in Infoblox. Pushes are additive or merge-based:
- Discovery data (hosts and IP addresses) is merged through Infoblox's CSV import: existing records are preserved,
and incoming rows from Forward either update matching entries or add new ones. Internally, the integration sets the
merge_data: trueflag on the Infobloxsetdiscoverycsvcall. - Network prefixes are created additively. When the Auto-create missing IP parent prefixes option is enabled, Forward creates only those prefixes that are missing from the target Infoblox network view. Prefixes that already exist (or overlap with existing ones) are left untouched.
Prerequisites
- Forward Enterprise: Version 25.7.0 or later
- Infoblox NIOS: Compatible version with API access (WAPI v2.10 or above)
- Authentication: Infoblox credentials (username and password)
- Connectivity: HTTPS access between Forward Networks and the Infoblox Grid Manager (TCP port 443)
Adding an Infoblox Instance
To connect Forward Networks to an Infoblox instance:
- Navigate to
Settings > Integrations. - Locate the Infoblox integration within the list and select Add.
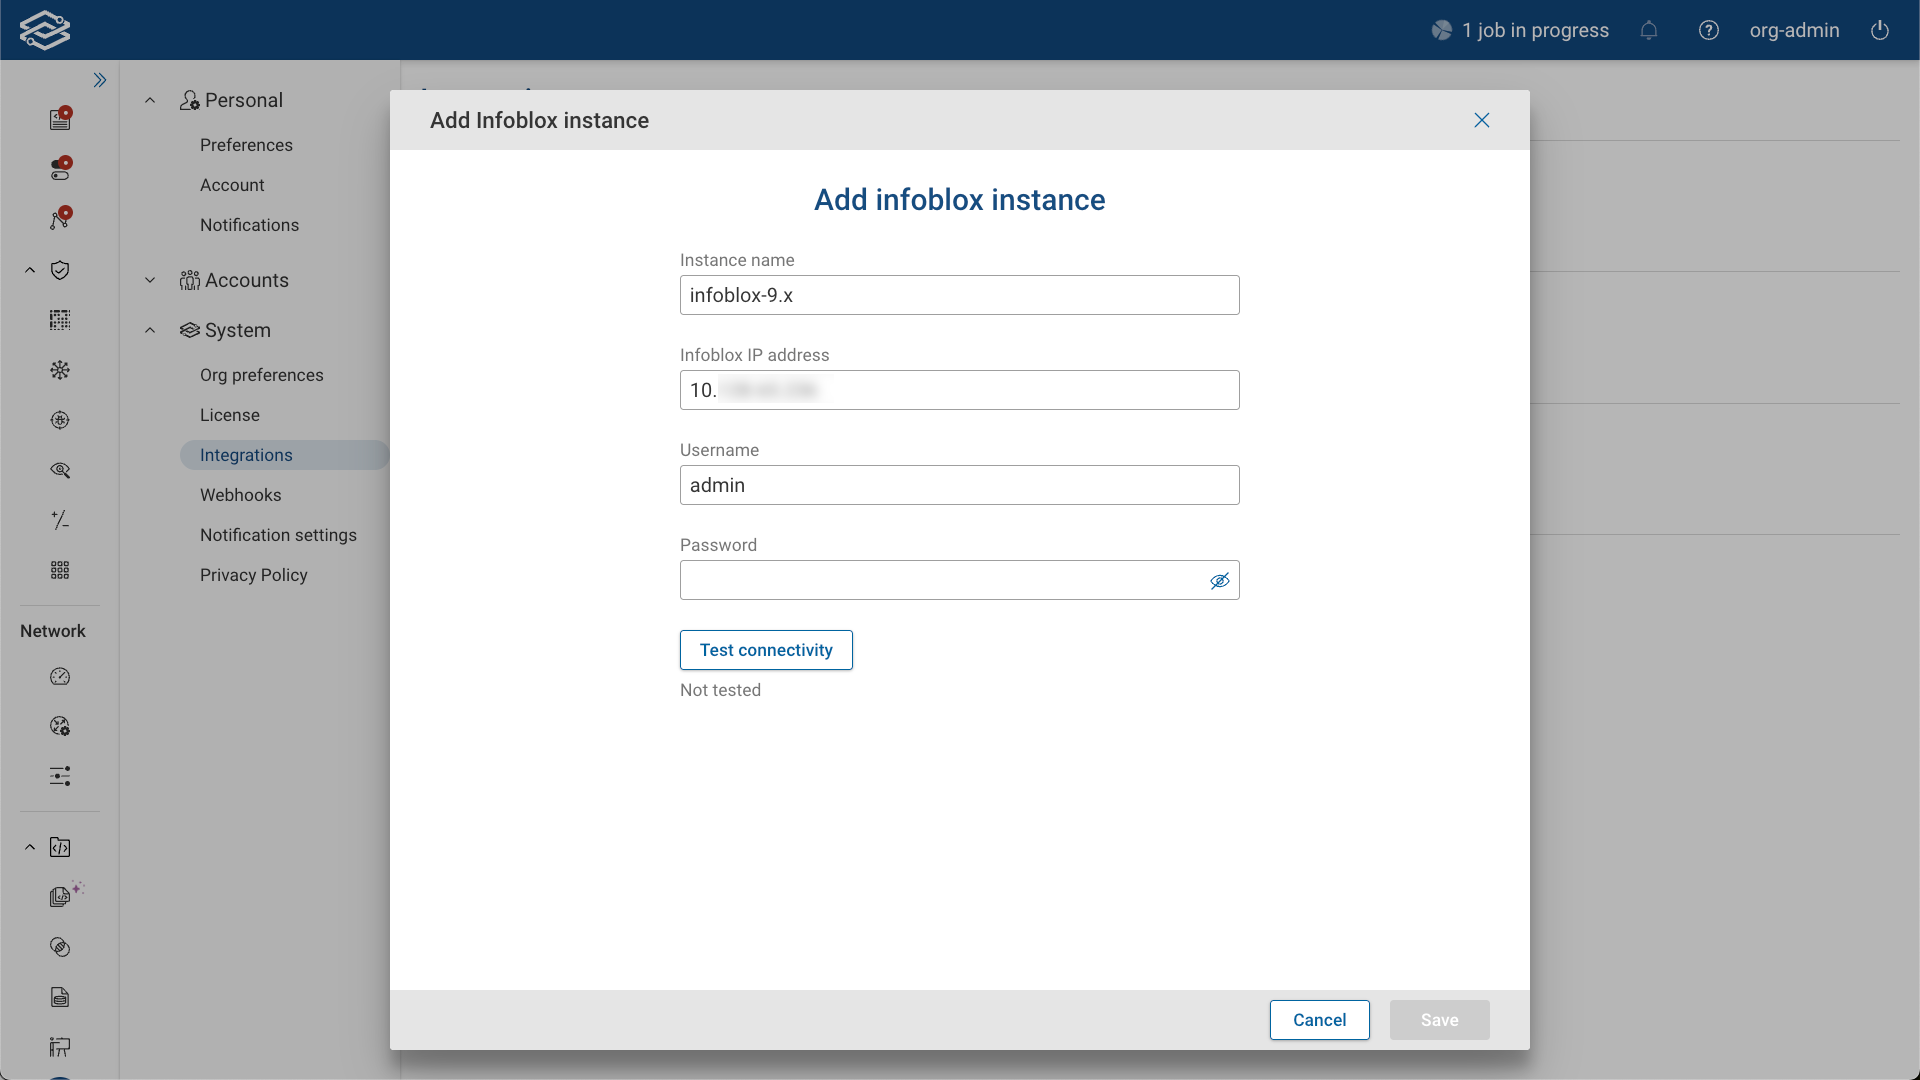
- Enter the following:
- Name: Display Name of the Infoblox Instance.
- IP Address: Address of the Infoblox Instance.
- Authentication Method: Username/Password.
- Select Test Connectivity to validate access.
- If successful, select Save.
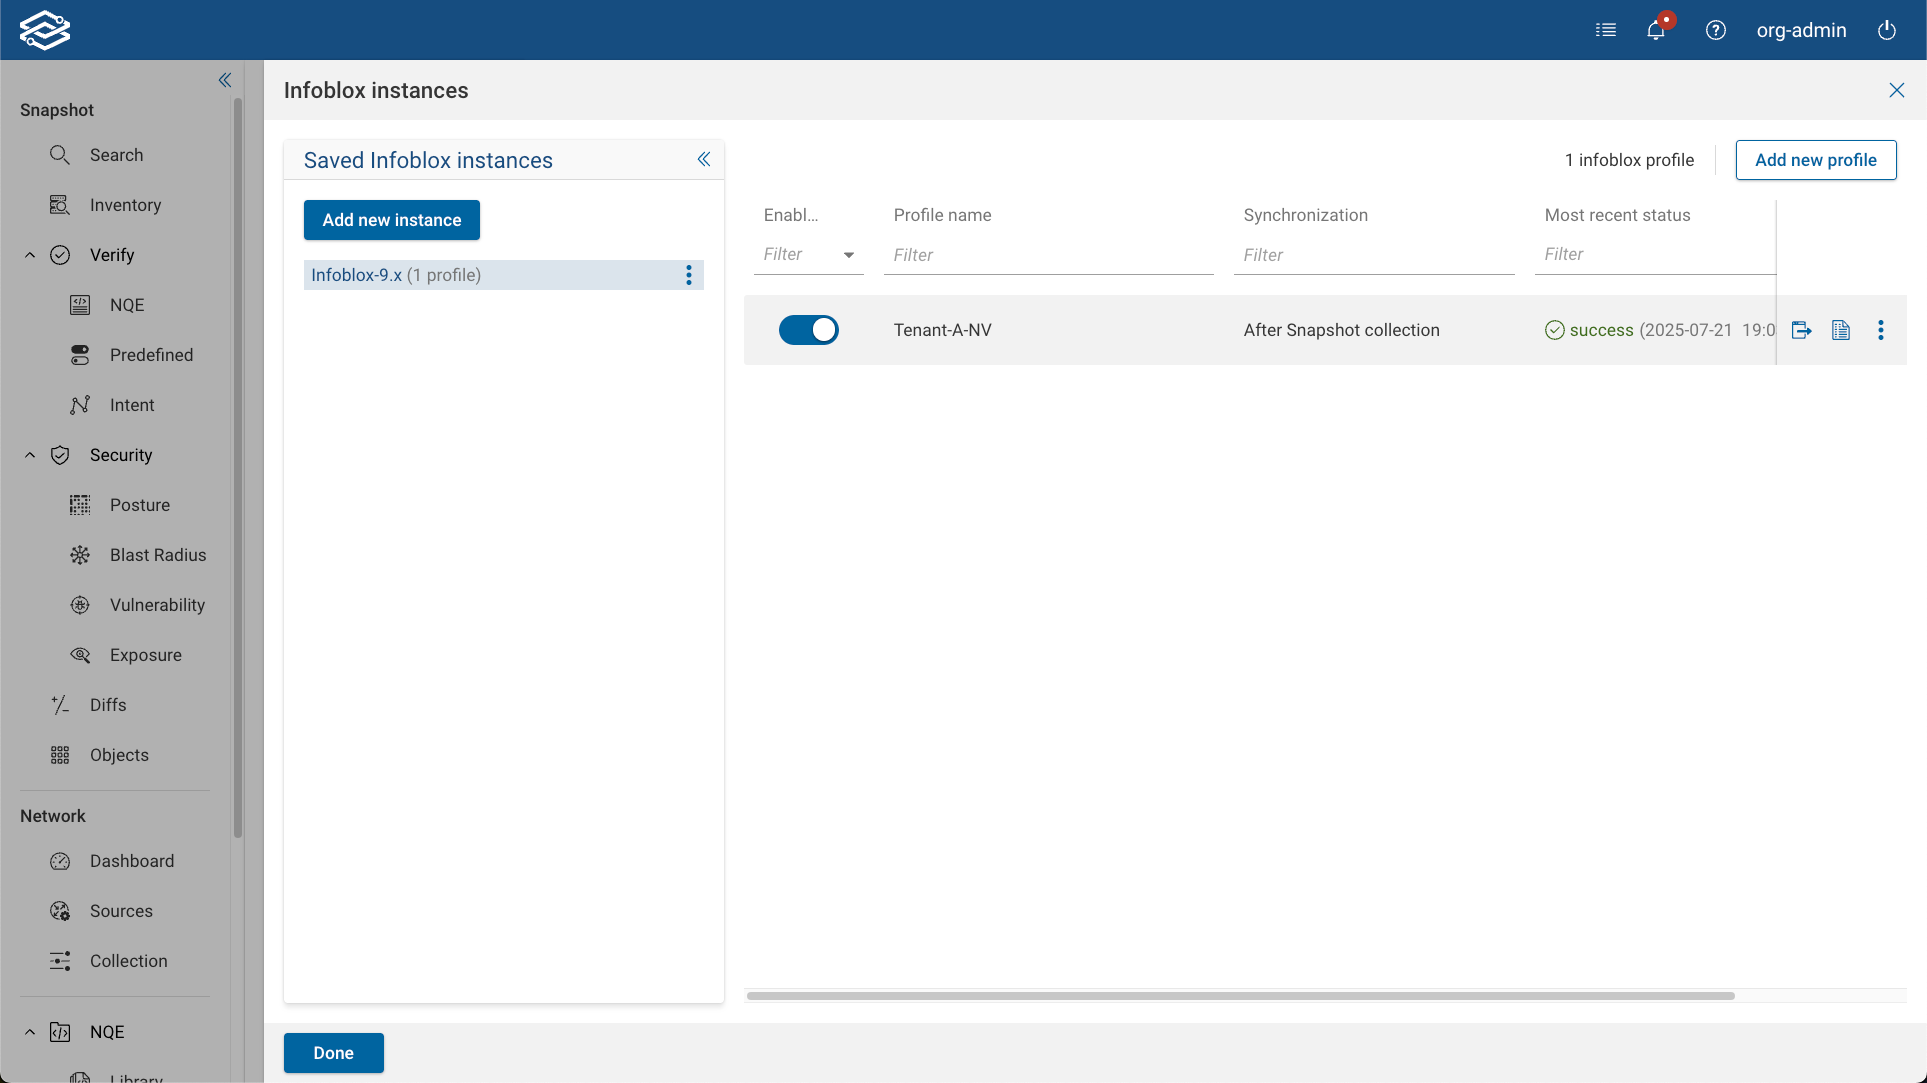
After saving, the instance appears on the Integrations page.
Configuring a Profile
Profiles define what data is pushed to Infoblox and which Network View it is sent to.
To create a profile:
- Select Add New Profile under the desired Infoblox instance.
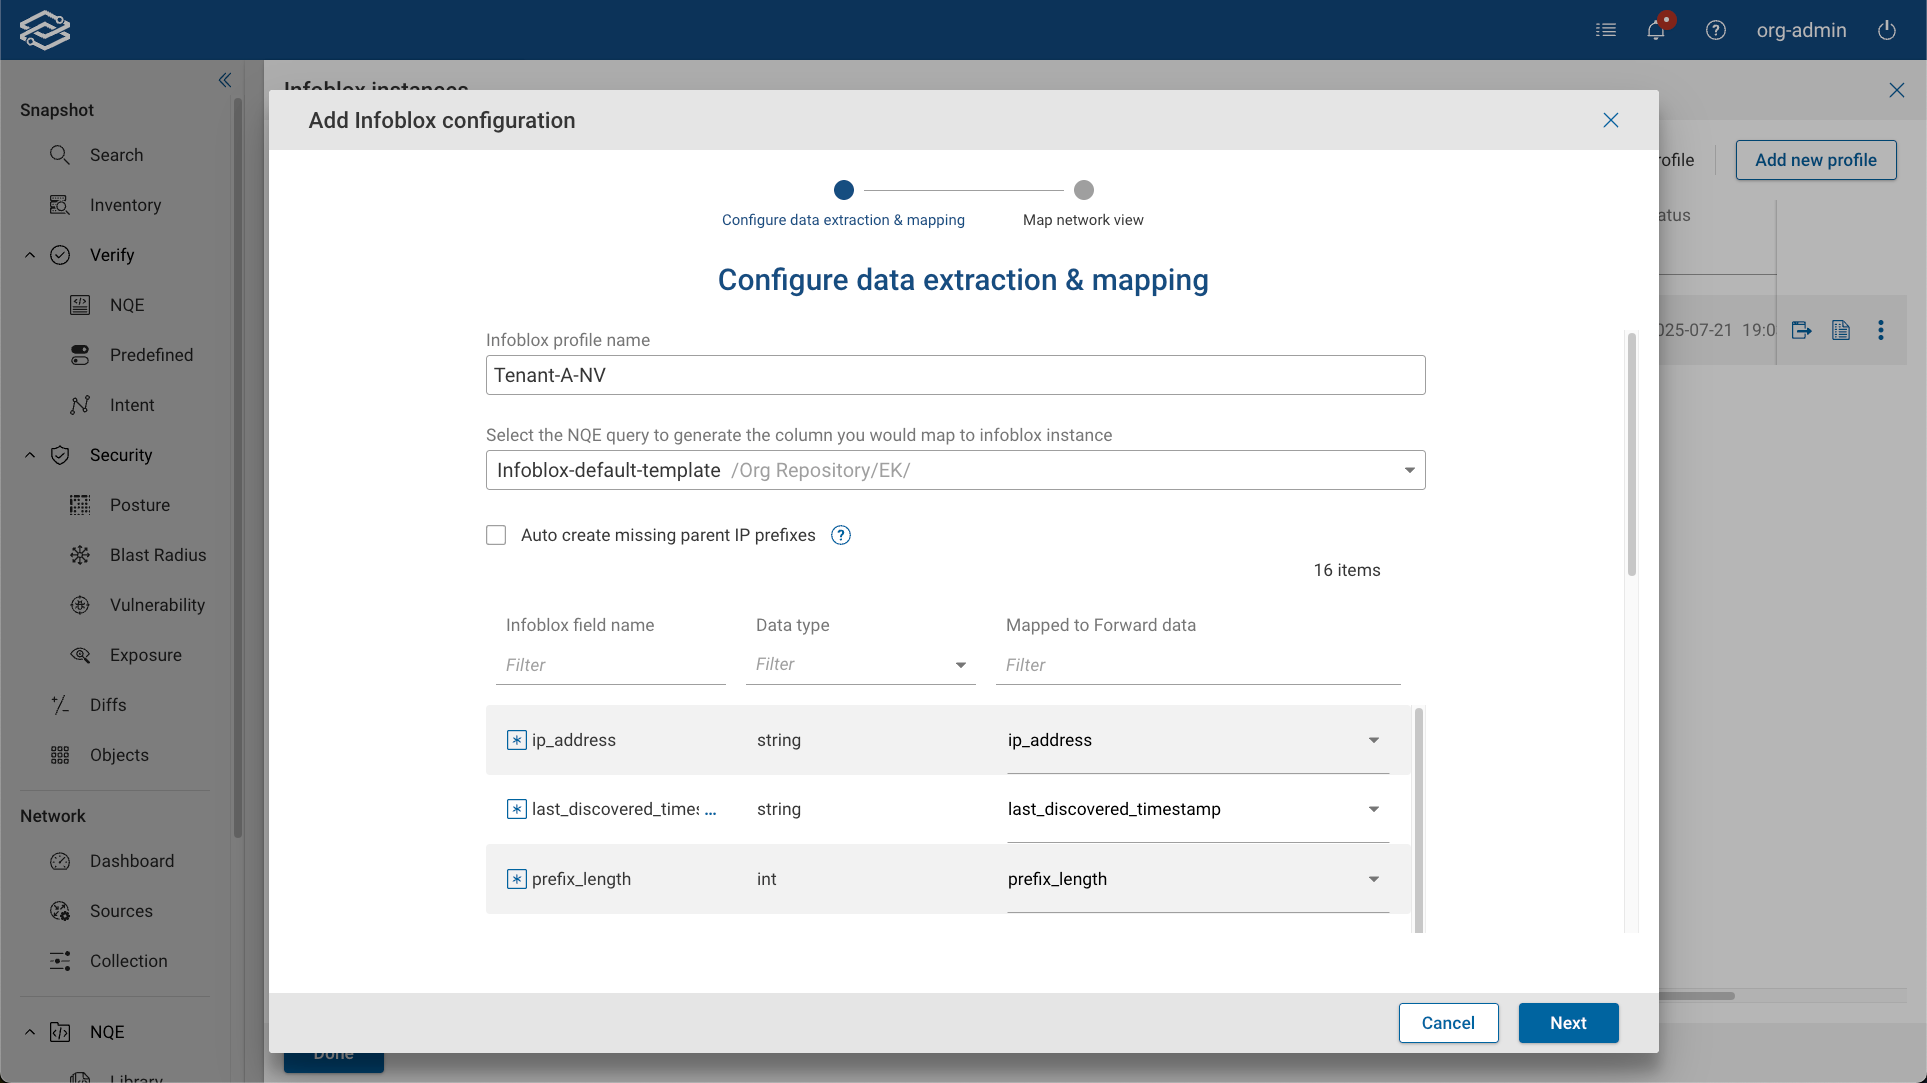
- Provide a Profile Name.
- Choose an NQE query to define the data source from Forward Networks.
- Map the columns from the query to the expected Infoblox fields, and select Next.
- Under Network View Mapping:
- Select the Forward network to use as the data source.
- Select the target Infoblox network view.
- Enable the Auto-create missing IP parent prefixes option if desired.
Infoblox requires a parent prefix for each subnet. Enabling this option will automatically create any missing parent prefixes during a data push. If disabled, any subnets without a parent prefix will be skipped during synchronization.
- Select Save, then Done once configuration is complete.
Default Field Mappings
The predefined NQE template maps data into the following Infoblox-compatible fields:
| Field | Description |
|---|---|
ip_address | IP address of the device interface (Required) |
last_discovered_timestamp | Snapshot timestamp (Required) |
prefix_length | Prefix length of the interface's subnet (Required) |
device_location | Device's physical or logical location |
os | Operating system |
device_vendor | Vendor or manufacturer |
device_port_name | Interface or port name |
discovered_name | Hostname of the device |
network_component_port_description | Port description |
mac_address | MAC address of the interface |
port_vlan_number | VLAN ID |
vrf_name | Name of the configured VRF |
port_status | Operational status of the port |
port_speed | Port speed |
discoverer | Source of the discovery (default: "Forward Networks") |
task_name | Discovery task label (default: "FWD CSV push") |
Default NQE query
The authoritative copy of this query lives in the NQE Library under External → Infoblox → Infoblox Default Query. The snippet below is a reference snapshot and may drift from the in-product version over time — always use the Library copy as the starting point when customizing.
/**
 * @intent The default query for Forward's Infoblox integration
 * @description Retrieves IP addresses from Layer 3 interfaces on all devices.
 * You may modify the query logic, for example to add more columns or to filter
 * entries based on specific criteria. A typical use case would be to duplicate
 * this query and then filter to support a particular network-view mapping.
 * However, do not remove the existing columns - they are all required by Infoblox.
 */

import "L3/Interface Utilities";

getIpSubnets(addresses) =
  foreach addr in addresses
  select ipSubnet(addr.ip, addr.prefixLength);

intfSpeeds =
  [{ value: 10, speed: "10M" },
   { value: 100, speed: "100M" },
   { value: 1000, speed: "1G" },
   { value: 10000, speed: "10G" },
   { value: 100000, speed: "100G" }
  ];

getSpeed(speed: Integer) =
  if isPresent(speed)
  then unknownIfNull(max(foreach val in intfSpeeds
                         where val.value == speed
                         select val.speed))
  else "Unknown";

unknownIfNull(speed) = if isPresent(speed) then speed else "Unknown";

parseTimestamp(ts: Timestamp) =
  foreach n
    in regexMatches(toString(ts), re`(?<year>\d{4})-(?<month>\d{2})-(?<day>\d{2})T(?<hour>\d{2}):(?<minute>\d{2}):(?<second>\d{2})Z`)
  let year = n.data.year
  let month = n.data.month
  let day = n.data.day
  let hour = n.data.hour
  let minute = n.data.minute
  let second = n.data.second
  select year + "-" + month + "-" + day + " " + hour + ":" + minute + ":" +
         second;

zeroMac = macAddress("00:00:00:00:00:00");

foreach device in network.devices
where device.snapshotInfo.result == DeviceSnapshotResult.completed
let platform = device.platform
let snapshotInfo = device.snapshotInfo
let discovered_timestamp = parseTimestamp(snapshotInfo.collectionTime)
foreach l3Iface in getL3Interfaces(device)
foreach ipv4_addr in l3Iface.ipv4.addresses
let ipv4_prefix = ipv4_addr.prefixLength
let ipv4_address = ipv4_addr.ip
select {
  discovered_name: device.name,
  device_vendor: platform.vendor,
  os: if isPresent(platform.osVersion)
      then toString(platform.os) + " " + platform.osVersion
      else "",
  device_location: if isPresent(device.locationName)
                   then device.locationName
                   else "",
  ip_address: ipv4_address,
  prefix_length: ipv4_prefix,
  device_port_name: l3Iface.name,
  network_component_port_description: if isPresent(l3Iface.iface.description)
                                      then l3Iface.iface.description
                                      else "",
  mac_address: if isPresent(l3Iface.iface.ethernet.macAddress)
               then l3Iface.iface.ethernet.macAddress
               else zeroMac,
  port_vlan_number: if isPresent(l3Iface.vlan) then l3Iface.vlan else 0,
  vrf_name: l3Iface.vrf,
  port_status: l3Iface.iface.operStatus,
  port_speed: getSpeed(l3Iface.iface.ethernet.speedMbps),
  last_discovered_timestamp: discovered_timestamp,
  discoverer: "Forward Networks",
  task_name: "FWD CSV push"
}
Synchronization Options
Manual Synchronization
- Select the Review data & push to Infoblox icon on a profile row to open the preview drawer.
- Review the mapped rows, then select Push manually to initiate the sync.
- Upon success, the sync time updates on the profile row.
Automatic Synchronization
- Enable Push to Infoblox after each successful Snapshot processing during profile creation or via profile edit.
- Data is automatically pushed to Infoblox after each snapshot completes.
Both modes support batching and paging for performance and API reliability.
Managing Infoblox Instances and Profiles
After setup, Infoblox instances and profiles can be managed from the Infoblox Instances page.
Pushing Data
To manually push data to Infoblox:
- Select the Review data & push to Infoblox icon on the profile row, then confirm with Push manually in the preview drawer.
Viewing Logs
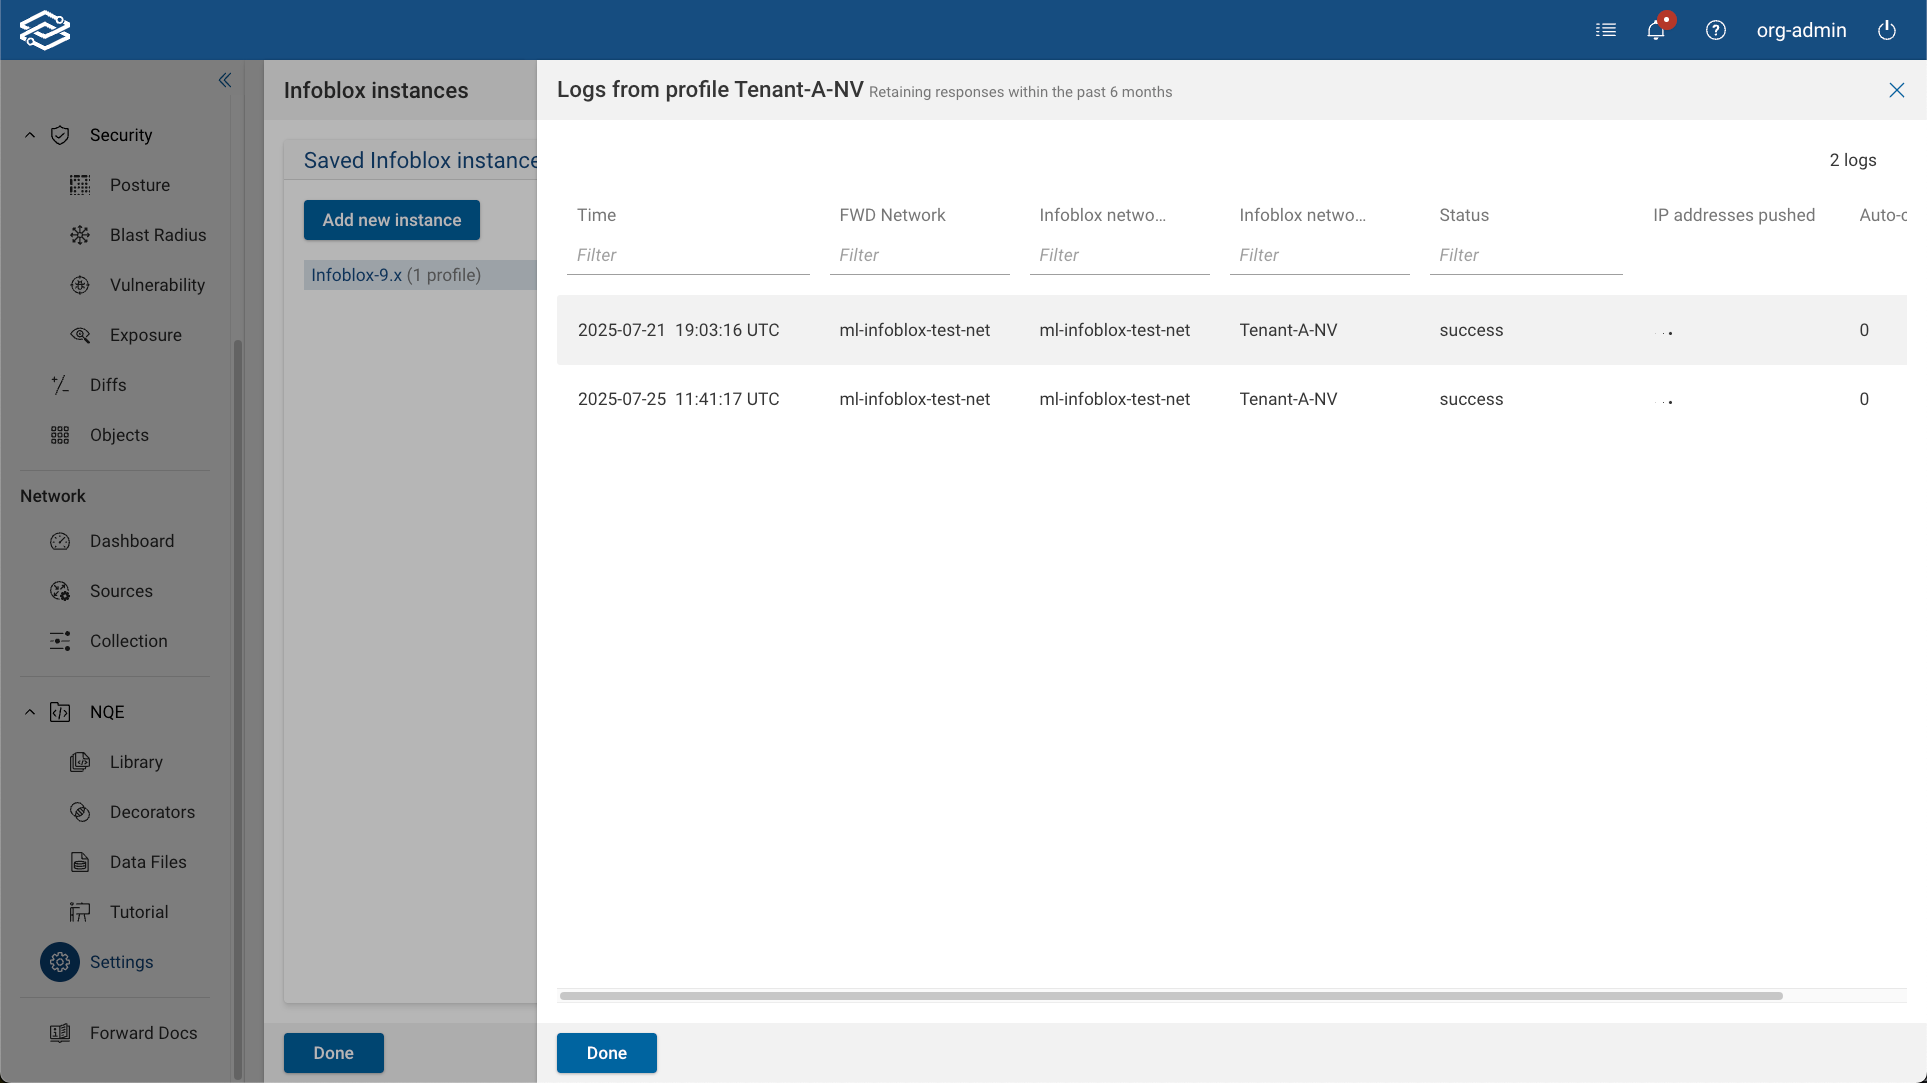
- Each profile maintains a separate sync log.
- Select the View Logs icon next to a profile to review status, errors, and results.
Editing and Deleting
Editing a Profile
- Select the More options icon next to a profile.
- Choose Edit.
- Modify the NQE query, column mappings, or network view.
- Select Save.
Deleting a Profile
- Select the More options icon next to a profile.
- Choose Delete, then confirm.
Editing an Instance
- Select the More options icon next to the instance.
- Choose Edit.
- Modify the instance name, IP address, or authentication method.
- Select Save.
Deleting an Instance
- Select the More options icon next to an instance.
- Choose Delete, then confirm.
API Endpoints Reference
Forward Networks uses the following Infoblox WAPI endpoints during integration:
List network views
GET /wapi/v2.10/networkview
Returns all configured Infoblox network views.
List networks in a specific network view
GET /wapi/v2.10/network?_return_fields=network&network_view=<VIEW>
Lists all networks (prefixes) within the specified Infoblox network view.
Create a missing network (CIDR)
POST /wapi/v2.10/network
Creates a new network (CIDR) if missing in Infoblox.
Bulk CSV import
The integration performs bulk updates using Infoblox’s CSV import process, which requires three sequential calls:
POST /wapi/v2.10/fileop?_function=uploadinitPOST /http_direct_file_io/<REQ_ID>/import_filePOST /wapi/v2.10/fileop?_function=setdiscoverycsv