Data Connectors
Data connectors integrate and augment network data from sources external to the network itself. They enable Forward Enterprise to retrieve, parse, and structure data using HTTP(S) GET requests. Data connectors can enhance visibility, improve analytics, and integrate external data sources into Forward Enterprise.
A data connector re-fetches from its HTTP(S) service every time a network snapshot is collected, so each snapshot holds whatever the service returned at that time. Use a connector for data that lives behind an API and changes over time, such as IPAM records, CMDB entries, ticketing or asset inventories, or any service that returns JSON, CSV, or text.
For static data you maintain yourself, such as a spreadsheet of site names or compliance parameters, use Data Files instead. You upload a data file once at the organization level; by contrast, a connector fetches its data on every collection. Both bring external data into the NQE data model.
What you can do with the collected data
Collected data is captured in the network snapshot and appears in the NQE data model under network.dataConnectors.
Each connector holds one httpResults entry per endpoint, and each endpoint holds the pages returned by its HTTP
request. The raw response text for a page is on its responseBody field. To read it, iterate over the connectors, their
endpoint results, and the pages of each result:
foreach dataConnector in network.dataConnectors
foreach httpResult in dataConnector.httpResults
foreach page in httpResult.pages
select {
  dataConnectorName: dataConnector.name,
  httpResultName: httpResult.name,
  responseBody: page.responseBody
}
To read one connector or endpoint, filter by name with a where clause, such as
where dataConnector.name == "my-connector".
You can parse the response body in NQE and join it against devices, interfaces, or other modeled data. Because the data is part of the snapshot, you can use it in NQE Library queries, Inventory, and Verify checks, and it is kept in snapshot history with the rest of the network data.
Navigating the Data Connectors page
You can view and manage data connectors by navigating to the Sources page and selecting the Data connectors category.
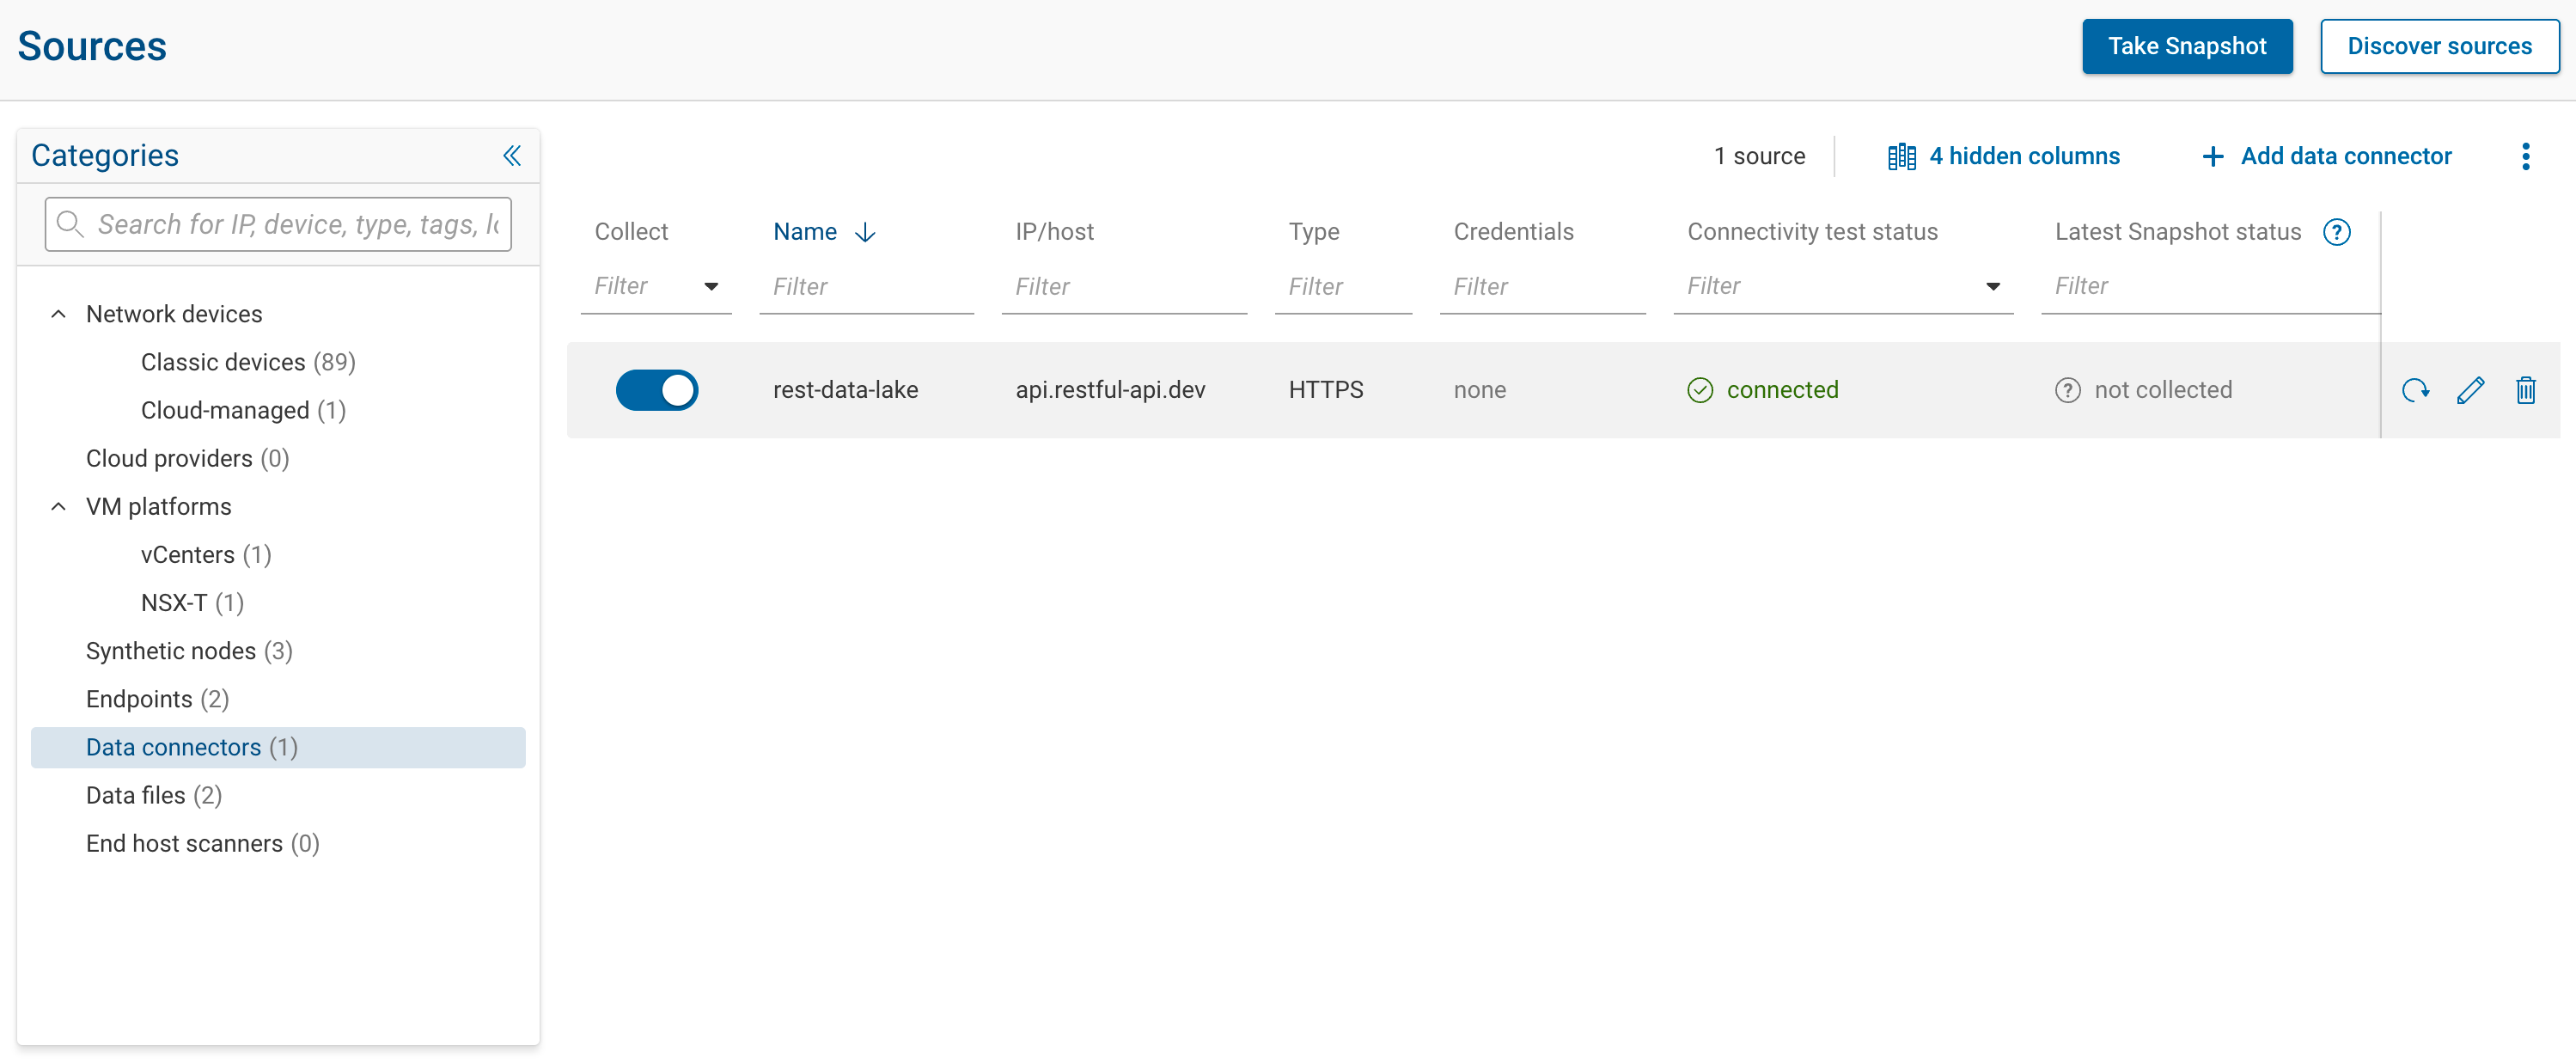
- Add Data Connector: Launches the Add HTTP(S) Data Connector wizard.
- Additional Options (⋮ Kebab Menu ): Dropdown with option to reset column width.
- List of Data Connectors: Displays a filterable list of data connectors with the following columns:
- Collect: Toggle to enable or disable data collection.
- Name: Displays the assigned name.
- Tags: Assigned tags for categorization.
- IP/host: The IP address or hostname of the data connector.
- Type: The profile type assigned to the data connector.
- Credentials: Credentials used for authentication.
- Connection Test Status: Status of the last connection test.
- Latest Snapshot Status: Status of the most recent snapshot.
- Last Tested: Timestamp of the last connection test.
- Per-Connector Actions: Data connector-specific actions available at the end of each row:
- Test connection: Initiates a real-time connectivity test for the selected data connector.
- Edit: Edit the selected data connector configuration.
- Delete: Deletes the data connector.
Adding an HTTP(S) Data Connector
To add a data connector, select Add data connector to launch the wizard.
Forward supports data in JSON, CSV, and any text. Binary data is not supported.
The format is based on the content-type header. If the content type is set to application/json then Forward uses
JSON format. If the content type is set to text/csv then Forward will use CSV format; otherwise, it uses text.
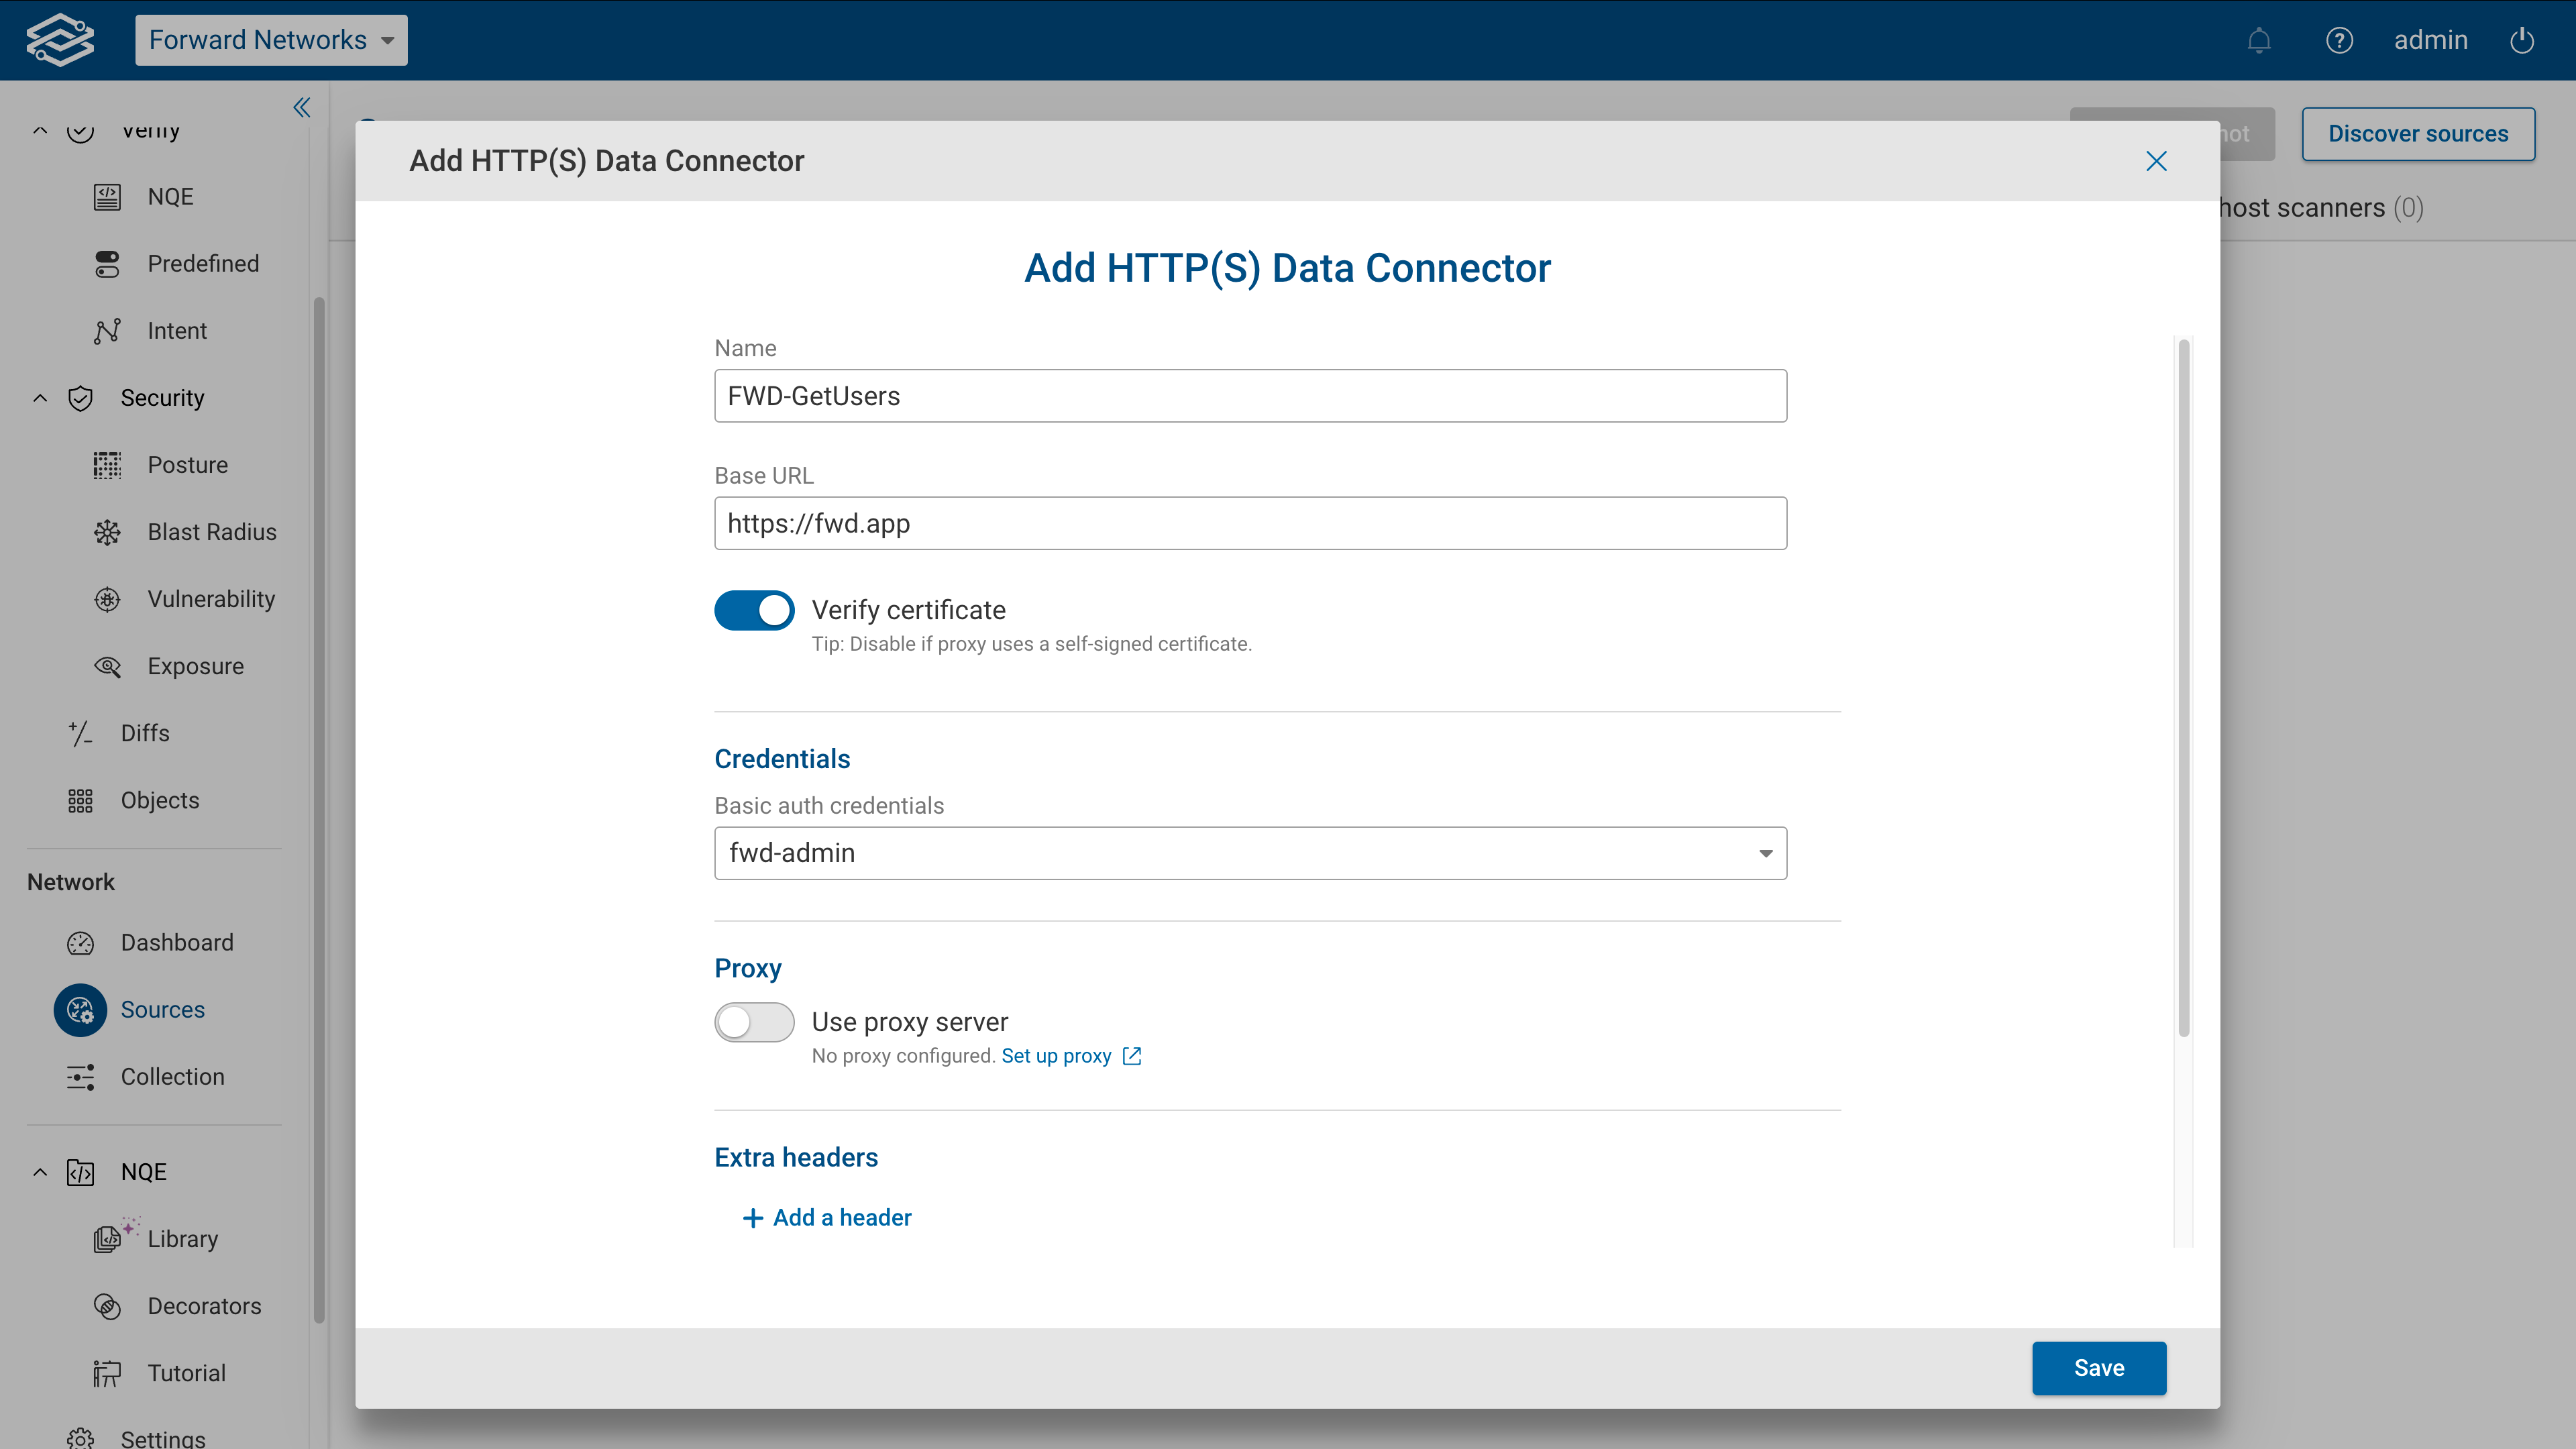
From the Add HTTP(S) Data Connector wizard, provide the following details:
General Information
- Name: Assign a name for the data connector.
- Base URL: Specify the base URL for requests.
Credentials
- Basic auth credentials: Select or create credentials from the dropdown.
- Use proxy server: Enable if a proxy is required. Select or create one from the list.
Extra headers
- Add extra headers: Define additional headers as Key/Value pairs.
Endpoints
- Add an endpoint: Select to assign endpoints to the data connector. There are two types to select from:
- Static Endpoints: Uses a static URL that returns all data in one request.
- Paginated Endpoints: Uses dynamic URLs for paginated data split up across one or more requests.
Once all endpoints have been added to the data connector, click Save.
Adding a static endpoint
A static endpoint uses a fixed URL that returns all data in a single request. This is useful for retrieving datasets that do not require multiple calls or pagination to be fully collected.
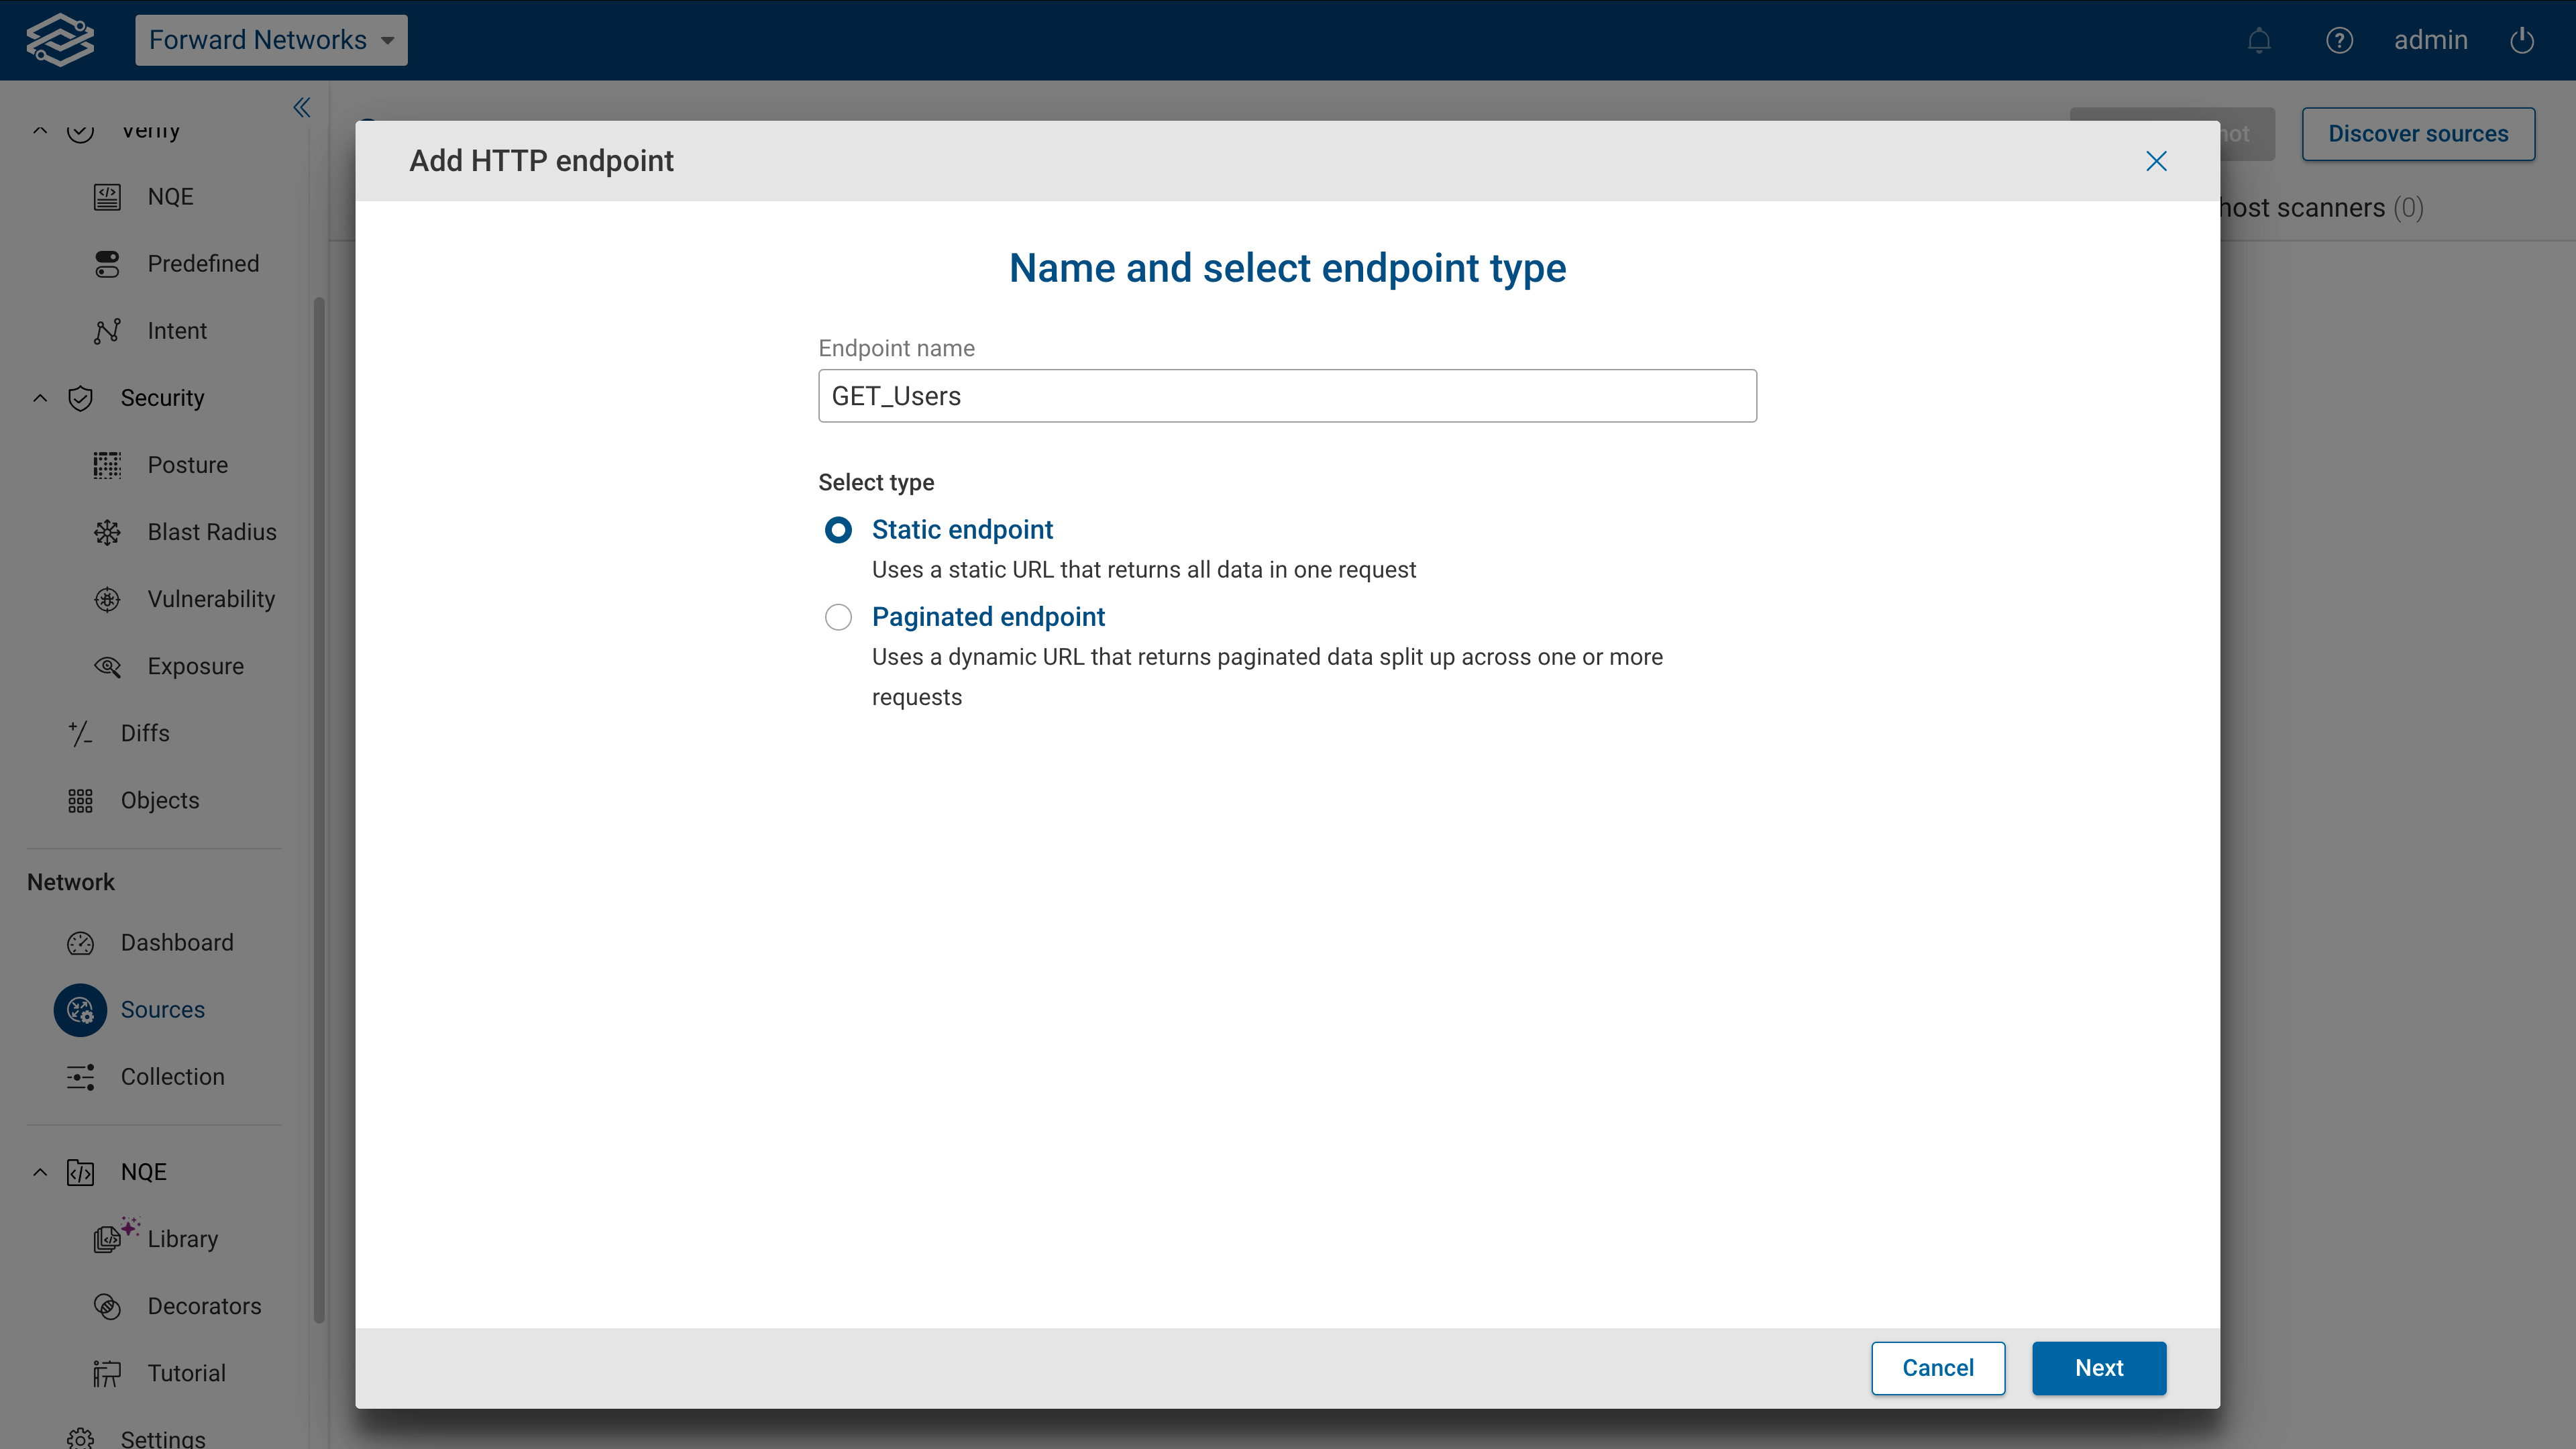
To configure static endpoint:
- Provide a name, and select static as the endpoint type.
- Enter the request path and click Execute to test connectivity. Results of the connectivity test will be
displayed within the Results section. Additional information can be found by selecting see details.
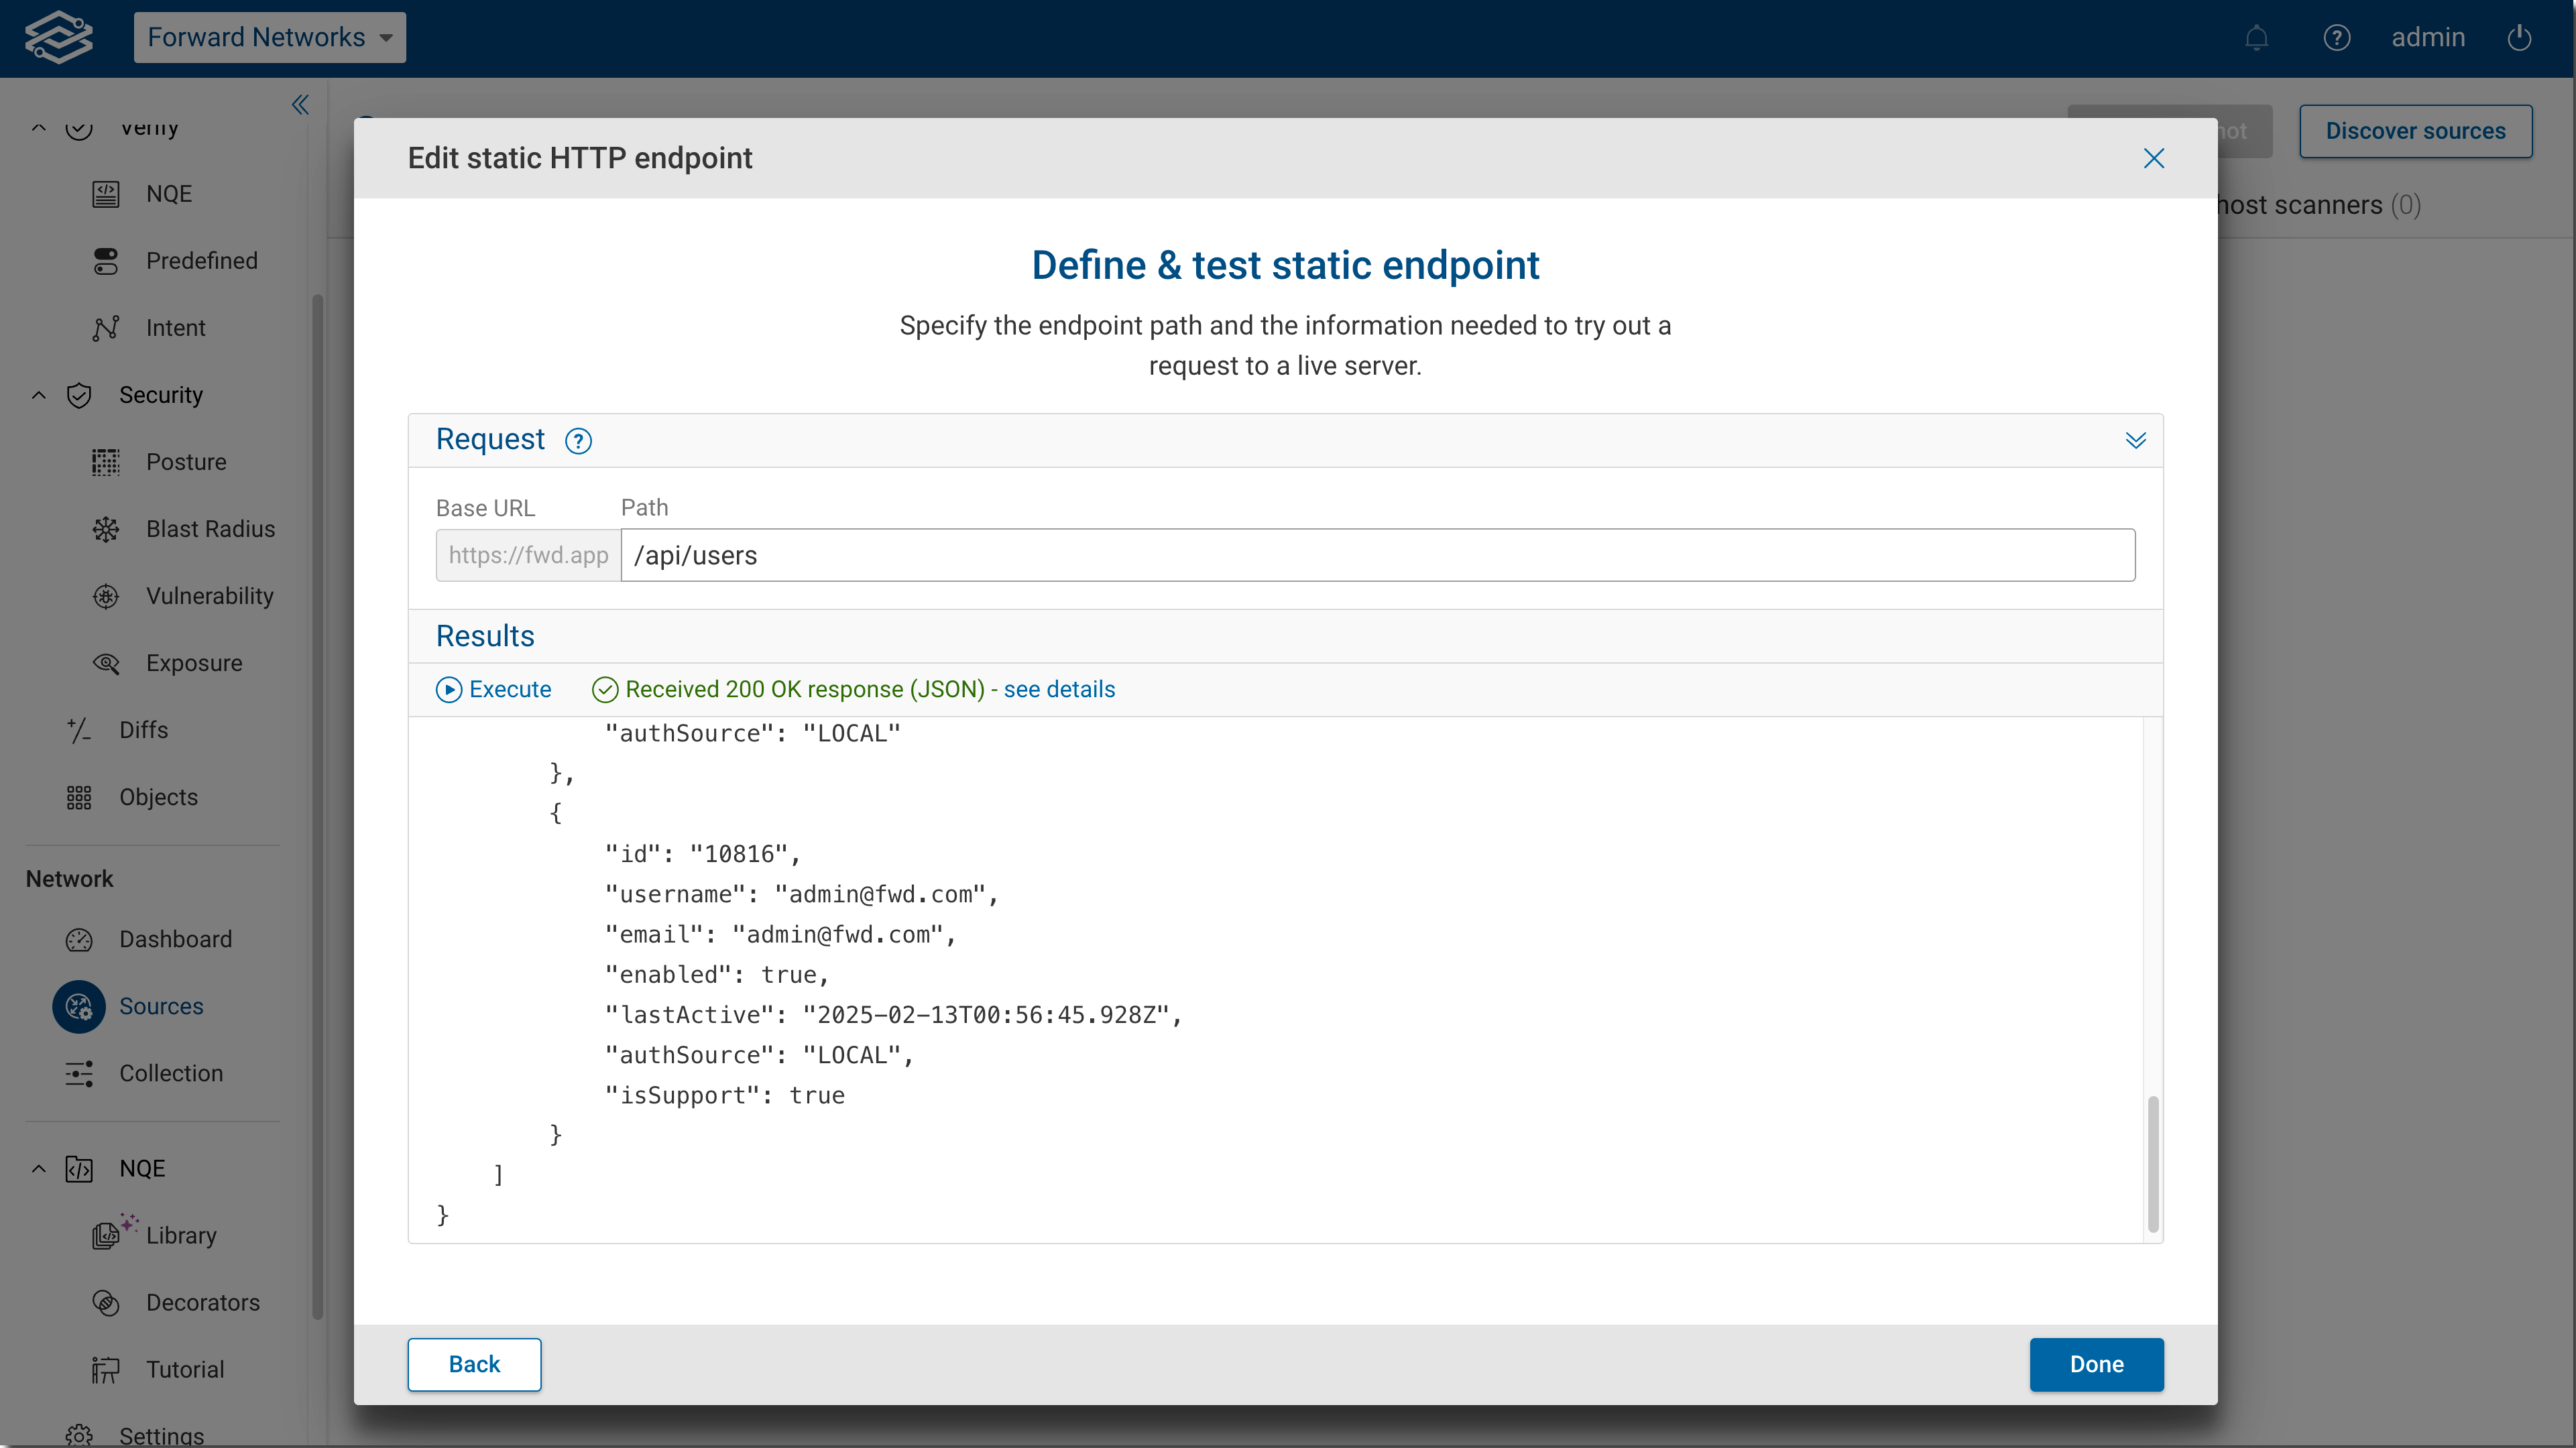
- Once the test succeeds, select Save.
Adding a paginated endpoint
A paginated endpoint is used when data is split across multiple pages, requiring multiple requests to retrieve the full dataset. Paginated data sources help manage large volumes of data efficiently.
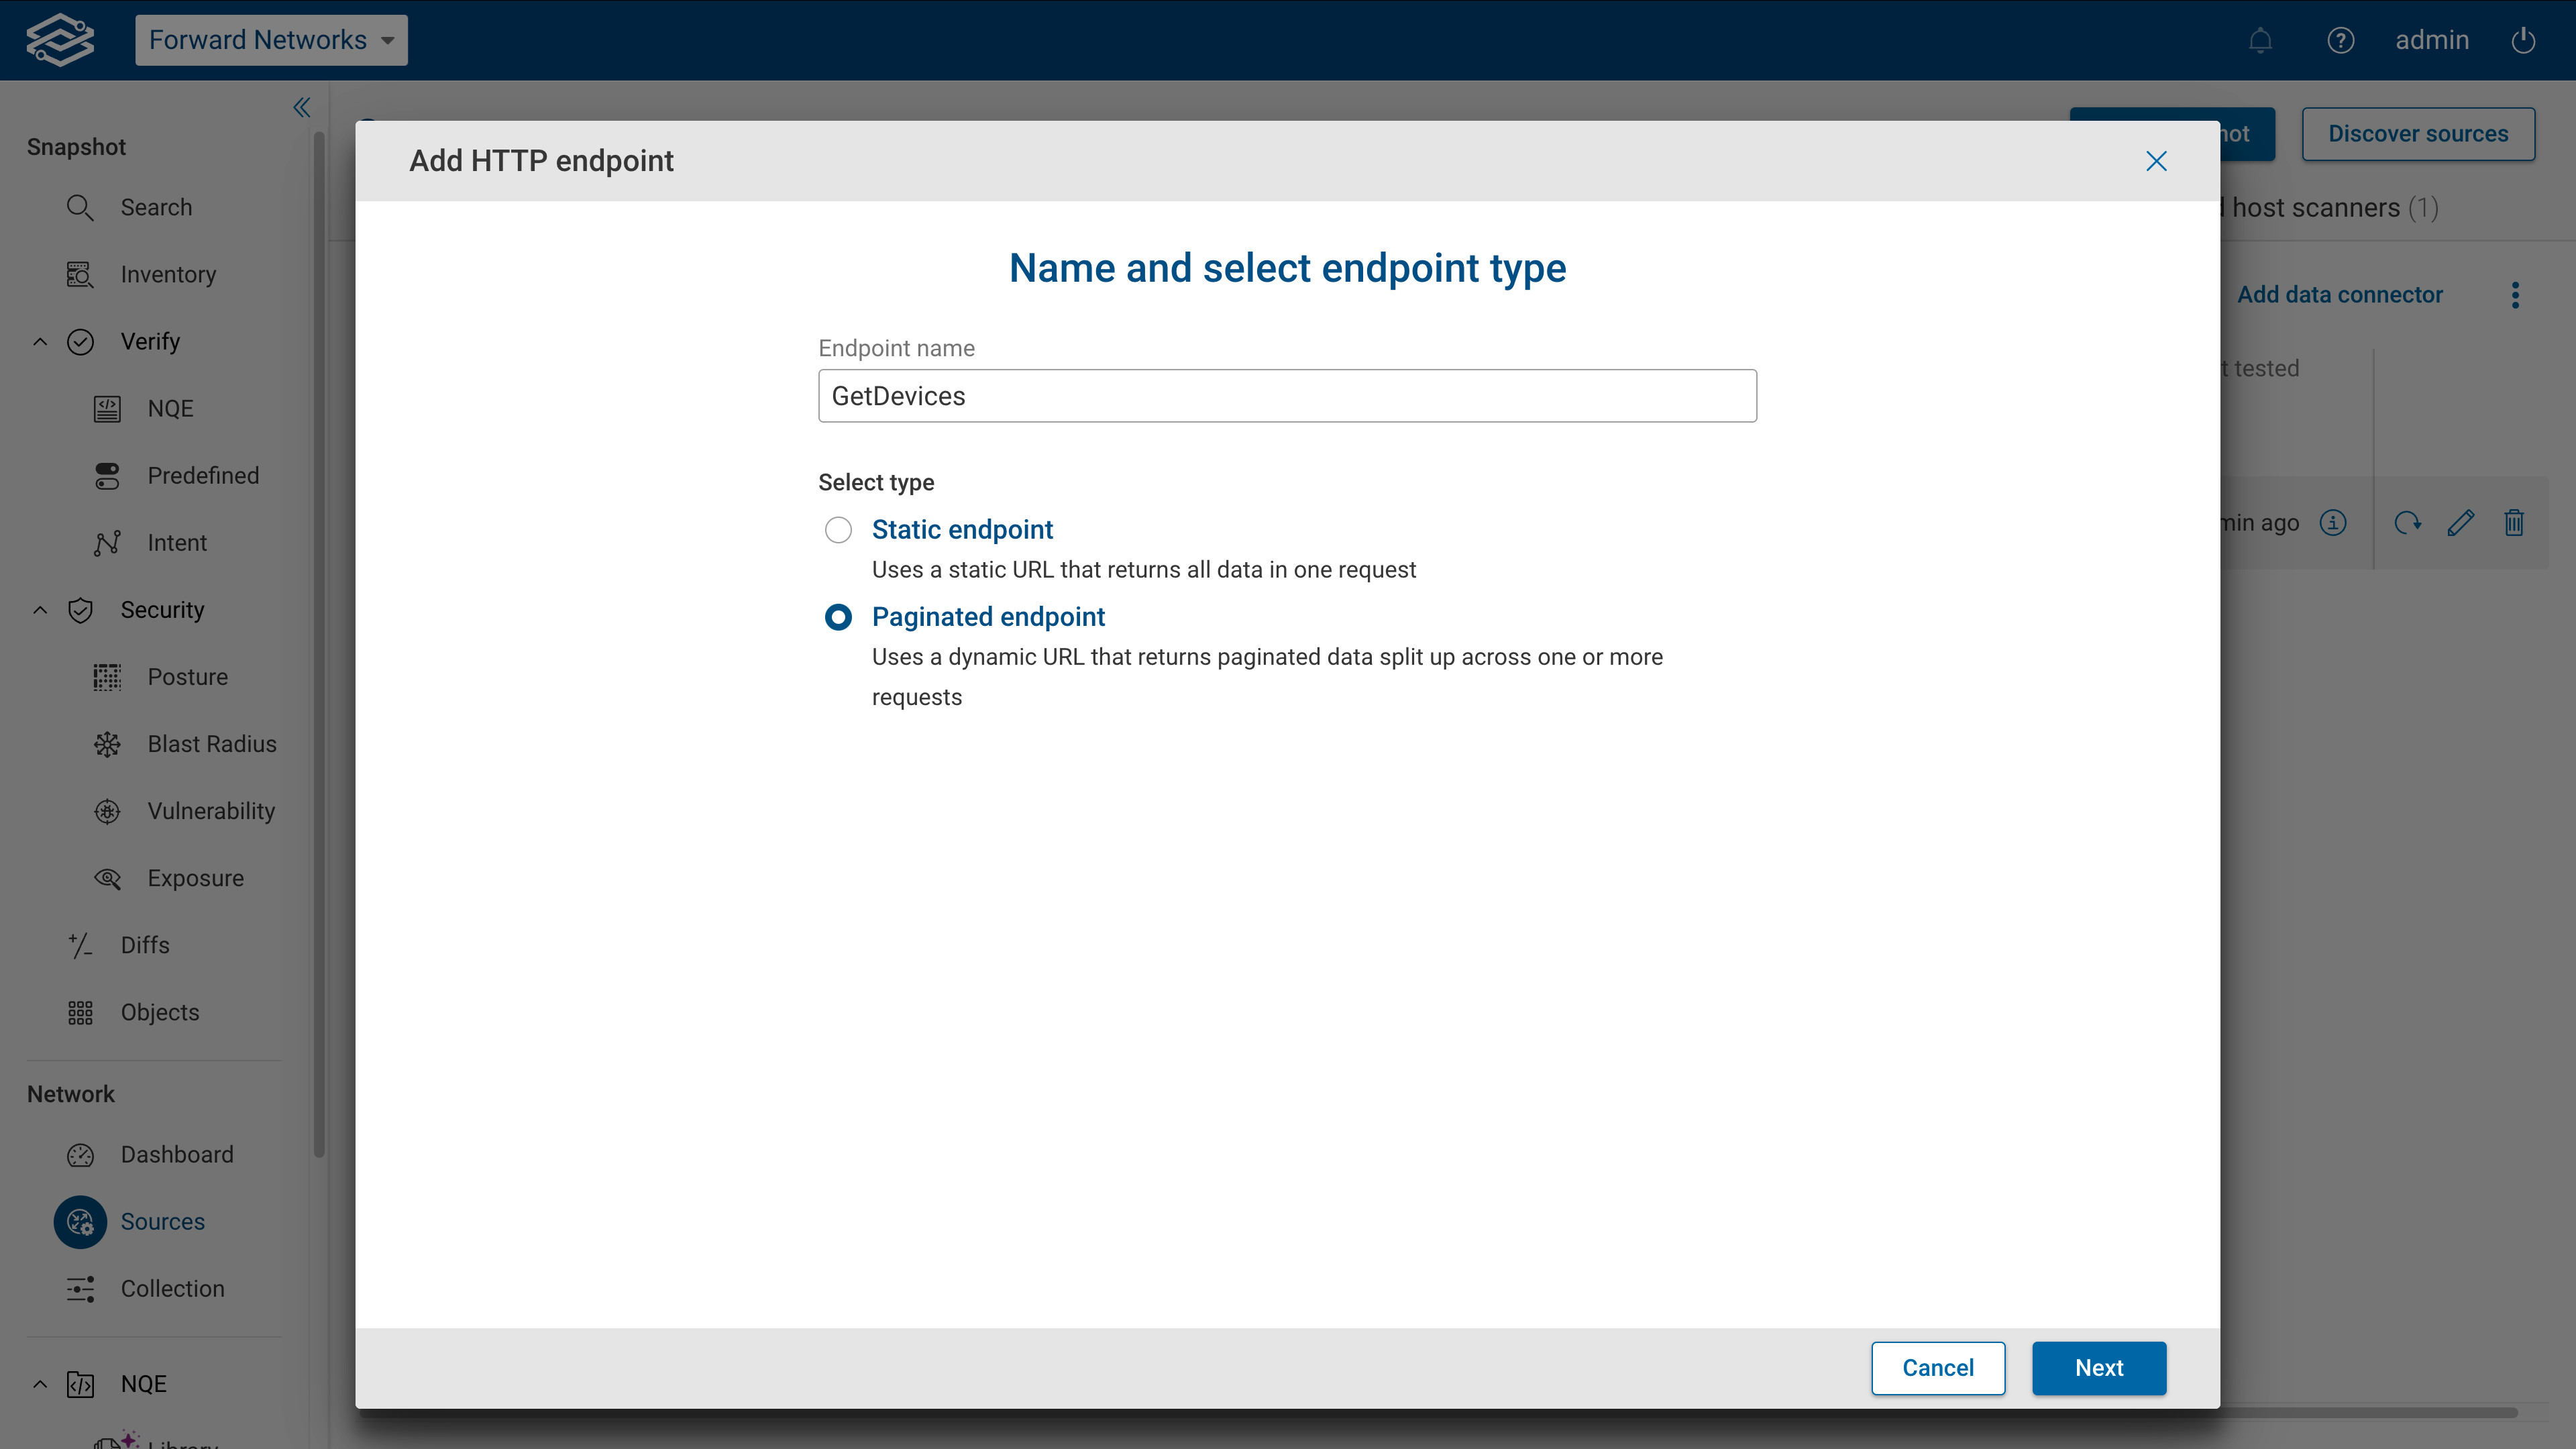
To configure paginated endpoint:
- Provide a name and select paginated as the endpoint type.
- Enter the request path for the first page and click Execute to test connectivity. Results of the connectivity
test will be displayed within the Results section. Additional information can be found by selecting see
details.
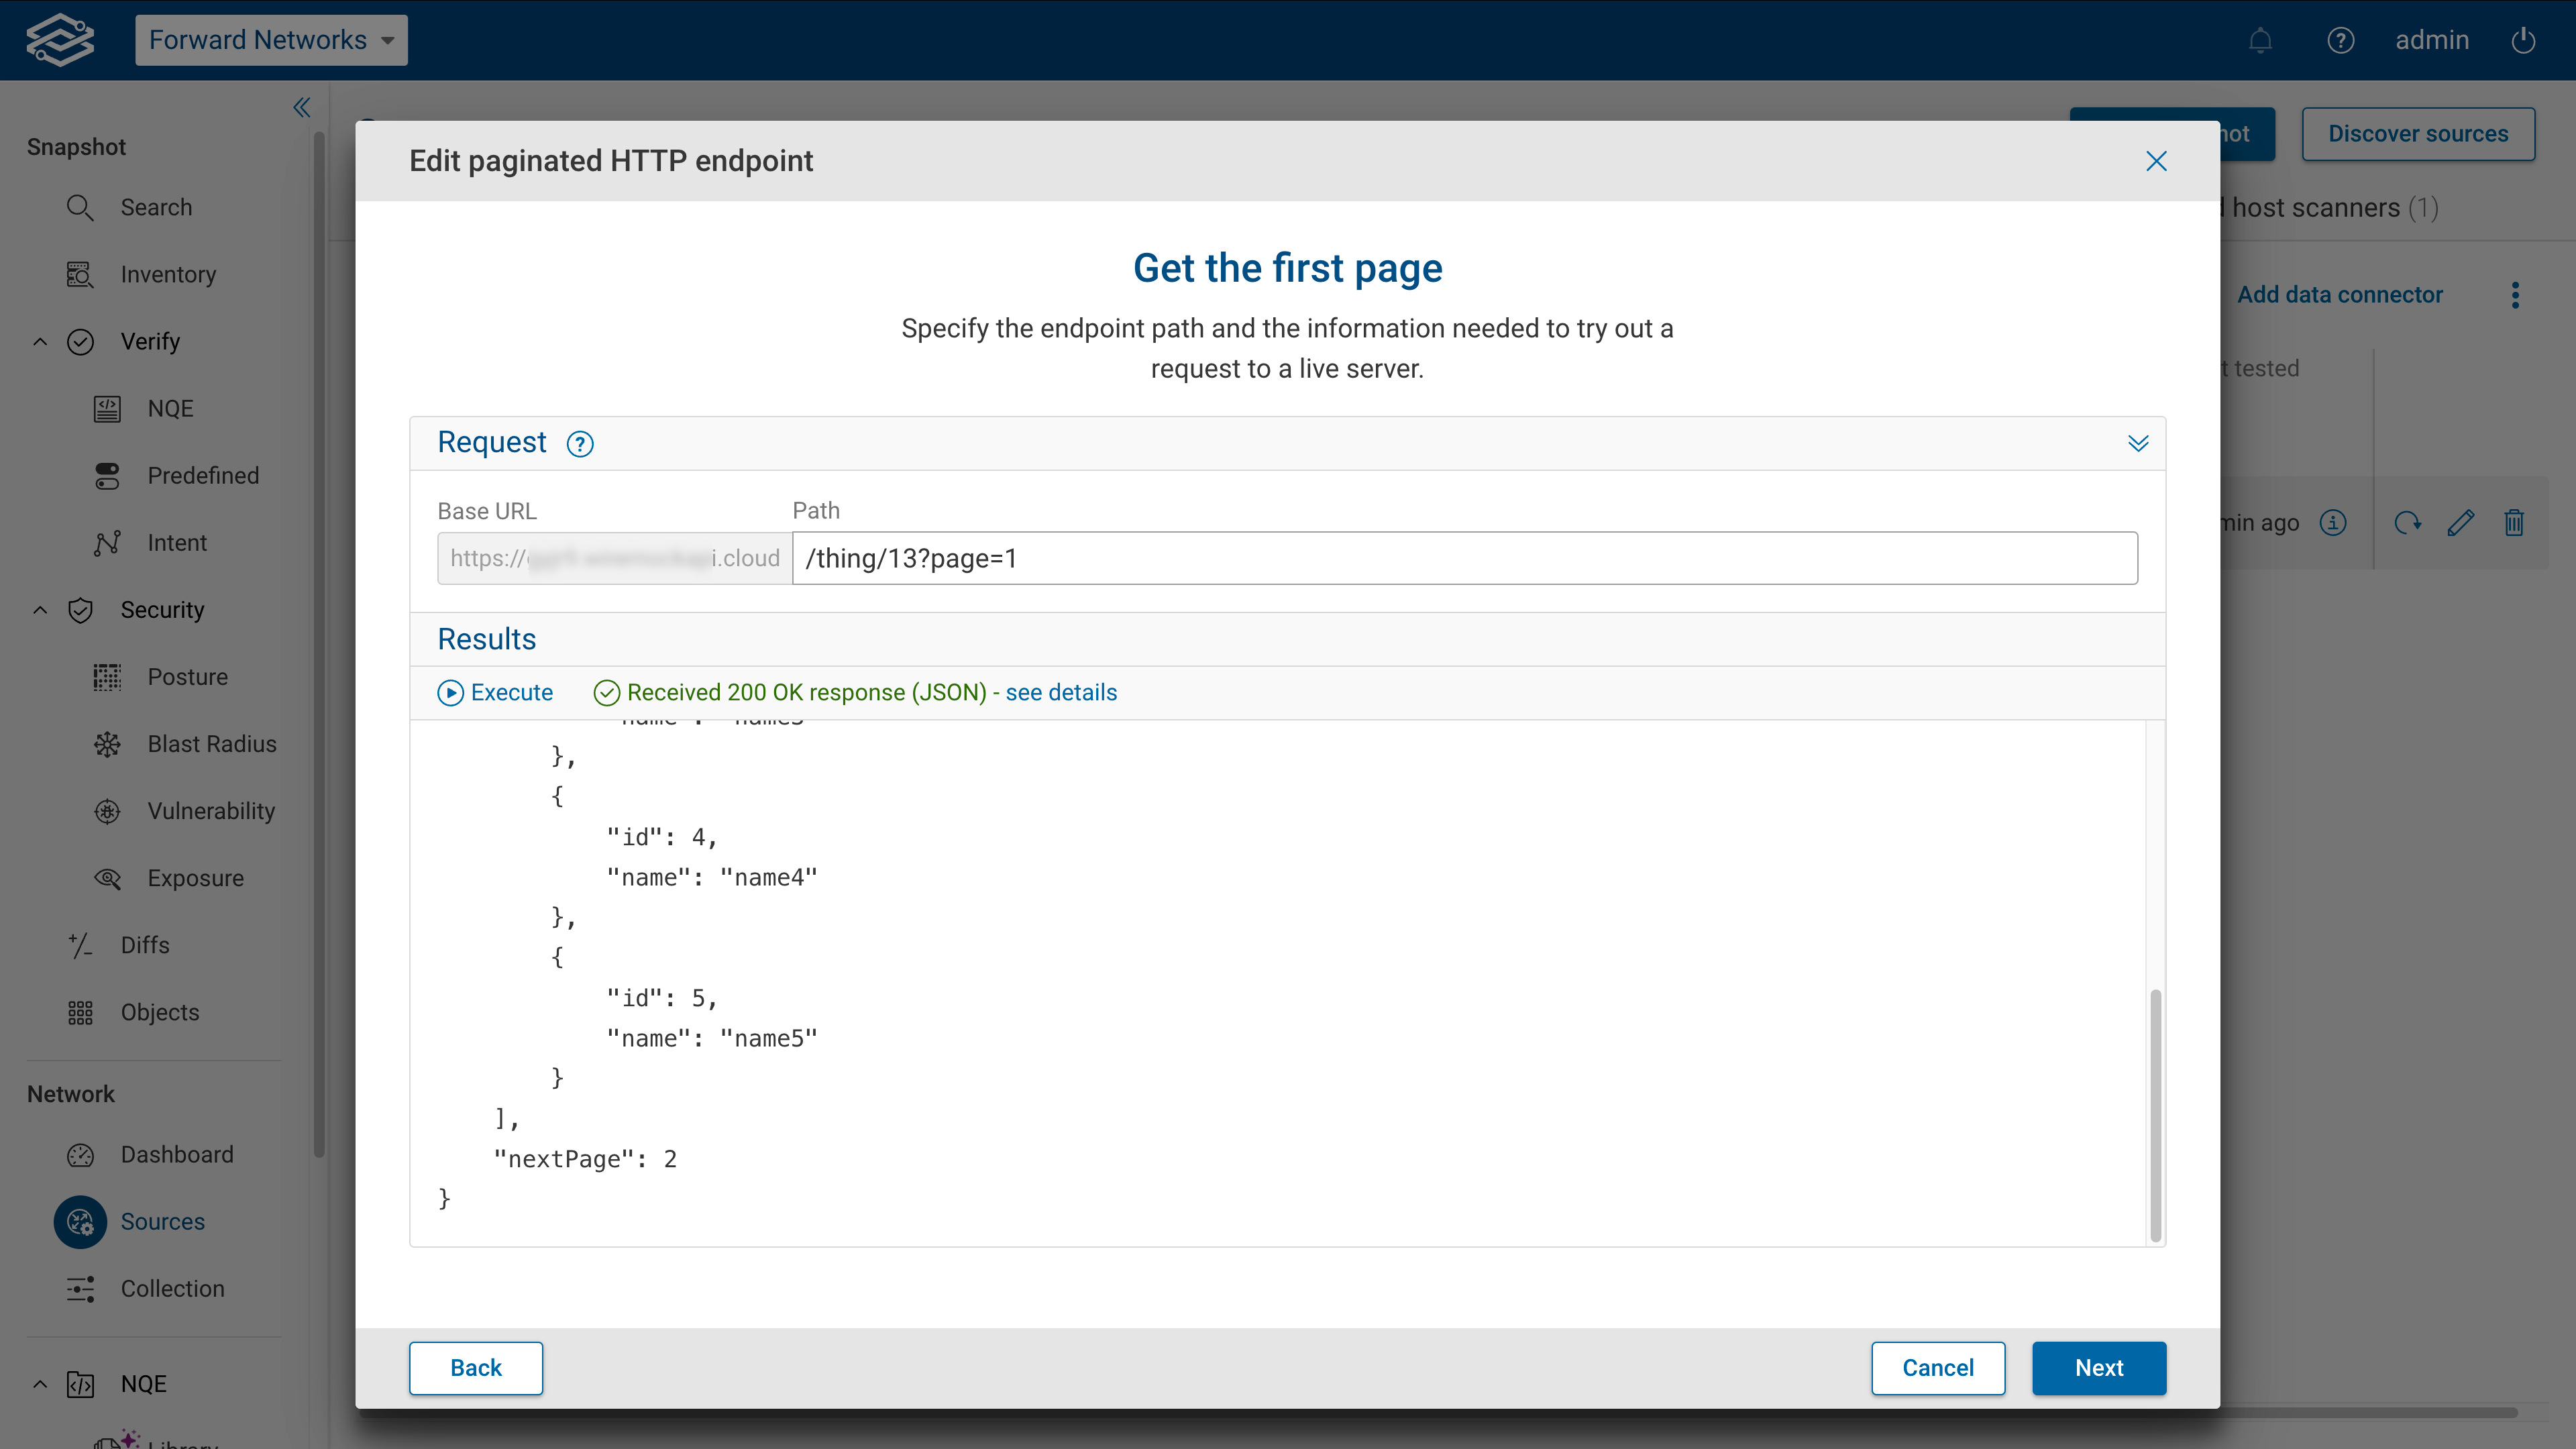
- Once the test succeeds, select Next.
- Choose the pagination model type for getting the next page:
- Offset pagination: Uses an offset and limit query parameters.
- Parameter cursor pagination: Uses a parameter value in responses.
- Define the pagination parameters, test the setup, and click Save.
Offset pagination
Offset pagination is a method where the request specifies an offset index and a limit to determine the number of results returned in each request. This approach is commonly used in APIs where data is stored in sequential order.
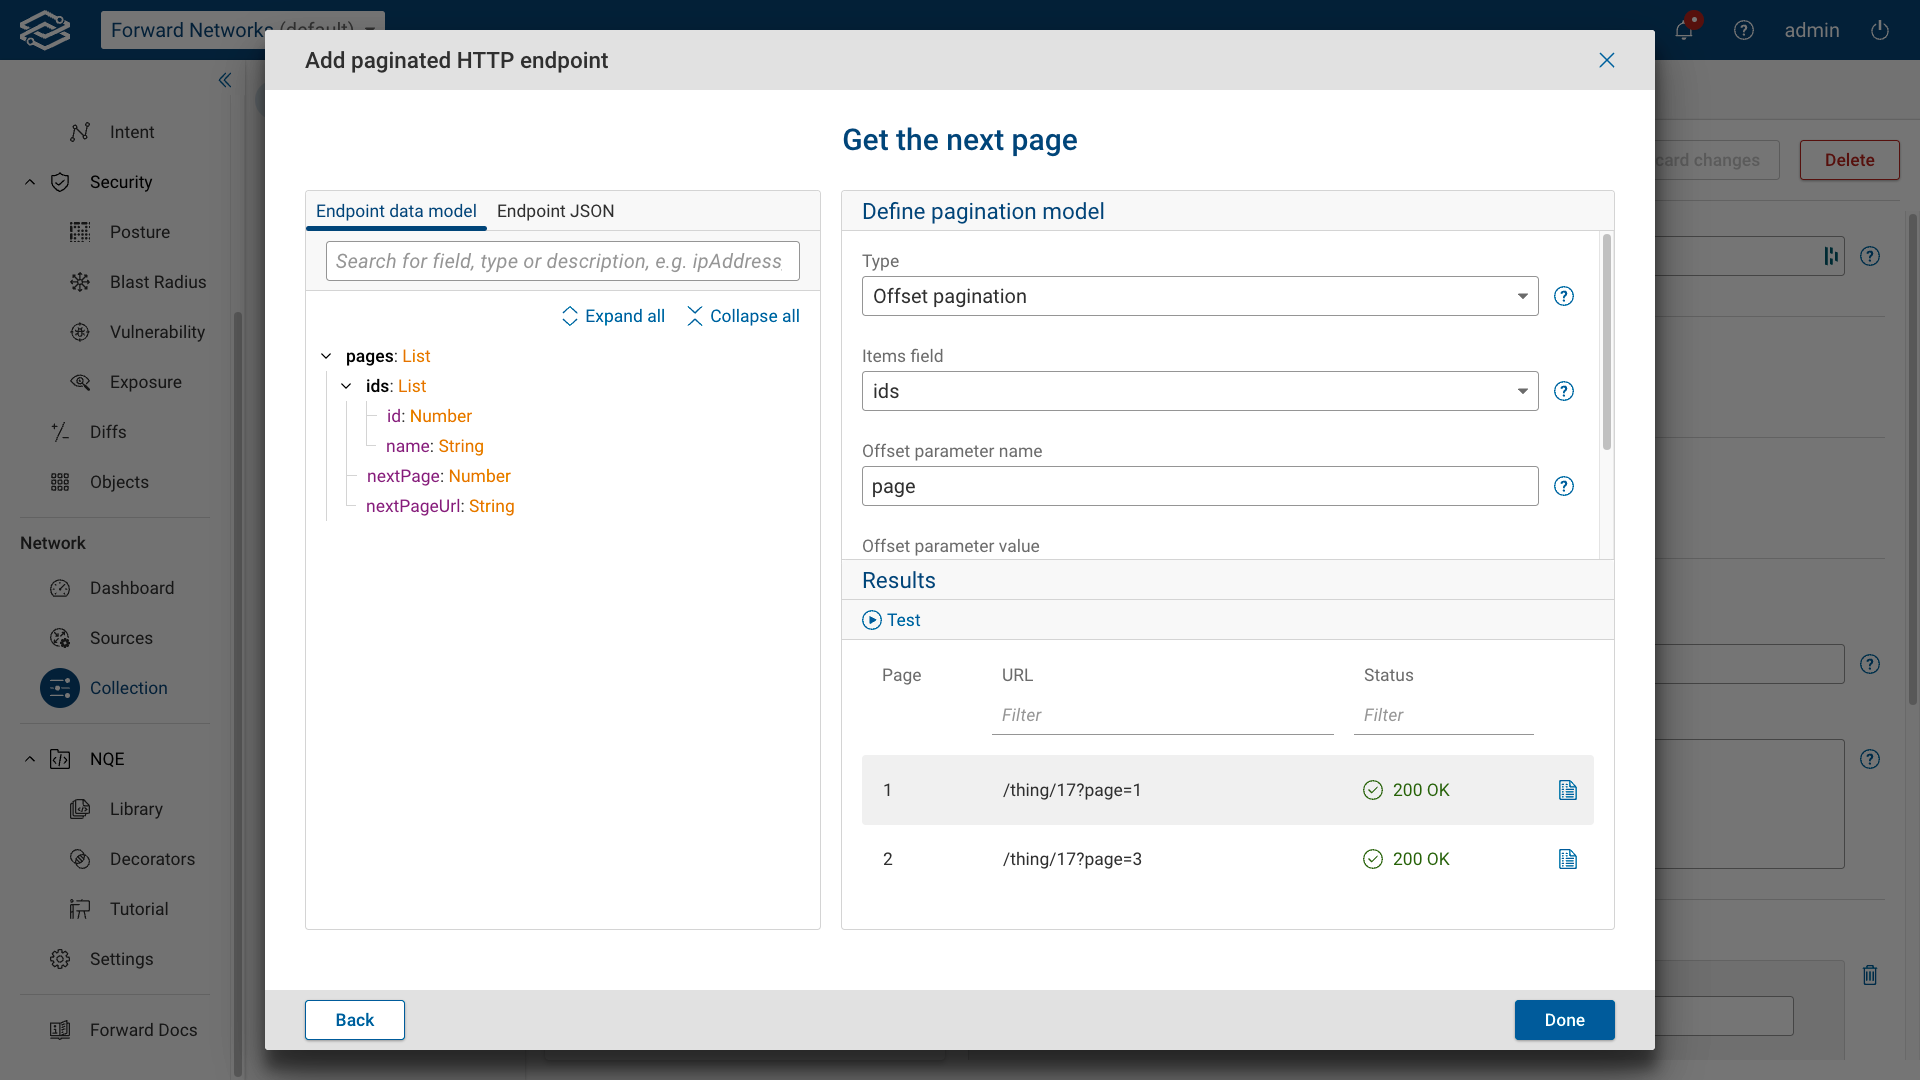
To configure offset-based pagination:
- Select Offset-based pagination as the pagination model type, and provide the following:
- Items Field: Field in the response data model that contains the paginated items.
- Offset Parameter Name: Name of the offset parameter in query-string.
- Offset Parameter Value: Define how the offset parameter value should be incremented for each subsequent
page request.
- Previous Offset + Length: This option uses the value of the selected Items field to calculate the next page.
- Previous Offset + nextPage: This option uses the value of the nextPage in the response to calculate the next page.
- Previous Offset + 1: This option uses the value of 1 to calculate the next page.
- Max Number of Pages (optional): Define the maximum number of pages to be collected.
- Test the setup and click Done if successful. Additional information for each result is available by selecting the see details icon located at the end of each row.
- Select Done after completing a successful test to finish.
Parameter cursor pagination
Parameter cursor pagination uses a dynamically generated cursor value provided in the response to fetch the next set of data. This method is more efficient than offset pagination, as it avoids skipping records when data changes dynamically.
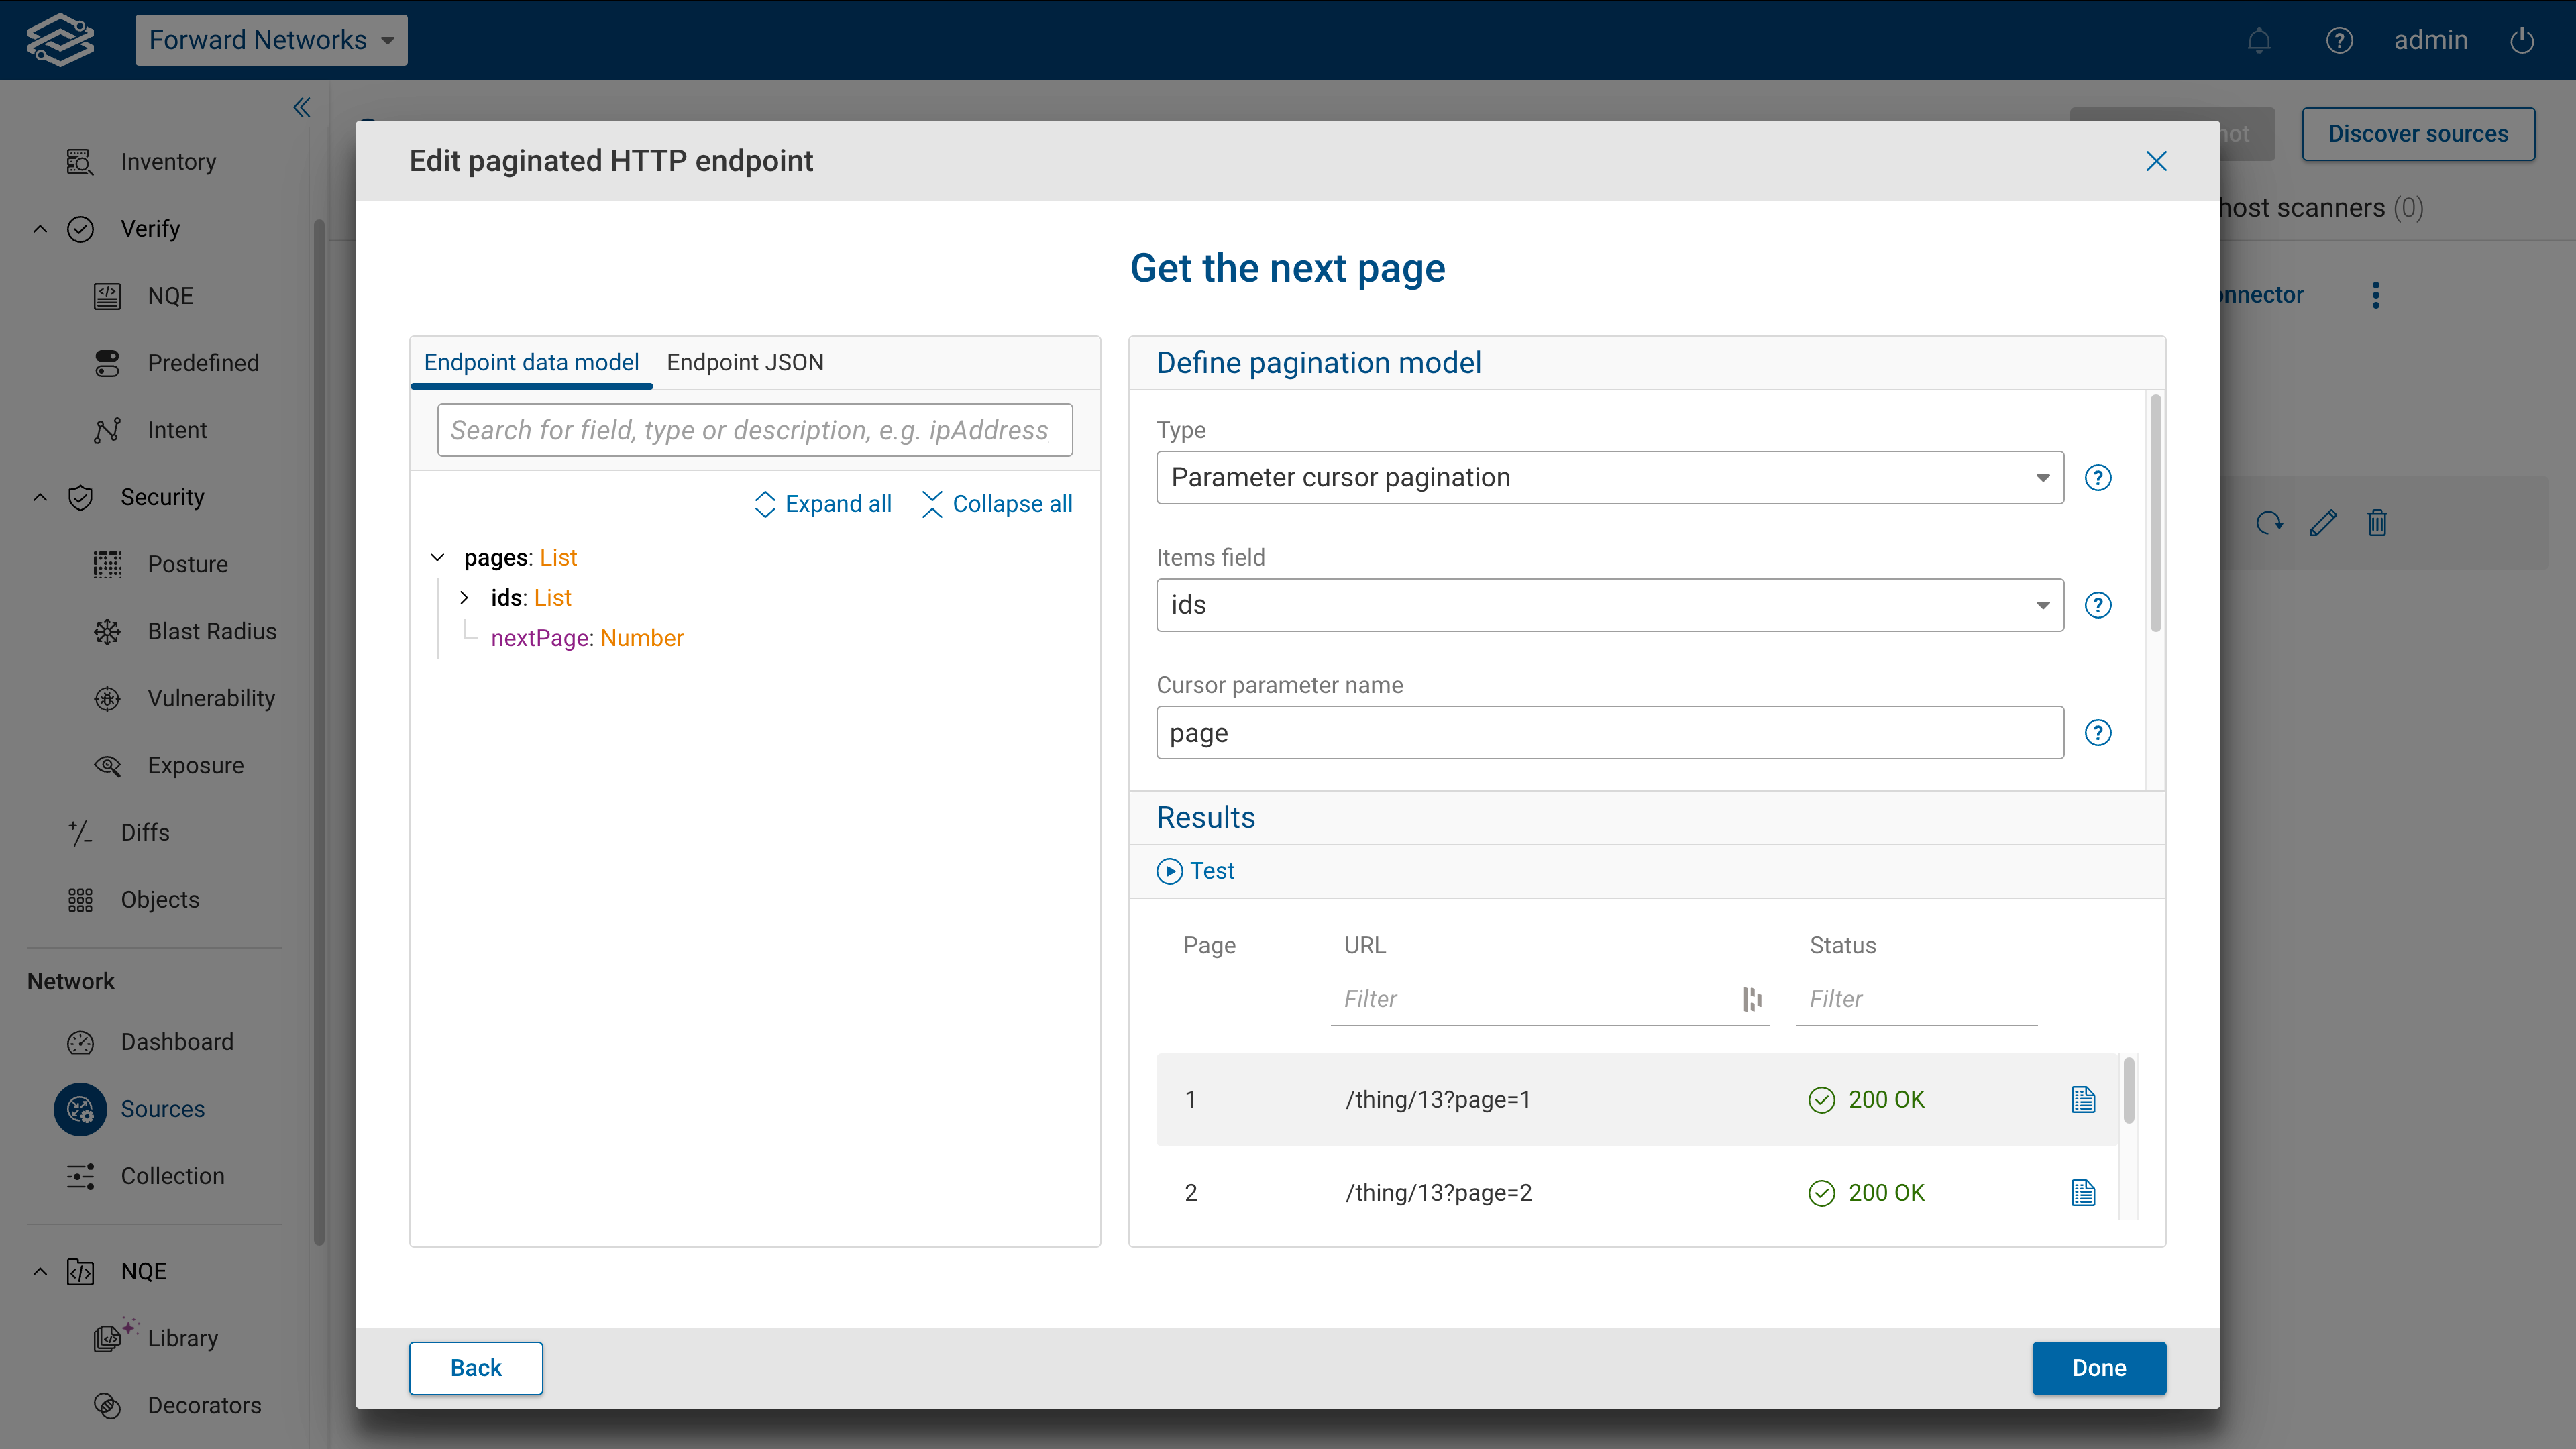
To configure parameter cursor pagination:
- Select Parameter cursor pagination as the pagination model type, and provide the following:
- Items field: Field in the response data model that contains the paginated items.
- Cursor parameter name: Name of the cursor parameter in query-string.
- Cursor parameter field: Specify the field from the response that includes the cursor or token.
- Cursor parameter value: Define how the offset parameter value should be incremented for each subsequent page request.
- Max number of pages (optional): Define the maximum number of pages to be collected.
- Test the setup and click Done if successful. Additional information for each result is available by selecting the see details icon located at the end of each row.
- Select Done after completing a successful test to finish.
Managing data connectors
Editing a data connector
To edit a connector, select the edit icon in the corresponding row.
Deleting a data connector
To delete a data connector select the delete in the corresponding row and confirm the deletion. Please note: deleting a data connector is irreversible.