Install
Introduction
The Forward Collector is the bridge between your network devices and the Forward Platform software.
After installing it, you can define the devices you'd like to use with the application.
The collector will download the configuration and state of these devices, analyze them and create a Snapshot of your network. Depending on how often you expect your network configs to change, you can adjust how often a Snapshot should be collected.
The Forward Collector is pre-installed in self-hosted deployments.
Its installation is needed in SaaS deployments only.
Please verify all the requirements listed in the SaaS deployment model page before proceeding with the Forward Collector installation.
Installation
To add a collector to your organization, go to the Collector Management page, and click Add a Collector.
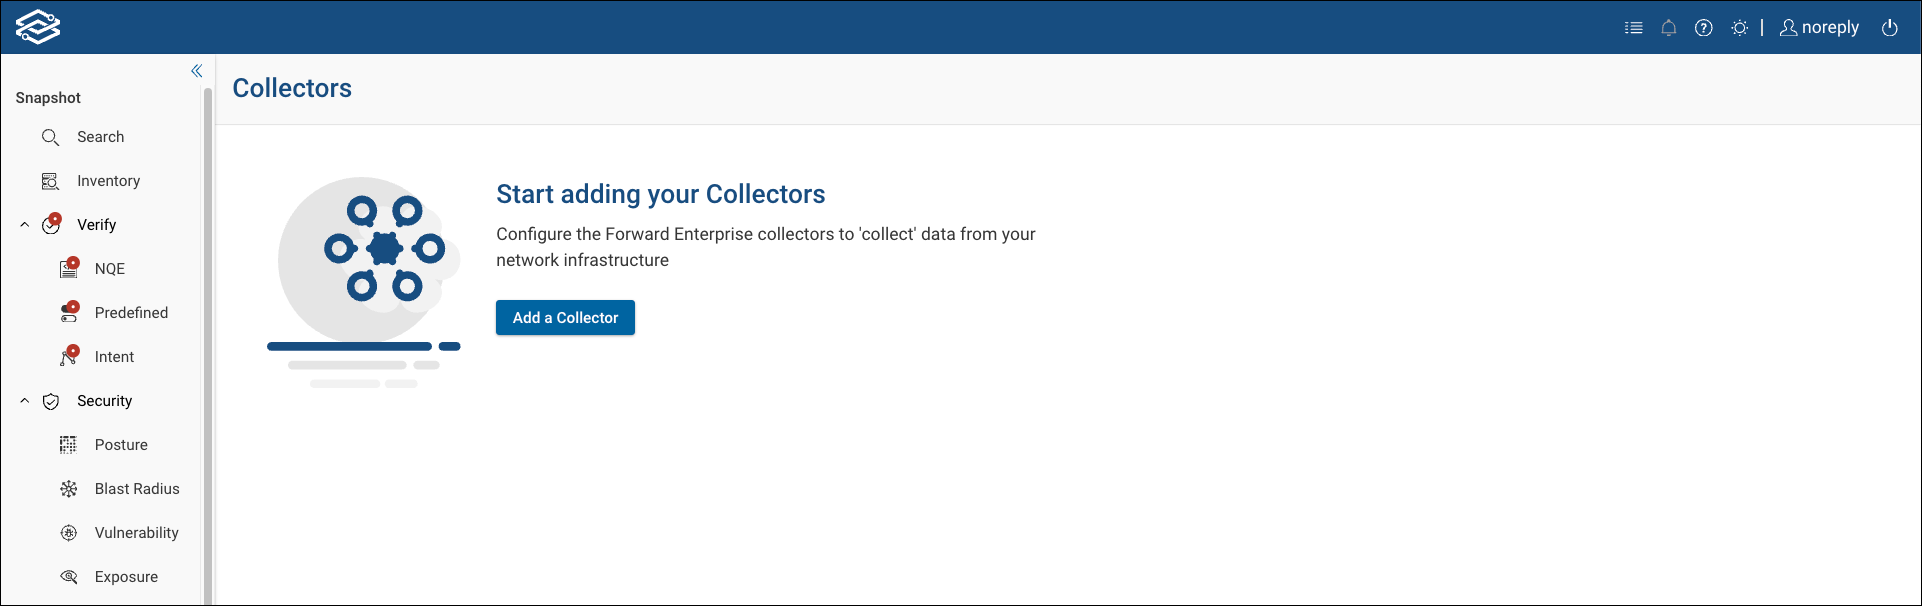
Only Org Admins and Network Admins can add new collectors.
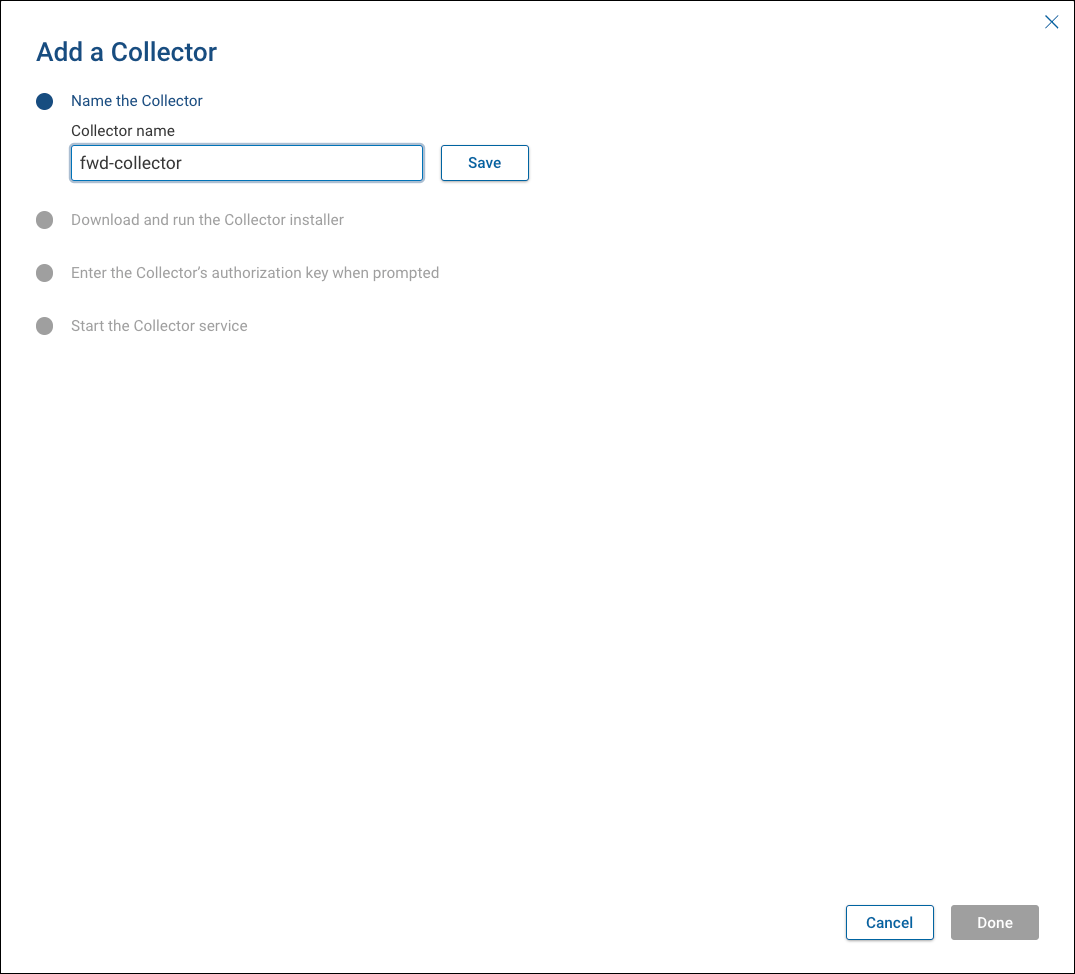
Provide a name for the collector and click Save.
Platform support for the Forward collector varies by deployment type:
- SaaS deployments: Windows, macOS, and Linux
- On-premises deployments: Windows and Linux
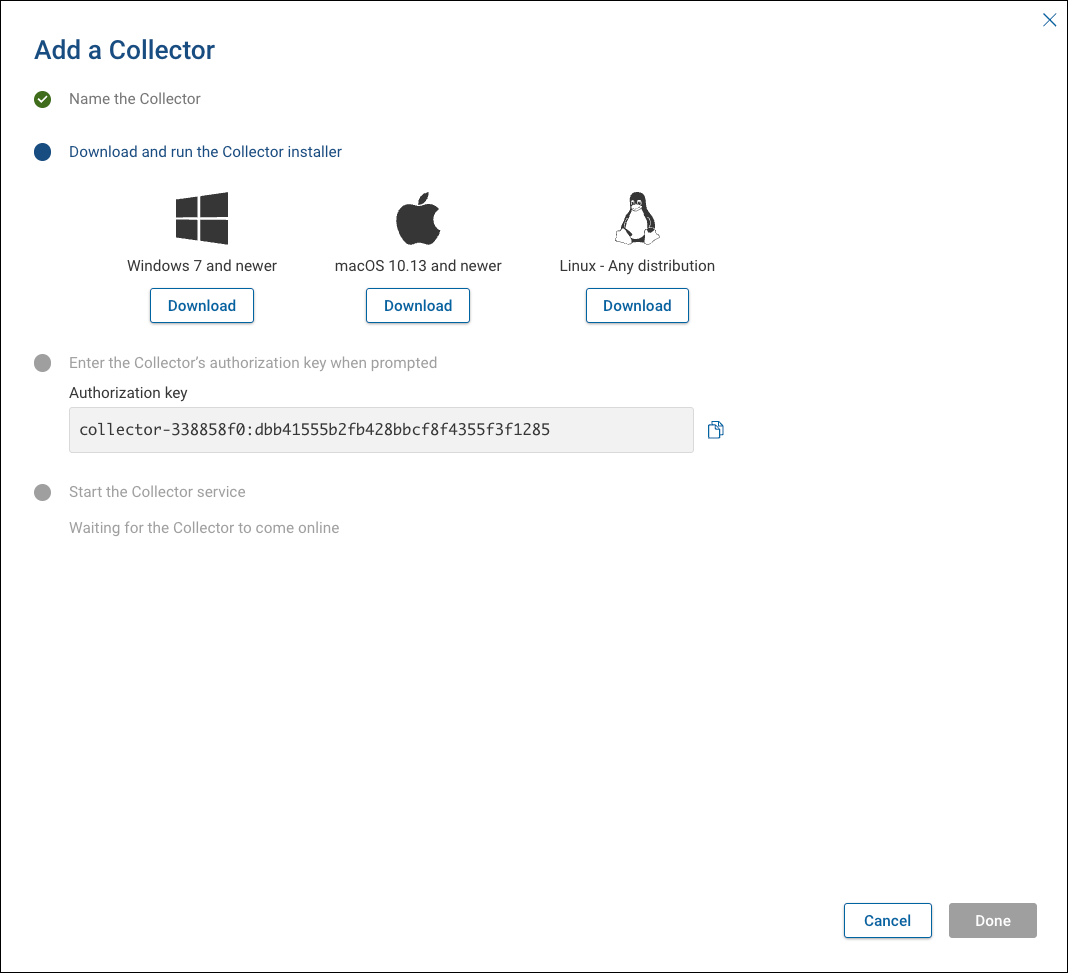
Select your platform and click Download to get the installation package.
Copy the Authorization Key, then run the installer on your device.
The installation process on a device with a graphical user interface is based on a wizard while on headless Linux is CLI based.
Wizard Install
- Open the installer to start the wizard.
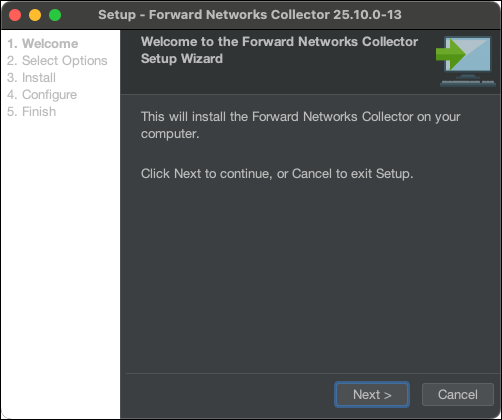
- Click on Next to continue.
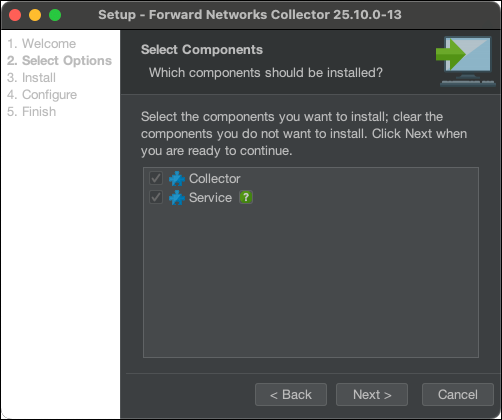
- Select the components to install and click Next.
It is important to keep the Service component selected to install the Collector as a service to automatically start the Forward Collector upon OS startup.
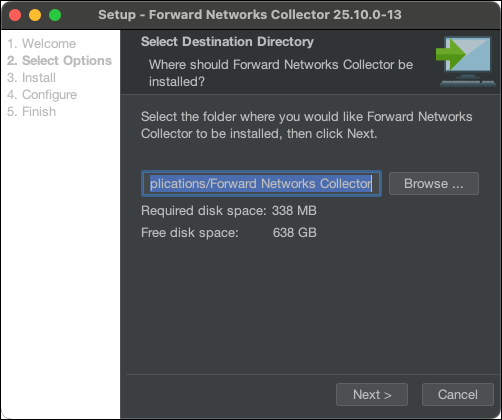
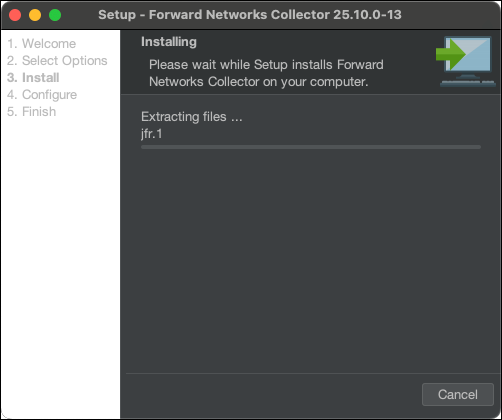
- Select the folder where you would like the Forward Collector to be installed, then click Next to begin the installation.
-
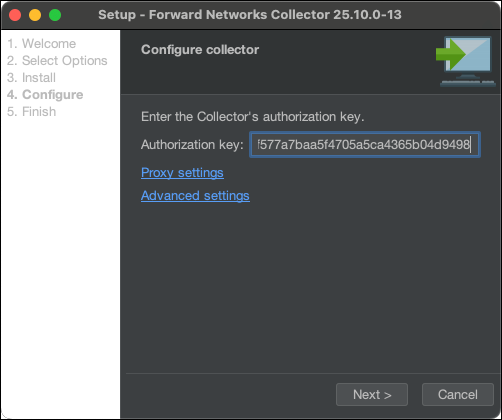
When prompted, enter the Authorization Key provided earlier.
-
If needed, click Proxy settings to configure proxy access.
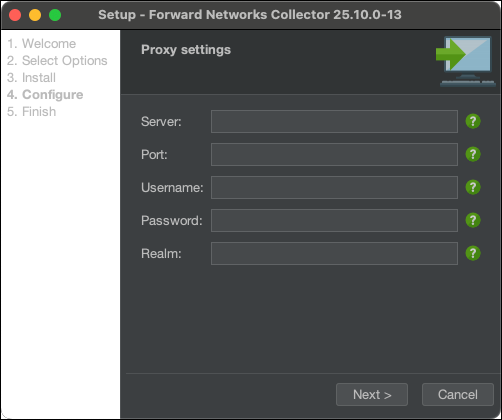
- Server: Proxy protocol and host (e.g. http://proxy.local.xyz.com)
- Port: Proxy port (e.g. 3128). This value is required if Server is specified.
- Username: Username used to authenticate with the proxy server. Leave this empty if the proxy server does not require authentication.
- Password: Password used to authenticate with the proxy server. This value is required if Username is specified.
- Realm: The realm used by the proxy server (if any).
- If needed, click on Advanced settings to configure the advanced proxy server settings then click Next.
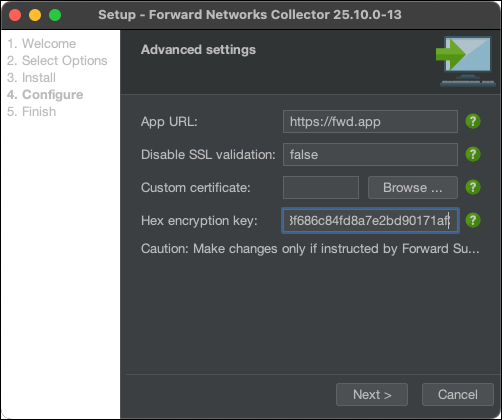
- App URL: The URL of the Forward application server.
- Disable SSL validation: Disables SSL validation when making calls to the application server. Enter true or false.
- Custom certificate: A custom trusted certificate used for communication between the collector and the appserver.
- Hex encryption key: An encryption key to be used by the collector to access encrypted collection secrets. from
fwd.app. If left blank, an encryption key will be automatically generated for use.
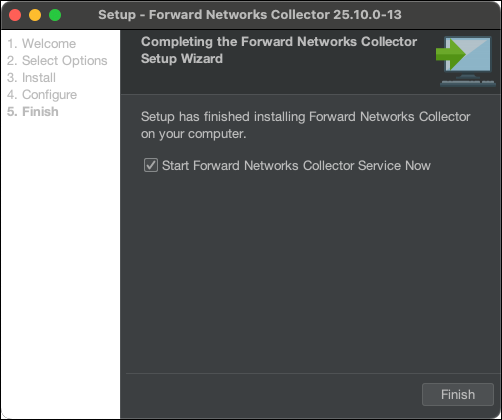
- Click Next to apply settings, then click Finish to complete installation and start the collector service.
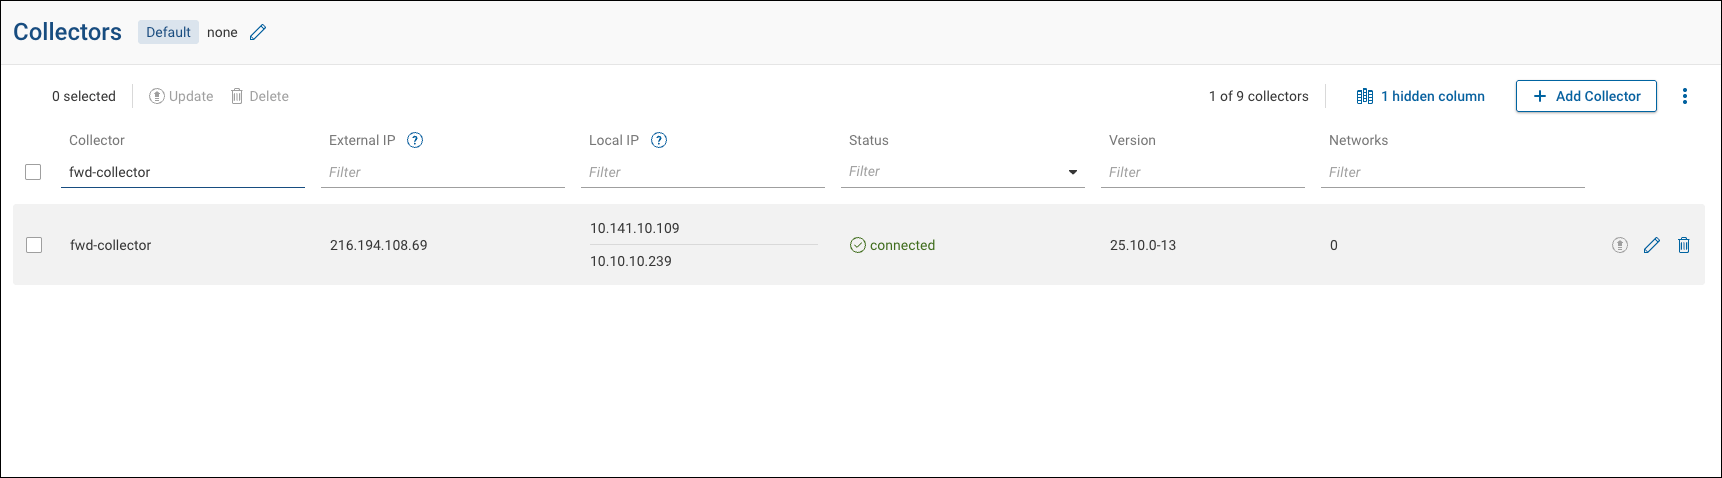
After installation, a confirmation message appears in the Forward Networks web interface:

After a few seconds, the Collectors page updates to display the newly added collector, including its External IP, Local IP(s), Connection Status, and Version.
Linux CLI
Avoid Using the Root Account
Do not install the Forward Collector using the root account. Installing as root is not required and can lead to
unexpected issues.
Please pay attention to the steps described below because the CLI based installation is less intuitive than the wizard-based one, especially if proxy server or advanced configurations are needed.
After having copied the Forward collector script to the Linux machine, connect to the Linux machine and execute the script.
The instructions below are based on a collector installation on an Ubuntu machine, but they are the same in other Linux distributions except for the default installation folders.
Start script
$ sudo bash fwd-unix-26.2.2-01.sh
Unpacking JRE ...
Starting Installer ...
This will install Forward Networks Collector on your computer.
OK [o, Enter], Cancel [c]
Press Enter:
Click Next to continue or Cancel to exit Setup.
Which components should be installed?
X: Collector
2: Service [*2]
(To show the description of a component, please enter one of *2)
Please enter a comma-separated list of the selected values or [Enter] for the default selection:
[2]
Type X then press Enter if you want to install the collector only, or press Enter to install the collect as a
service to automatically start the Forward Collector upon OS startup. The latter is the recommended option.
Basic info
Select the folder where you would like Forward Networks Collector to be
installed, then click Next.
Where should Forward Networks Collector be installed?
[/opt/fwd]
Select the collector folder for installation or press Enter to keep the default folder.
Wait for the collector installation to finish:
Extracting files ...

Configure collector
[Enter]
Press Enter to proceed with the initial collector configuration.
Then, input the Authorization Key provided by the Forward wizard earlier and press Enter.
Enter the Collector's authorization key.
Authorization key:
[]
Proxy settings
Proxy settings
Yes [y], No [n, Enter]
Type y then press Enter to configure the Forward Networks collector to connect to the Forward Networks server
through an HTTP or HTTPS proxy. Note that this has no impact on how the Forward Networks client connects to devices that
it collects from.
y
Advanced settings
Yes [y], No [n, Enter]
If you have typed y, ignore the Advances settings option and press Enter to proceed with the proxy settings
Proxy settings
Server:
[]
https://dev-vm-1
Port:
[]
3128
Username:
[]

Password:

Realm:
[]

Configure collector
[Enter]
- Server: proxy protocol and host, e.g. http://proxy.local.xyz.com
- Port: proxy port, e.g. 3128; this value is required if Server is specified.
- Username: username used to authenticate with the proxy. Leave this empty if the proxy server does not require authentication.
- Password: password used in combination with Username to authenticate with the proxy server. This value is required if the Username is specified.
- Realm: The realm used by the proxy server (if any). The Forward Networks client will only respond to authentication requests from the specified proxy server if the realm used by the proxy server matches the realm configured here. Leave this empty to allow the Forward Networks client to authenticate with the proxy server regardless of the proxy server's realm.
Then press Enter. At this point, the proxy settings are saved and the script starts again with the collector
configuration steps. Type Enter to keep the same options and this time type n at the Proxy settings step to keep
the saved proxy setting and proceed with the installation.
Advanced Settings
y
Advanced settings
Yes [y], No [n, Enter]
Type y to configure advanced settings.
Advanced settings
App URL:
[https://fwd.app]
https://fm-dev-vm.local.forwardnetworks.com:8443/
Disable SSL validation:
[false]
- App URL: Forward SaaS URL https://fwd.app
- Disable SSL validation: type
trueto disable SSL validation.
Make changes only if instructed by Forward Support.
At this point, the advanced settings are saved and the script starts again with the collector configuration steps.
Continue typing Enter to keep the same options, and this time type n at the Advanced settings step to proceed
with the installation.
Enter the Collector's authorization key.
Authorization key:
[********]

Proxy settings
Yes [y], No [n, Enter]

Advanced settings
Yes [y], No [n, Enter]

Setup has finished installing Forward Networks Collector on your computer.
In the next step press Enter to start the collector service:
Start Forward Networks Collector Service Now?
Yes [y, Enter], No [n]
y
Finishing installation ...
Check installation
Shortly after you should see a green Collector successfully installed message in the Forward Networks Web User Interface.
After a few seconds, the Add a Collector dialog disappears. The Collector page will show the new Collector name, Status and Version.
Change the Collector Service Account
The recommended practice is to run the Forward Collector under a dedicated service account (for example fwdsvc) rather
than root. If the collector was installed as root — or under a user account that no longer meets your internal
security policy — use the steps below to switch it to a dedicated service account without reinstalling.
The examples assume a default installation directory of /opt/fwd and a service account named fwdsvc. Adjust both
values to match your environment (e.g. /usr/local/fwd).
-
Verify that the service account exists and, if not, create it:
id fwdsvc -
Stop the Forward Collector service:
sudo systemctl stop fwd-daemon -
Change the ownership of the installation directory and all its contents to the service account:
sudo chown -R fwdsvc:fwdsvc /opt/fwdsudo chown -R fwdsvc:fwdsvc /etc/systemd/system/fwd-daemon.service -
Update the systemd unit file
/etc/systemd/system/fwd-daemon.serviceso the service runs as the new account. In the[Service]section, set:[Service]User=fwdsvc -
Reload the systemd configuration and start the service:
sudo systemctl daemon-reloadsudo systemctl start fwd-daemon -
Verify that the service is running under the new account:
systemctl status fwd-daemon
If file or directory permissions under the installation directory were modified manually (for example, execute bits were removed), reinstalling the collector under the target service account is the cleanest way to restore the expected permission layout.
Next Steps
Congratulations! You have successfully installed the Forward Networks Collector!
Proceed to the Configure Network Collector to fully configure the Forward Collector.