NQE Verifications
Overview
NQE stands for Network Query Engine. NQE enables you to write queries for information about your network. The queries return a collection of records that are displayed as rows in a table.
An NQE Verification is formulated as a query for violations. Every NQE Verification follows a common pattern: query the data model to identify violations of the property that you want to verify. If the query finds no violations, then the verification passes. If the query finds violations, the verification is marked as failed, and the identified violations form the failure diagnosis. You can create, store, run, diagnose and publish your NQE queries entirely in the Forward Enterprise NQE Library application. The NQE queries need to be published in the NQE Library application via the Commit process in order to be used as NQE Verifications.
Getting started
Follow instructions in the editor to get started writing your first check. Some key points to notice:
- Results show up below in the Results tab.
- If there are problems with your edits, the editor will underline problematic parts. Hover over the underlined part to see a detailed description and suggestion for how you might fix the problem.
- The Overview section describes the key parts of an NQE Check.
NQE Checks with violation label
An NQE Check is formulated as an NQE query. Each row may include the label violation containing a value of type
Bool indicating whether the row is a violation or a passing verification. The rows of an NQE Check should include all
attributes of the objects of interest that are relevant to understanding why the row is labeled as a violation or a
passing verification. This allows readers of the check results to quickly understand what the NQE check is verifying and
why an item may be failing.
If any rows returned by an NQE query are labeled as violations, then the check is marked failed and the attributes in each violation row forms the diagnosis for the failure indicated by the row. Otherwise, the check passes, and the rows can be used to inspect what network items were positively verified.
The numbers of passing and failing rows are charted on the Dashboard as the number of passing verifications and the number of violations, respectively.
The letters in the violation label must be all lowercase. If some letter is uppercase, then a warning will be given.
NQE Checks with no violation label
If an NQE Check does not include a violation label to indicate whether each row is violation or passing verification,
it is assumed that every row is a violation. In addition, for such an NQE Check, if the query produces no rows, then the
number of passing verifications is 1 and the number of violations is 0. Otherwise, the number of passing verifications
is 0 and the number of violations is 1.
Note that this type of check is deprecated and allowed for backwards-compatibility. Support for this type of check will be removed in a future release.
Anatomy of a Check
NQE Checks use a syntax similar to LINQ, which is itself similar to SQL.
For example, the following check finds every interface on Cisco NXOS devices. It marks each interface that is admin UP, but not operationally UP as a violation. All other interfaces are considered passes.
foreach device in network.devices
foreach interface in device.interfaces
where device.platform.os == OS.NXOS
select {
  deviceName: device.name,
  interfaceName: interface.name,
  adminStatus: interface.adminStatus,
  operStatus: interface.operStatus,
  violation: interface.adminStatus == AdminStatus.UP &&
             interface.operStatus != OperStatus.UP
}
The basic idea is that foreach clauses iterate over the data, the where clauses restrict (filter) the data to the
condition you care about, and the select clause determines what information is included in the diagnosis. Expanding on
this:
foreach: In the above check, the first twoforeachclauses iterate over the devices and their interfaces.foreachonly applies to collections of elements. There can be any number offoreachclauses.- Scoping:
foreachintroduces a new variable that is available in the subsequent lines of the check. In the above example,deviceandinterfaceare introduced in the first two lines and then used in the last few lines of the check. - The only variable in scope initially is
network. This variable provides access to all attributes of the network. where: Thewhereclause limits the data to just that matching the condition you care about. Think of it as a way to filter data. Thewhereclause supports any boolean-valued condition, including expressions constructed from familiar boolean and relational operators, such as&&(and),||(or),!(not),==,!=,<,>, etc. You can have any number ofwhereclauses. They can appear intermixed withforeachclauses, so long as they only use variables in scope at that line.select: The finalselectclause constructs a record (or object) for each combination ofdeviceandinterfacevalues that satisfy thewherecondition. These records determine what information is included in the diagnosis. The field names are used as column names in the results table. There can be only oneselectclause.violationfield: Each row produced in theselectclause should have a field calledviolationwith a boolean-valued condition. This condition defines whether a row is considered a violation or a passing verification.- A record is a comma-separated list of name-value pairs enclosed in curly braces:
{name1: value1, …}. - Case-sensitivity: The language is case-sensitive.
- Whitespace: The language is not sensitive to the number of spaces or line breaks.
Adding NQE Queries to NQE Verifications
To add NQE queries to NQE Verifications, initiate the process by selecting the Add NQE Queries button within the NQE Directory Panel.

Selecting NQE Queries
Choose one or more queries from the available directories to add as NQE Verifications. The selected queries will be listed in the adjacent panel.

Defining Query Parameters
For NQE queries requiring additional parameters to be configured, define them before adding. For each query, provide a Name and enter the preferred parameter values. This process repeats until all NQE query parameters are assigned.

Visit the Parameterized Queries section of the NQE Library page for additional information on parameterized queries.
Enabling/Disabling NQE Verifications
By default, newly added NQE queries start in an enabled (active) state. Clicking on the Active toggle of an NQE Verification will change its state to disabled (inactive).

Deleting NQE Verifications
To delete an NQE Verification, select the Delete icon, located at the end of each row, to delete it.
NQE Verification Results
If an NQE Verification fails, the violations and query are available by clicking on the Failed status link, or by selecting the View Details icon. The Results tab displays the report, while the Code tab displays the NQE query used to generate the report.

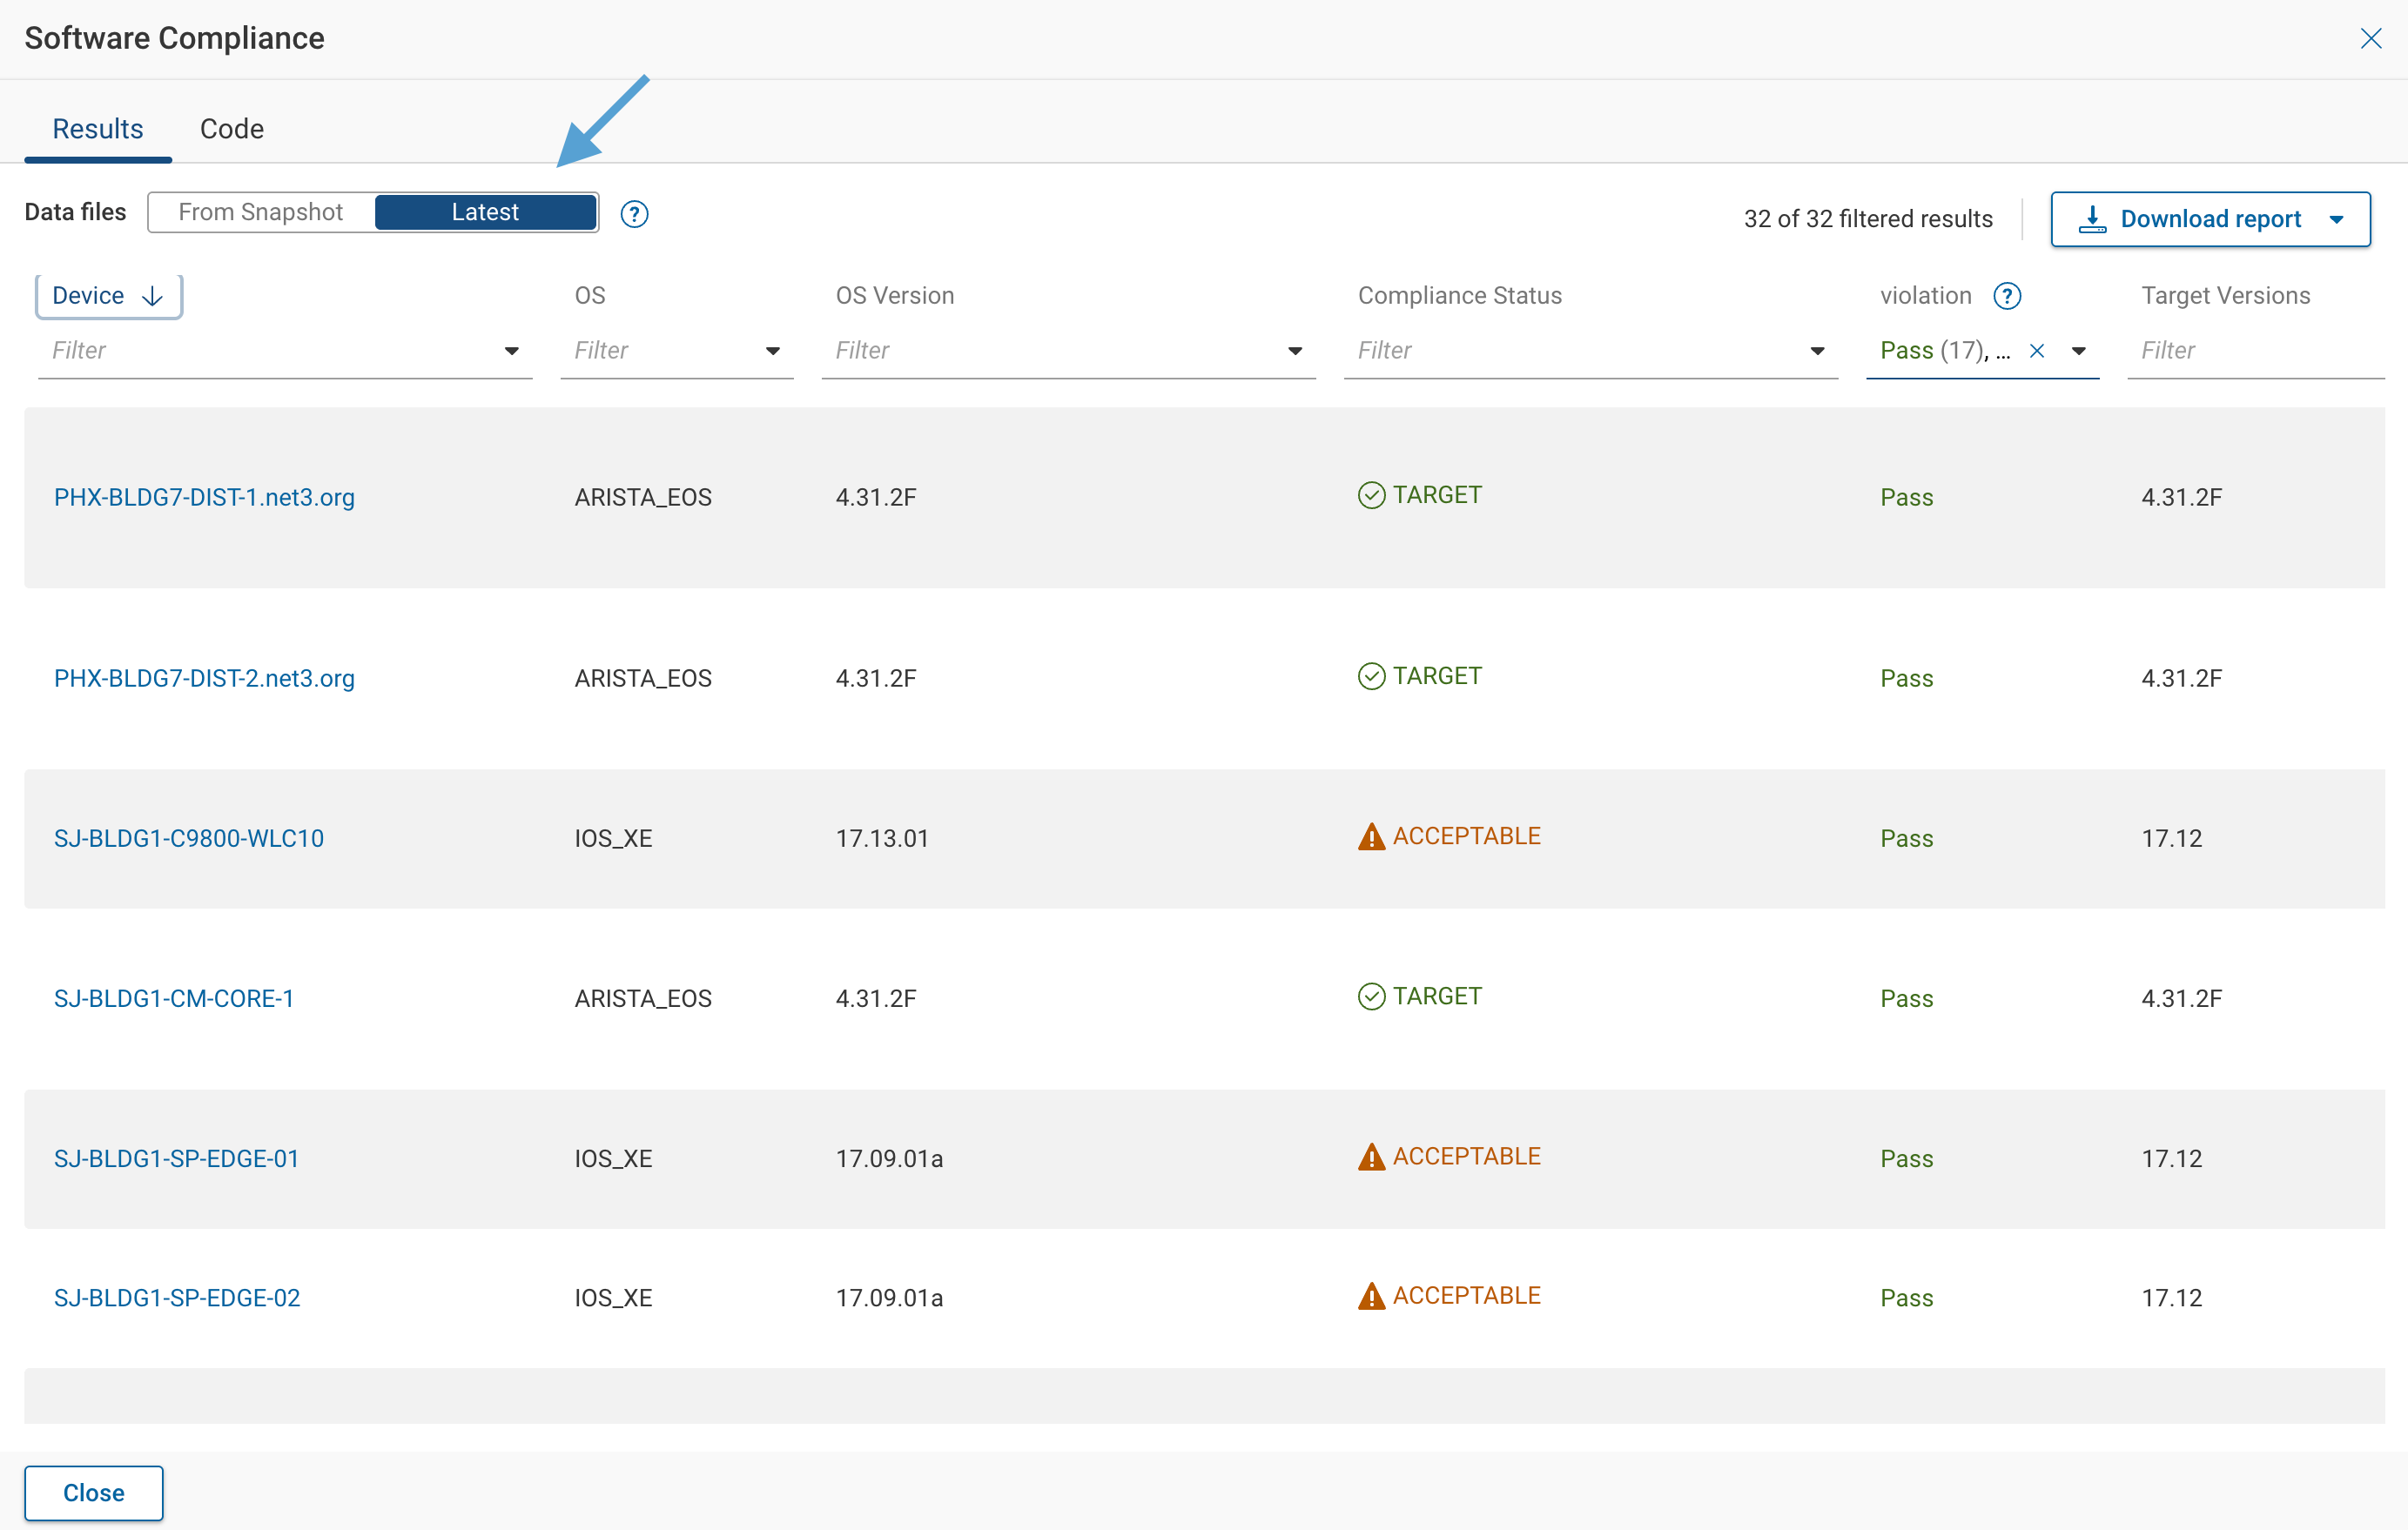
Previewing Results with Updated Data Files
Some NQE-based verifications depend on external data files. When a data file is updated, the verification’s details view includes a selector that allows you to run the check using:
- Snapshot – the authoritative snapshot-based result
- Snapshot with Latest Data Files – a preview that overlays the most recently uploaded data files onto the snapshot
This allows you to validate updates to data files immediately, without waiting for a new snapshot collection. The main verification status remains based on the snapshot.
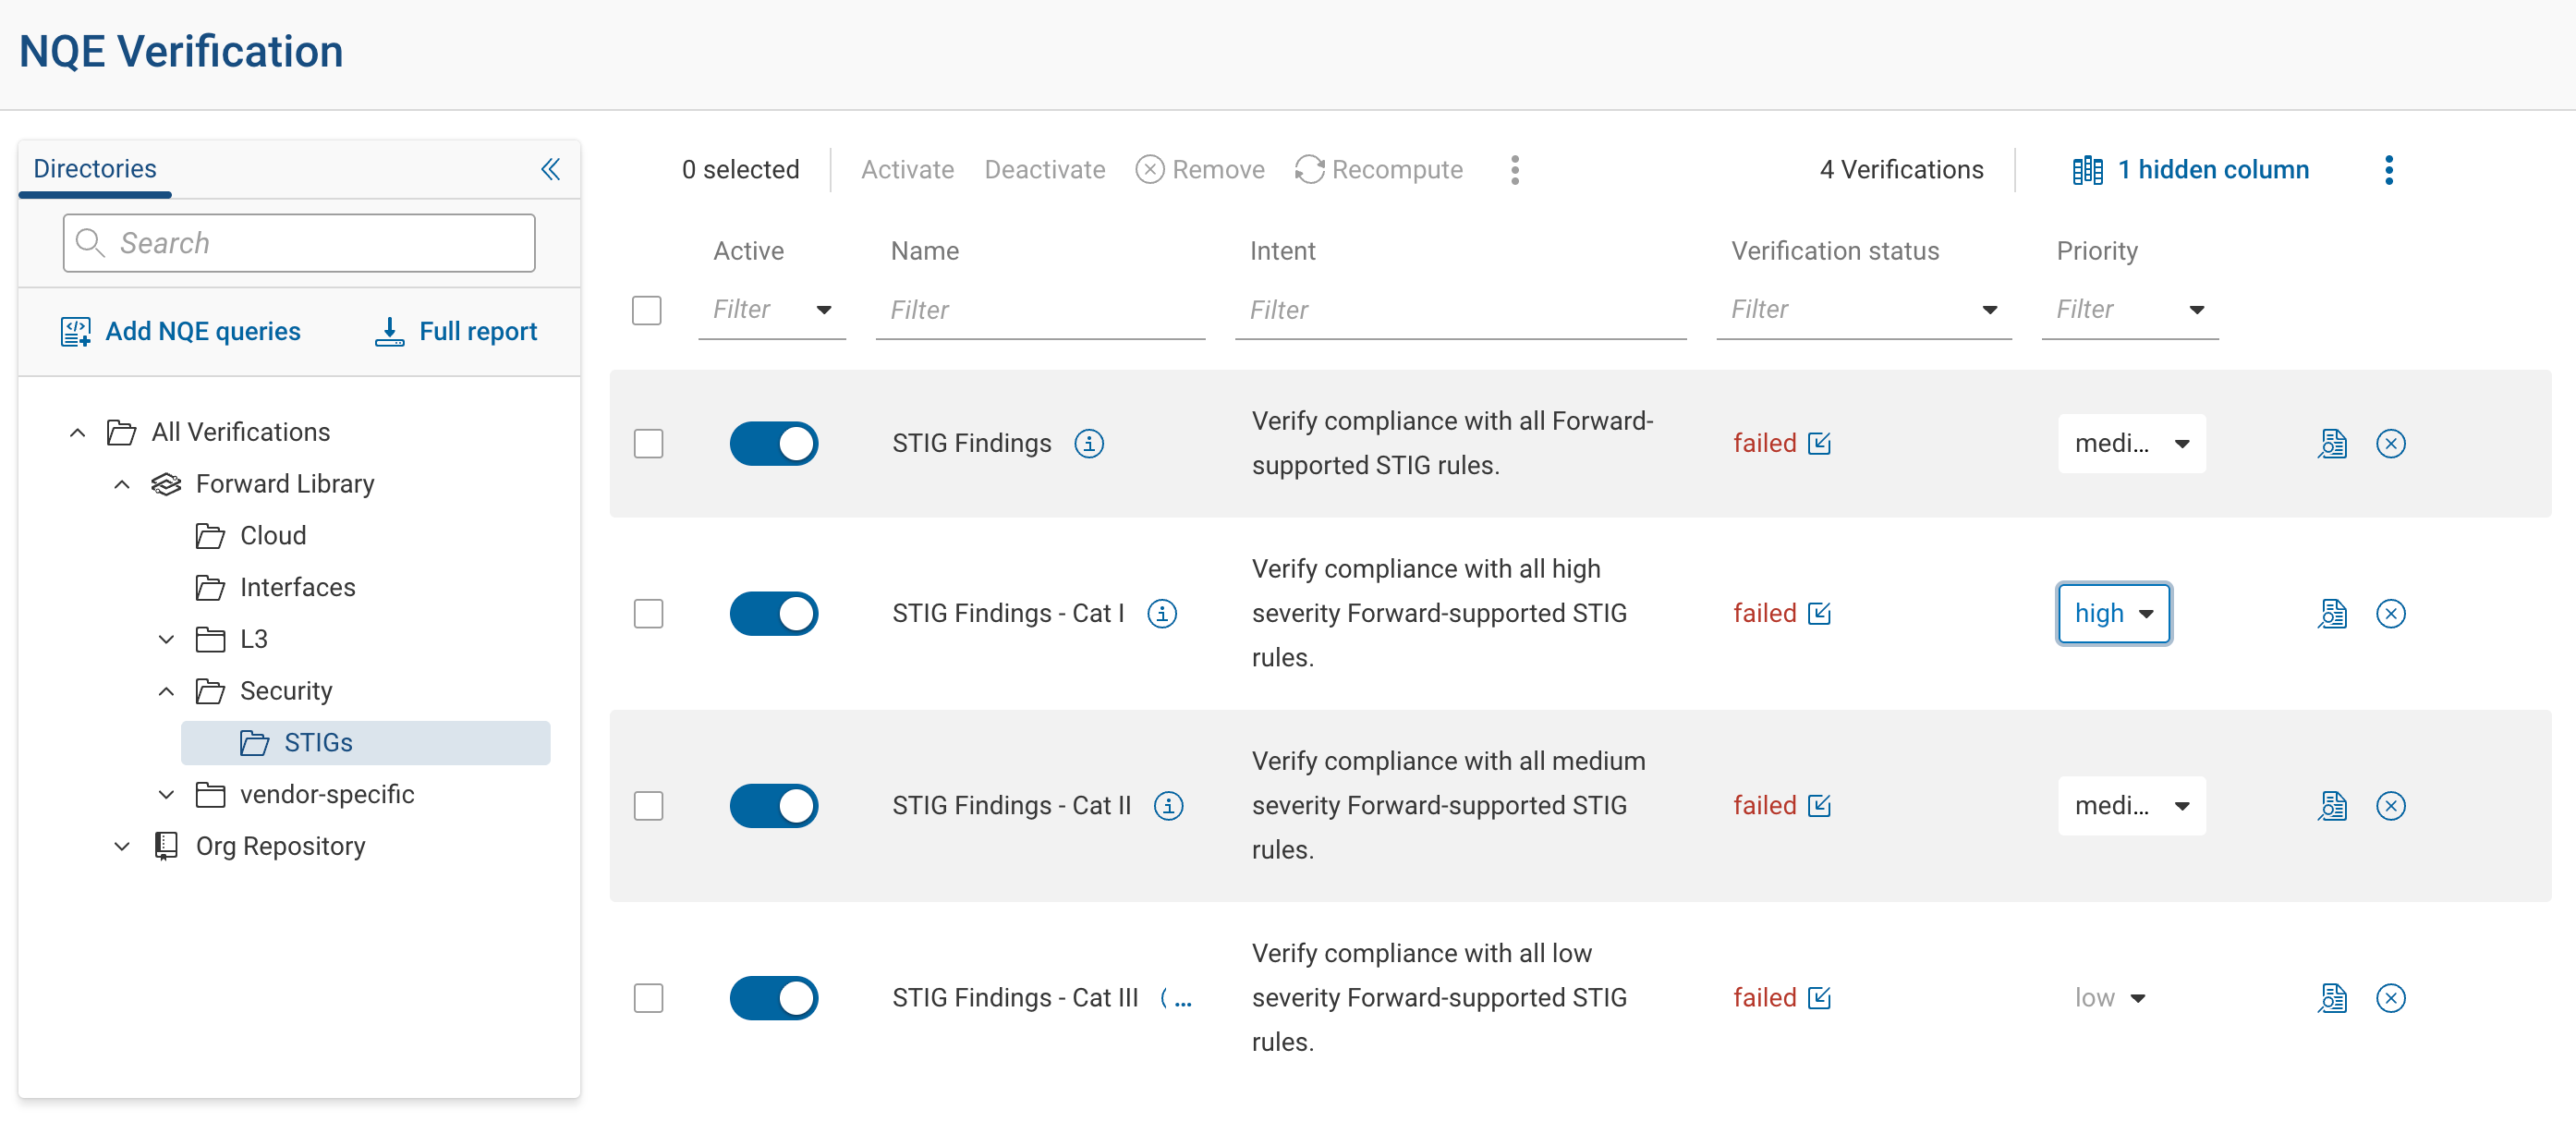
STIG Compliance
Forward includes a built-in STIG Findings verification in the Forward Library, allowing you to assess compliance
against supported DISA STIG rules.
In addition to the main STIG Findings check, the Library also provides severity-specific STIG Findings queries (for
example, queries scoped to Critical, High, or Medium severity findings).
These checks can be add from Forward Library directly to the Verify page and behave like other NQE-powered verifications.
STIG Security Policy (User-Defined Parameters)
Some STIG rules require operator-supplied parameters to determine whether certain conditions apply to a device or
interface.
These parameters are provided through the STIG Security Policy file (fn-stig-policy.csv), imported as a data
file.
You can download the policy template from:
NQE → Data Files → Import data file → Download Template
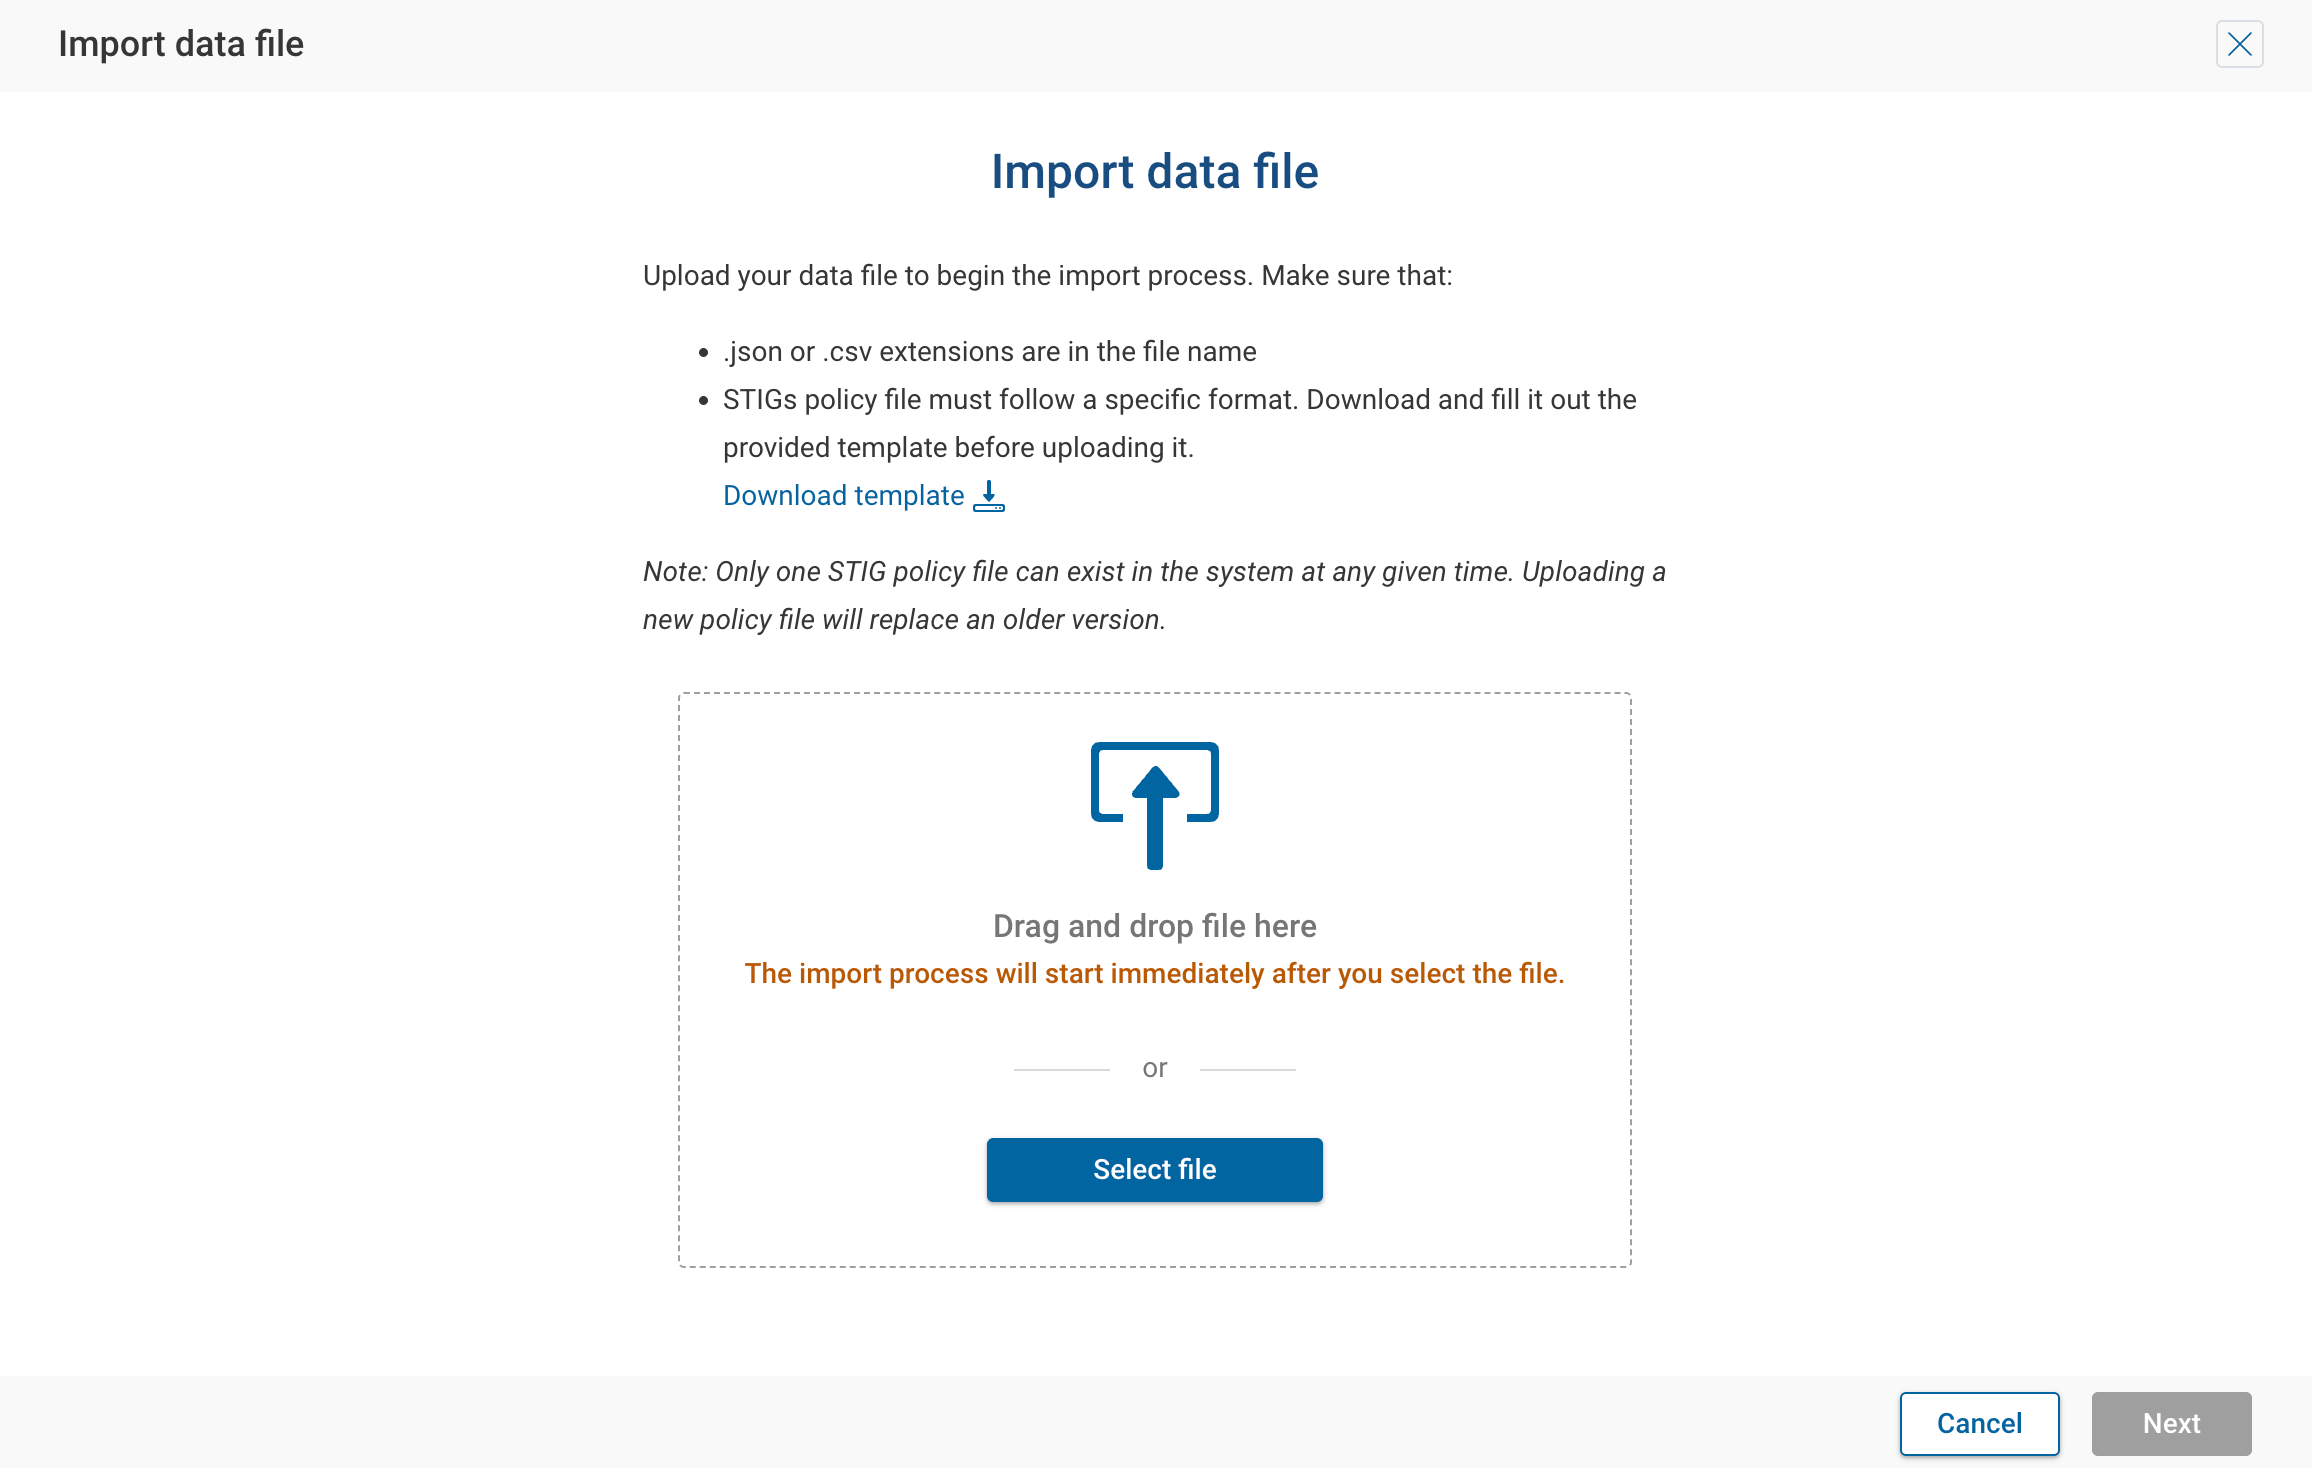
After editing the policy values, upload the file using NQE → Data Files. Once uploaded and enabled for the network, the STIG Findings verification automatically incorporates these parameters.
Visit the Data Files page for more details on managing data files.
STIG Findings and severity-specific STIG queries can be run using the latest uploaded STIG Security Policy file, without waiting for the next snapshot. Use the selector in the verification details view to choose Snapshot or Snapshot with Latest Data Files.
See Data Files for STIG Security Policies for more details
The verification status shown in the main Verify table always reflects the snapshot only. Previewing with latest data files does not modify snapshot-driven results.
Downloading a Report
The NQE Verifications page allows users to export query results in various formats for analysis or compliance purposes. Available export formats include CSV, XLSX, and CKLB.
Downloading a CSV and XLSX Report
-
Open the NQE Verifications page and locate the desired query and click the View Details icon.
-
In the results pane, click on Download report at the top-right corner.
-
Select one of the following options from the dropdown:
- Download .xlsx report
- Download .csv report

CKLB Export
CKLB Export generates STIG compliance reports in a DoD-compliant CKLB format. This export option is available only for queries that include all the required columns found in any of the STIG Findings queries (e.g., STIG Findings - Cat I, STIG Findings - Cat II, or STIG Findings - Cat III). While additional columns can be added to the query, none of the required columns can be removed.
To download a STIG report:
- Open the NQE Verifications page and locate any of the STIG Findings queries.
- In the results pane, click on Download report at the top-right corner.
- Select Download .ckl report (STIG) from the dropdown.

Additional Options
An Additional Options icon is available for Verifications with defined query parameters:
- Edit Parameters - Selecting this option opens the edit parameter settings window for editing.
- Duplicate - Selecting this option will duplicate the selected Verification and make a copy available for use.
