Backup/Restore
Forward provides multiple methods of backup, depending on your needs:
- Forward Backup/Restore: A backup and restore of all configurations and optionally Snapshots. Useful for hardware failures, Forward Cluster migrations, and Disaster Recovery.
- Snapshot Download: Individual Snapshot backup. Useful for sharing with Forward Support. For more information, see the Snapshot page.
This page covers Forward Backup/Restore.
Forward allows users to backup and restore application state and Snapshots.
Forward Backup/Restore is not available for Forward SaaS users, as the deployment is maintained by Forward Networks which internally maintains continuous backups.
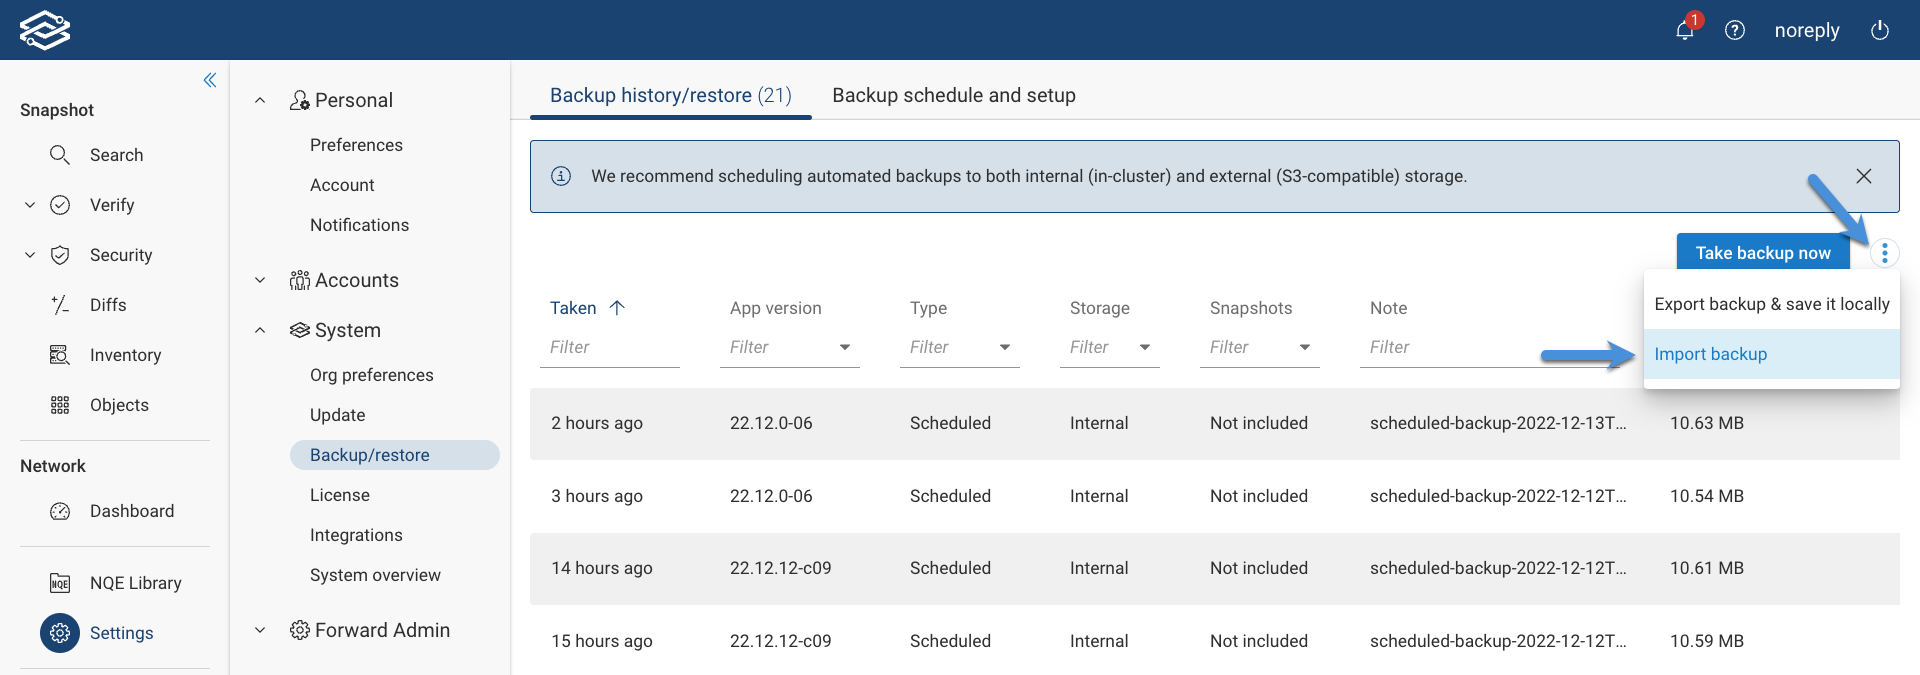
Navigate to Settings > System > Backup/Restore page to manage your Forward backups via the Forward UI or use the Forward Networks APIs.
Full vs Lightweight Database Backup
Forward provides two backup options:
- Lightweight Backup: It contains all application settings, collector settings, network-specific topology layouts, and credentials. It should be used to quickly restore a Forward cluster and restart collecting Snapshots as soon as possible.
- Full Backup: It includes everything included in the lightweight backup plus all the Snapshots. It should be used for Forward cluster migrations and Disaster Recovery scenarios only.
Including all Snapshots will greatly increase the backup’s size and the backup restore time.
Backup/Restore Storage Options
There are two storage options for Forward backups:
- Internal In-Cluster Storage: Backup data is stored to the local disk on the Forward cluster nodes.
- External S3-Compatible Storage: This option saves space on local disks and allows customers to maintain a larger number of backups. It can also be used for Disaster Recovery on a remote instance.
We recommend scheduling automated backups to both internal (in-cluster) and external (S3-compatible) storage.
Set Up S3-Compatible Storage
Before using an external S3-compatible storage backup, you need to set it up. To do this, navigate to the Backup Schedule and Setup tab, and select Set Up S3-Compatible Storage. Provide the following information when prompted:
- Service Endpoint: If using Amazon S3, the service endpoint is in the format
https://s3.<region>.amazonaws.com. - Bucket: Specify the S3 bucket intended for backup storage.
- Access Key ID and Secret Access Key: Enter the access key ID and secret access key to grant Forward access to the S3 bucket.
- Immutable Backups (retention managed externally): When selected, indicates the S3 bucket is configured to prevent delete operations, requiring external management of backup retention.
If using Amazon S3, the bucket has to have the following permissions:
"s3:PutObject",
"s3:GetObject",
"s3:ListBucket",
"s3:DeleteObject"
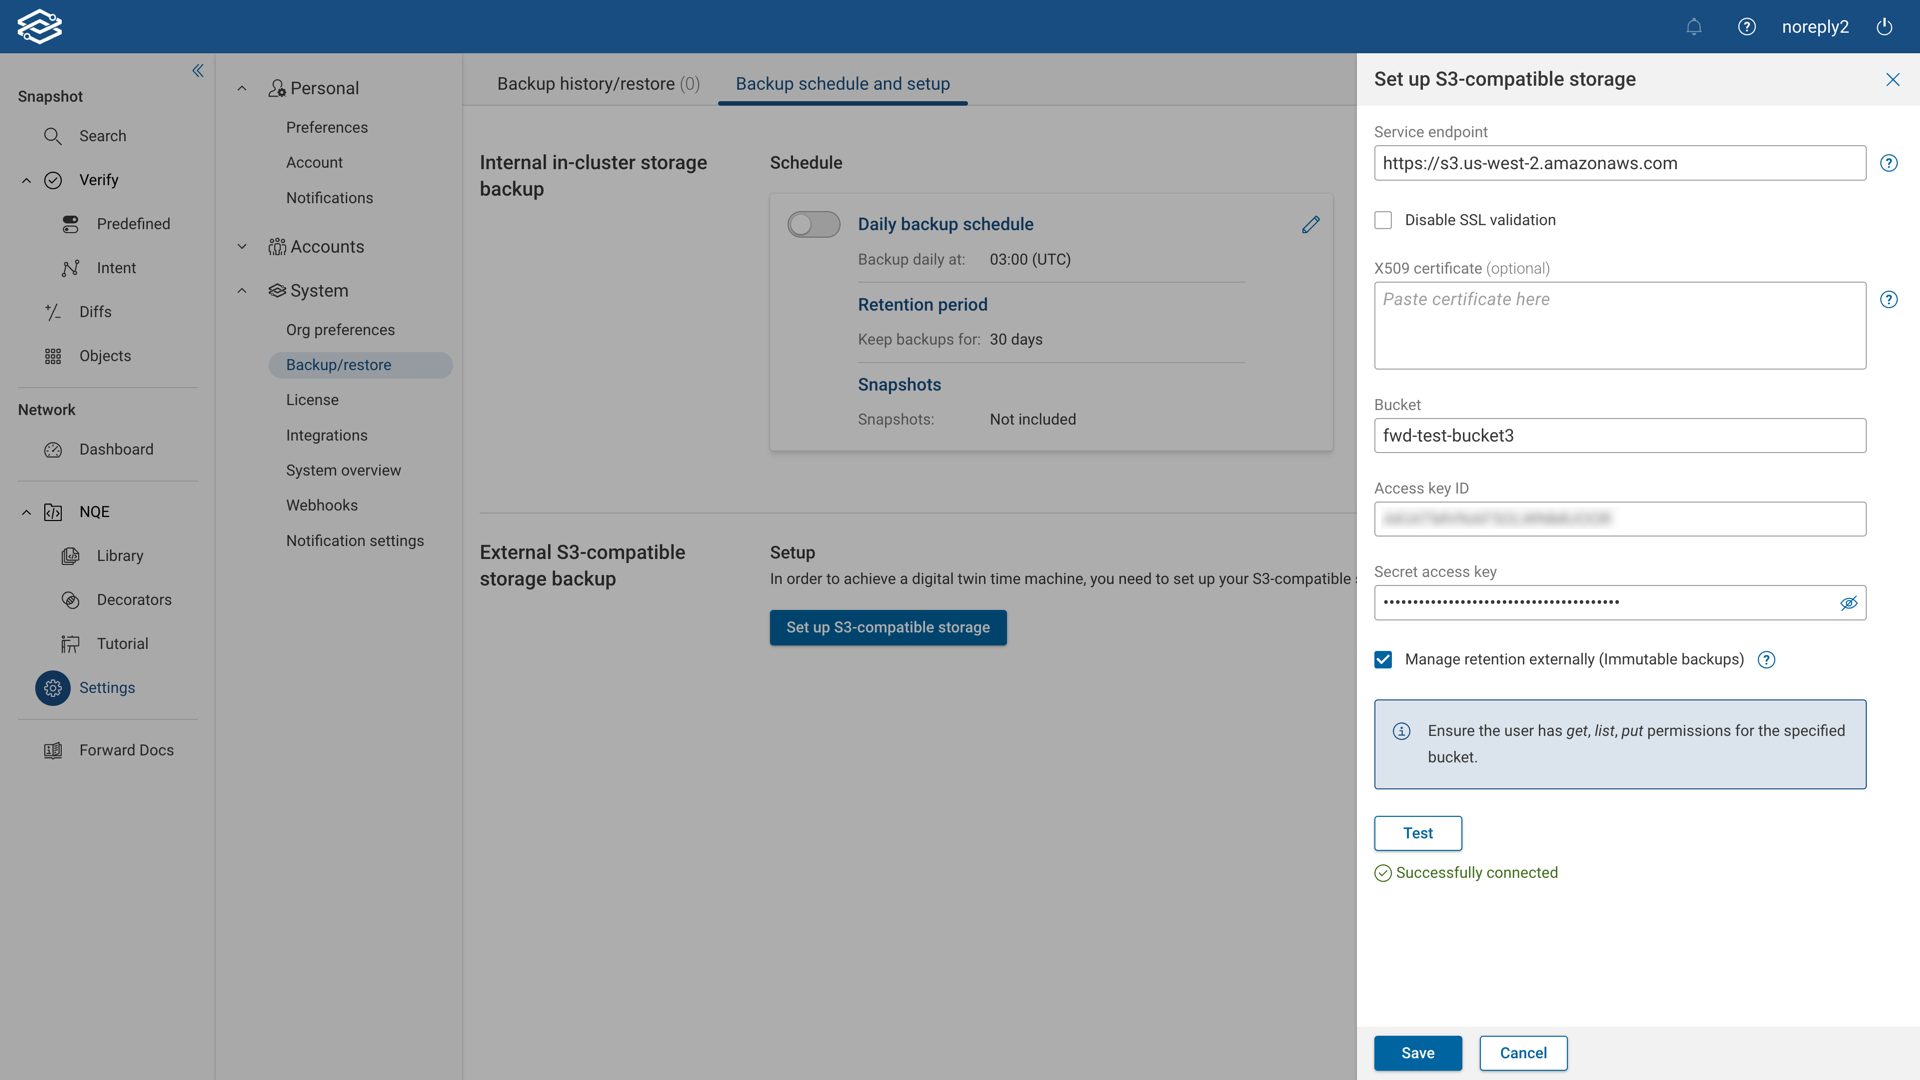
After entering your configuration details, test the connection to the AWS S3 bucket, then click Save to finalize the setup after a successful test.
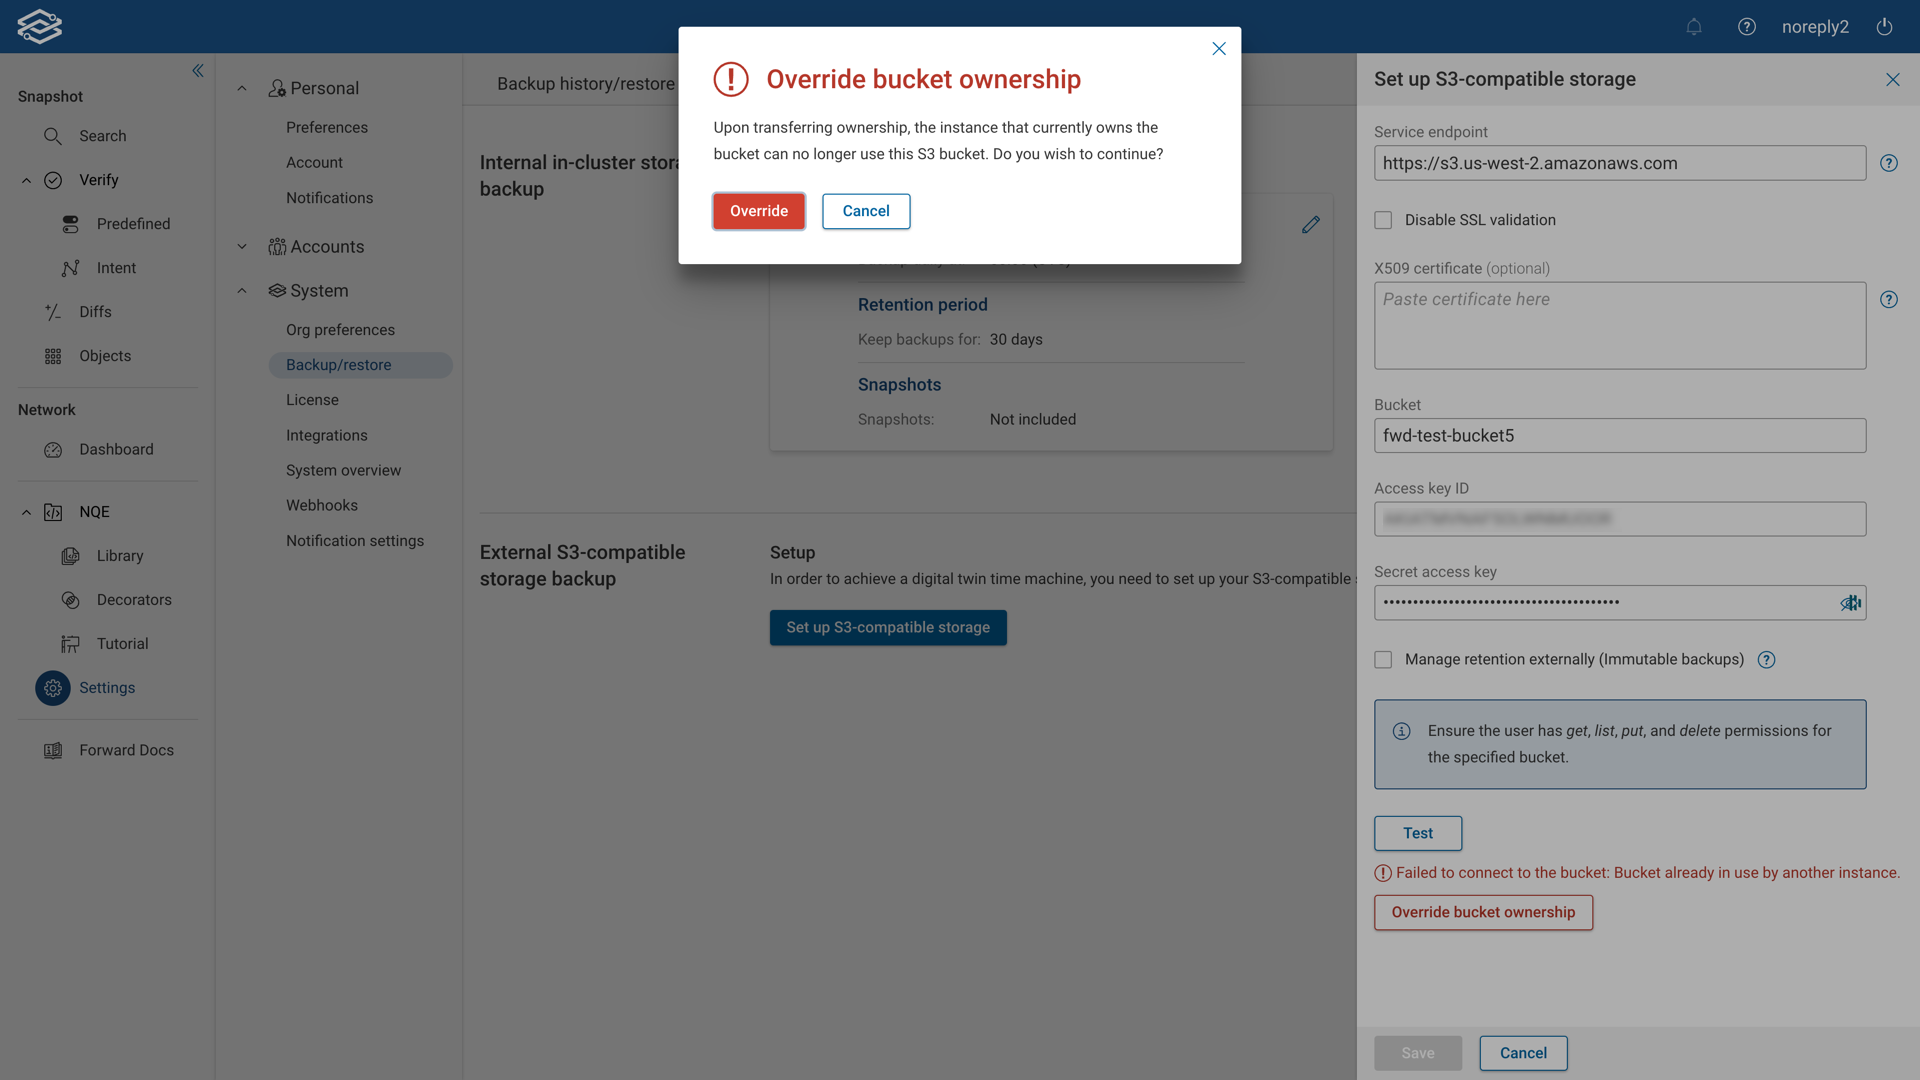
Override Bucket Ownership
During S3 storage setup, the connectivity test checks if the chosen S3 bucket is available for use. If the bucket is already in use by another Forward Cluster, the test fails with an error that the bucket is in use, and an option to Override Bucket Ownership is made available. Selecting this option and confirming the action initiates the transfer of bucket ownership to the current cluster.
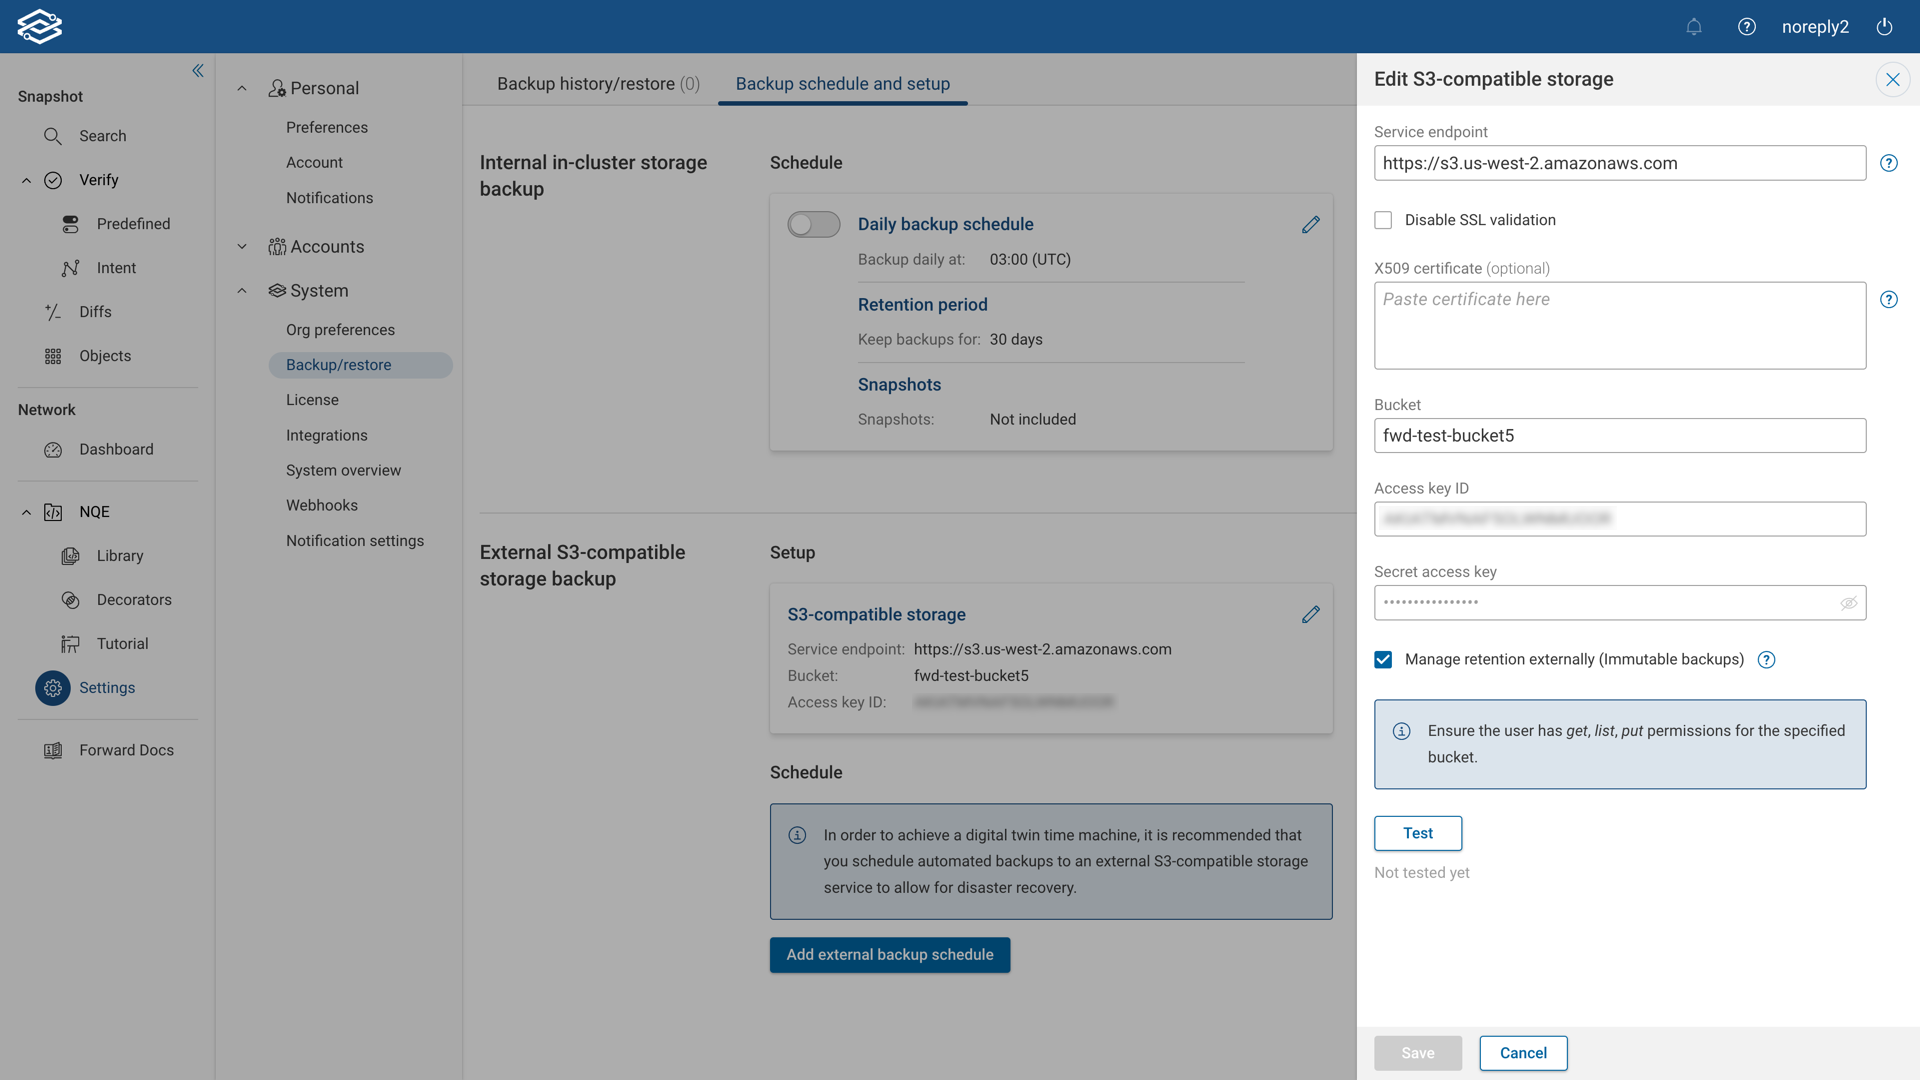
Edit S3-Compatible Storage
To modify an existing S3-compatible storage, click the Edit icon in the Setup section, edit any option, Test the connection, and click Save to finalize the setup after a successful test.
Internal In-Cluster Storage Backup
The Forward cluster can be backed up manually or scheduled on a daily basis. Data is stored on the cluster nodes using up to 60% percentage of the data disk. Each backup is saved on multiple nodes (2 by default) for redundancy and fault tolerance.
Manual Backup
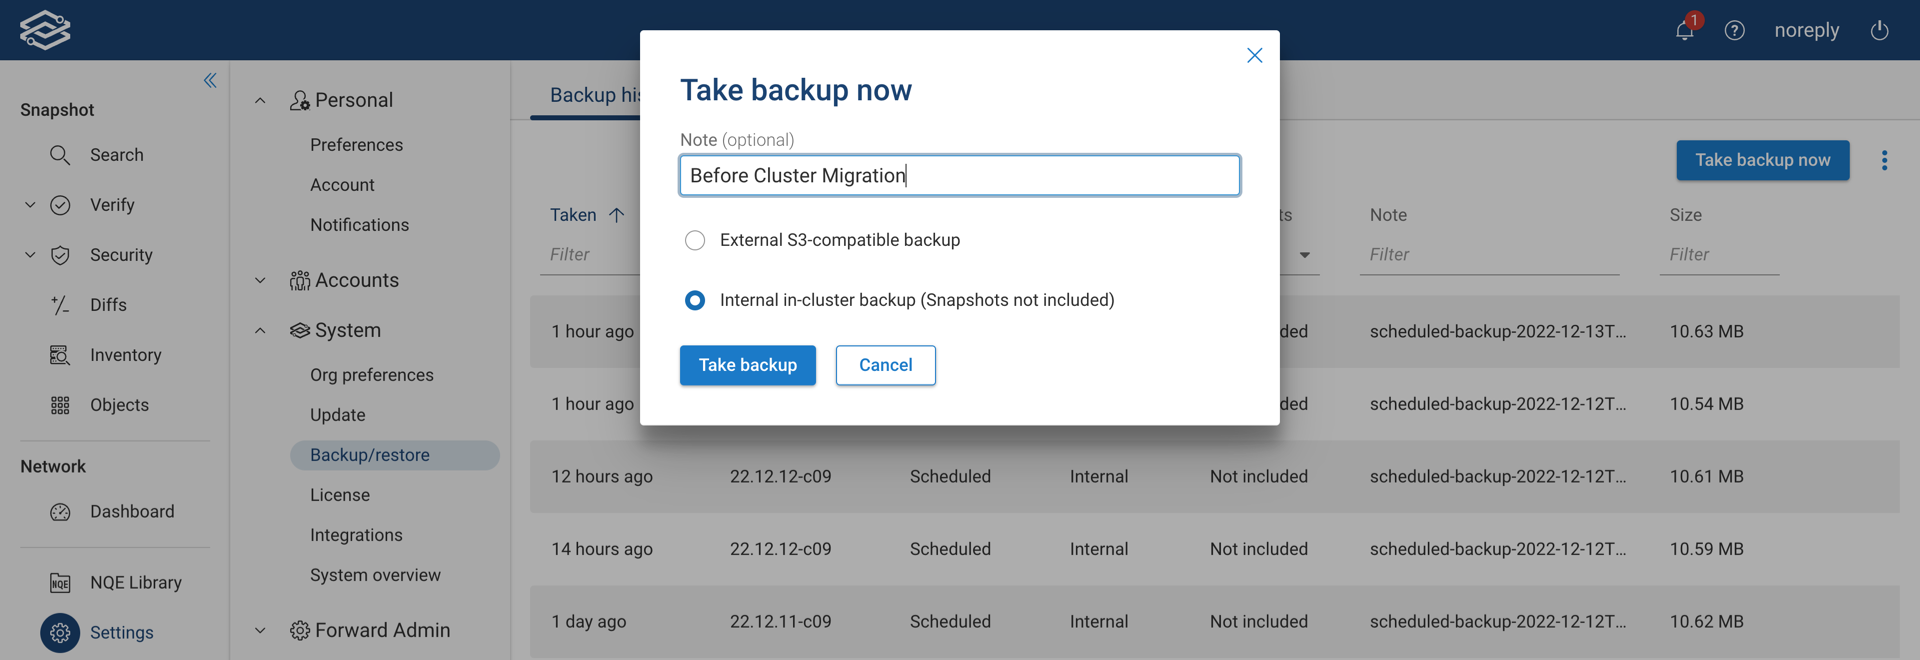
To manually save a new backup into the in-cluster storage, select the Backup history/restore tab, click on Take a backup now, optionally add a Note, and select the Internal in-cluster backup (Snapshot not included) option. Finally, click on Take backup.
Scheduled Backup
To schedule a daily backup to the in-cluster storage, select the Backup schedule and setup tab, click on the Edit icon in the Schedule tile in the Internal in-cluster storage backup section.
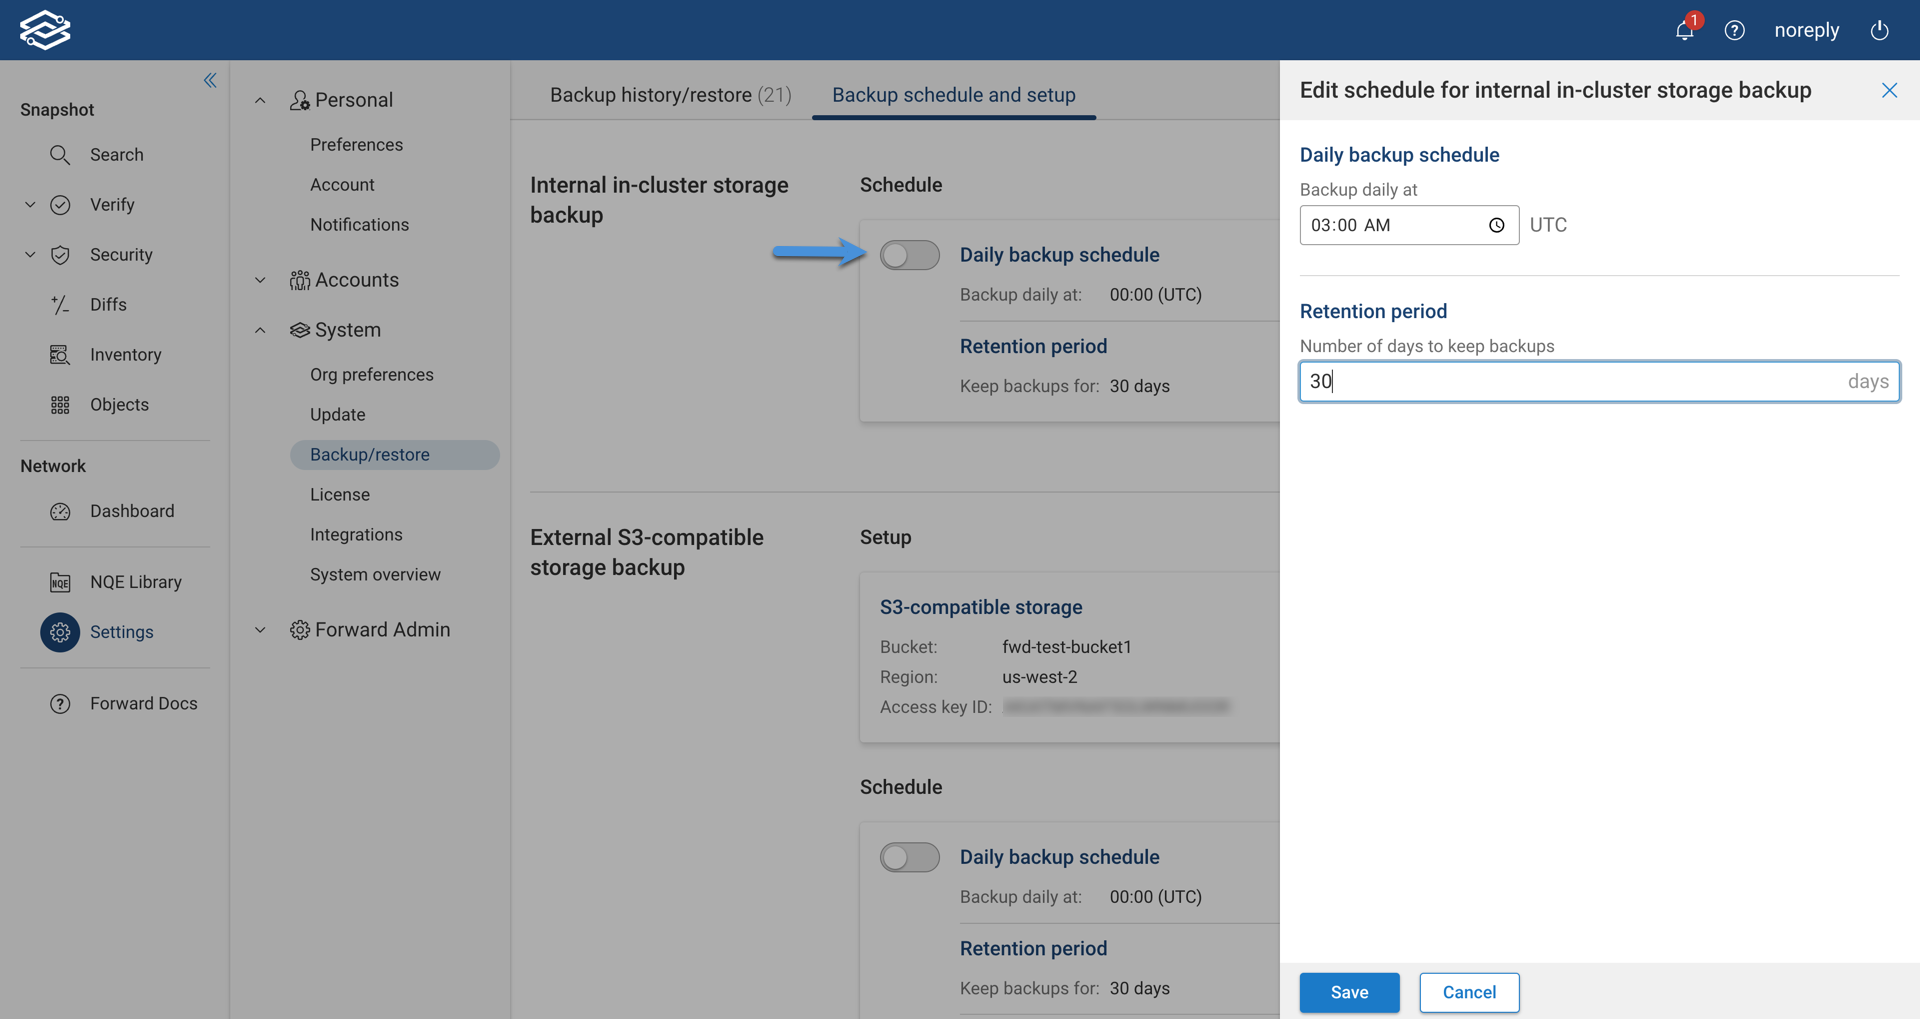
Set the backup time in Daily backup schedule, the number of days to keep backups in Retention period, and click on Save.
The Daily backup schedule toggle button allows you to enable and disable the scheduled backup.
The retention policy is only enforced if the schedule is enabled. If the schedule is disabled, none of the backups are deleted.
External S3-Compatible Storage Backup
The Forward Cluster can be backed up manually or scheduled on a daily basis.
Manual Backup
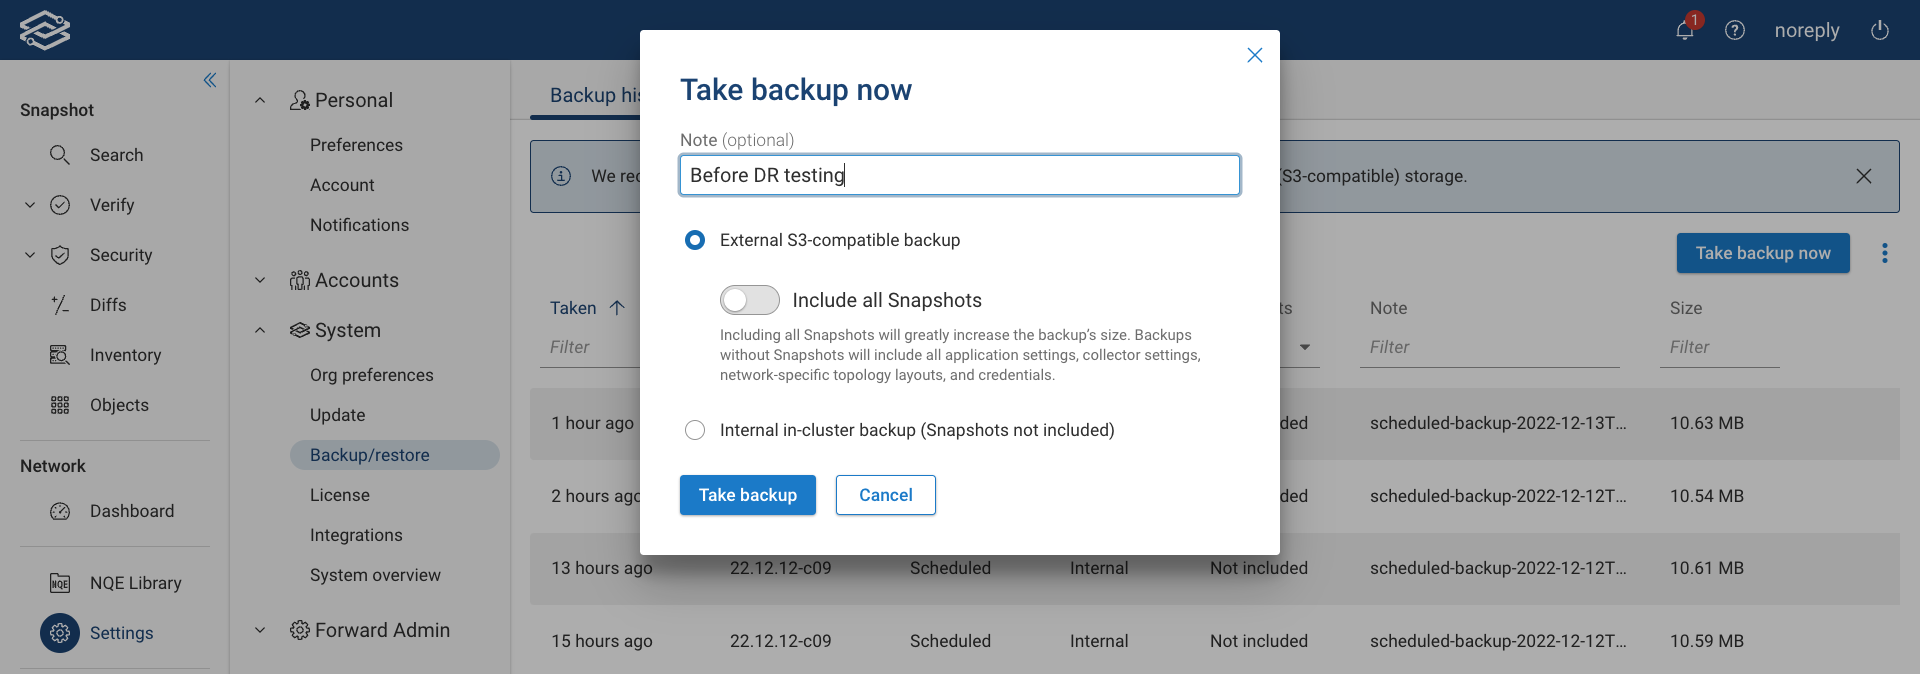
To manually save a new backup into an AWS S3 Bucket, select the Backup history/restore tab, click on Take a backup now, optionally add a Note, select the External S3-compatible backup option, and optionally, enable the Include all Snapshots toggle.
Finally, click on Take backup.
Scheduled Backup
To schedule a daily backup to an AWS S3 Bucket, select the Backup schedule and setup tab, click on the Edit icon in the Schedule tile in the External S3-compatible storage backup section.
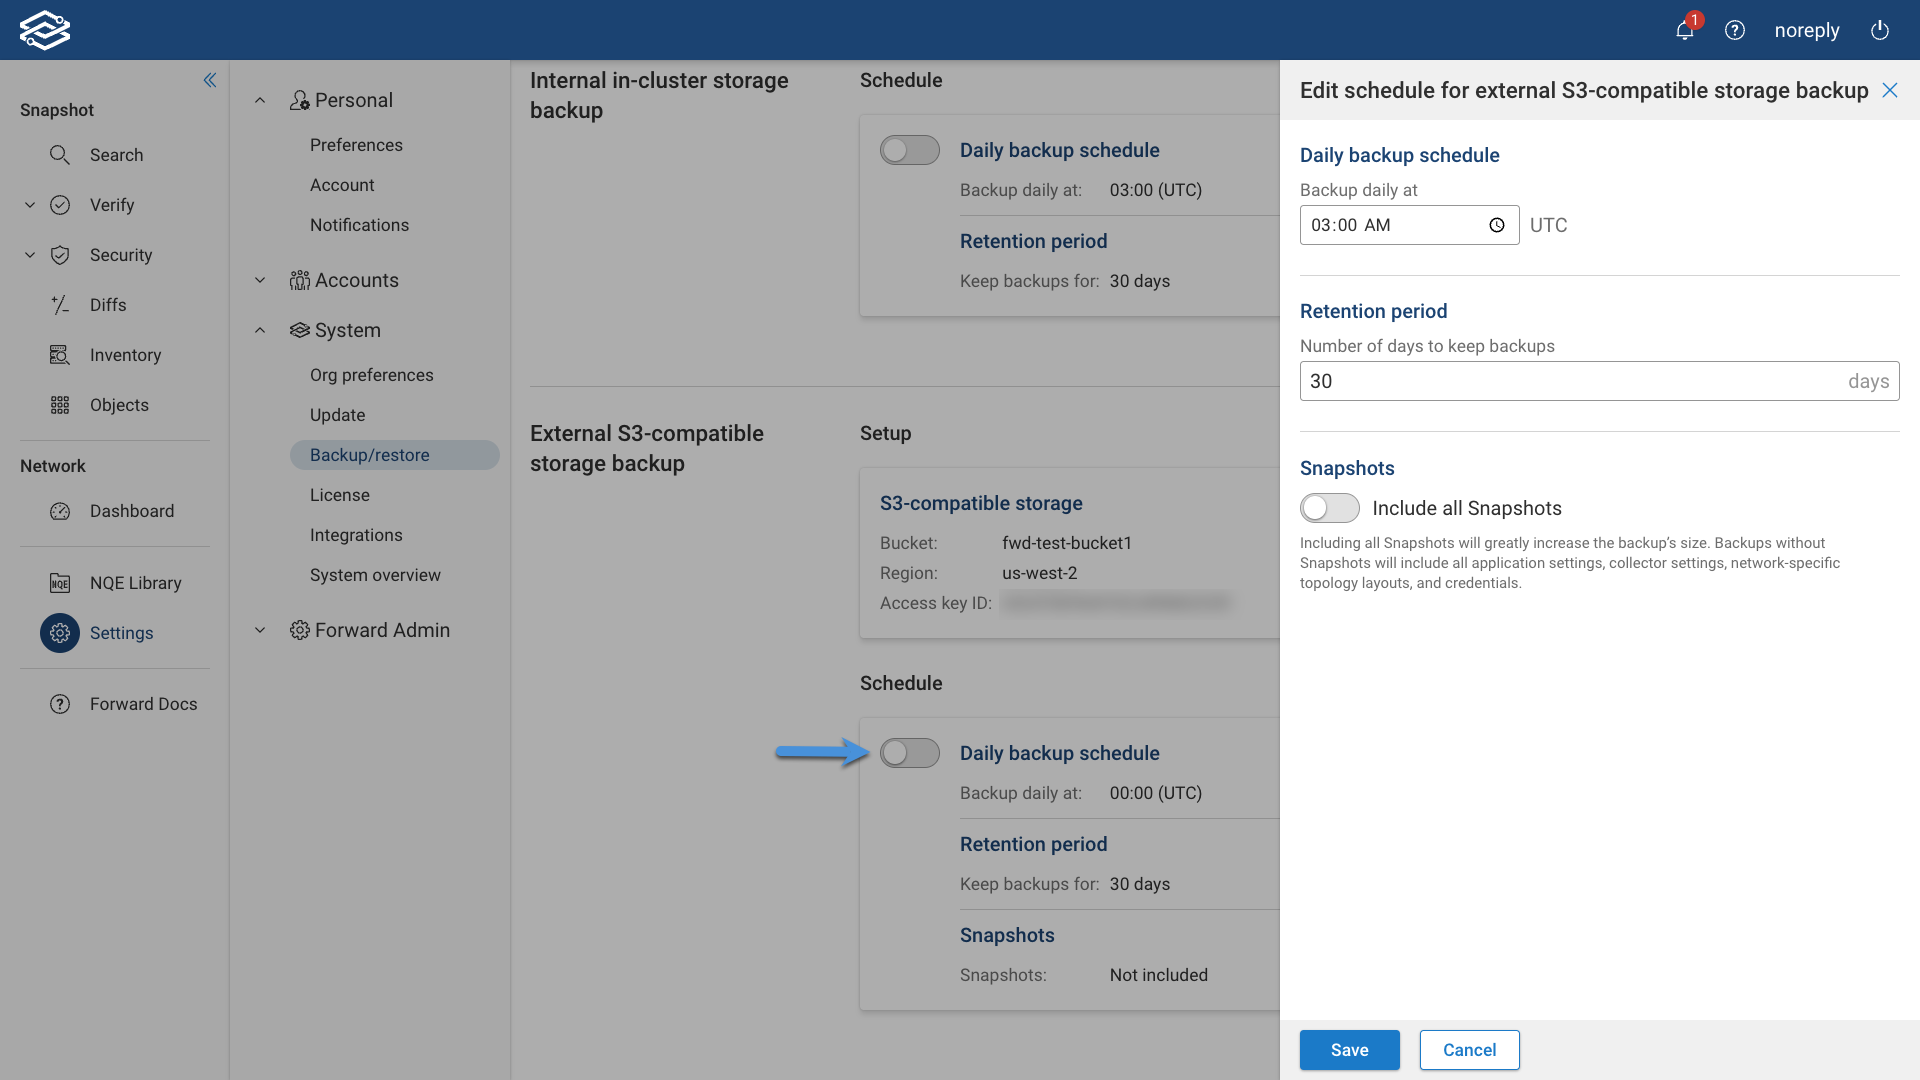
Set the backup time in Daily backup schedule, the number of days to keep backups in Retention period, optionally enable the Include all Snapshots toggle button, and click on Save.
The Daily backup schedule toggle button allows you to enable and disable the scheduled backup.
Backup Structure
The folder structure used on disk and in S3 bucket for backups is as follows:
/forward/backup/
├── app/
│   ├── <backup id1>/
│   │   ├── db_dump.zip
│   │   └── entry.txt
│   └── <backup idM>/
│       ├── db_dump.zip
│       └── entry.txt
└── snapshot/
    ├── <snapshot id1>/
    |   ├── snapshot.zip
    │   │   entry.bin
    └── <snapshot idX>/
        ├── snapshot.zip
        └── entry.bin
List Available Backups
To get the list of available backups, you can either use the Forward APIs (see List Backups), or login to any master node and run the following command
kubectl exec -n forward $(kubectl get pods -n forward --no-headers -o custom-columns=":metadata.name" -l app.kubernetes.io/name=fwd-cbr-server) -- curl localhost:40099/backups
Sample output:
  {
    "id" : 1670826471,
    "backupName" : "scheduled-backup-2022-12-12T06:27:49.458793608Z",
    "appVersion" : "2022.12.08-kp-22ee97c3fce",
    "backupTime" : "2022-12-12T06:27:51.887254322Z",
    "snapshotIds" : [ ],
    "triggerType" : "SCHEDULED",
    "storageType" : "INTERNAL"
  }
You can also filter backups by a specific Forward Enterprise version by using the “appVersion” parameter
kubectl exec -n forward $(kubectl get pods -n forward --no-headers -o custom-columns=":metadata.name" -l app.kubernetes.io/name=fwd-cbr-server) -- curl localhost:40099/backups?appVersion=22.2.1-07
Restore
To restore from a backup, the restore target must run the same or a later Forward release version that was running on the Forward instance used to take the backup.
To restore a Forward cluster from a previously saved backup, execute the following steps:
- Login via SSH to any of the master nodes
- Run the following command
./restore_fwd.py -u <fwd_app_admin_user> -p <fwd_app_admin_password> --start
Make sure that the fwd_app_admin_user was present in the fwd app when the backup was taken. Restore would be able to finish even without a proper user, but restore script wouldn’t be able to get restore progress from the fwd app.
- Select yes if you’ve already deployed the desired Forward Enterprise version
- The restore utility will print all the available backups in the system.See sample output below:
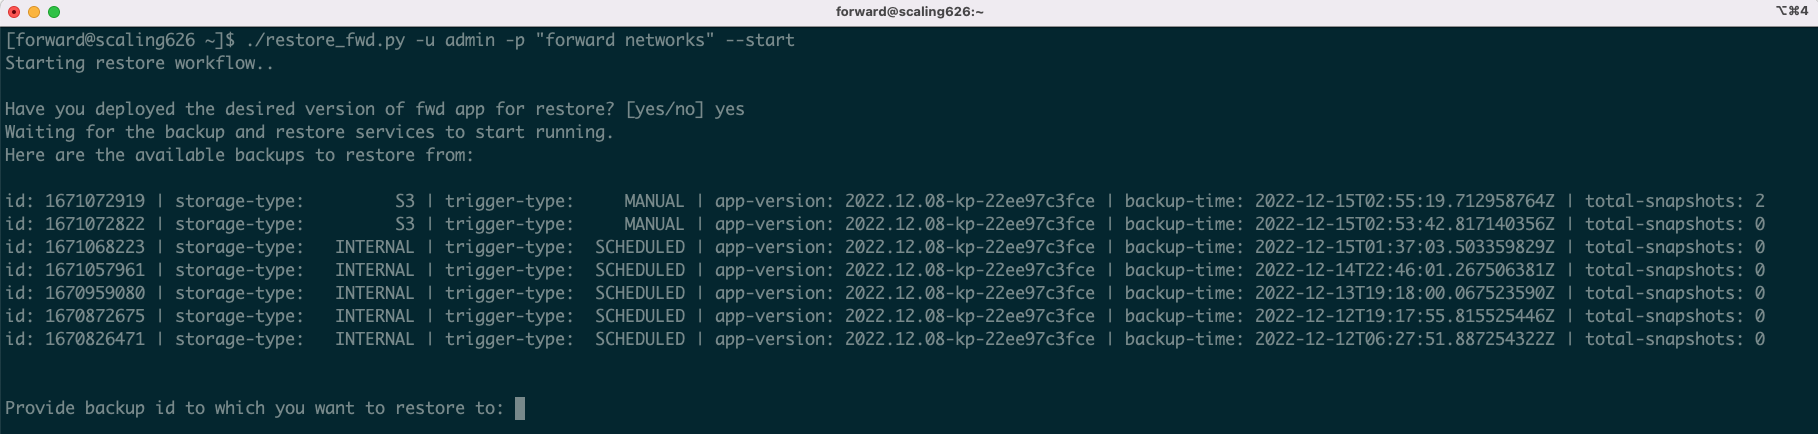
- Provide the backup id you want to restore and press enter
- Wait until the restore is completed
Forward Enterprise will be unavailable until the restore is completed.

Since all the Snapshots are invalidated you might have to reprocess the Snapshots you need right away or wait until Snapshot reprocessing background job reprocesses them automatically.
Single Snapshot Restore
When using an external S3 store for backups, it is possible to restore a specific Snapshot from those backups. To do this, enable the Show Archived Snapshots option in the Snapshot dropdown to view all archived Snapshots associated. Archived Snapshots can be identified by the Archived icon in the Status column.
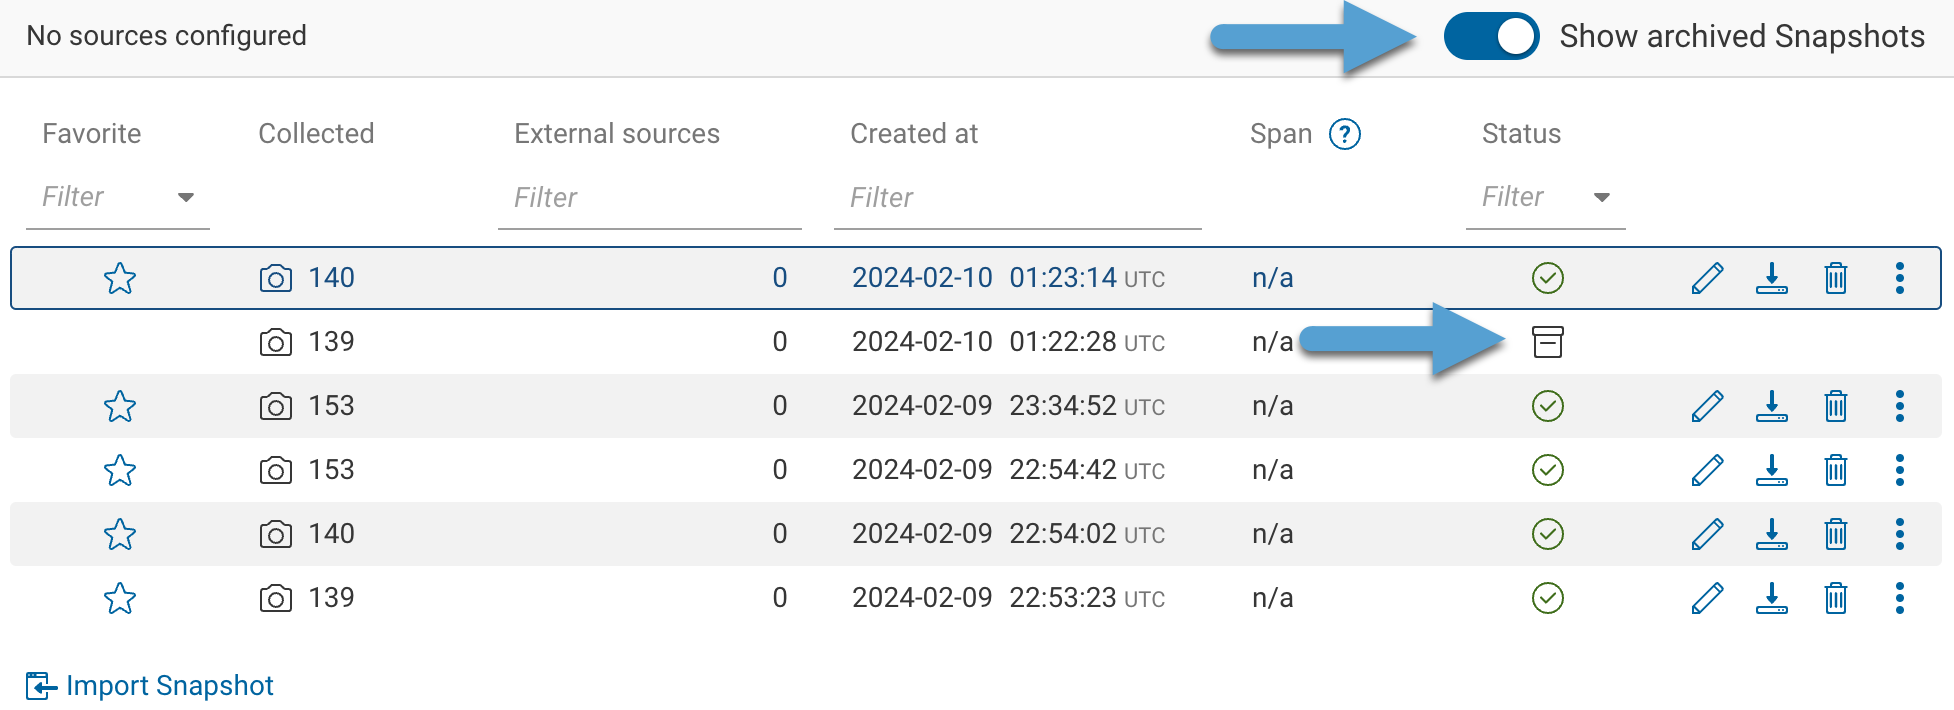
Select the desired archived Snapshot from the list and click the Restore & Reprocess Snapshot button to initiate the restoration process. Once the restoration process is complete, the Snapshot will be available for use.
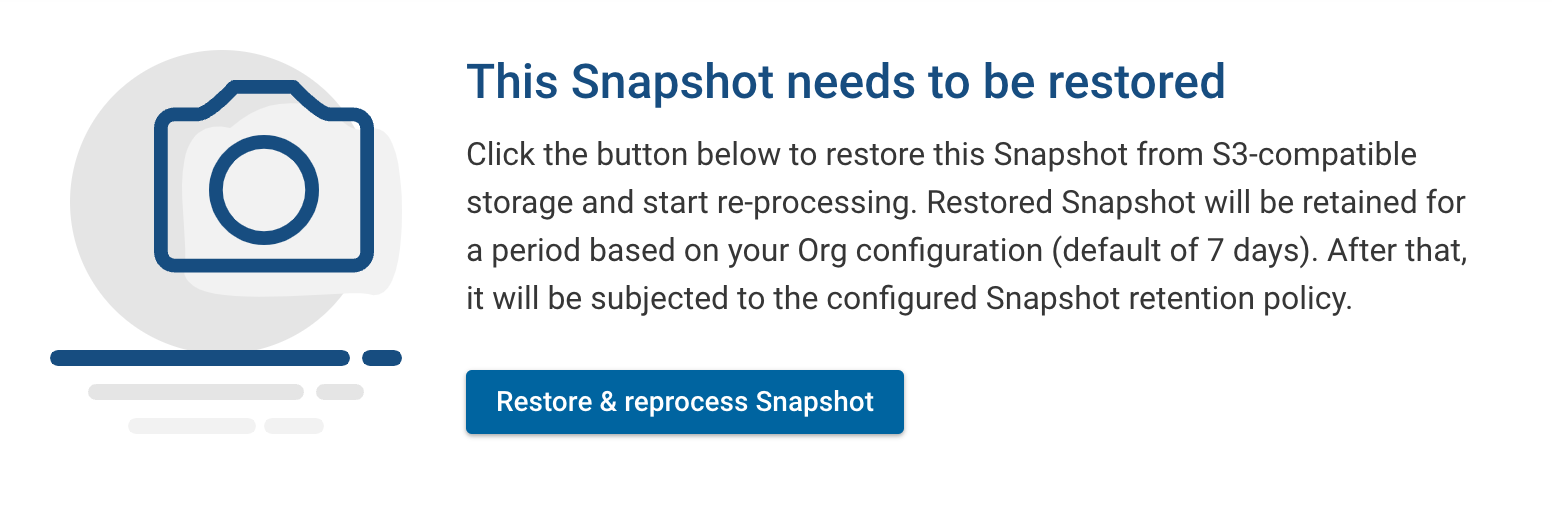
This feature is only available for on-prem deployments, and is applicable to Snapshots that have been backed up manually or through a scheduled process.
Disaster Recovery
When using an external S3 store for backups, it is possible to restore from those backups on another Forward Cluster if the original instance of the application is no longer up and running. Perform the following actions:
- Deploy a fresh Forward Cluster
- Delete lock file on S3 storage: Look for the lock file in your configured S3 bucket with key
fwd-deployment-id. Delete this key. - Configure S3 backups on the fresh Cluster: Follow the steps defined in this section
- Find backup to restore from: List backups on UI or using List Backups
- Trigger restore: Follow steps defined here
Ensure you only have one cluster configured to use an S3 bucket at any time. Having multiple Forward Clusters configured to use the same S3 bucket can lead to backup data corruption.
Forward Backup Restore APIs
For information on Backup/Restore APIs, see the System Administration API documentation.
Following are reported some useful curl commands:
List Backups
curl -k https://<appserver>/api/backups -u <admin_user>:<admin_password>
Disable Scheduled Backups
curl -k https://<appserver>/api/backup-policy -u <admin_user>:<admin_password> -XPATCH -H 'Content-Type: application/json' -d '{"enabled":false}'
Backup/Restore Progress
To show any currently running operations:
curl -k https://<appserver>/api/backups?view=progress -u <admin_user>:<admin_password>
Backup Result
To show the result of a previously run backup operation on the provided storage type:
curl -k https://<appserver>/api/backups?view=lastBackupResult&storageType=<storageType>&triggerType=<triggerType> -u
<admin_user>:<admin_password>
It will return null if that operation has never been run. It does not show currently running operations of that type. Only updates after they have finished.
Restore Result
To show the result of a previously run restore operation:
curl -k https://<appserver>/api/backups?view=lastRestoreResult -u <admin_user>:<admin_password>
It will return null if that operation has never been run. It does not show currently running operations of that type. Only updates after they have finished.
The above curl command are based on unpublished API that are subject to change without any warning. Check with your Forward Networks representative for support.
Legacy Database Export/Import
The Lecacy database export/import is deprecated, and it will be removed in future releases.
Please use the Forward Backup/Restore features described above instead.
Export
To export the Forward Cluster database and save it locally into the user machine, select the Backup history/restore tab, click on the kebab button on the right, and select Export backup & save it locally.

Optionally enable the Include All Snapshots option, and click on Export.
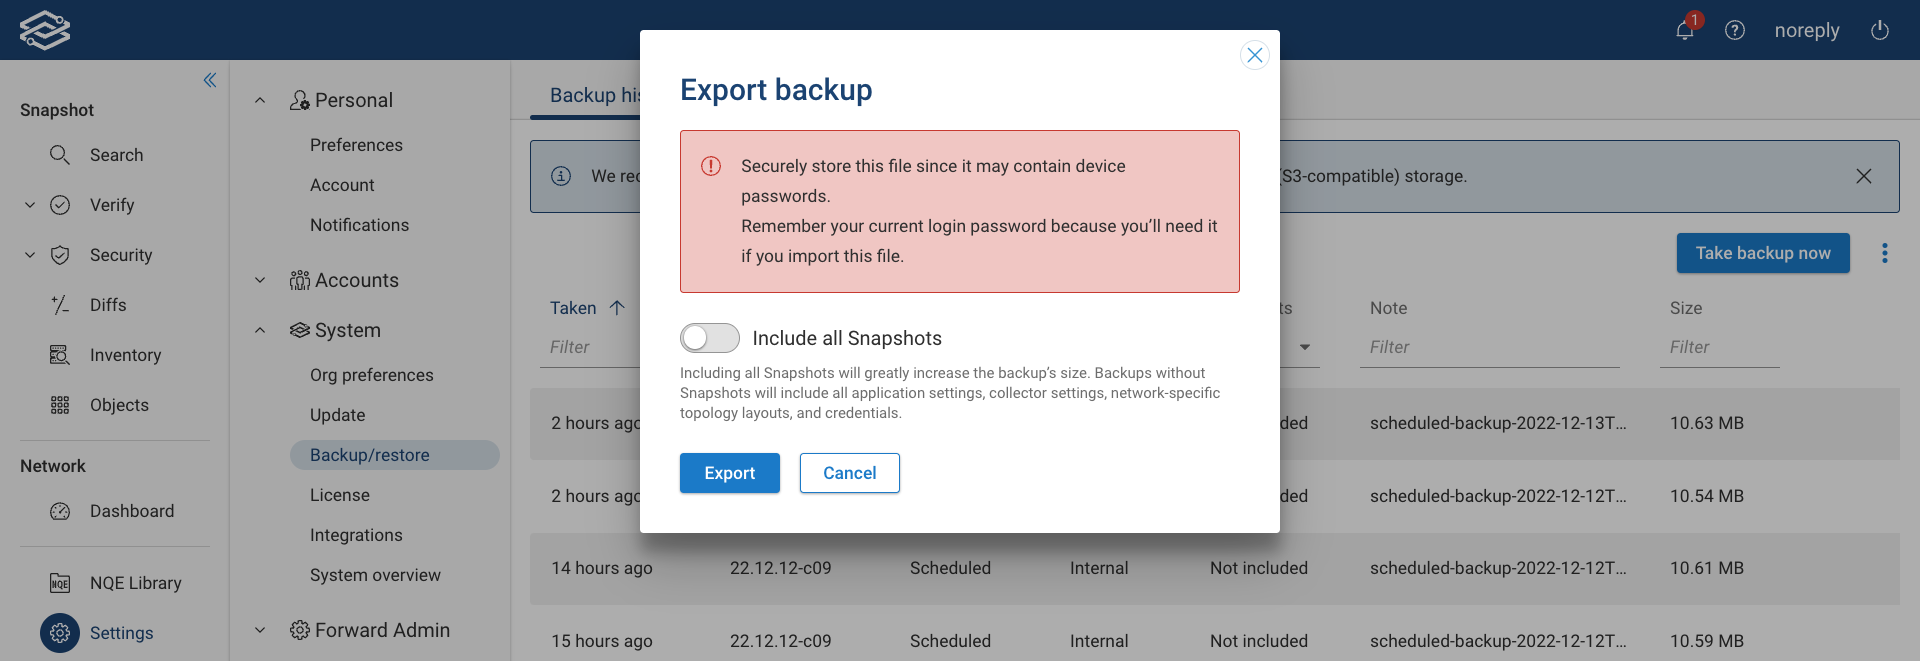
Securely store this file since it may contain device passwords. Remember your current login password because you’ll need it if you import this file.
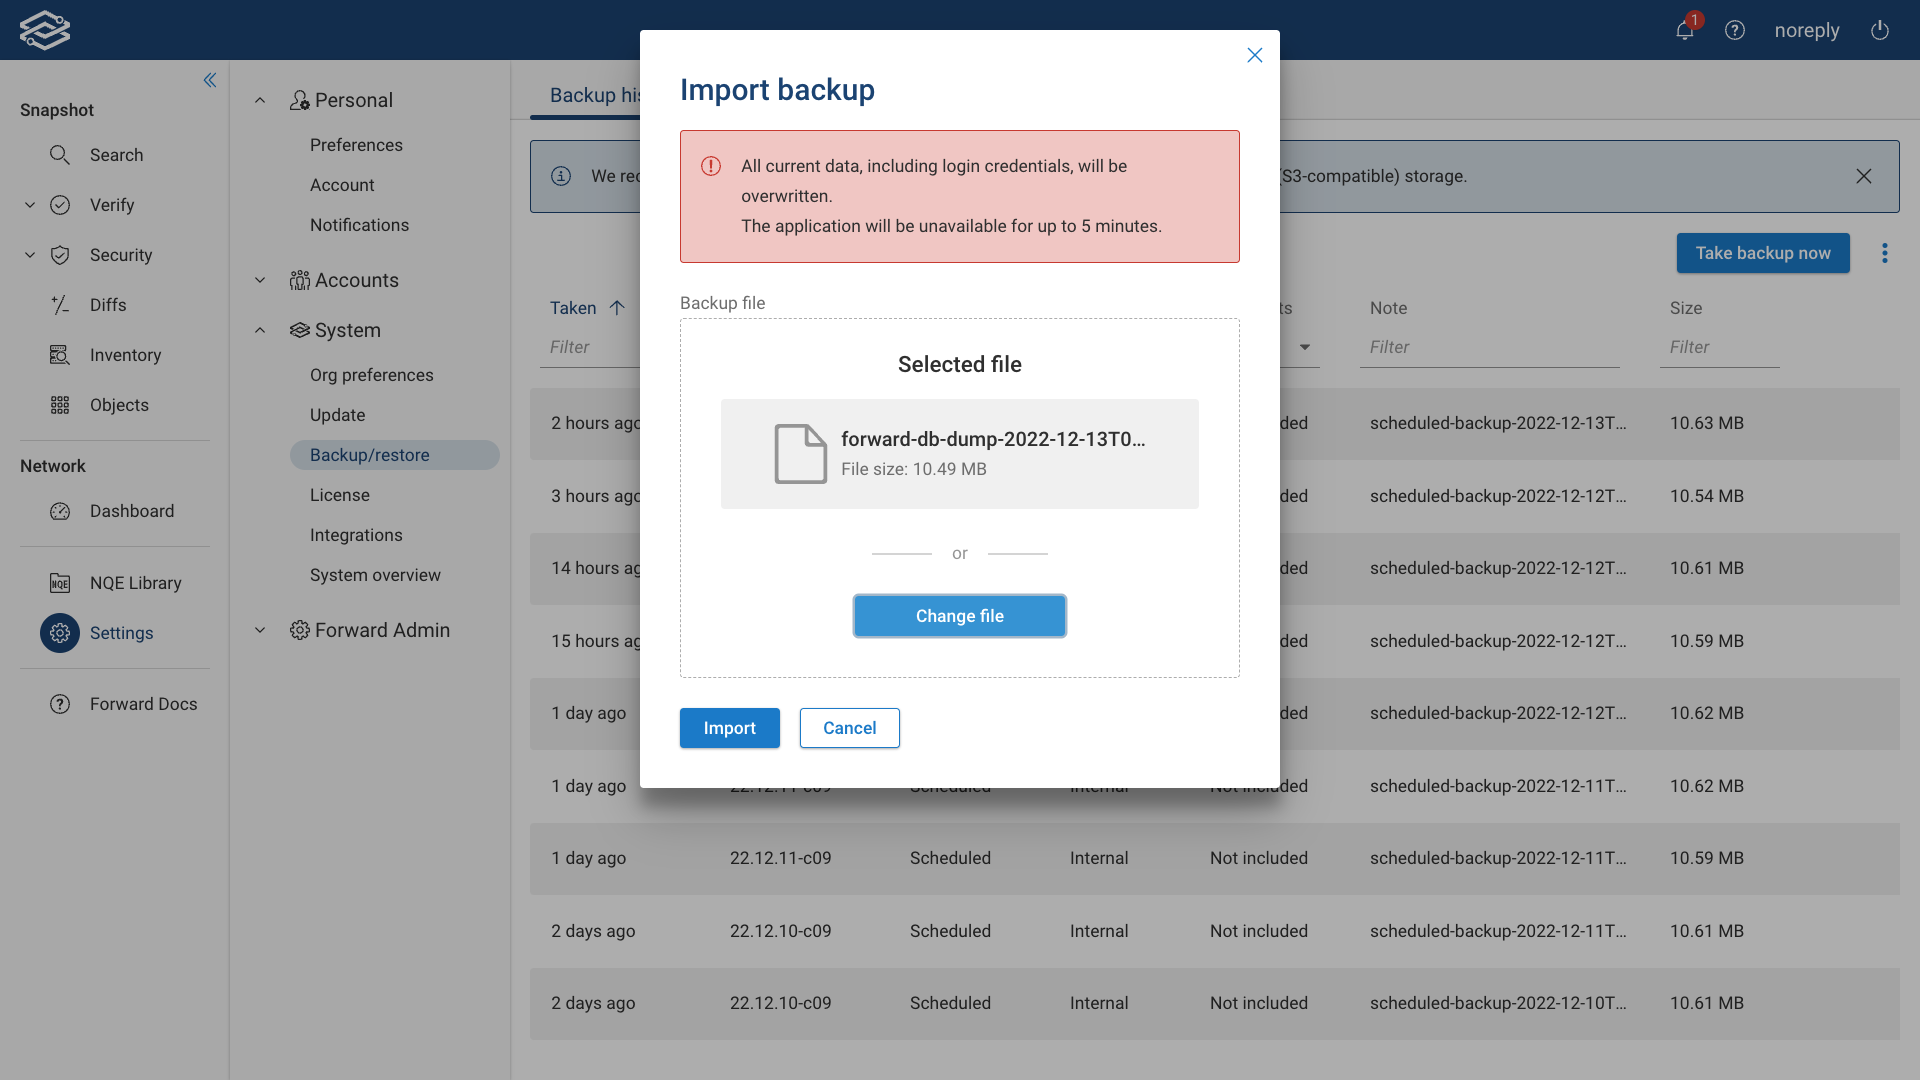
Import
Please proceed with caution.
Importing a full database backup will overwrite and replace all data and settings with the contents of the backup file. All collected Snapshot data and settings added since the database backup export will be lost.
Importing a Lightweight database backup file in the Forward Cluster will wipe all collected Snapshots and overwrite applications settings.
The application will be unavailable for up to 5 minutes.
To restore the Forward Cluster database from a previously exported database backup file, select the Backup history/restore tab, click on the kebab button on the right, and select Import backup.
Drag and drop or select the backup file from the local machine, and click on Import to start the database restore process.