Install on Azure
Brief System Overview
Forward Enterprise can be installed on one or more nodes (in this document node refers to a VM). The customer can decide to start deploying on a single node and later seamlessly extend the cluster over multiple nodes.
The first installed node is always a primary node. Additional nodes can be installed either as primary or worker nodes. The control plane of the cluster runs on the primary nodes. On multi-node installations, we recommend having 3 primary nodes and adding additional nodes as workers.
A multi-node deployment provides additional value and flexibility:
- Scale-out - When the cluster spans 3 or more nodes, processing is faster and able to use multiple executors. Similarly, search throughput scales with each added node.
- High Availability (HA) - When a cluster is installed with 3 primary nodes, both system and application services are configured to automatically handle node-level failures. As long as no more than a single node goes down at a time, the complete Forward application should remain available, and should not require any administrator involvement (although there may be a transient loss of availability between when the node failure is detected and when application components are restored on other healthy nodes).
- Flexible Resource Allocation - Users can configure resources when using multiple nodes to maximize network scale, minimize the snapshot processing time, or fully isolate different tasks, like processing, search, and collection.
Resource Requirements
Depending on the size and complexity of the networks to be modeled by the platform, we provide different recommendations on number of cluster nodes and hardware requirements of each of those nodes:
| Network Elements | Number of Nodes | VM Type | Disk Size per Node |
|---|---|---|---|
| 1k | 1 | Standard_E32s_v5 or Standard_E32s_v4 | 400 GB (premium SSD) |
| 5k | 3 or more | Standard_E48s_v5 or Standard_E48s_v4 | 600 GB (premium SSD) |
| 15k | 5 or more | Standard_E48s_v5 or Standard_E48s_v4 | 800 GB (premium SSD) |
| 45k+ | 7 or more | Standard_E64s_v5 or Standard_E64s_v4 | 2 TB (premium SSD) |
Larger networks require more memory to be able to model them. Total vCPUs (across nodes) determine processing speed and search throughput. At least 3 nodes are required for HA support.
Please only use one of the VM types mentioned in the above table. Other VM types are not guaranteed to work.
- * Premium SSD storage type is strongly recommended.
Connectivity Requirements
External and Intra-node Connectivity
Each Forward Cluster deployment requires cluster-incoming, cluster-outgoing, cluster-internal, and node-internal connectivity.
It is simpler to allow unrestricted connectivity between cluster nodes. If unrestricted connectivity is not an option, the list of specific ports is noted below. The list below assumes any cluster node can be a primary or a worker node. For additional details about each port and its usage, please contact your Forward Networks representative.
| Source IP | Destination IP | Layer 4 Destination Port |
|---|---|---|
| External | Cluster node | 22 (ssh) |
| Cluster node | Cluster node | 22 (ssh) |
Connectivity to Network Infrastructure
Connectivity from the Forward cluster to network devices or external services is required for snapshot collection, DNS lookups, access to SMTP server, etc. The list of specific ports is noted below. For additional details about each port and its usage, please contact your Forward Network representative.
| Source IP | Destination IP / Address | Layer 4 Destination Port |
|---|---|---|
| Cluster node | Local DNS server | 53 (UDP) |
| Cluster node | Network devices | 22 |
| Cluster node | Cloud Collection: | 443 |
| Cluster node | VMware vCenter | 443 |
| Cluster node | Openflow devices | 6653 |
| Cluster node | SMTP server | SMTP configurable port (if enabled) |
Hostname and IP Address Requirements
Hostnames and IP addresses of cluster nodes should not change. IP addresses must be consistent across reboots, either via static allocation, or persistent allocation with a DHCP server.
Get the Installation Images
- Find the tenant ID in which the VM (or VMs) will be deployed. Instructions are here.
- Enable access to app: In the below url replace the tenant ID and paste the URL into a browser and follow the
sign-in prompts to sign in to customers account.
- For AzureCloud:
https://login.microsoftonline.com/<Tenant_ID>/oauth2/authorize?client_id=7cb27594-38c3-4483-b12a-84c23e1882f5&response_type=code&redirect_uri=https://portal.azure.com/ - For AzureUSGovernment:
https://login.microsoftonline.us/<Tenant_ID>/oauth2/authorize?client_id=d64e7224-74e0-4e64-86ab-839cfa9d43b4&response_type=code&redirect_uri=https://portal.azure.us/
- For AzureCloud:
- Set permissions to allow the app to deploy VM’s: Add the Permission for the Forward application to the resource
group where they will deploy the VM’s.
- Navigate to
services→Resource groups. - Select the Resource Group Name in which Forward VM will be provisioned (create a new resource group if needed).
- Navigate to
Access Control (IAM)→Role assignments - Click on
Add→Add role assignment.- Select the role as Contributor and click “Next”.
- Click on “Select Members”
- Search for the
fwd-base-accessand click Select.
- Navigate to
- Install Azure CLI or Configure Azure Cloud Shell using the instruction provided below.
- Instructions to install Azure CLI
- Configuration Instructions for Azure Cloud Shell
(Select
bashterminal during the cloud shell configuration.)
- Azure CLI app login: Sign in the service principal for both forward networks and the customer tenant using the
below command (The sign in to Forward Networks tenant is required to allow the service principal to fetch the details
of the base image to deploy). Replace the Customer-Tenant-ID with the tenant in which the VM will be deployed.
-
For AzureCloud:
# Switch cli to use AzureCloud.
az cloud set --name AzureCloud

# Clear all the previous logins.
az account clear

# login to forward networks tenant.
az login --service-principal -u 7cb27594-38c3-4483-b12a-84c23e1882f5 \
    -p b5I8Q~HgLz-WLrjnBR4amjp03b2KEroI6P65gcGw \
    --tenant 52983c8d-6060-463f-b617-79873d1f756c

# login to Customer tenant.
az login --service-principal -u 7cb27594-38c3-4483-b12a-84c23e1882f5 \
    -p b5I8Q~HgLz-WLrjnBR4amjp03b2KEroI6P65gcGw \
--tenant <Customer-Tenant-ID> -
For AzureUSGovernment:
# Switch cli to use gov cloud.
az cloud set --name AzureUSGovernment

# Clear all the previous logins.
az account clear

# login to forward networks tenant.
az login --service-principal -u d64e7224-74e0-4e64-86ab-839cfa9d43b4 \
    -p v4Z.b6yPX-0x4_jQ~j3BJ9ZVKB2P2C~eyv \
    --tenant 891bb8d7-eb57-4d95-bc10-0b1b48f6f9b2

# login to Customer tenant.
az login --service-principal -u d64e7224-74e0-4e64-86ab-839cfa9d43b4 \
    -p v4Z.b6yPX-0x4_jQ~j3BJ9ZVKB2P2C~eyv \
    --tenant <Customer-Tenant-ID>
-
Visit Forward Software Central to get the Image IDs. These Image IDs will be used in the next step to provision the VM (or multiple VMs).
Make sure to also obtain the Forward License required to run Forward Enterprise post installation. The license is needed to collect and model the network infrastructure.
Provision Azure Virtual Machines
Provison one or more Azure Virtual Machines using the image IDs obtained in the previous step. This can be done from Azure CLI or Azure Cloud Shell using the following command:
az vm create \
  --resource-group "< Resource Group to deploy >" \
  --name "< Name of the VM >" \
  --image "< Image ID >" \
  --admin-username forward \
  --admin-password "< Admin Password >" \
  --os-disk-size-gb "< Disk Size >" \
  --size "< VM_Size >"  \
  --location "< VM Region >"
Installation
Log in to a VM that will be one of the primary nodes via SSH, using these default credentials:
- Username:
forward - Password:
changeme
Change the password or add an SSH key and disable password-based logins.
Base Installation
Two subnets are needed for operating the cluster. The fwd-cluster utility will attempt to default to 100.70.0.0/21 and
100.64.0.0/21. If you want to manually pick the subnets to be used, ensure that the pod/service CIDR range is larger
than or equal to /22, as each node in the cluster requires a /24 subnet. This ensures sufficient IP addresses for the
pods running on each node, run the following commands to configure pod/service CIDR after running the fwd-cluster
utility, for example:
fwd-cluster
Forward Cluster> set pod CIDR 10.27.0.0/16
Forward Cluster> set service CIDR 10.16.0.0/16
Where 10.27.0.0/16 and 10.16.0.0/16 are respectively the pod subnet and the service subnet.
Recommended node types based on the cluster size
Note that 2 node clusters are not supported. The number of primary nodes in a multi node cluster must be equal to 3 to ensure high availability.
| Total Number of Nodes in the Cluster | Primaries | Workers |
|---|---|---|
| 1 | 1 | 0 |
| 2 (not supported) | -- | -- |
| 3 | 3 | 0 |
| 4 | 3 | 1 |
| 5 | 3 | 2 |
| n (6 or more) | 3 | n-3 |
Steps for provisioning a single-node cluster:
-
Launch the
fwd-clusterutility and follow the steps shown below, to create a single-node cluster (installation takes a few minutes):fwd-cluster
Forward Cluster> add <node_ip> primary [hostname]
Forward Cluster> applyEnsure that the
hostnameprovided is unique -
The installation was successfull if you see this message at the end:
Base installation is complete. -
You may now exit the
fwd-clusterutility using theexitcommand.
Steps for provisioning a multi-node cluster:
For a multi-node cluster the steps for creating a primary node are the same as single-node cluster. We can follow the same steps to add additional primary and worker nodes as shown below.
-
To add a primary node to the cluster, please launch the
fwd-clusterutility and run the commandaddas shown below:fwd-cluster
Forward Cluster> add <node_ip> primary [hostname]Ensure that the
hostnameprovided is unique. In addition, it is important to ensure that number of primaries added adhere to the recommendations in the table mentioned above -
To add a worker node, please run the following steps:
Forward Cluster> add <node_ip> worker [hostname]Ensure that the
hostnameprovided is unique -
[Optional] At any given point, you may verify the list of nodes added by running the command
list:Forward Cluster> list -
Once the desired number of nodes are added, provision the cluster by running the command
apply:Forward Cluster> apply -
The installation was successfull if you see this message at the end.
Base installation is complete. -
You can now exit the
fwd-clusterutility using theexitcommand.
App Installation
Install Forward application using the commands shown below using the fwd-cluster utility.
Forward Cluster> app install [included | path to forward-app-yy.mm.x-bb.package]
Running the command app install included installs default package that comes with the base.
Running the command app install alone will trigger a prompt asking whether to install the default app version. You may
type "yes" and press ENTER to install the default package that comes with the base or "no" to provide the path to the
desired forward-app-yy.mm.x-bb.package.
Running the command app install (path to forward-app-yy.mm.x-bb.package) will install forward package provided at the
path.
Browser Access
Before accessing the application with a web browser, please note the following:
Upon the first login, the system will ask to change the password. Be ready to store it in a safe place. The user will be able to configure external authentication mechanisms like LDAP, SSO and TACACS after the first login.
It is now time to access the browser and log into the Forward UI using the following default credentials (the system will ask to change the password):
- username:
admin - password:
forward
Set the TLS certificate
By default, the server uses a TLS certificate provided by Forward Networks.
Upload your own trusted certificate in the Settings --> System -->Org Preferences page to eliminate browser security warnings.
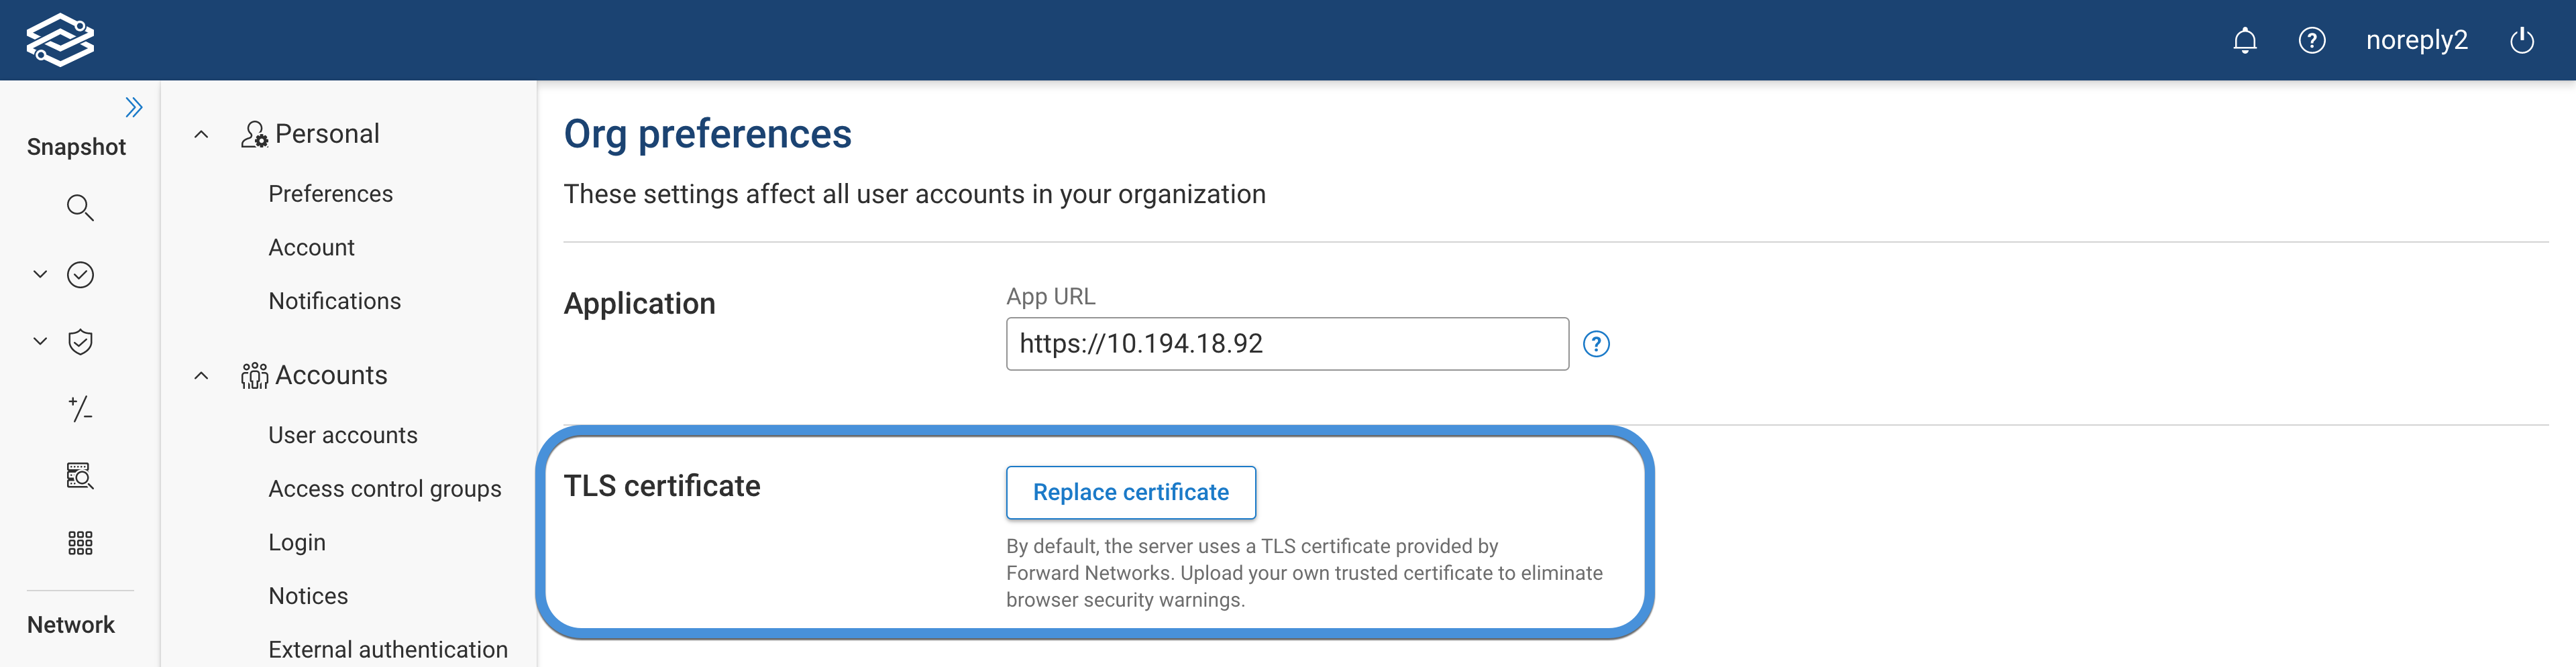
The server will be restarted after the certificate is uploaded, and may be unavailable for up to 5 minutes.
Optional: Set up load balancing
If you have installed 3 primary nodes, the control plane of the cluster is already running in HA mode. Assuming the IP address of these nodes are primary1-ip, primary2-ip and primary3-ip, you can reach the application through any of the following addresses:
https://primary1-ip/
https://primary2-ip/
https://primary3-ip/
However, if users use one of these addresses and that node is down, they will see failures. To have proper HA, it is better to use a load balancing option which has health checks. To do that you need a reverse proxy which forwards requests to port 443 to any of the healthy nodes in the cluster.
The following methods can be used to perform health checks:
- TCP health checks on port
443. - HTTP health checks that issue
GET /pingand expect 200 status code.
Configure License
Please follow the instructions here for configuring the license.