Install on KVM Hypervisor
Brief System Overview
Forward Appliance can be installed on one or more nodes (in this document, a node refers to a VM). You can start with a single node and later seamlessly extend the cluster to multiple nodes.
- Primary nodes: Run the cluster control plane in addition to performing modeling. The first three deployed nodes must be primary nodes.
- Worker nodes: Additional nodes added solely for scaling modeling capacity.
Deployment Recommendations
- Single node: Development, testing, and small environments.
- 3 primary nodes: Minimum for high availability (provides quorum).
- 3 primary nodes + worker nodes: Production deployments for larger networks with higher processing and availability requirements.
A multi-node deployment provides additional value and flexibility:
- Scale-out -- When the cluster spans 3 or more nodes, processing is faster and able to use multiple executors. Similarly, search throughput scales with each added node.
- High Availability (HA) -- When a cluster is installed with 3 primary nodes, both system and application services are configured to handle node-level failures automatically. As long as no more than a single node goes down at a time, the Forward application remains available without administrator involvement (although there may be a transient loss of availability while node failure is detected and components are restored on healthy nodes).
- Flexible Resource Allocation -- Users can configure resources across multiple nodes to maximize network scale, minimize snapshot processing time, or fully isolate different tasks such as processing, search, and collection.
Host Requirements
This section describes the requirements of the host that runs KVM and can host one or more VMs that can be used in a Forward deployment. This host can be a Bare Metal server or a VM with virtualization flags enabled. Python 3.9 or a newer version and KVM server tools should also be installed on it. The following is an example of how to install these packages.
RHEL / Oracle Linux / Fedora (dnf):
sudo dnf update -y
sudo dnf module install -y virt
sudo dnf install -y virt-install virt-viewer python39
sudo systemctl enable libvirtd
sudo systemctl start libvirtd
Ubuntu / Debian (apt):
sudo apt update
sudo apt install -y qemu-kvm libvirt-daemon-system libvirt-clients virtinst virt-viewer python3
sudo systemctl enable libvirtd
sudo systemctl start libvirtd
You can use the following command to verify the host can virtualize VMs:
sudo virt-host-validate qemu
The following image shows a host that can run VMs:
 It's OK to not have IOMMU support as we are not
passing through any physical devices.
It's OK to not have IOMMU support as we are not
passing through any physical devices.
Resource Requirements
Depending on the size and complexity of the networks to be modeled by the platform, we provide different recommendations on number of cluster nodes and hardware requirements of each of those nodes:
| Minimum | Recommended | |||||||
|---|---|---|---|---|---|---|---|---|
| Network Elements | Number of Nodes | Node vCPU | Node RAM | Disk Size* | Number of Nodes | Node vCPU | Node RAM | Disk Size* |
| 1k | 1 | 16 | 128 GB | 150 GB | 1 | 32 | 256 GB | 400 GB |
| 5k | 3 | 32 | 128 GB | 300 GB | 3 or more | 64 | 256 GB | 600 GB |
| 15k | 3** | 32 | 256 GB | 400 GB | 5 or more | 64 | 512 GB | 800 GB |
| 45k+ | 5** | 32 | 256 GB | 1 TB | 7 or more | 64 | 512 GB | 2 TB |
- * Minimum of 3000 write IOPs is required. Minimum of 128MB/s throughput is recommended. NVMe SSD is highly recommended.
- ** Isolated Mode is recommended to ensure full node memory is available for each worker. For more information, see the Resource Allocation page.
Larger networks require more memory to be able to model them. Total vCPUs (across nodes) determine processing speed and search throughput. At least 3 nodes are required for HA support.
Connectivity Requirements
Management Network
Each node requires:
- A static IP address (DHCP is supported but not recommended for production)
- Network connectivity to a DNS server, NTP server, and log server (if configured)
- Outbound HTTPS (443) for updates and license validation
- Inbound HTTPS (443) if remote collectors are used
External and Intra-node Connectivity
Each Forward Cluster deployment requires cluster-incoming, cluster-outgoing, cluster-internal, and node-internal connectivity.
It is simpler to allow unrestricted connectivity between cluster nodes. If unrestricted connectivity is not an option, the list of specific ports is noted below. The list below assumes any cluster node can be a primary or a worker node. For additional details about each port and its usage, please contact your Forward Networks representative.
| Protocol | L4 Dest Port | Service | Direction |
|---|---|---|---|
| TCP | 22 | Node Management (SSH) | external ⇒ any cluster node |
| TCP | 80 | HTTP (redirects to HTTPS) | external ⇒ any cluster node |
| TCP | 443 | Web Frontend/API | external ⇒ any cluster node |
| TCP | 30000 | File Transfer (Upload/Download) | external ⇒ any cluster node |
| TCP | 22 | Cluster Config Sync | any cluster node ⇔ any cluster node |
| TCP | 2380 | Controller State Sync | any cluster node ⇔ any cluster node |
| TCP | 6443 | Cluster API Service | any cluster node ⇔ any cluster node |
| TCP | 8132 | Cluster Control | any cluster node ⇔ any cluster node |
| TCP | 9443 | Cluster Control | any cluster node ⇔ any cluster node |
| TCP | 10250 | Cluster Status | any cluster node ⇔ any cluster node |
| UDP | 4789 | Cluster Networking | any cluster node ⇔ any cluster node |
Cluster Network
The cluster uses a dedicated internal network for inter-node communication. The following requirements apply:
- Low latency: less than 10ms RTT between nodes recommended
- Minimum 1 Gbps bandwidth; 10 Gbps recommended for production
- Two non-overlapping CIDR ranges for pod and service networks. Pod CIDR must be /24 or larger (each node consumes a /24 from this range; /21 or larger is recommended for multi-node clusters). Service CIDR must be /26 or larger; /24 or larger is recommended.
- If not specified, default subnets of 100.70.0.0/21 (pods) and 100.64.0.0/21 (services) are used
- These ranges are not directly accessible or routable from outside the cluster and are used for inter-pod communication, load balancing, and service discovery
It is recommended that all ports are open on the intra-cluster network. If your corporate policy requires port restriction on intra-cluster networks, contact your Forward Networks representative for assistance.
Connectivity to Network Infrastructure
Connectivity from the Forward cluster to network devices or external services is required for snapshot collection, DNS lookups, access to SMTP server, etc. The list of specific ports is noted below. For additional details about each port and its usage, please contact your Forward Networks representative.
Forward services may migrate between cluster nodes due to high availability (HA) failover, node maintenance, resource rebalancing, or other operational reasons. To ensure uninterrupted connectivity, configure firewall rules to allow outbound traffic from all nodes in the cluster to the destinations.
| Protocol | L4 Dest Port | Service | Direction | Note |
|---|---|---|---|---|
| UDP | 53 | Name Resolution | any cluster node ⇒ DNS | |
| TCP | 22 | SSH Terminal | any cluster node ⇒ network device | |
| TCP | 23 | TELNET Terminal | any cluster node ⇒ network device | Only if required |
| TCP | 179 | BGP RR Collection | any cluster node ⇒ network device | Only if needed |
| TCP | configurable | BGP BMP Collection | any cluster node ⇒ network device | Only if needed |
| TCP | 443 | Cloud Collection | any cluster node ⇒ network device | |
| TCP | 443 | VMware vCenter | any cluster node ⇒ vCenter | |
| TCP | configurable | Email notifications | any cluster node ⇒ SMTP relay | |
| UDP | 161, 162 | SNMP Data Access | any cluster node ⇒ network device | Only if needed |
User Application Access
| Protocol | L4 Dest Port | Service | Direction |
|---|---|---|---|
| TCP | 443 | Web Interface / SAML | user workstation ⇒ cluster |
| TCP | 389 | LDAP Authentication | cluster ⇒ LDAP server |
| TCP | 514 | Remote Syslog (TCP) | cluster ⇒ syslog server |
| UDP | 514 | Remote Syslog (UDP) | cluster ⇒ syslog server |
Network Topology Recommendations
- Use separate VLANs or network segments for management and intra-cluster traffic
- Ensure all cluster nodes can communicate with each other on the cluster network
- Use anti-affinity rules to place nodes on different physical hosts
- Configure network redundancy where possible
Hostname and IP Address Requirements
Hostnames and IP addresses of cluster nodes should not change. IP addresses must be consistent across reboots, either via static allocation, or persistent allocation with a DHCP server. A DNS server must be configured and accessible from cluster nodes for hostname resolution.
For instructions on configuring IP addresses and DNS servers, see Changing Node IP Address.
Procure the Installation Image
To procure the VM installation image, sign in to Forward Software Central and click Add new deployment. In the Create new deployment dialog, select the appropriate hypervisor, provide a Name, optionally choose a Base version, and create the deployment. From the deployment row, click the download icon (Download installation software) and download the Base + Forward App package.
The Forward Cluster image consists of two components:
Forward Enterprise Base: The base component is a stripped-down and hardened Linux image that has been optimized to run the Forward Enterprise application. The Base component also contains the required packages and dependencies to run the cluster orchestration software. The Base component is built using Oracle Linux 8.5 and is updated infrequently.
Forward Enterprise Application: This component contains the Forward Application. Major releases of the Forward Application are published monthly and typically there are several minor releases in each month for bug fixes.
The file name is in the following format forward-base-{BASE_VERSION}-app-{APP_VERSION}-kvm.tar.gz, where
BASE_VERSIONhasvN-bMformat (e.g.v9-b4) wherevNshows the major version andbMshows the build number in that version.APP_VERSIONhasyy.m.x-bbformat (e.g.22.8.1-03)yyare the last two digits of the yearmis the month in which the major release was builtxis the minor release number (0 indicates the major release)bbis the build number
Provision a VM
Download / Copy the Forward KVM image to your KVM host. As mentioned in the previous section, this file has the
following format: forward-base-{BASE_VERSION}-app-{APP_VERSION}-kvm.tar.gz.
Then on the KVM host run the following (replace <FORWARD_KVM_IMAGE> with the downloaded file name):
tar xzvf <FORWARD_KVM_IMAGE>
./kvm_installer.py
The above command will create and start a VM for you that can be used for running Forward Enterprise.
Installation
Console Access
Open the VM console from your virtualization platform, or open a terminal and SSH into the VM using the IP address configured during provisioning.
Log in with the default credentials:
- Username:
forward - Password:
changeme
Change the default password before using the appliance in production via Security > SSH access in the TUI.
After login, the system displays the Forward Cluster Text User Interface (TUI).
Forward Cluster TUI
The TUI provides a menu-driven interface for all node, cluster, and application management. Use the arrow keys to navigate between menu items, Tab to move between interface elements, and Enter to select. Mouse navigation may also be available depending on your terminal. Press Esc to go back or cancel.
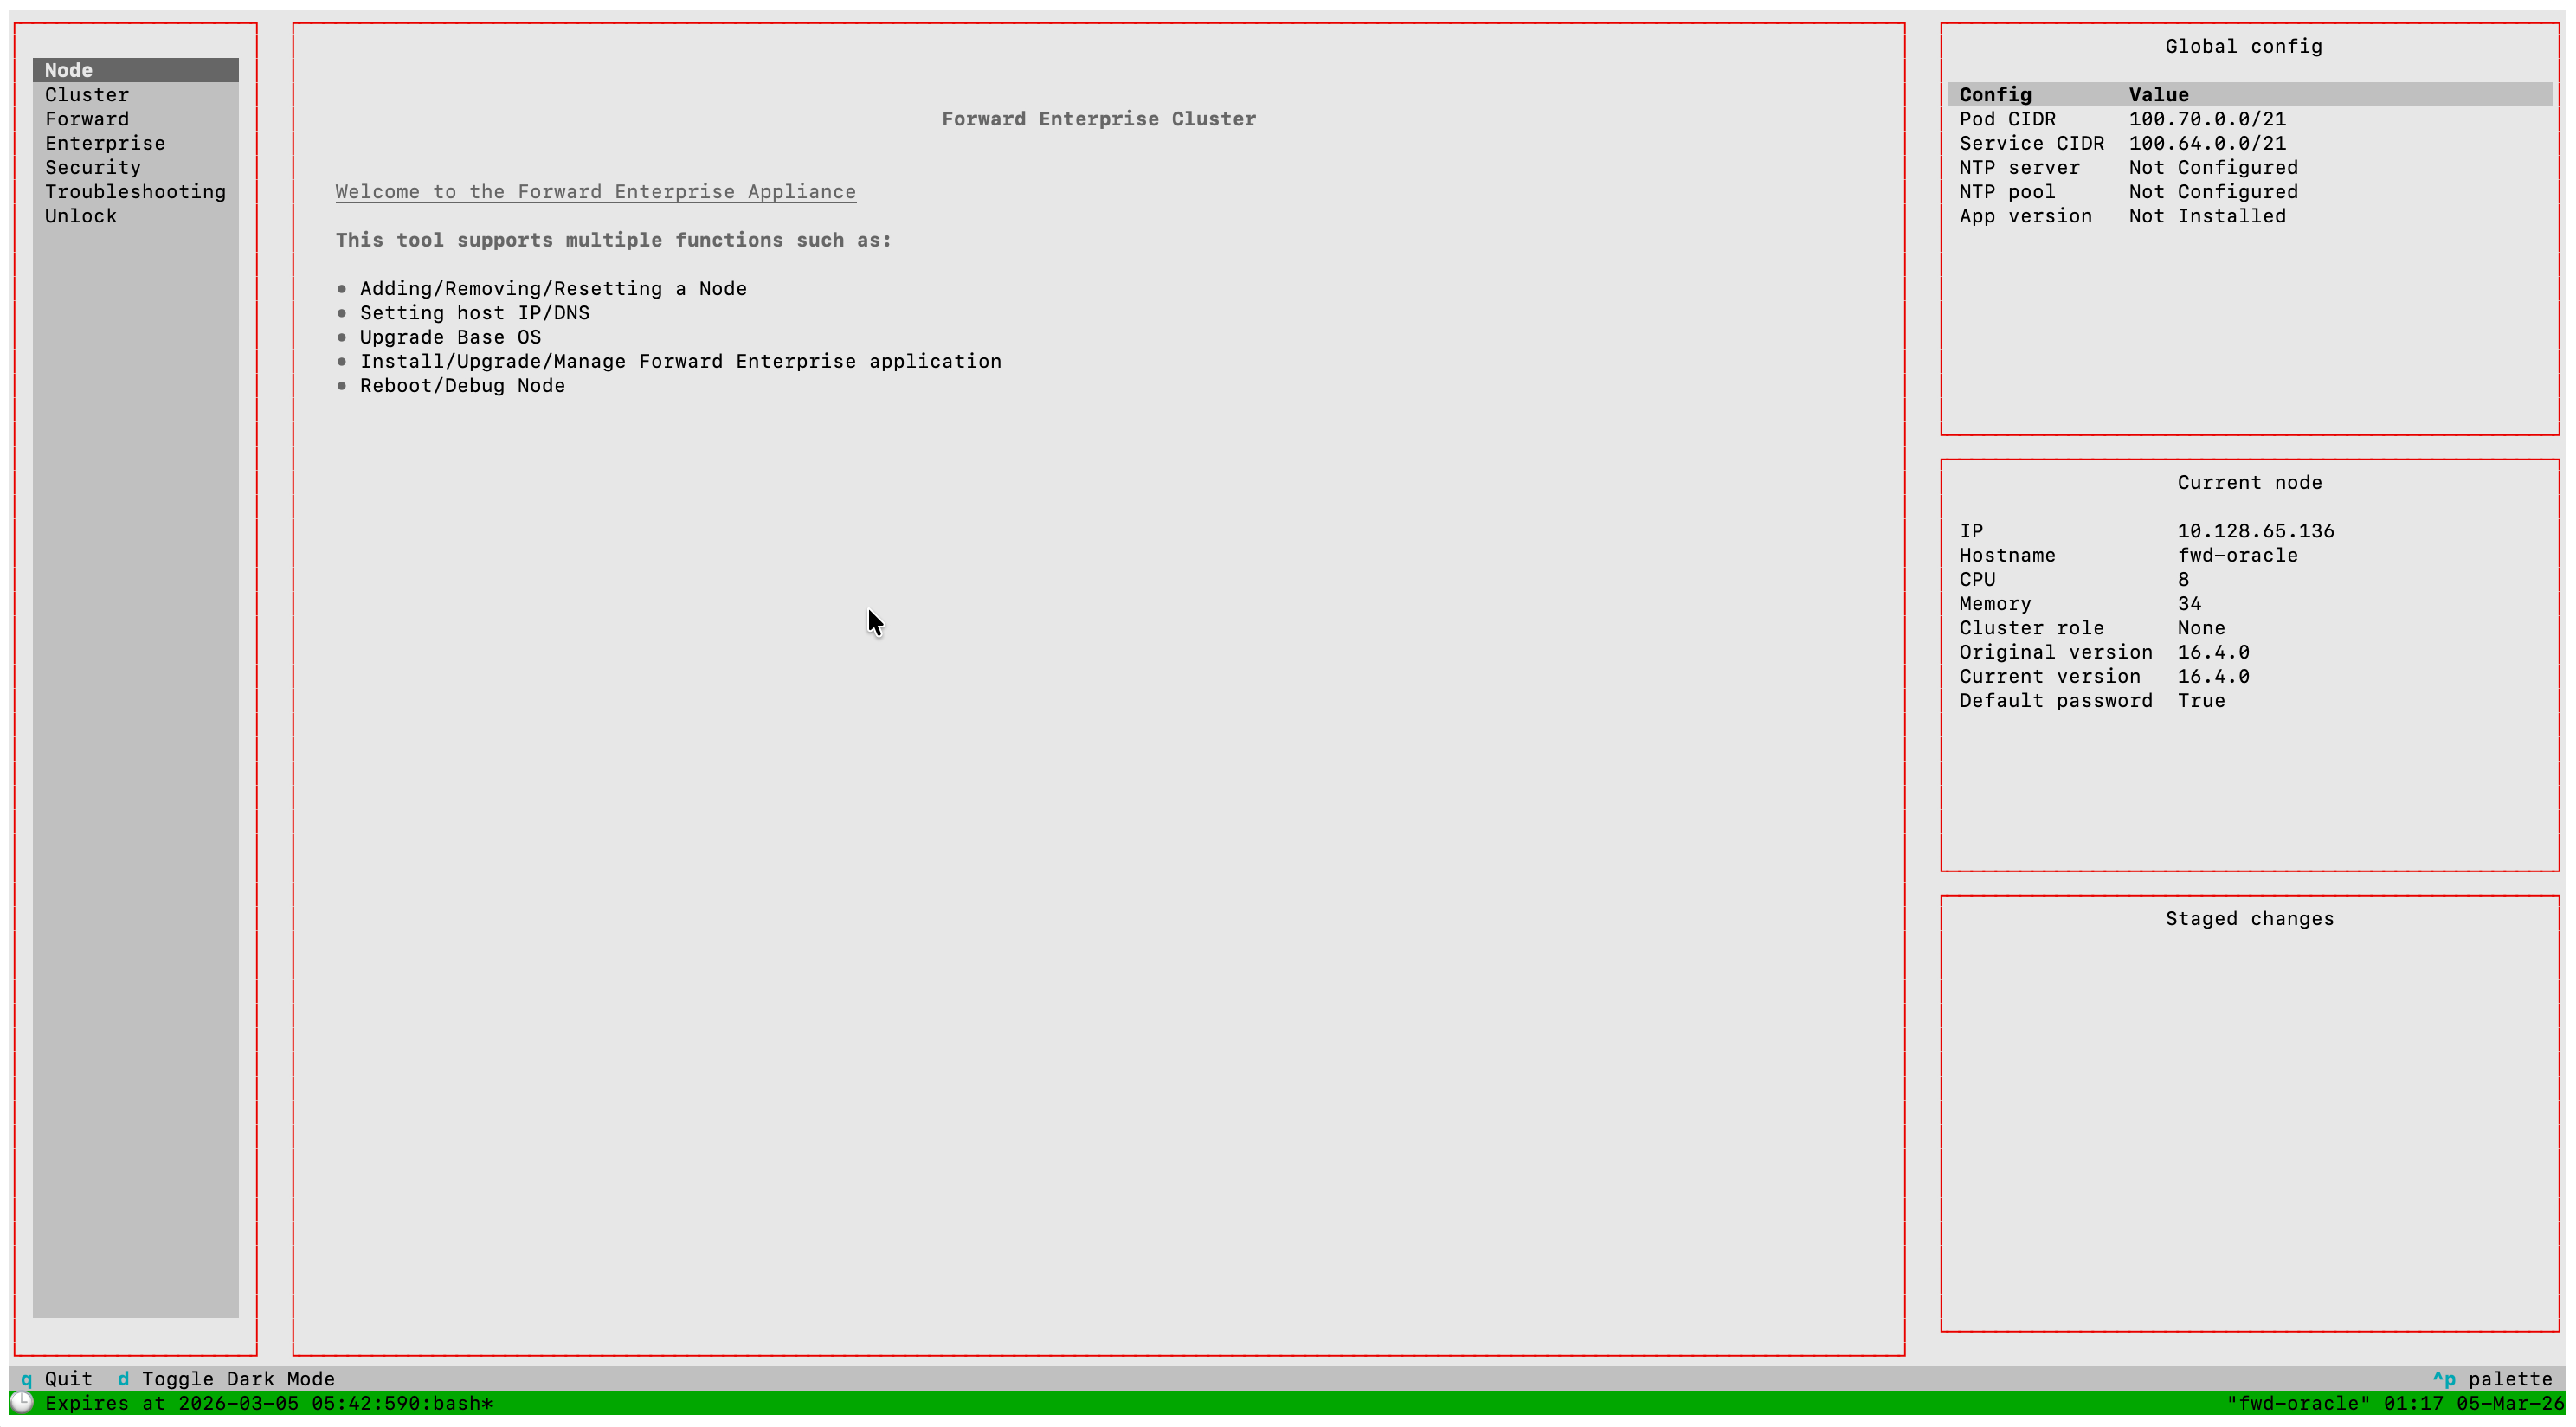
TUI Main Menu:
| Menu Item | Description |
|---|---|
| Node | View and configure the local node |
| Cluster | Configure and manage the cluster |
| Forward Enterprise | Install and manage Forward Enterprise |
| Security | Password, SSH keys, bastion host, syslog, TLS |
| Troubleshooting | View pods, logs, diagnostics, and connectivity tools |
Press D to toggle between dark and light display modes. Press Q or Ctrl+C to terminate the SSH connection.
For the full TUI layout and navigation reference, see the TUI Reference.
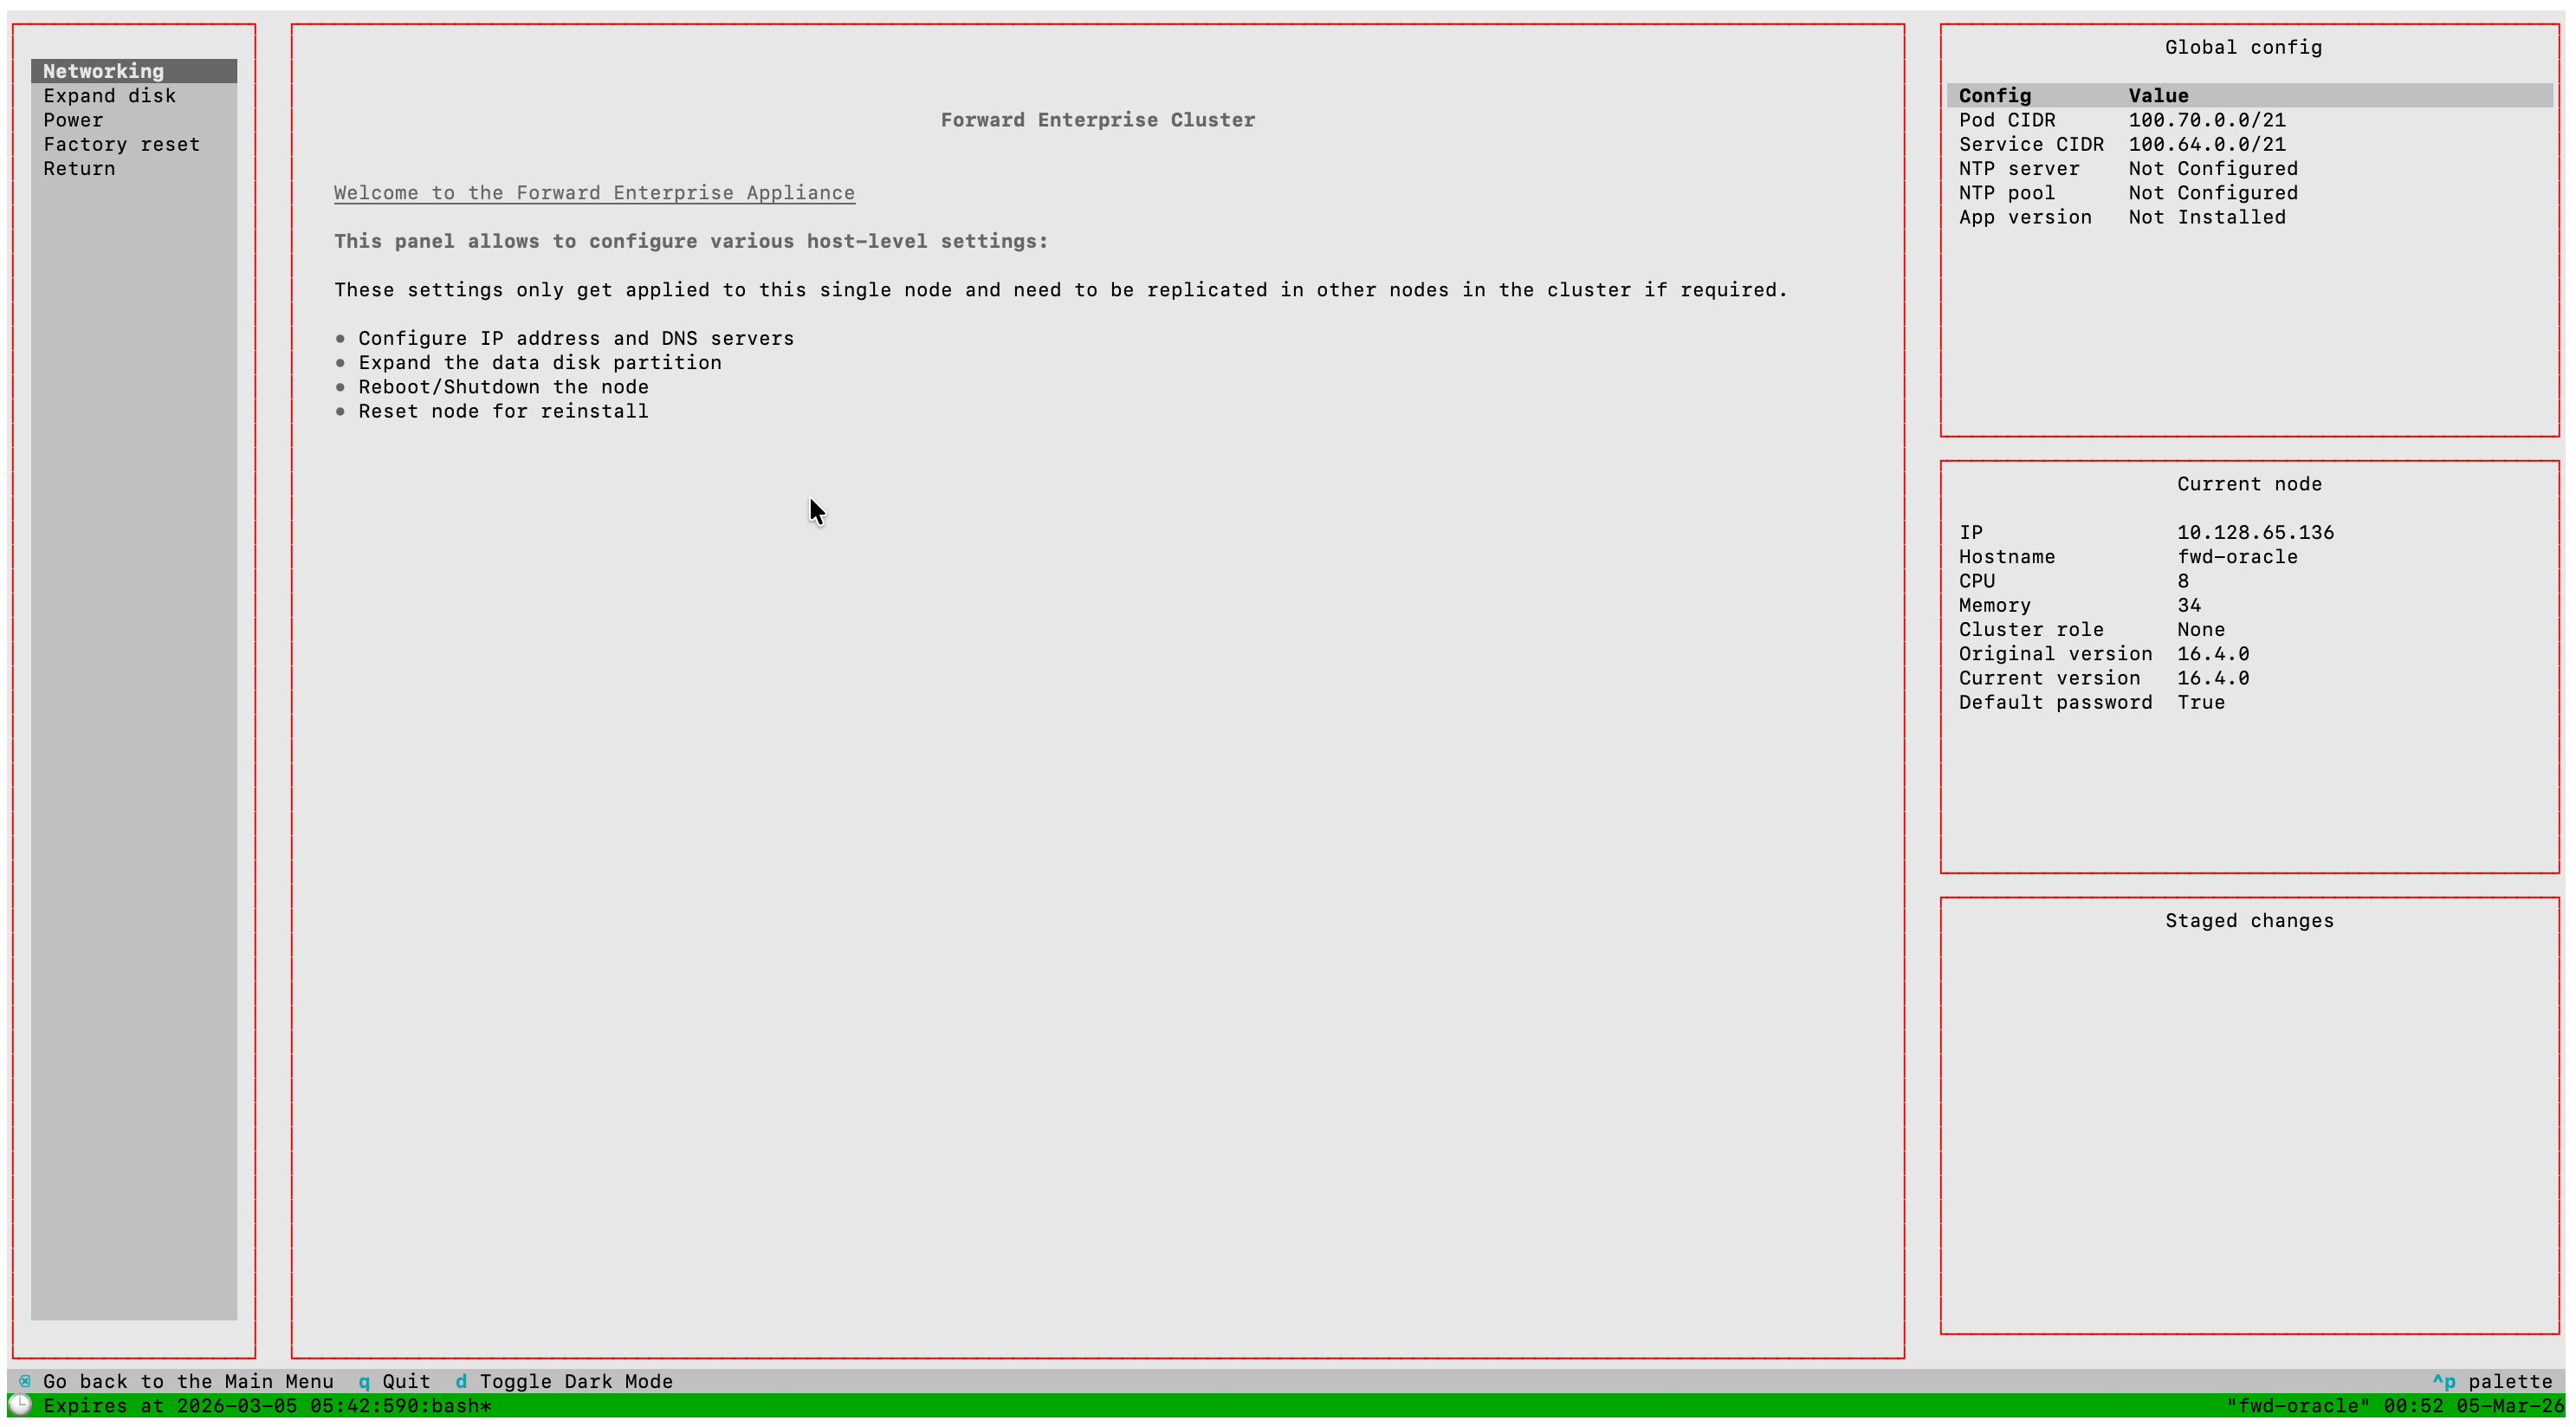
Node Configuration
- Select Node from the main menu.
- Verify the node Name and Management IP are configured correctly.
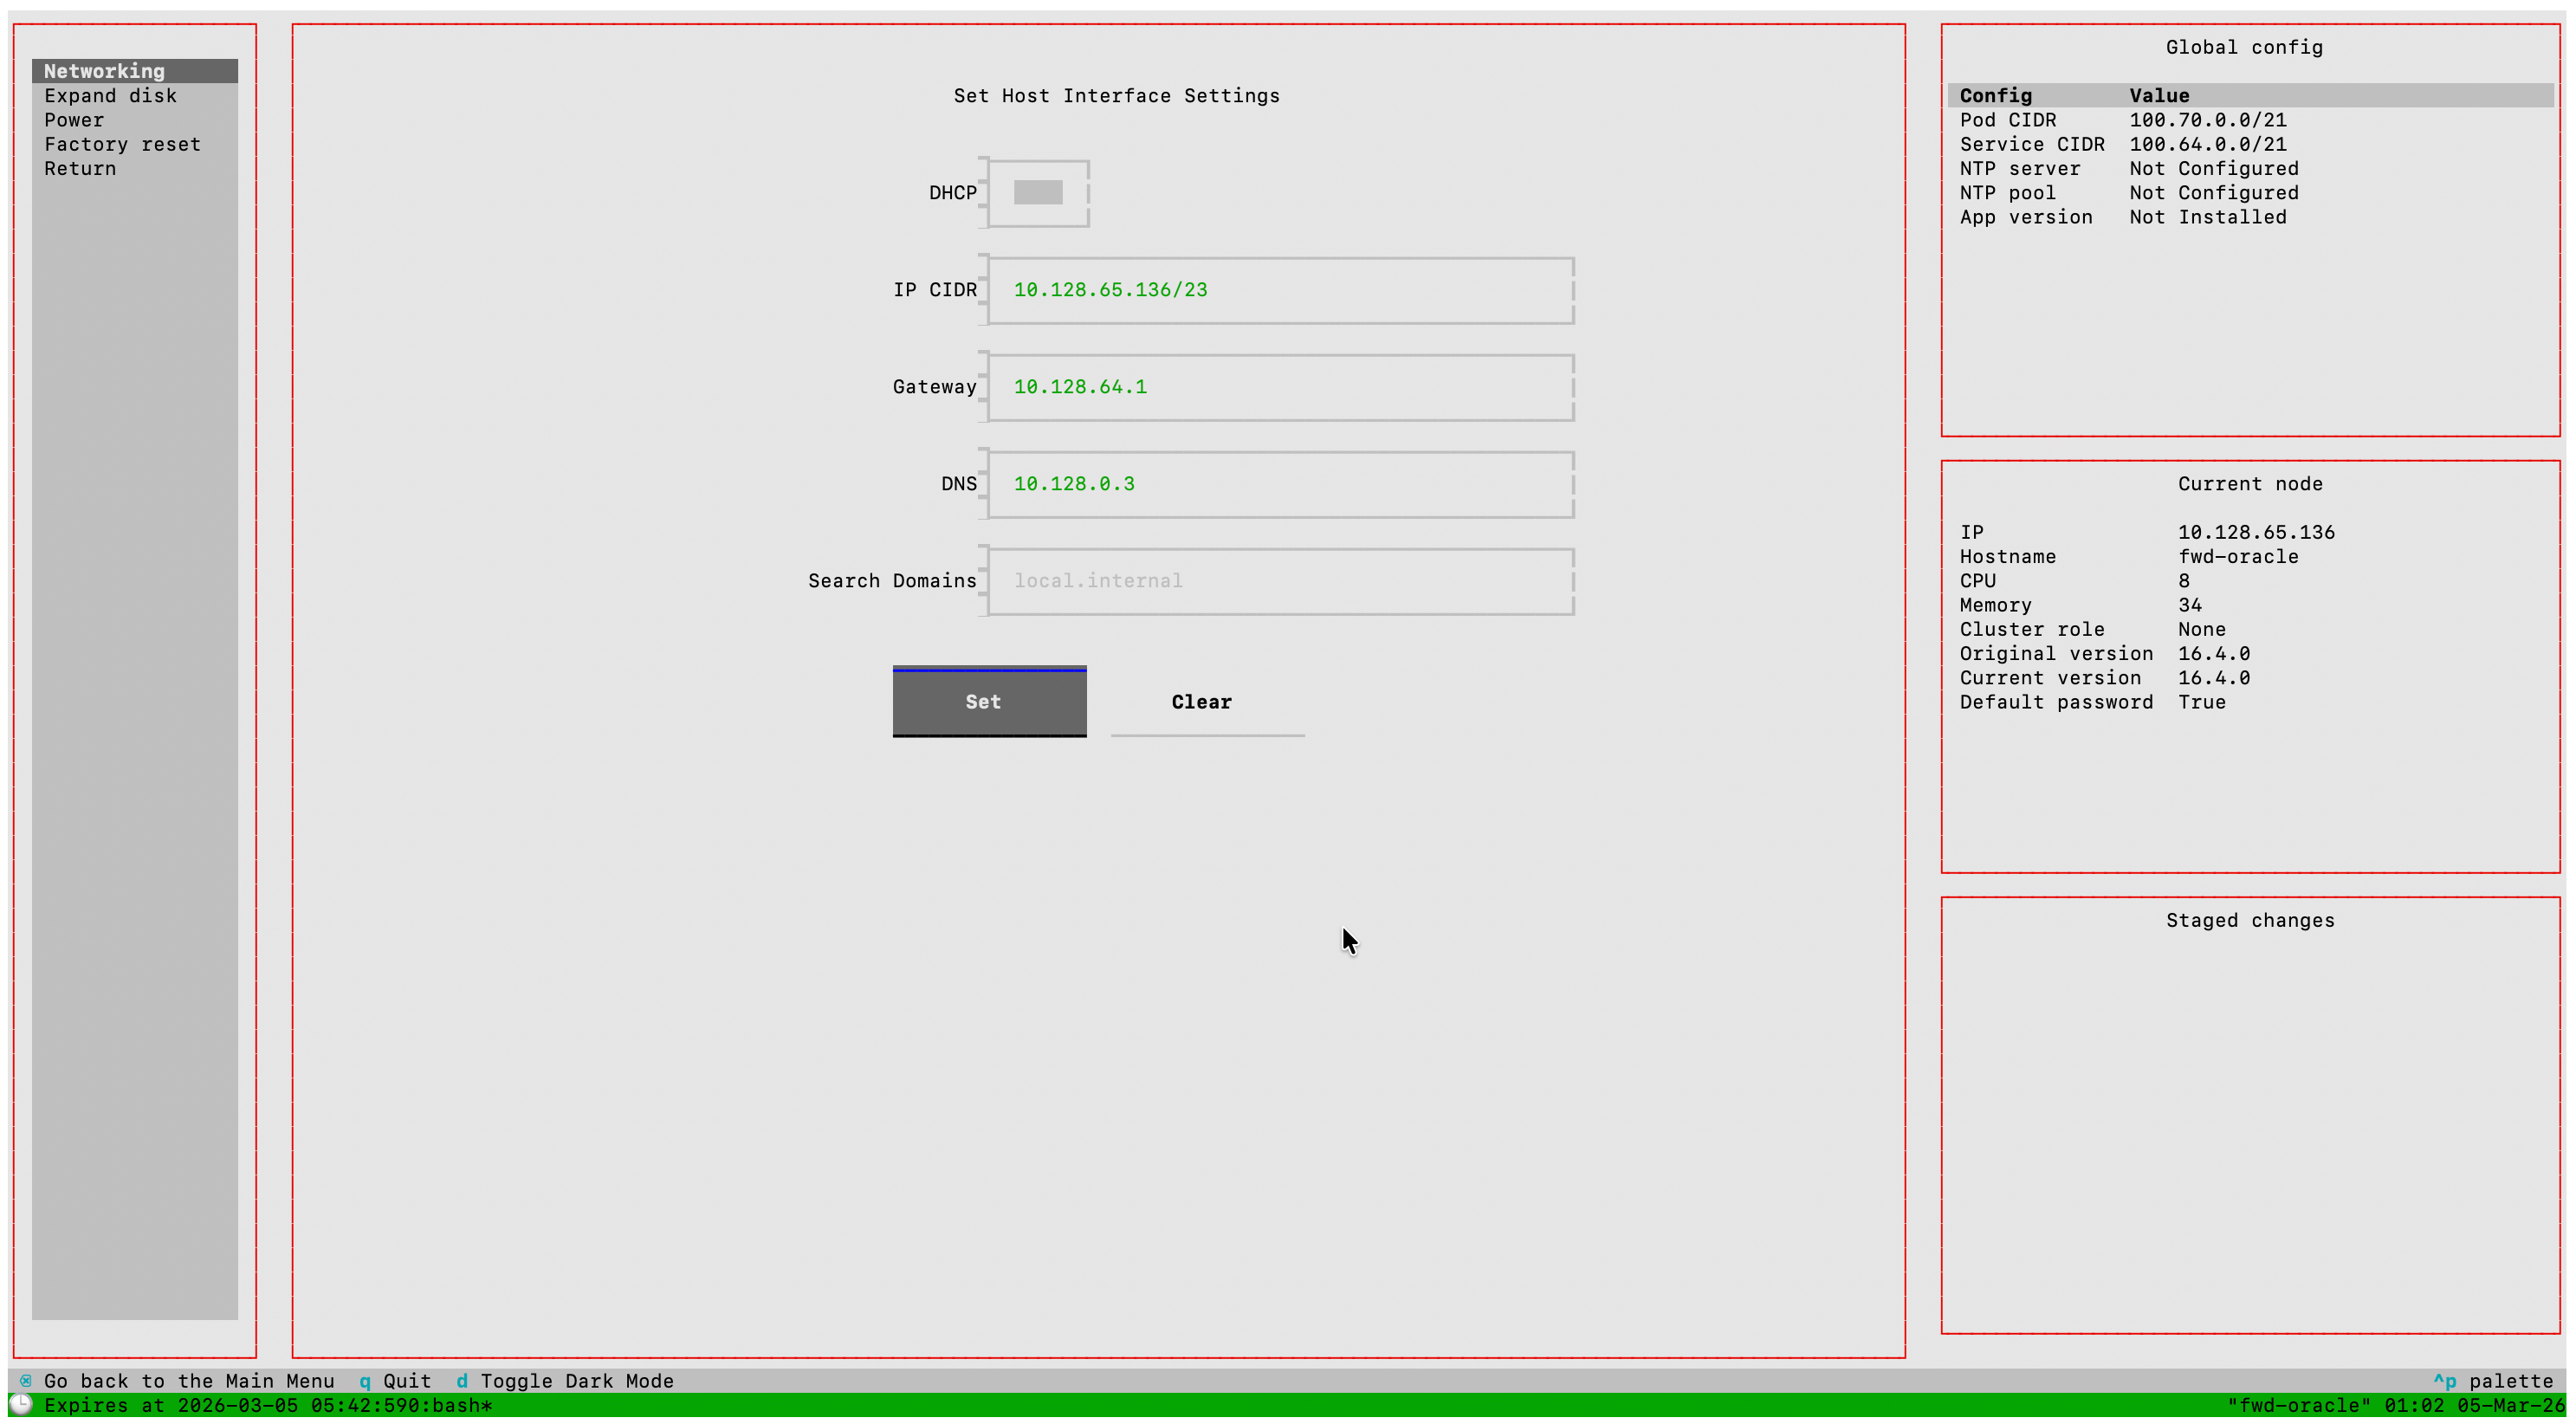
Multiple DNS servers can be specified as comma-separated values.
Cluster Configuration and Roll-out
Recommended node types based on the cluster size
2-node clusters are not supported. The number of primary nodes in a multi-node cluster must be 3 to ensure high availability.
| Total Number of Nodes in the Cluster | Primaries | Workers |
|---|---|---|
| 1 | 1 | 0 |
| 2 (not supported) | -- | -- |
| 3 | 3 | 0 |
| 4 | 3 | 1 |
| 5 | 3 | 2 |
| n (6 or more) | 3 | n-3 |
Configure Cluster Network
- Select Cluster from the main menu.
- Select Set CIDRs to configure the intra-cluster network ranges.

Configure the following:
- Service CIDR: IP range for intra-cluster services (default:
100.64.0.0/21) - Pod CIDR: IP range for intra-cluster pod addressing (default:
100.70.0.0/21)
Once the cluster is installed, the Pod and Service CIDRs cannot be changed. Ensure they are correct before applying the cluster configuration.
Pod CIDR must be /24 or larger (each node consumes a /24 subnet from this range; /21 or larger is recommended for multi-node clusters). Service CIDR must be /26 or larger; /24 or larger is recommended. The configured ranges must not overlap with each other or with your management network.
If the default ranges conflict with your existing network, change them before proceeding.
Add Nodes to the Cluster
- Select Cluster > Install/Manage from the menu.
- Enter the current node's IP address and hostname to add it to the cluster.
- For each additional node, enter its IP address and hostname and select Add.
For a single-node deployment, add the node's management IP address and hostname as the only cluster member, then select Apply. No additional nodes are needed.
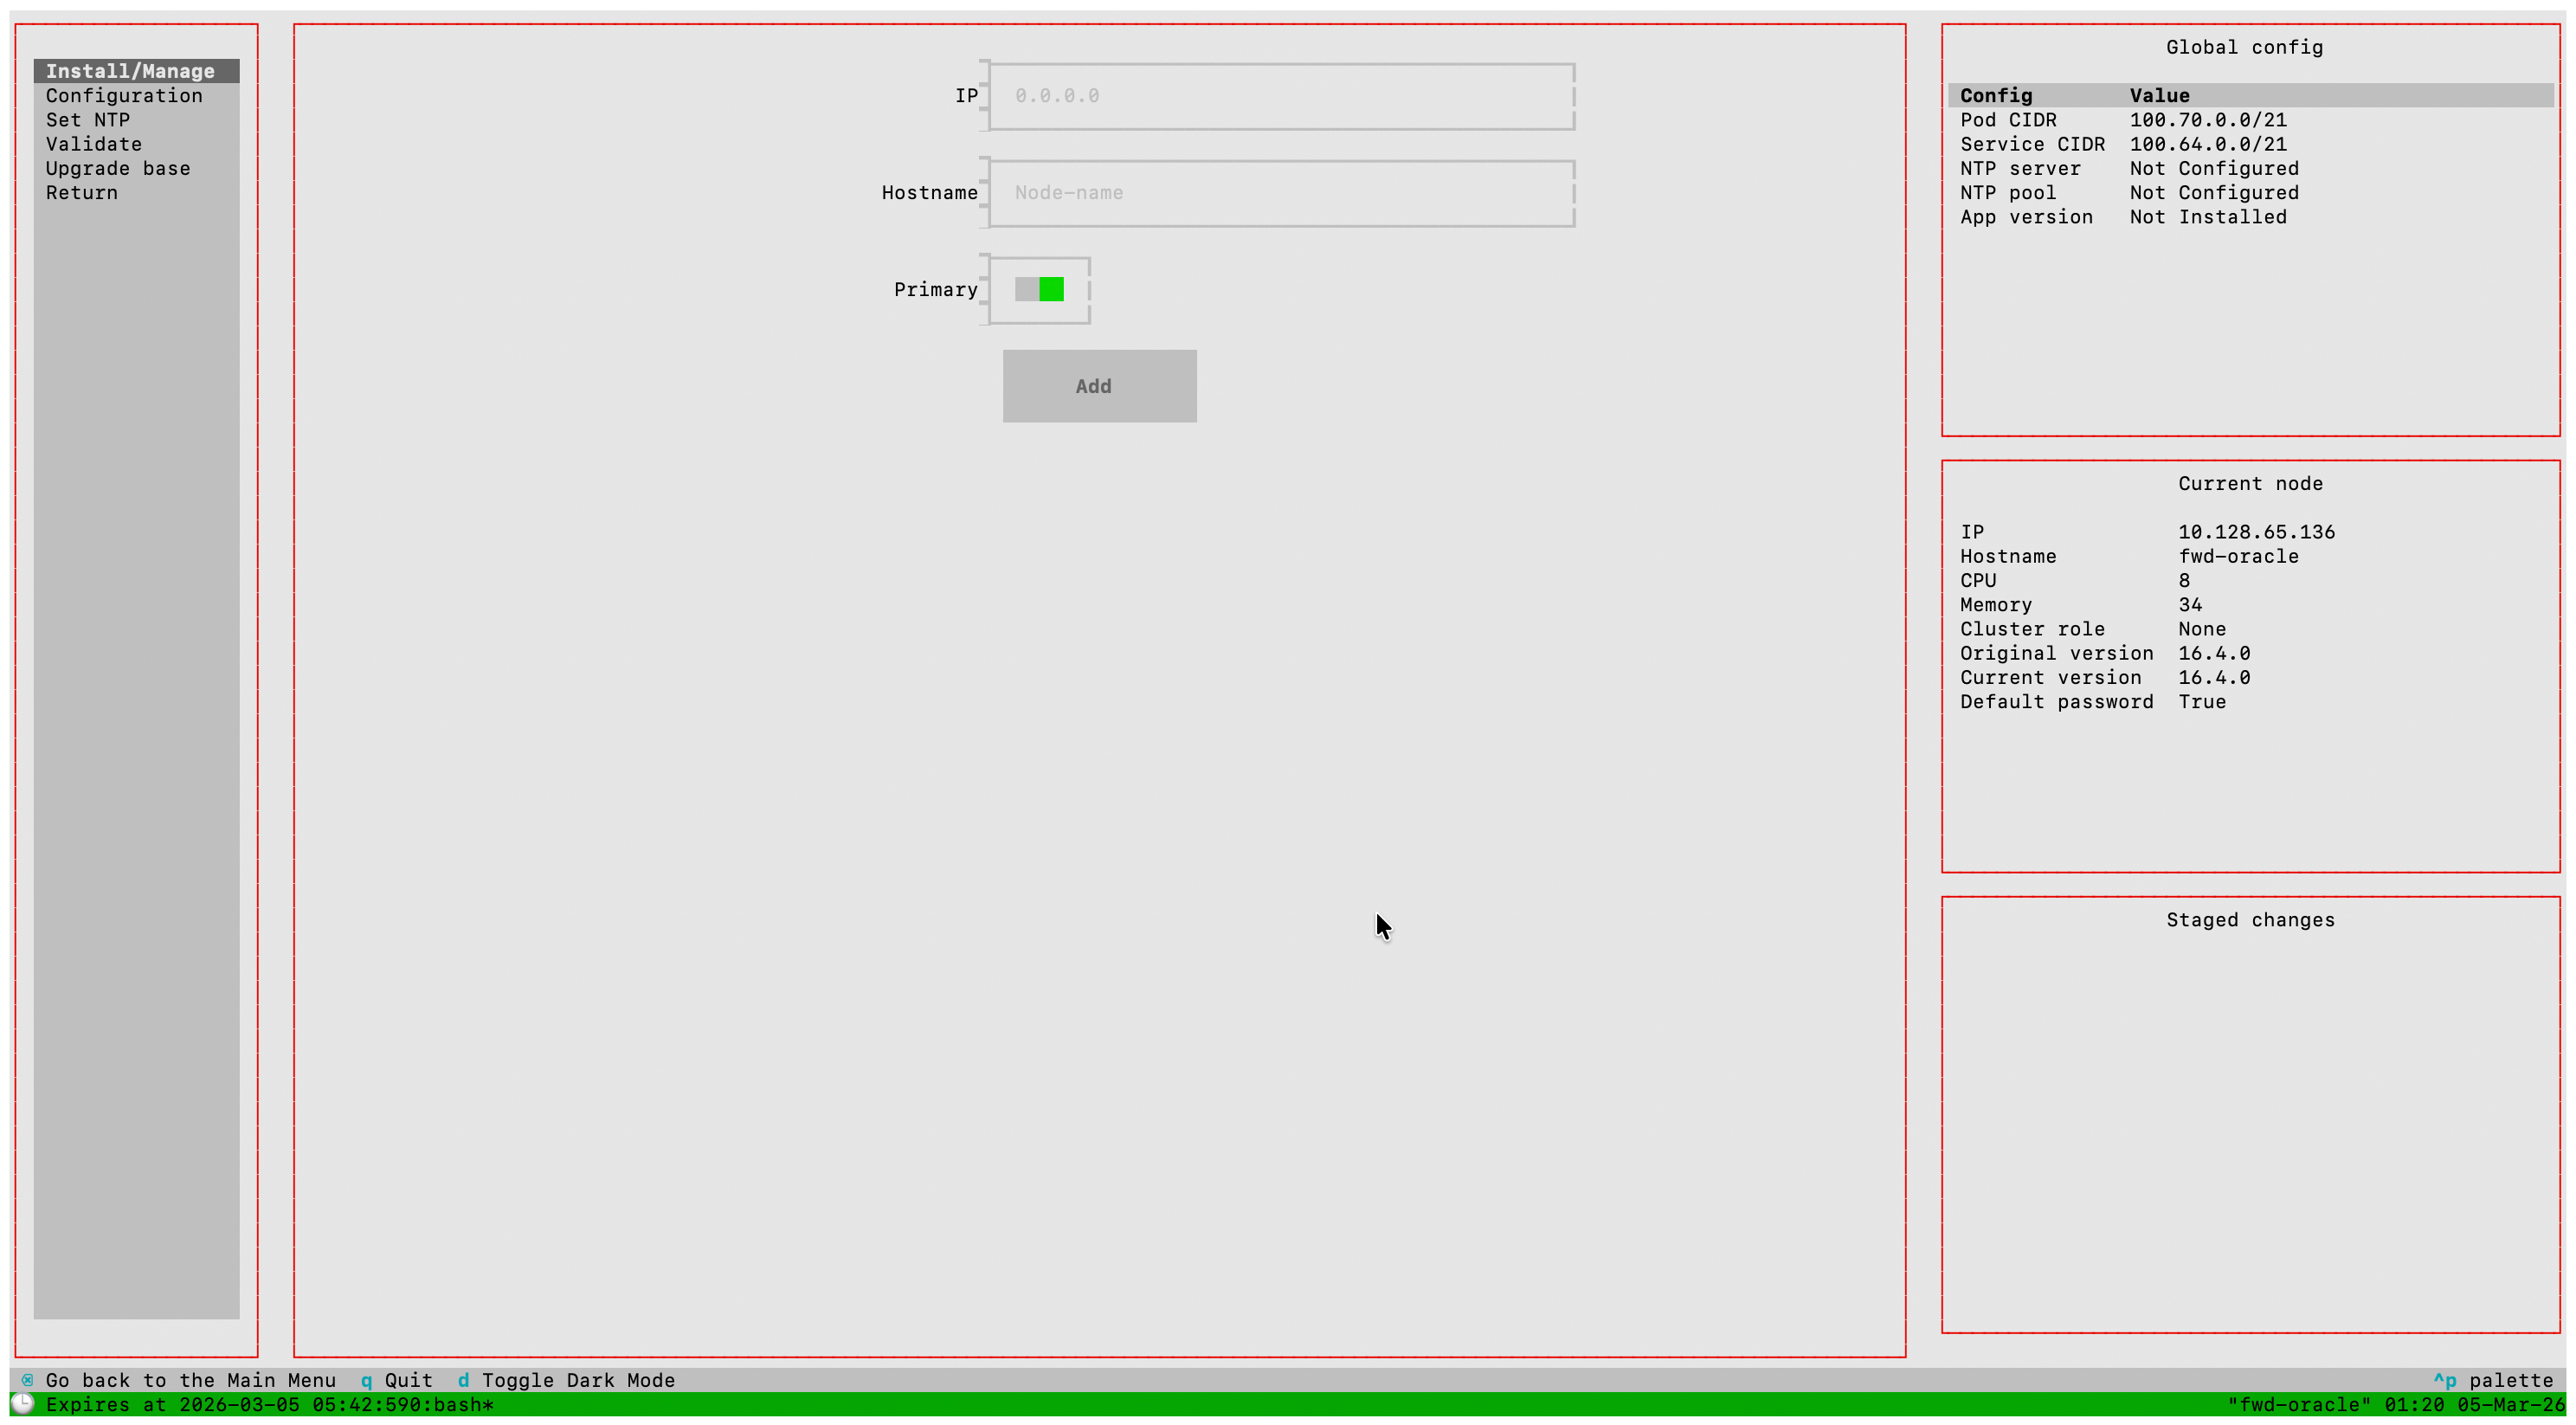
Ensure that all hostnames used in the cluster are resolvable via DNS. Each hostname must resolve to the correct IP address from all cluster nodes.
The first three nodes must be added as primary nodes for availability. Additional nodes beyond three are added as workers.
Install Cluster
Select Apply to begin cluster roll-out, or Reset to return to the configuration step.
The cluster roll-out combines the selected nodes into a unified cluster. This process takes 3--5 minutes.
Configure NTP
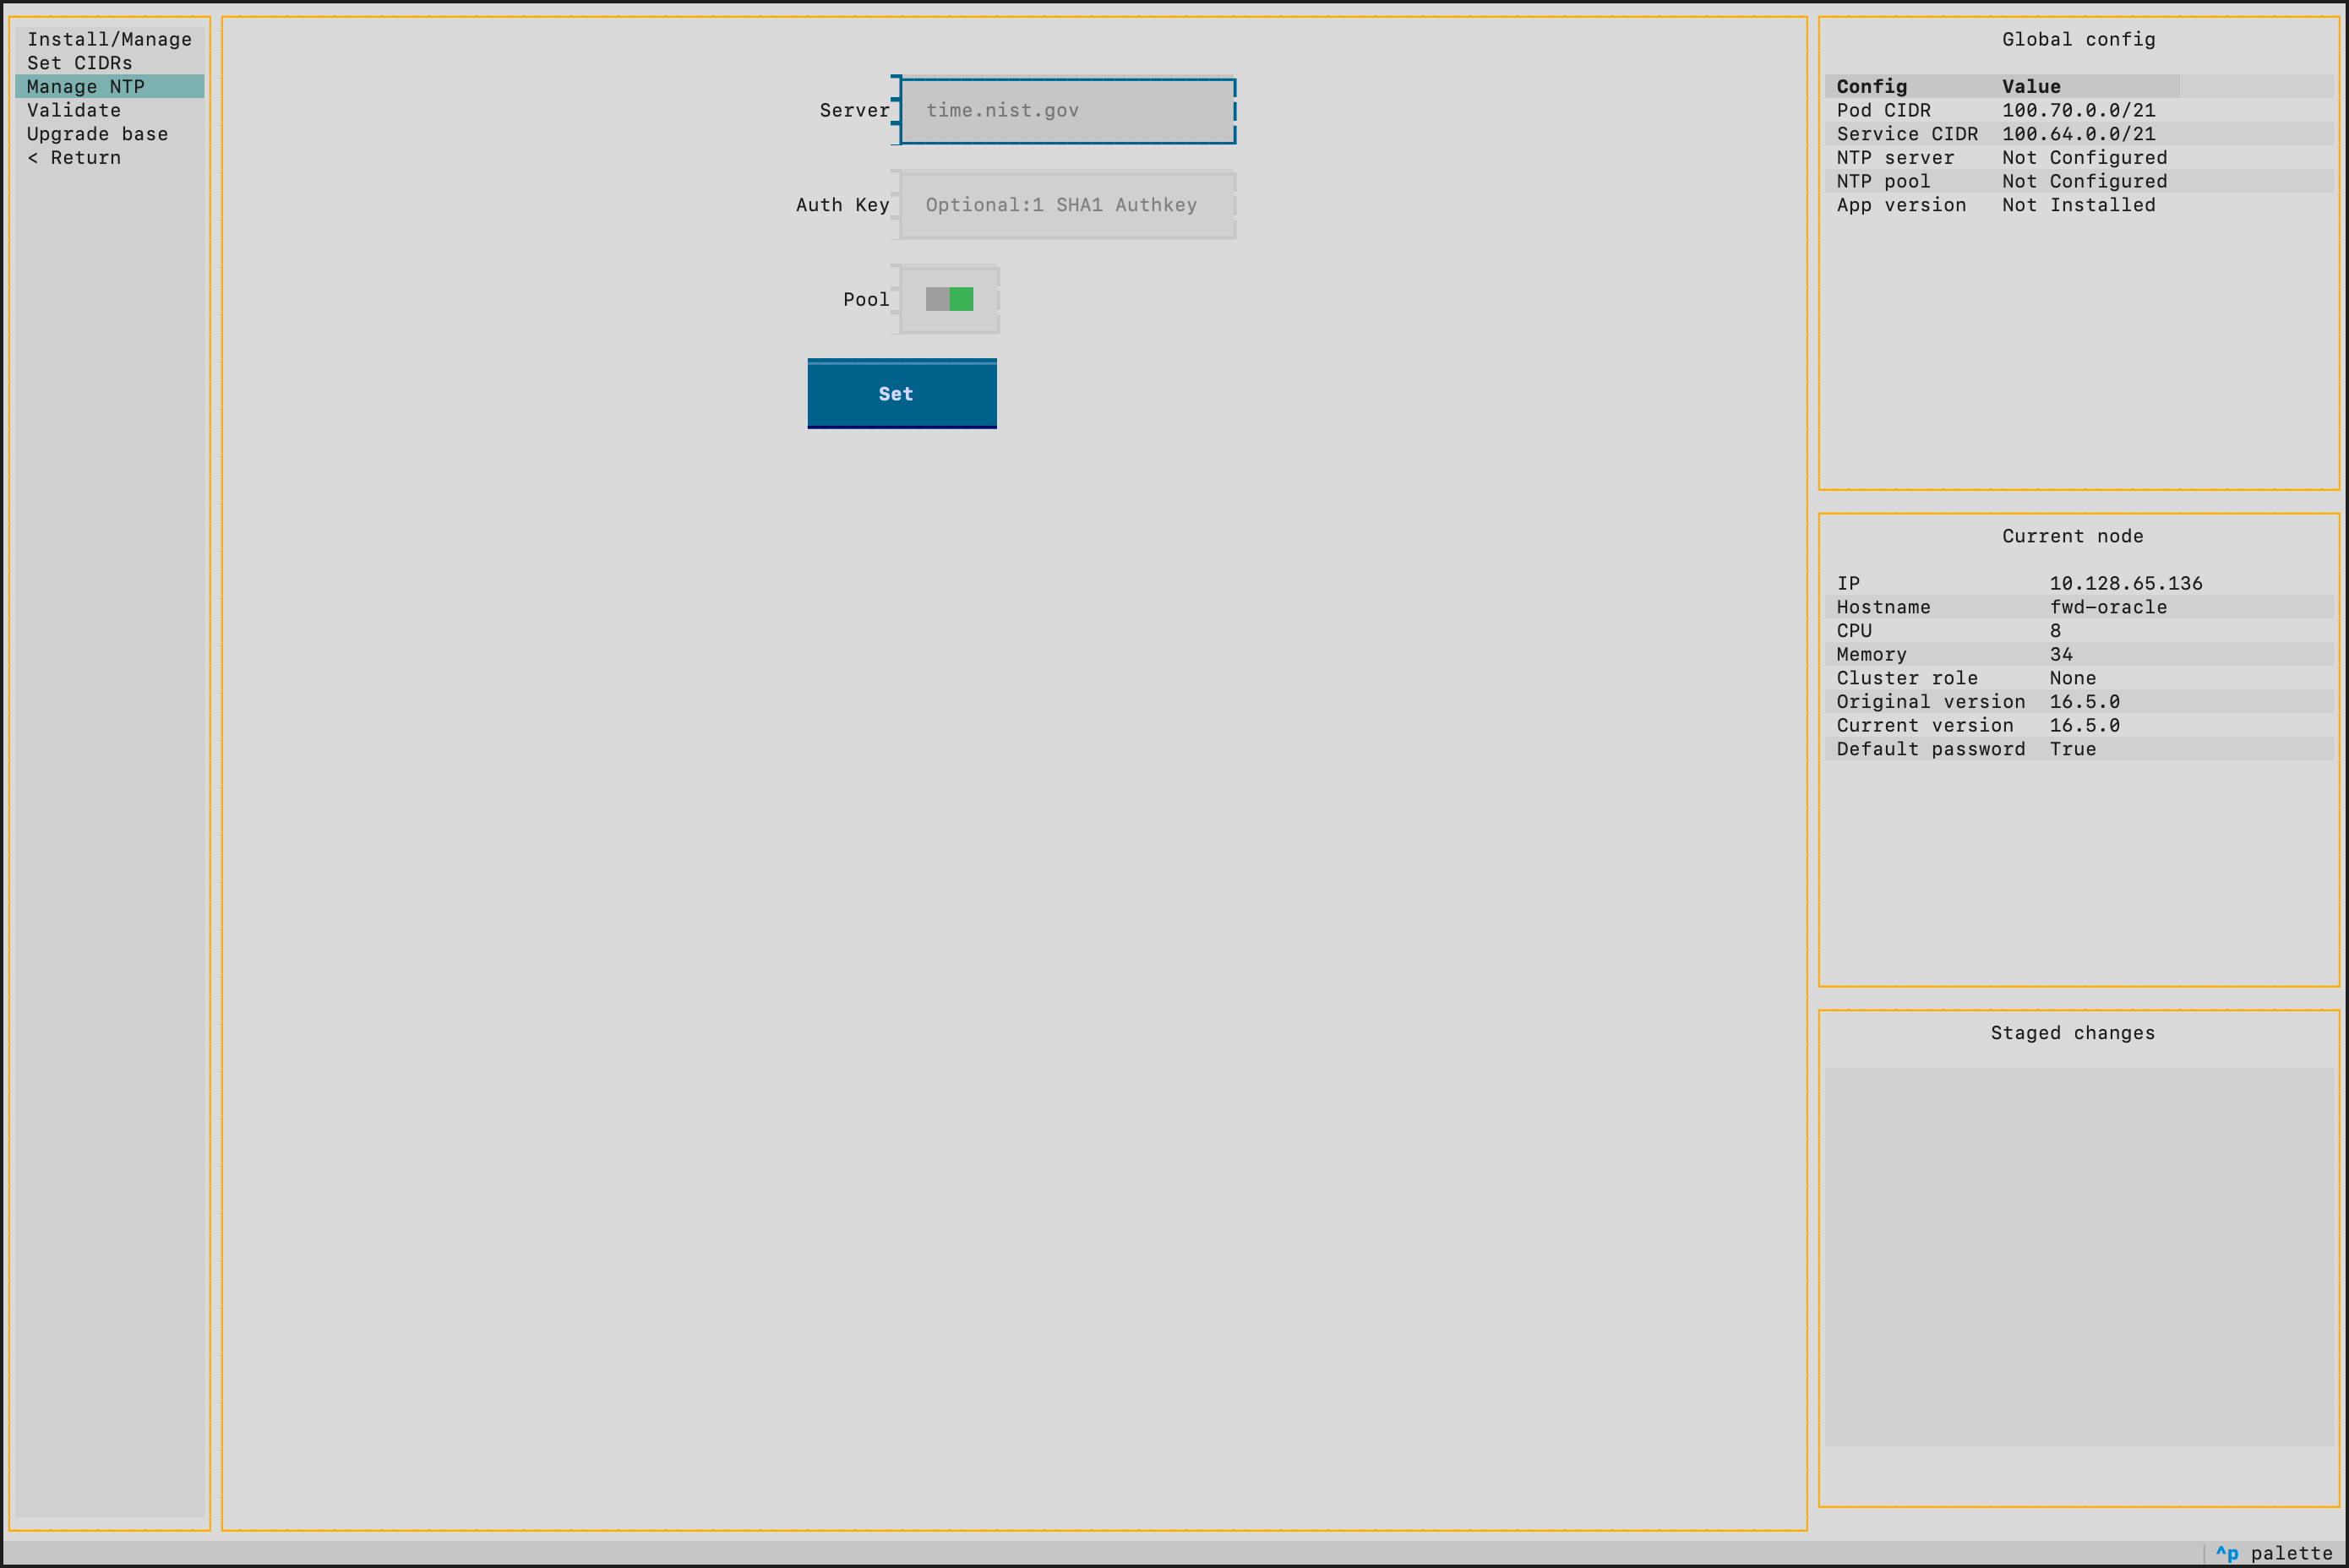
After the cluster is installed, configure NTP:
- Select Cluster > Manage NTP from the main menu.
- In the Server field, enter an NTP server address (e.g.
time.nist.gov). NTP pool addresses (e.g.pool.ntp.org) are also accepted — toggle the Pool switch on for pool entries. - (Optional) Use the Auth Key field to supply a symmetric key in the form
<keyid> <algo> <key>(e.g.1 SHA1 mysecret). Leave blank for unauthenticated servers. - Click Set. The entry appears in the table below and is added to staging. Repeat for each additional server.
- Select Apply to push the new configuration to all nodes.
Verify on the right panel of the TUI that the cluster installed successfully and all nodes were added.
Install Forward Enterprise
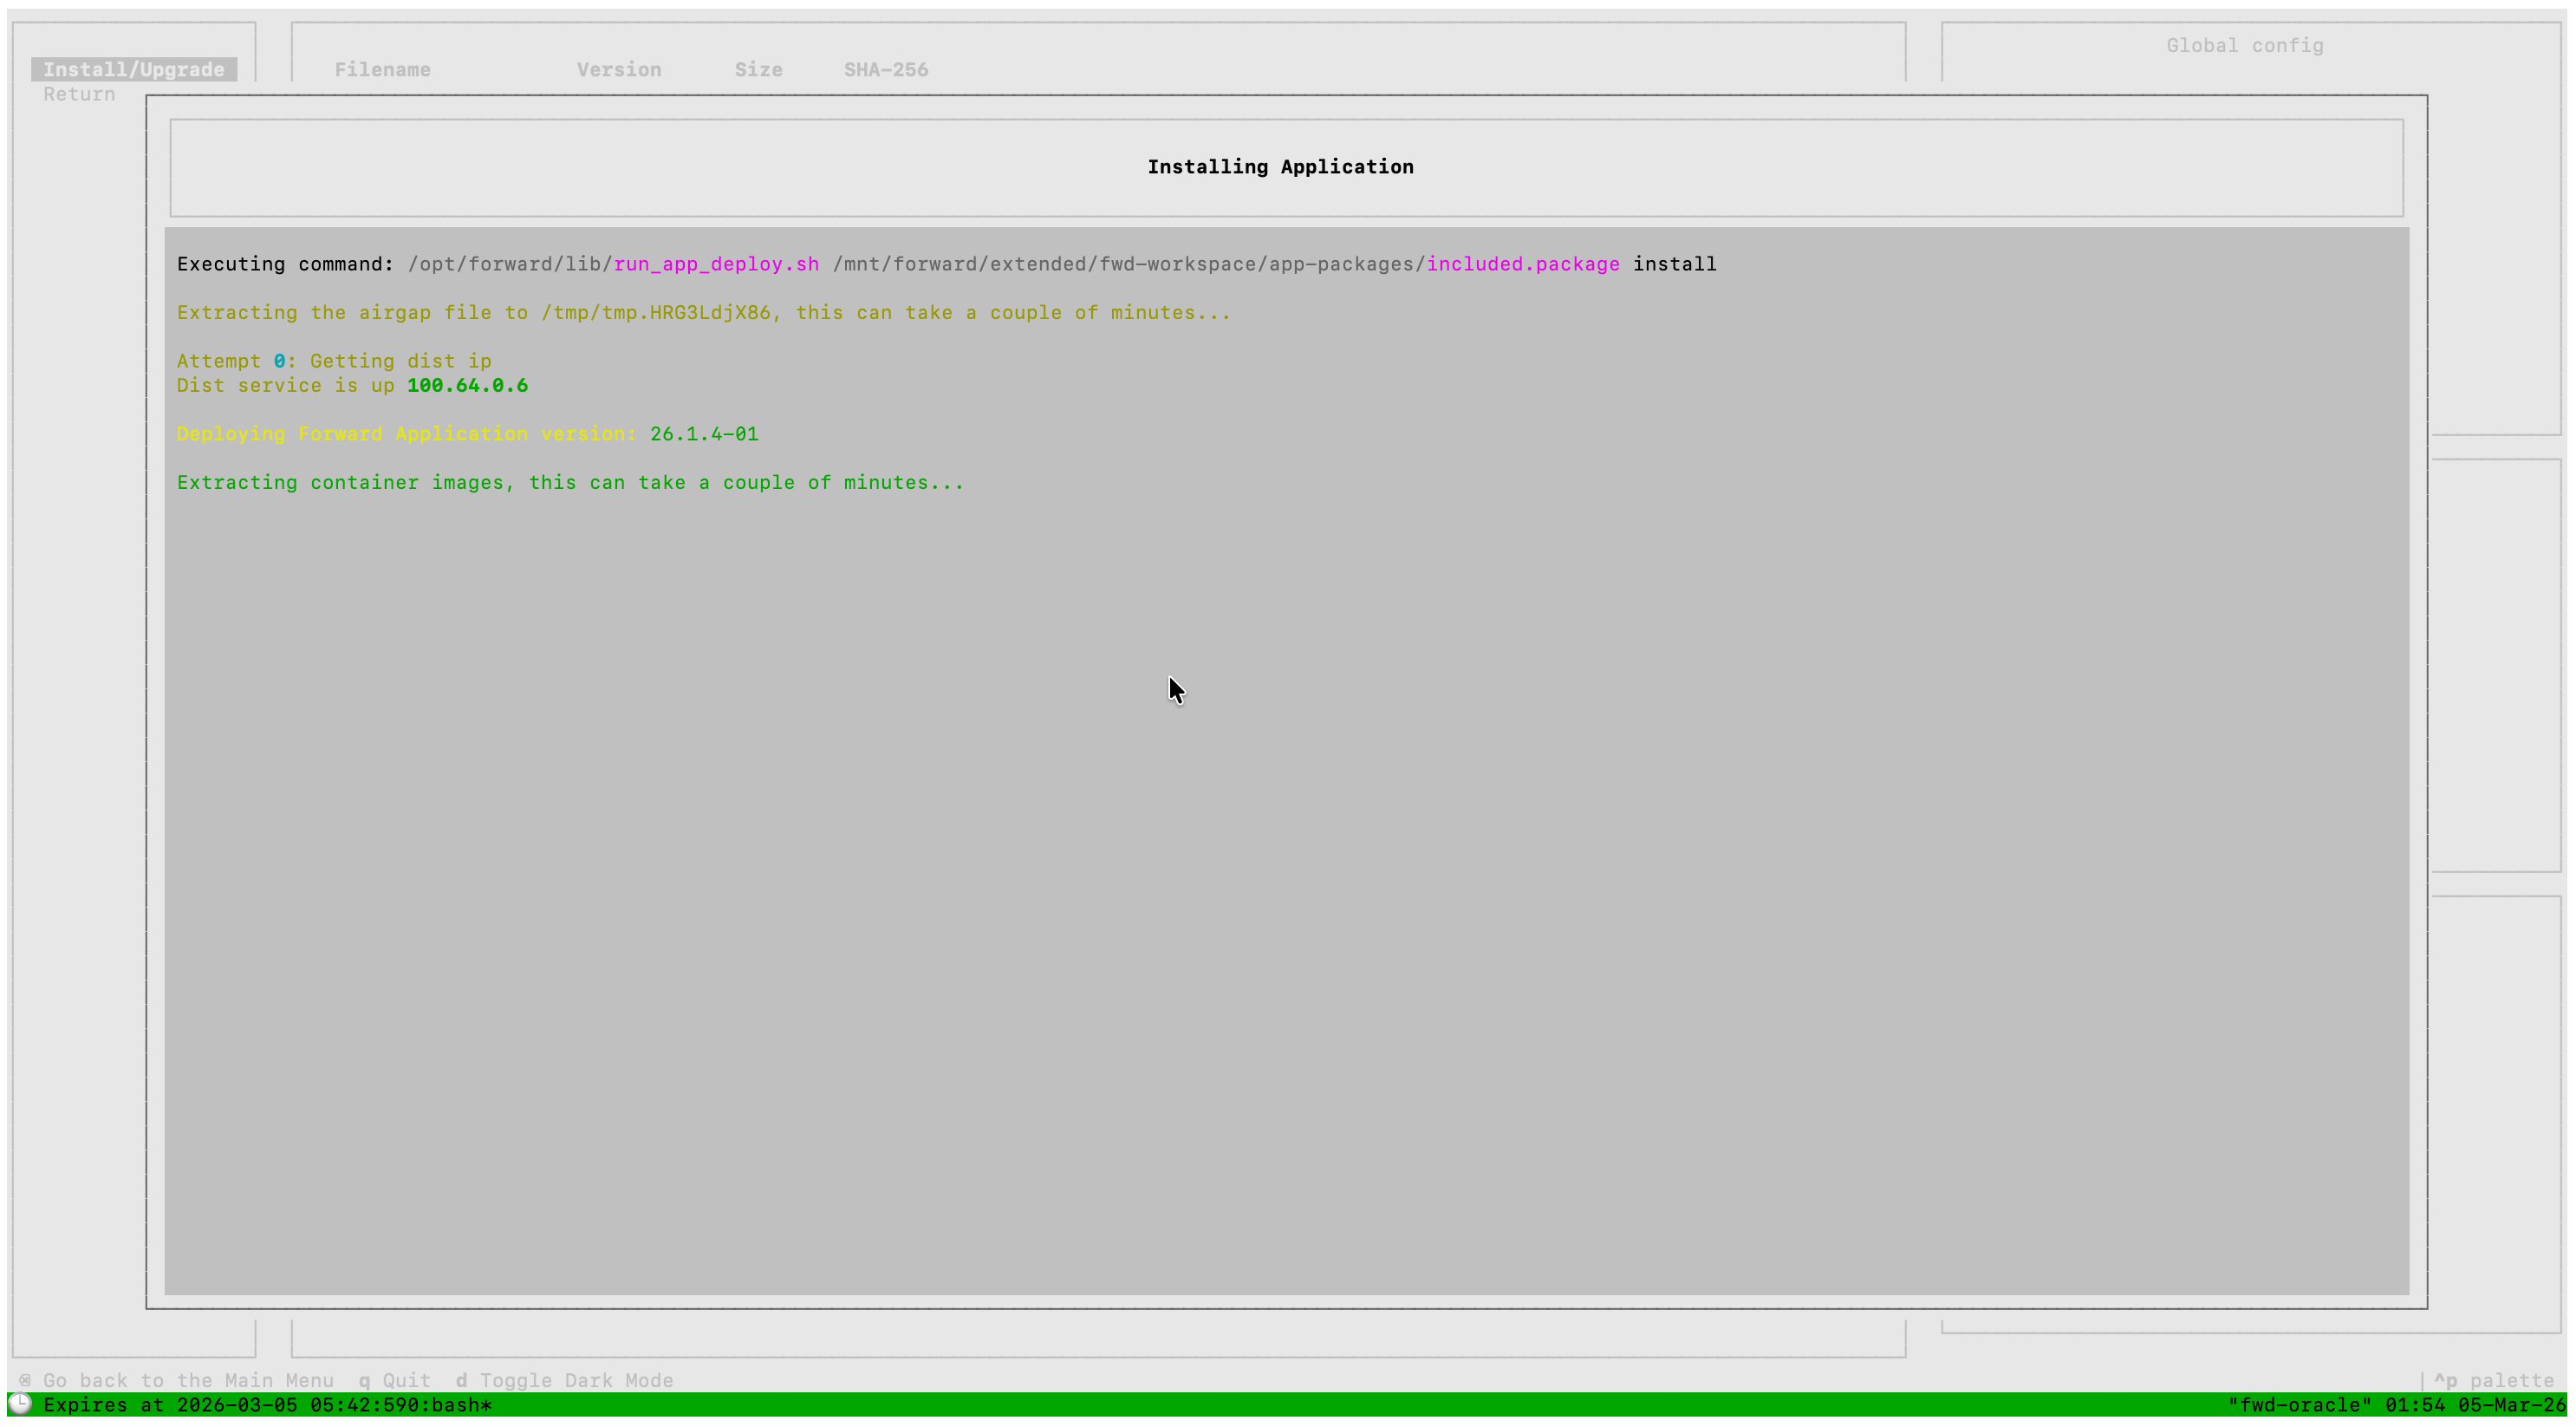
- Select Forward Enterprise > Install/Upgrade from the main menu.
- The Forward Enterprise installation package included with the appliance is shown. Proceed to install.

To install a newer version of Forward Enterprise, obtain the package from Forward Software Central and transfer it to any appliance node. Select Forward Enterprise > Install/Upgrade > Upload, then choose one of the three transfer methods:
- HTTPS (Browser) — opens a temporary upload service at
https://<node-ip>:30000where you can upload the package through your browser - SSH (SFTP) — opens a temporary SFTP service on port 30000 for transferring the package via SCP/SFTP:
scp -P 30000 forward-app-yy.mm.x-bb.package forward@<Primary_Node_IP>:~/
- Download from URL — paste the package URL (for example, a signed link from Forward Software Central) and let the TUI download the file directly to the node. The node must have outbound HTTPS access to the URL host.
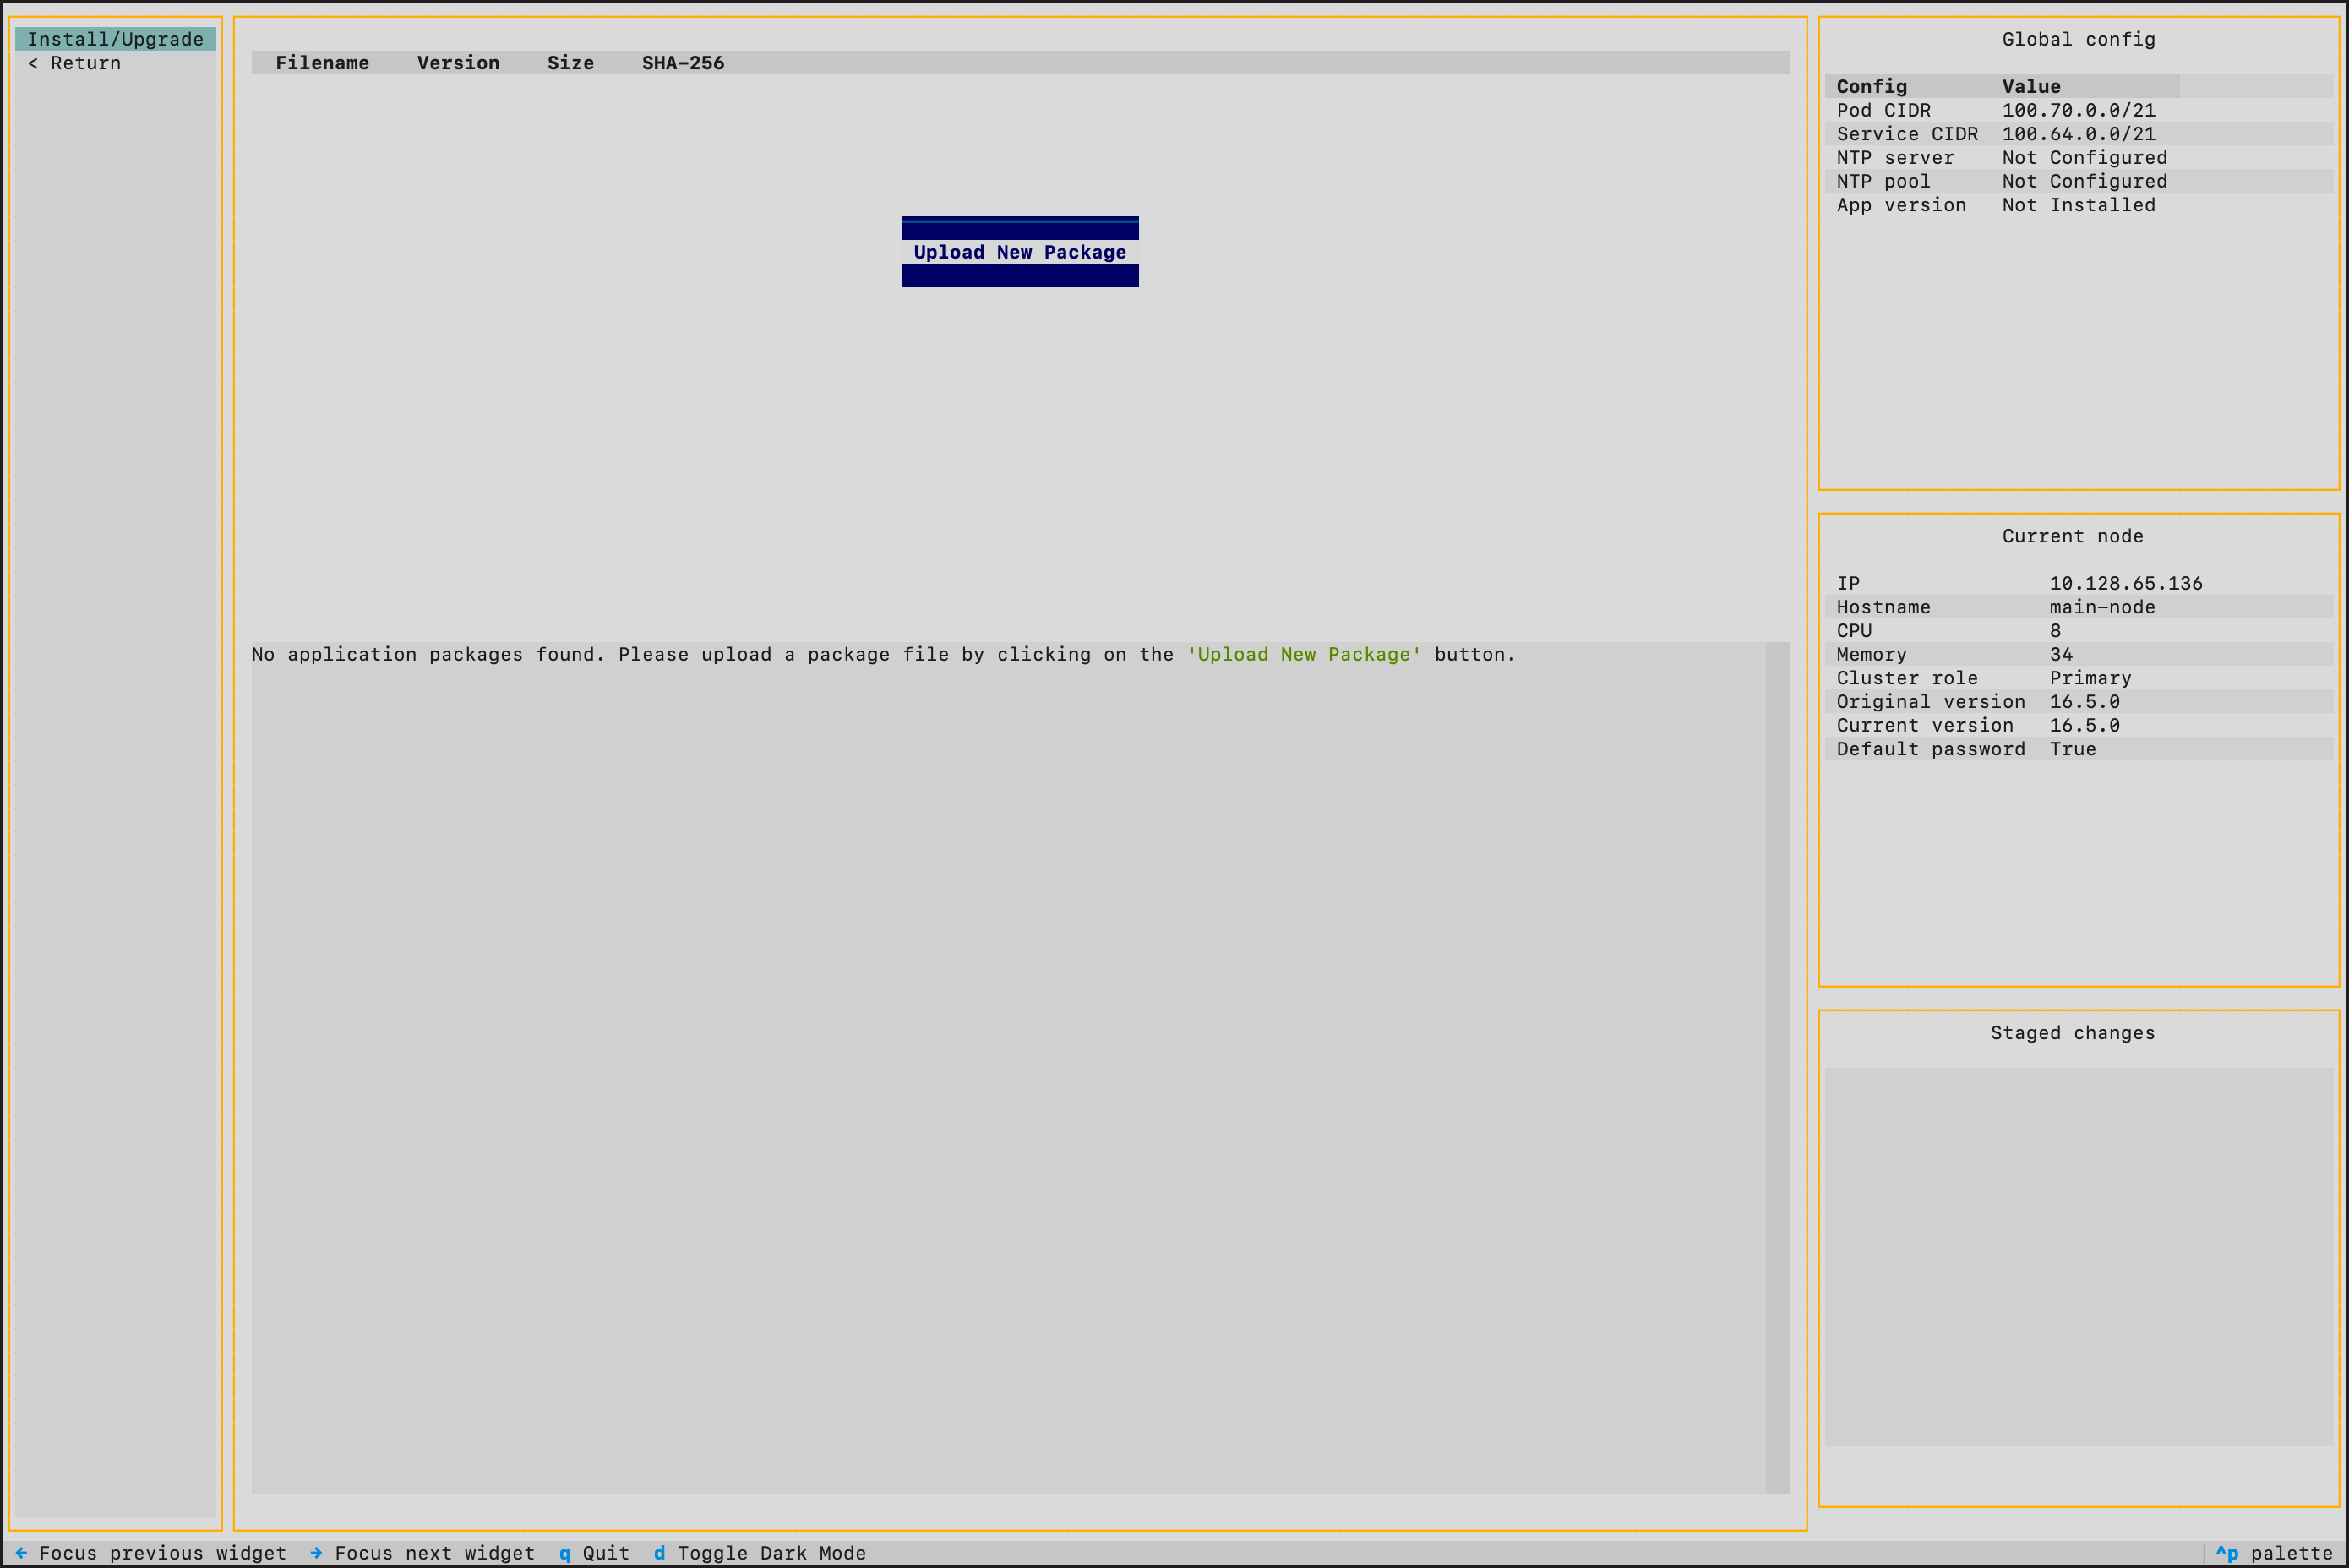
Then select the uploaded package in the Forward Enterprise > Install/Upgrade menu to install it.
Browser Access
Before accessing the application with a web browser, please note the following:
Upon the first login, the system will ask to change the password. Be ready to store it in a safe place. The user will be able to configure external authentication mechanisms like LDAP, SSO and TACACS after the first login.
It is now time to access the browser and log into the Forward UI using the following default credentials (the system will ask to change the password):
- username:
admin - password:
forward

Set the TLS Certificate
By default, the server uses a TLS certificate provided by Forward Networks. If your organization requires a custom trusted certificate, you may upload your own.
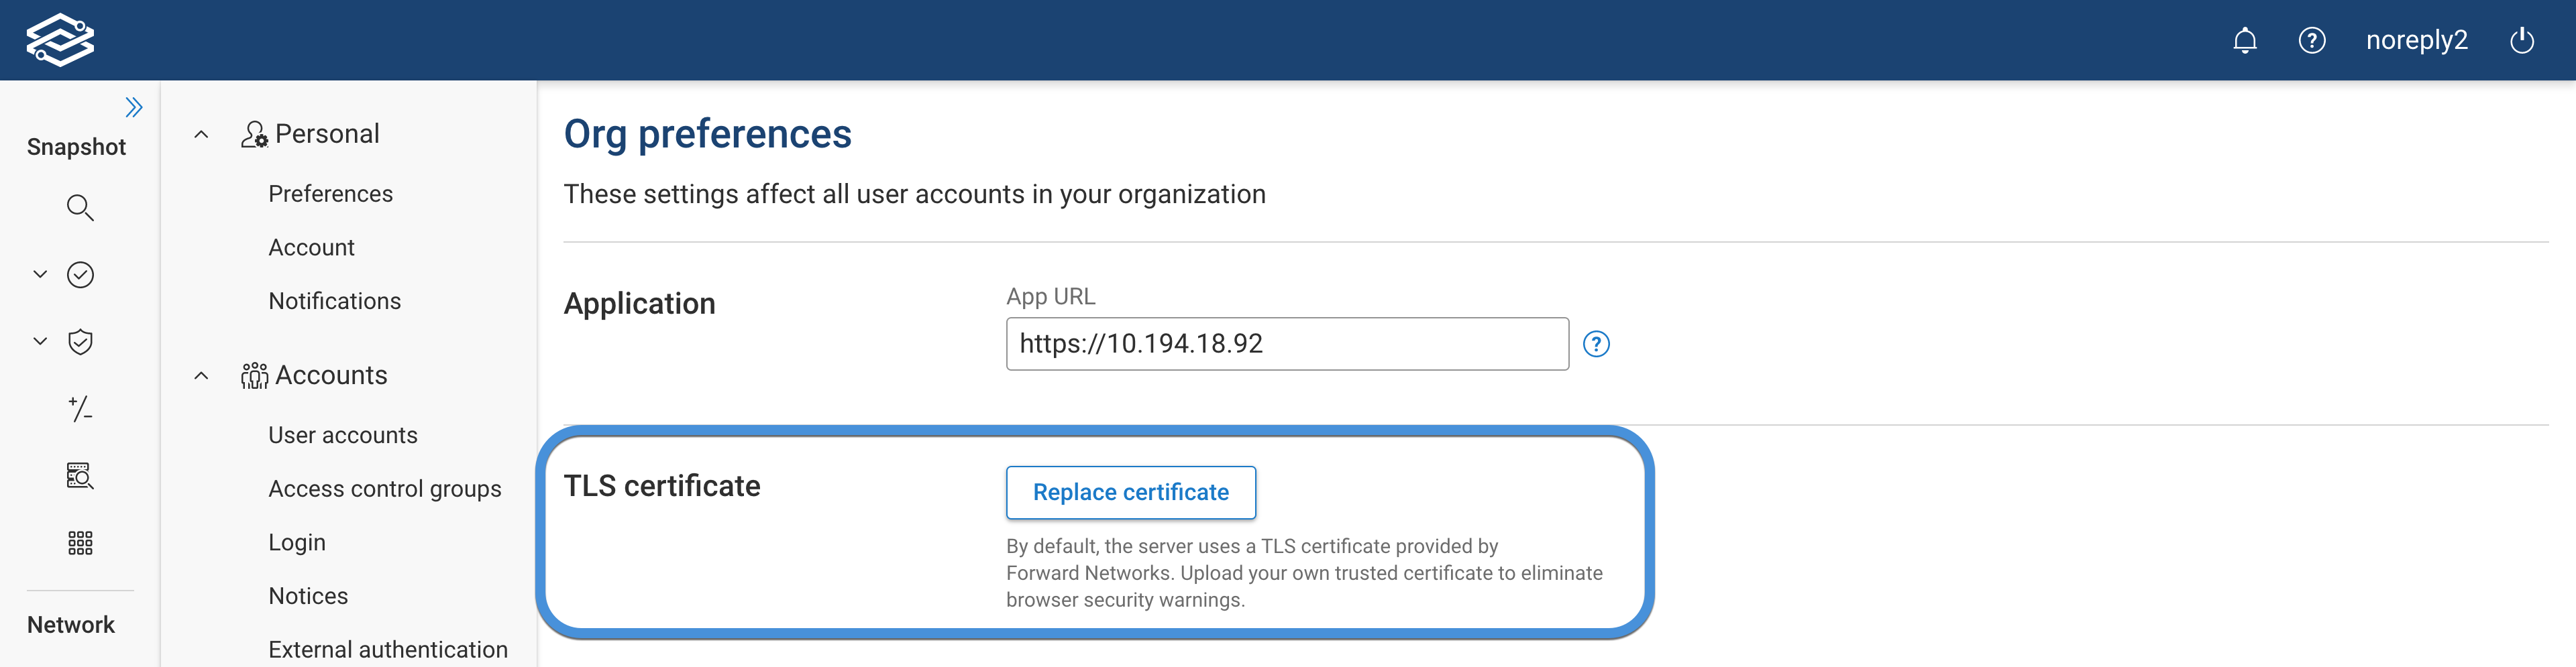
The uploaded certificate must meet the format and encoding requirements described below. Certificates that do not meet these requirements will fail to import.
If Forward Enterprise is unavailable, the TLS certificate can be reset via the TUI at Security > Reset tls.
Certificate Requirements
Your certificate must:
- Be in PEM format
- Use UTF-8 encoding
- Be readable by OpenSSL
- Include the full certificate chain
- Match the provided private key
If your certificate generation tool exports files in a different encoding or format, Forward Enterprise will not be able to import them.
Supported Format
The certificate must be PEM-encoded (Base64 text format) and contain standard headers:
-----BEGIN CERTIFICATE-----
(base64 content)
-----END CERTIFICATE-----
The private key must also be PEM formatted:
-----BEGIN PRIVATE KEY-----
or
-----BEGIN RSA PRIVATE KEY-----
Forward Enterprise relies on OpenSSL for certificate validation. Any certificate format that OpenSSL cannot load is not supported.
File Encoding Requirement
The certificate file must use UTF-8 encoding.
Some certificate tools export files as UTF-16LE or other encodings. These encodings are not supported and will cause import failures.
If OpenSSL cannot load the certificate, the file encoding may not be compatible.
Certificate Chain Requirement
The uploaded certificate must include the complete certificate chain.
Most CA-issued certificates are part of a chain that includes:
- The server certificate
- One or more intermediate certificates
- (Optionally) the root certificate
Forward Enterprise expects the full chain to be present in the uploaded certificate file.
If intermediate certificates are missing, clients may experience trust errors.
Certificates in .crt format can be bundled into a single .pem file that contains the full chain. The combined file
must contain all certificates in PEM format.
File Extensions
Common extensions include:
.pem.crt.cer.key
The file extension itself does not determine validity.
What matters is:
- PEM format
- UTF-8 encoding
- Complete certificate chain
- Private key match
Optional: Verify Certificate with OpenSSL
You may optionally validate your certificate before uploading.
To verify that OpenSSL can read the certificate:
openssl x509 -noout -text -in your-cert.pem
To confirm that the certificate matches the private key:
openssl rsa -noout -modulus -in your.key | openssl md5
openssl x509 -noout -modulus -in your-cert.pem | openssl md5
The MD5 values must match.
To verify a certificate chain:
openssl verify -CAfile root.crt -untrusted intermediate.crt server.crt
If OpenSSL reports that it cannot load the certificate, the format or encoding is not supported.
Pre-Upload Checklist
Before uploading the certificate to Forward Enterprise, confirm:
- Certificate is PEM formatted (contains BEGIN/END CERTIFICATE)
- File encoding is UTF-8
- Certificate can be loaded by OpenSSL
- Certificate includes the full chain (server + intermediates)
- Private key matches the certificate
If any of the above conditions are not met, the import process will fail.
The server will be restarted after the certificate is uploaded, and may be unavailable for up to 5 minutes.
Optional: Set up load balancing
If you have installed 3 primary nodes, the control plane of the cluster is already running in HA mode. Assuming the IP address of these nodes are primary1-ip, primary2-ip and primary3-ip, you can reach the application through any of the following addresses:
https://primary1-ip/
https://primary2-ip/
https://primary3-ip/
However, if users use one of these addresses and that node is down, they will see failures. To have proper HA, it is better to use a load balancing option which has health checks. To do that you need a reverse proxy which forwards requests to port 443 to any of the healthy nodes in the cluster.
The following methods can be used to perform health checks:
- TCP health checks on port
443. - HTTP health checks that issue
GET /pingand expect 200 status code.
Sample configuration for HAProxy with http checks
# Frontend that accepts requests from clients
frontend fwd-app
    bind *:443
    # Mode is the mode the frontend is operating (TCP or HTTP)
    mode tcp
    # Enable advanced logging of TCP connections with session state and timers
    option tcplog
    # Maximum inactivity time on the client side
    timeout client 9000s
    default_backend fwd-app

# Backend servers that fulfill the client requests
backend fwd-app
    # Enable HTTP protocol to check on the servers health
    option httpchk GET /ping
    # HTTP health checks to validate the response status code to be 200
    http-check expect status 200
    # Use SSLv3 client hello health checks for server testing
    option ssl-hello-chk
    # Use roundrobin load balancing algorithm
    balance roundrobin
    # inter : Time interval between two consecutive health checks
    # downinter : Time interval between two consecutive unhealthy checks
    # rise : server will be considered as operational after <count> consecutive successful health checks
    # fall : server will be considered as dead after <count> consecutive unsuccessful health checks
    # slowstart : time after how long a server which has just come back up will run at full speed
    # maxconn : Maximum number of concurrent connections that will be sent to this server
    # maxqueue : Maximum number of connections which will wait in the queue for this server
    # weight : used to adjust the server's weight relative to other servers
    default-server inter 10s downinter 5s rise 2 fall 2 slowstart 60s maxconn 250 maxqueue 256 weight 100
        server server1 <primary1-ip>:443 check
        server server2 <primary2-ip>:443 check
        server server3 <primary3-ip>:443 check
Sample configuration for HAProxy with tcp checks
frontend fwd-app
    bind *:443
    mode tcp
    option tcplog
    timeout client 9000s
    default_backend fwd-app

backend fwd-app
    mode tcp
    option tcplog
    # Perform health checks using tcp-check send/expect sequences
    option tcp-check
    timeout server 9000s
    balance roundrobin
    default-server inter 10s downinter 5s rise 2 fall 2 slowstart 60s maxconn 250 maxqueue 256 weight 100
        server server1 <primary1-ip>:443 check
        server server2 <primary2-ip>:443 check
        server server3 <primary3-ip>:443 check
Sample configuration for F5 load balancer
# create monitor (HTTPS request for "GET /ping" from server, if code 200 => server is up)
tmsh create ltm monitor https fwd_https { send "GET /ping \r\n" recv "^HTTP.1\.[0|1]\s+200" }

# create pool of servers with monitoring
tmsh create ltm pool FwdPool members add { <primary1-ip>:443 <primary2-ip>:443 <primary3-ip>:443 } monitor fwd_https

# create virtual server for load balancing (ip <ip address>), works only for TCP 443 traffic, balanced to all living
servers in pool
tmsh create ltm virtual FWDvServer { destination <ip address>:443 mask 255.255.255.255 pool FwdPool ip-protocol tcp translate-address enabled }
Activate the License
After each VM is running, log in to the deployed Forward Enterprise system as an Org Admin and navigate to Settings → System → License. You can obtain the required Instance ID either by clicking Deployment ID in the top-right corner of the License page, or by selecting Manage device licenses and clicking Add new license, where the Instance ID is also displayed.
Return to Software Central, click Add Deployment ID, paste the Instance ID into the Deployment ID field, and click Activate to generate the license.
Back in the deployed system, use Manage device licenses → Add new license to paste the generated license key and activate it.
Update CVE Database
For accurate vulnerability detection, the CVE database should be updated after the initial installation. The database included with each Forward Enterprise release may not contain the latest published vulnerabilities.
Scheduled updates (recommended): Starting with release 26.2, you can enable automatic hourly CVE database updates. Navigate to Settings > System > Software Central and enable the Enable hourly updates toggle. This requires network access to Forward Software Central.
Manual updates: Download the latest CVE database from the CVE Update page and upload it via Security > Vulnerability > Update CVE database.
For full details on all update methods, including REST API automation, see the CVE Database Update documentation.